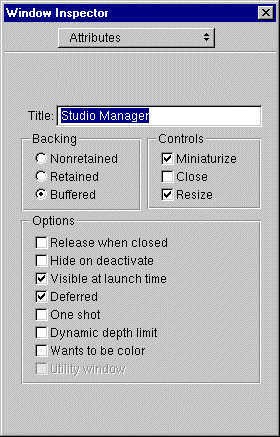
Select the window by clicking its title bar.Choose Inspector from the Tools menu.
Enter "Studio Manager" in the TItle field of the Attributes display.
Creating a Java Client WebObjects Application
Starting with this exercise, you will create the final user interface of the StudioManager application. This means that you should start off by removing all objects added earlier to your nib file; also, give your application window a title.
In Interface Builder, delete the table view from the window.
Delete the Studio EODisplayGroup and the EditingContext from the nib file window.
Select the window by clicking its title bar.Choose Inspector from the Tools menu.
Enter "Studio Manager" in the TItle field of the Attributes display.
Drag Studio's movies relationship from EOModeler onto the window in Interface Builder.Rearrange and resize the tables so that they are next to each other.
Reconnect the Add and Remove buttons to the new Studio EODisplayGroup
Reconnect the Save button to File's Owner (the interface controller).
(See Adding Action Methods for these procedures.)

This operation creates a master-detail interface. Columns are automatically added for all of the attributes marked as class properties; you can delete any columns you don't want.
For a Java Client application, the interface controller--represented by the File's Owner icon in the nib file window--is the "controller" object in the Model-View-Controller design scheme. The interface controller comes already connected to its "view" through the component outlet. But you must connect it to its "model" object, the editing context.
Control-drag from File's Owner to the EditingContext icon in the nib file window.In the Connections inspector, select the editingContext outlet.
Control-drag from File's Owner to the Studio icon in the nib file window.
In the Connections inspector, select the MasterDisplayGroup outlet.
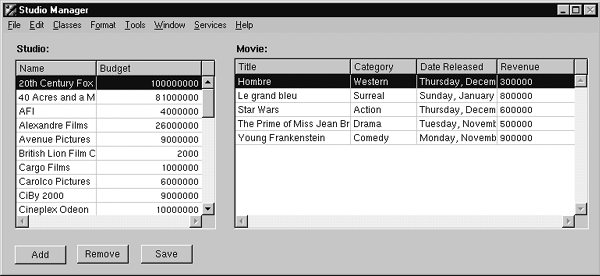
In the following figure, you can see the master-detail interface in action. Notice that the table views have been rearranged, and that titles have been added above the Studios and Movies tables.
To see the effects of your changes, you must compile and run the application. However, before you run the application, there is one last step to perform. The providing the running environment for your Java Client application is set to a default size in the WOJavaClientApplet bindings in Main.wod . This size could be too small to accommodate your user interface (or too large for it).
Open Main.wod.Now you are ready to test the application.Enter the dimensions of the window in the height and width bindings.
Applet: WOJavaClientApplet {


   height = 503; // change this


   width = 700; // and this


   interfaceControllerClassName = "studiomanager.client.StudioManager";


   useJavaPlugin = NO;


}
Choose ToolsWhen you select a studio in the Studios table view, the display changes in the Movies table view to show the selected studio's movies.Launcher
Start up the client side (see Running a Java Client Application ).