Adding and removing a submenu from a menu in Cocoa

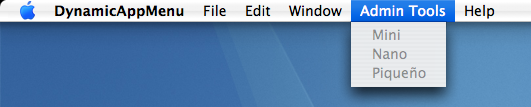
Q: How do I add or remove a submenu from a menu in Cocoa?

A: Use NSMenu methods like insertItem:atIndex: or removeItemAtIndex: to add or remove the NSMenuItem to which the "submenu" in question is attached.

A "submenu" in Cocoa is just an instance of NSMenu, it just happens to be attached to an item in a higher level menu. In other words, menus are hierarchical, and a submenu is any menu other than the "top level" menu. When you want to add or remove a submenu, simply use the NSMenu methods to add or remove the NSMenuItem itself. It does not matter whether that item has a submenu attached (hasSubmenu). See the NSMenu and NSMenuItem Class References for these and additional methods.

Note that the application's menu bar itself is an instance of NSMenu in Cocoa. It is an example of a top level menu, and its standard "File", "Edit", and "Window" entries are menu items with a submenu attached.

To give an example of adding and removing a submenu, let's assume you want to make an additional submenu of adminstrative tools available based on some condition. Figure 1 shows the addition of an NSMenuItem "Admin Tools" with an NSMenu attached to it, itself containing three NSMenuItems.

Figure 1: A submenu of administrative items.

Figure 1, A submenu of administrative items.

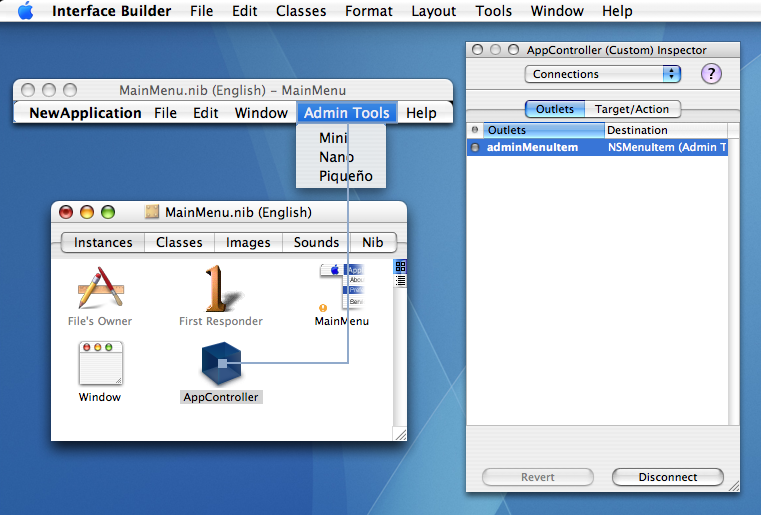
Note: Although this example uses the application's menu bar, this technique applies equally well to other menus, such as a contextual menu attached to a view.

One option is to programatically allocate the "Admin Tools" NSMenuItem, the NSMenu "submenu" and then attach it using setSubmenu:. However, this example shows the more typically case: just create the whole submenu in Interface Builder and connect an outlet (here, adminMenuItem) to refer to it. The whole item could then be added or removed based on some condition, such as successful authentication.

Figure 2: Connecting the menu outlet in Interface Builder.

Figure 2, Connecting the menu outlet in Interface Builder.

The following code shows how to set the initial state by removing the item when the nib file is loaded and provides methods to add or remove it as needed. This example controller preserves the index where the menu is found in adminMenuItemIndex so it may later be restored in the same location.

Listing 1: Removing the menu initially when the nib file loads.

- (void) awakeFromNib {
    adminMenuItemIndex = [[NSApp mainMenu] indexOfItem: adminMenuItem];
    [self removeAdminMenuItem];
}

Listing 2: Removing the submenu by using its outlet.

- (void) removeAdminMenuItem {
    [adminMenuItem retain]; // ensure item and its submenu aren't dealloc'd when removed from mainMenu
    [[NSApp mainMenu] removeItem: adminMenuItem];

}

Listing 3: Adding a submenu to the application's menu bar.

- (void) addAdminMenuItem {
    [[NSApp mainMenu]insertItem: adminMenuItem atIndex:adminMenuItemIndex]; 
    [adminMenuItem release]; // maintain accurate retainCount since mainMenu will retain on insert
}

Document Revision History

Date Notes
2007-09-10 Editorial corrections.
2007-08-30 Explains how to dynamically add and remove menus in a Cocoa application.

Posted: 2007-09-10


Did this document help you?
Yes: Tell us what works for you.
It’s good, but: Report typos, inaccuracies, and so forth.
It wasn’t helpful: Tell us what would have helped.