Authoring Apple Help
This chapter describes how to author help content for Help Viewer and organize it into a help book. Anyone authoring user help for Mac OS X should be familiar with the basic requirements of creating a help book and with the general guidelines for writing user help.
These are the basic steps for creating a help book for Mac OS X:
Design the help content.
Author the HTML help pages.
Organize the help book. This includes creating the necessary auxiliary files that Help Viewer uses.
Index the help book.
In addition, this chapter describes how you can include additional content, such as QuickTime movies and AppleScript scripts, in your help book and how you can localize your help book for other languages.
In this section:
Designing a Help Book
Authoring Help Pages
Creating a Basic Help Book
Creating a Chapter-Based Help Book
Indexing Your Help Book
Adding Specialized Content to Your Help Book
Setting Up Exact Match Searching
Providing Your Own Online Support Articles
Localizing Your Help Book
Designing a Help Book
The first steps in authoring your help book are identifying the topics your help must cover and designing a layout for presenting these topics. To this end, you may find it useful to create a topic outline. If the software product for which you are creating help already has existing documentation, you may be able to base your outline on this material. If you are creating a help book from scratch, there are a number of ways you can approach the outline. A few examples:
Walk through the steps of the main task sequence in order. If you are writing help for a larger application, there may be several different task sequences a user would perform. For example, a productivity suite may have different task sequences for word processing, using spreadsheets, and creating presentations.
List topics alphabetically.
Go through each menu and menu item in the application sequentially.
Each topic should be simple enough to be described in a few short paragraphs on a single HTML page. If a topic is lengthy, you should consider breaking it up into smaller subtopics.
Here are some tips to keep in mind when designing your help book.
Divide the information into overview information and tasks. Overview information defines terms and explains concepts important to an understanding of your software product; task information gives step-by-step directions for accomplishing a particular goal. You should generally place these two kinds of information on separate help pages to give users quick access to the information they want. You can link between pages containing overview and task information when appropriate. Avoid including “feature-oriented” pages, which describe application features but don’t tell users what they can do or how.
Identify any information you think you’ll need to give users more than once in a help book. You can write an individual help page to cover this information and link to it from other topics in the book to avoid duplication.
Build pages around four central questions:
What can users do?
Why do they want to do it?
How can they do it?
How can they solve problems doing it?
Depending upon the complexity of the task, a well-designed help page may cover each of the first three questions in one or two sentences and the fourth in two or three bullet points.
Authoring Help Pages
Once you have identified the subjects covered in your help book, you need to create HTML files for your help pages. To ensure that your help displays properly in Help Viewer, your help files should comply with the HTML 4.01 specification. Your main file—which contains the AppleTitle meta tag—should conform to the XHTML 1.0 specification. For a comprehensive description of the HTML 4.01 specification, see HTML 4.01 Specification, W3C Recommendation 24 December 1999 (http://www.w3.org/TR/1999/REC-html401-19991224/). XHTML is described in XHTML 1.0 The Extensible HyperText Markup Language (Second Edition), W3C Recommendation 26 January 2000, revised 1 August 2002 (http://www.w3.org/TR/2002/REC-xhtml1-20020801/).
Compatibility Note: If your help book is used only on Mac OS X v10.4 or later, use HTML 4.01 and use XHTML for the main page that contains the AppleTitle meta tag. Help Viewer references this file often and formatting it as XHTML improves performance. If your help book is also used on Mac OS X v10.3 or earlier, however, use HTML 3.2 and do not use XHTML for the main page. If you use XHTML in that case, your help book will not be indexed properly. For details about writing Apple Help for older versions of Mac OS X, see Providing User Assistance With Apple Help in the Legacy Documentation section of the Apple Developer Connection Reference Library.
For an example of a help book to use as a starting point, see the files for Mac Help in /Library/Documentation/Help/MacHelp.help/Contents/Resources/.
Authoring Tools
You can author your help book in any application that generates valid HTML 4 files. Likewise, you can view your help book in any HTML 4–qualified browser; however, you should always test your help book in Help Viewer to ensure that your help book displays properly.
Creating Topic Pages
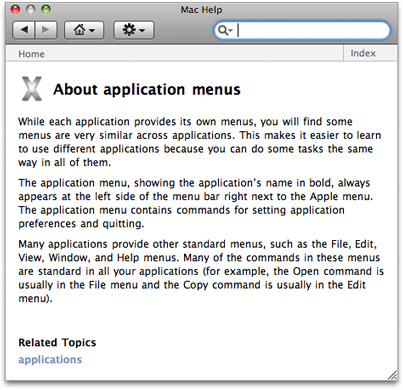
Each help page should cover only one topic, which can be expressed in a few short paragraphs. As mentioned in the section “Designing a Help Book,” your help book may contain both overview and task information. Overview pages define terms and concepts important to your application or offer other general information that users may need to know to understand your software product. For example, the help book page shown in Figure 2-1 describes application menus.
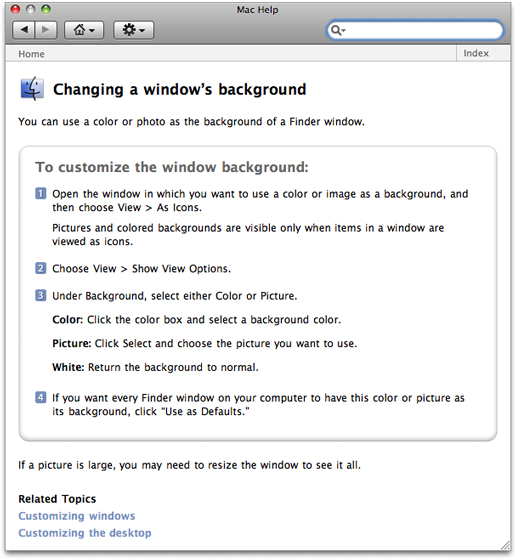
Task pages, on the other hand, offer a step-by-step description of the actions the user must take to perform a common task in your software product. The help book page shown in Figure 2-2 describes the steps necessary to change the background of a Finder window.
Topic pages typically include these elements:
A title identifying the topic. In Figure 2-1, “About application menus” identifies the topic and indicates that the topic is informational, not task oriented. In Figure 2-2, “Changing a window’s background” indicates (by beginning with a verb) that the topic describes a procedure or task.
The topic introduction. For an overview page, this section describes what the user will learn about by reading this page. For a task-oriented page, the introduction indicates what the user will accomplish by performing the task.
Requirements for performing the task. For a task page, any conditions that must be met in order for the task to succeed should be mentioned up front, before the user begins the task. For example, if the help topic is "Burning a CD," the system requirements—such as the presence of a CD burner—for burning the CD should be mentioned here.
The task description. These are the steps that the user must perform to accomplish the given task. Overview pages typically do not contain this information.
The topic wrap-up. This includes any information the user may need in order to wrap up any task described in the page. It is also a good place to include tips, shortcuts, troubleshooting information, and links to related help topics. For example, the last paragraph shown in Figure 2-2 gives a hint the user might need in order to see a large picture in their Finder window.
Related topics. At the end of a topic is a list of links to other topics that are related to this one and thus might be of special interest to the user.
Printing A Page’s URL
While debugging a help book or examining a help book to learn how it was made, it can be difficult to figure out which file is the source of the page being displayed. To find the URL of the page of a help book, execute the following command in the Terminal application:
defaults write com.apple.helpviewer PrintURLInFooter YES |
This command causes every page’s URL to be listed in the footer when the page is printed. The onscreen version of the page does not change. Figure 2-3 shows a printed help page with a URL in the footer.
Creating Navigation Pages
In addition to topic pages, you may need to create navigation pages for your help book. Users should be able to find most of the information they need by searching and navigating through links in your topic pages. However, navigation pages, such as tables of content, allow users to browse your help book and navigate to topics they want to learn more about without having a particular search topic in mind. You may consider providing a table of contents at the following levels:
Top level
Chapter level
Topic level
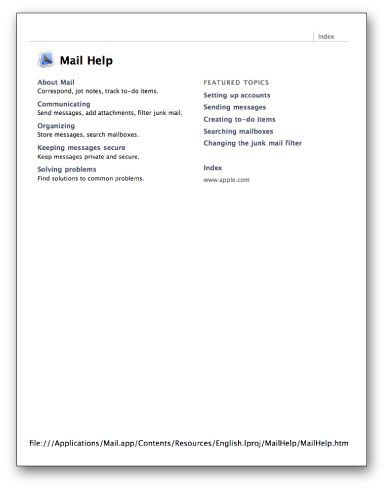
Including a table of contents on the title page, at the top level of your help book, allows the user to select a starting point within your help book. A title-page table of contents gets the user started in finding help, even if they do not quite know what they are looking for. Figure 2-4 shows the top-level table of contents for the Mail application.

As mentioned in “Designing a Help Book,” you should break complex topics with lengthy descriptions into smaller subtopics in order to keep each help topic short and focused. However, it may not be appropriate to include all of the subtopics directly in your main table of contents.
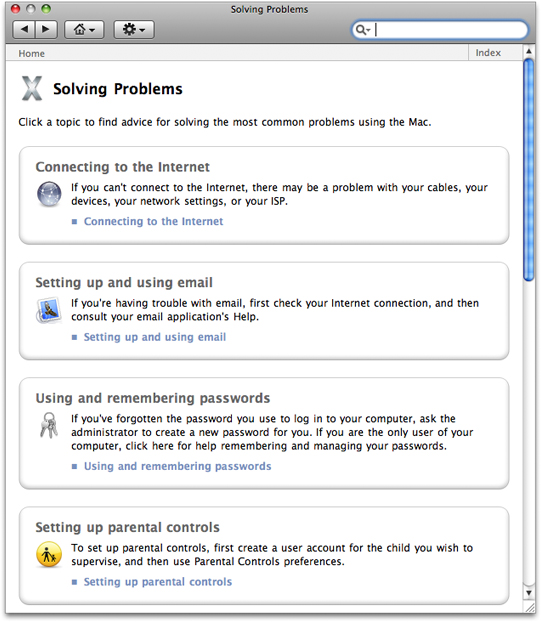
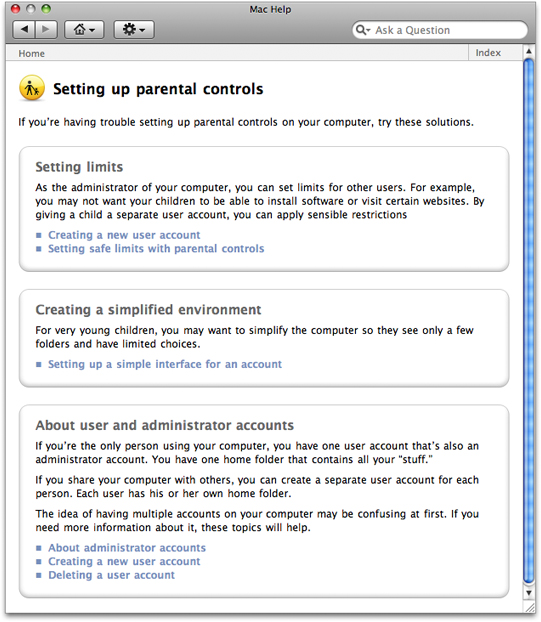
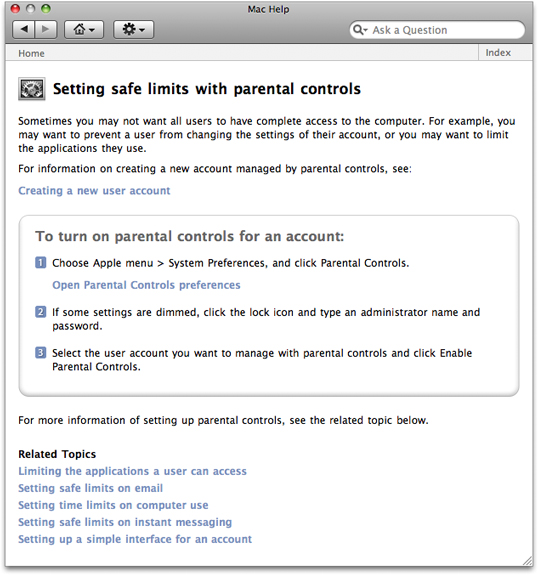
You can create navigation pages that contain links to sets of related subtopics. Figure 2-5 shows a high-level TOC page from Mac Help. If the user clicks one of the topics, a list of subtopics appears, giving information about each (Figure 2-6). By clicking one of those subtopics, the user can get an information or task page for that subtopic (Figure 2-7). Typically, this page also contains links to further information about this subtopic and to pages for related subtopics.
Creating a Basic Help Book
Once you create the HTML files containing your help content, you must organize them into a help book. To do this, create a help book folder and include the following items:
The topic and navigation pages. These are the HTML pages that you created for your help content, as described in “Authoring Help Pages.”
A title page (sometimes called a start page). This is the XHTML file that is displayed by default when the user first opens your help book.
A help book icon. This icon is displayed next to your help book in the Library menu.
For an example of a help book to use as a starting point, see the files for Mail Help in /Applications/Mail.app/Contents/Resources/English.lproj/MailHelp/. (Note that you have to select Show Package Contents from the contextual menu to see the contents of the Mail.app bundle.)
Organizing the Help Book Folder
Every help book must be enclosed in its own folder. For a simple help book, Apple recommends that you also create separate subfolders for your HTML help files and graphics. Figure 2-8 shows an example of a simple help folder for SurfWriter Help.
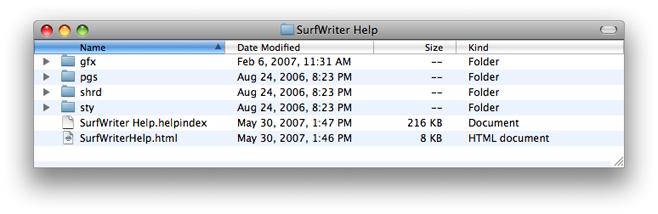
At the top level of the SurfWriter Help folder are the index file and the title page. The book’s icon and other graphics files are in the gfx folder. The pgs folder contains the HTML pages for all the help topics. The shrd folder contains AppleScript and JavaScript scripts. The sty folder contains style sheets. Note that this is an example of a typical help folder, not a prescription for how you need to organize your help book. Only the index file, the title page, and the exact match property list file (if any—see “Setting Up Exact Match Searching”) should be located at the top level of the help folder. (For chapter-based help books, each chapter can have its own index file—see “Organizing a Chapter-Based Help Book Folder”). For performance reasons, there should be only a single HTML file at the top level. What other files and folders you use are entirely up to you.
The title page is described in the next section, “Creating a Title Page.” “Specifying a Help Book Icon” describes how to add an icon to your help book. Index files are discussed in “Indexing Your Help Book.”
Creating a Title Page
The title page is your help book’s default page, which appears when the user opens your help book, either by choosing the application help item from the Help menu in your application or by choosing your help book from the Library menu. The title page introduces your help book and serves as the entry point into the rest of your help content. All help books registered with the Help Viewer must have a title page.
There are many ways you can approach designing the title page for your help book. For example, the title page from Mac Help, the system help book, has a link to a help page that describes the new features in the current version of Mac OS X, a link to a page that introduces the capabilities of the system, and offers a number of links to help pages answering common queries to get the reader started.
To indicate the title page of your help book, include the AppleTitle meta tag in the header section of the XHTML file you want to use as your book’s default page. This XHTML file must reside at the top level of your help book folder, as shown in Figure 2-8. Here is how you would use the AppleTitle meta tag in the title page for a help book called SurfWriter Help:
<meta name="AppleTitle" content="SurfWriter Help">
Figure 2-4 shows the title page for Mail Help.
Specifying a Help Book Icon
When you register a help book, your help book becomes visible in the Library menu. If you provide an icon, Help Viewer displays this icon in the Library menu, next to the title of your help book. Adding an icon to your help book makes it easier for users to associate your book with your application.
To specify an icon for your help book, use the AppleIcon meta tag in the header section of your title page file. Here is how you would specify an icon file called surfwritericon16.png for SurfWriter Help if the icon were at the top level of the help folder.
<meta name="AppleIcon" content="SurfWriter%20Help/surfwritericon16.png"> |
Figure 2-9 shows the Library menu, with each application’s icon next to the book title.
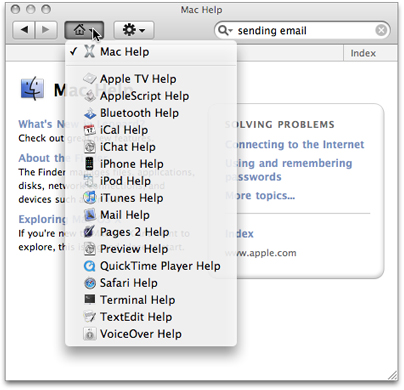
The icon file can be placed at the top level of the help folder or in any subfolder as long as you specify the path accordingly. Many applications place the icon file in the same graphics subfolder as all the illustrations for the help book. The icon should be a 16-by-16 pixel version of your application icon, with a transparent background, saved as a PNG file. Note that the icon cannot be updated from a remote server. Only the local icon file is used by Help Viewer.
Creating a Chapter-Based Help Book
If your application uses optional components such as plug-ins or expansion packs, you may find it useful to organize your help book into chapters. Chapters are subfolders within a help book. The advantage of creating a chapter-based help book is that you can choose to install only those chapters that support components the user has installed. If the user later adds or removes components, you can install or remove individual chapter folders as required.
Organizing a Chapter-Based Help Book Folder
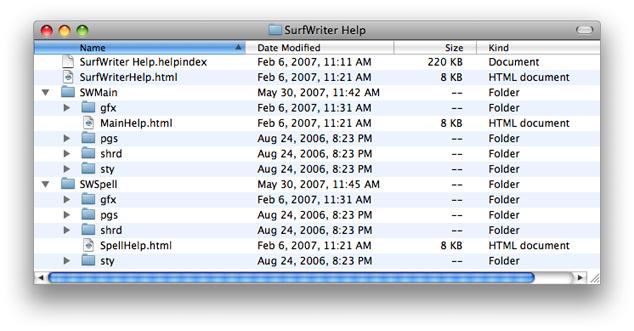
Each chapter has its own title page and may contain its own index and subfolders. For example, SurfWriter features several optional components, so the help book is organized into a main folder and a subfolder for each component. Figure 2-10 shows the SurfWriter help book with only the main folder installed.
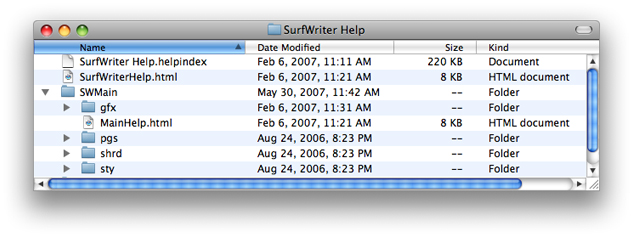
Figure 2-11 shows the SurfWriter help book after the user installs the optional spelling checker. Note that each subfolder has its own title page.
In addition, you should provide a separate table of contents for each chapter. This makes your help book truly modular, allowing chapters to be easily added and removed. You can use this chapter-level table of contents as your chapter title page.
Important: Chapter-based books can have an index file for the whole book or separate index files for each chapter. If you are providing an index file for each chapter of your chapter-based help book, do not also provide a separate index file at the top-level of your help book.
Creating a Dynamic Table of Contents
If you have a chapter-based help book, you can create a dynamic table of contents for it. With a dynamic table of contents, you can install and remove chapters, and the top-level table of contents for your help book will always reflect the latest contents of the help book currently on the user’s system.
To create a dynamic table of contents, each chapter in your help book must have a title page containing the AppleTitle meta tag. At the top level of your help book, include a template file for the table of contents. The template file must be named toctmpl.htm. In this template file, specify the format of the table, using HTML comments containing the strings AppleTOCRowBegin and AppleTOCRowEnd. For example, the following lines specify the format of a table row in the dynamically generated table of contents for SurfWriter Help:
<!-- AppleTOCRowBegin --> |
<tr height="1"> |
<td height="1" width="158"></td> |
</tr> |
<tr> |
<td width="158"><font face="Helvetica,Arial" size="2"> |
<a href="AppleURL" target="AppleTarget"><b>AppleTitle</b></a></font> |
</td> |
</tr> |
<!-- AppleTOCRowEnd --> |
The AppleTOCRowBegin and AppleTOCRowEnd HTML comments mark the beginning and end of the definition of a table row in the dynamically generated table of contents. Help Viewer locates the title page of each chapter in the book and, using the table row definition in your template file, inserts a row in the table of contents linking to that page. Help Viewer uses the chapter title, defined by the AppleTitle meta tag in the chapter title page, as the text of the link. Any content that appears before the AppleTOCRowBegin comment in the template file is copied over to the dynamically generated table of contents without change.
You can use the generated table of contents as your help book’s title page by including the AppleTitle tag at the top of your template file, above the AppleTOCRow comments. You should also include any other relevant title page information, such as your help book icon.
Specifying Chapter Order
You can control the ordering of the chapters in your help book’s table of contents by using the AppleOrder meta tag in the header of each chapter’s title page file. For example:
<meta name="AppleOrder" content="80"> |
When Help Viewer creates a dynamic table of contents for your help book, it lists each chapter in the order specified by the AppleOrder vaues, lowest to highest. Chapters with no AppleOrder value are listed last. If you do not specify chapter ordering, Help Viewer displays all chapter titles in alphabetical order. For example, given a help book with three chapters titled "About SurfWriter," "Using SurfWriter," and "SurfWriter Reference," the default chapter ordering is as follows:
About SurfWriter
SurfWriter Reference
Using SurfWriter
Using the AppleOrder tag, the chapter ordering for the same book can be changed. Given an AppleOrder value of 10 for "About SurfWriter," 20 for "Using SurfWriter," and 30 for "SurfWriter Reference," Help Viewer orders the table of contents as follows:
About SurfWriter
Using SurfWriter
SurfWriter Reference
If you specify the same AppleOrder value for more than one chapter, Help Viewer sorts those chapters alphabetically.
Indexing Your Help Book
To help users quickly find the information they need to accomplish their tasks, you should make your help book searchable by running the Help Indexer utility to create an index for the book. The Help Indexer utility is described in “Using the Help Indexer Utility.”
You should also include additional tags and metadata in your HTML help files to control how your help is indexed. Including this information improves the user experience of searching your help book by increasing the relevance of the results returned for searches of your help book and improving their appearance in Help Viewer. “Controlling Indexing of Your Help” describes how you can improve indexing and searching of your help book.
Compatibility Note: Starting with Mac OS X v10.4, index files support several advanced features such as automatic creation of help-page abstracts. These index files have the suffix .helpindex. Help Viewer in Mac OS X v10.3 and earlier, on the other hand, cannot read *.helpindex files. If you are writing help that must be compatible with Mac OS X v10.3 and earlier, you cannot use UTF-8 character encoding and you must generate index files with the suffix .idx in addition to the *.helpindex files. The *.idx index files do not support the new Help Viewer features. For more information on features and compatibility of these two types of indexes, see “Generating an Index Compatible with Different Versions of Mac OS X.” To learn how to generate either type of index file, see “Using the Help Indexer Utility.”
Controlling Indexing of Your Help
There are a number of tags that you can include in your HTML pages to control how your help content is indexed by the Help Indexer utility. In addition to indexing the text of your help topics, this tool indexes the following items:
Keywords. Keywords allow you to specify synonyms or common misspellings for a help topic, ensuring that users who search on these alternate terms still get a hit on the relevant topic.
Abstracts. An abstract is a brief summary of a help topic that is displayed when the user places the cursor over the topic in a list of search results. Users can determine whether they wish to learn more about the topic without actually loading the topic page.
Anchors. Anchors allow you to uniquely identify a topic or section within a page. Anchors help you provide quick access to help content; you can specify an anchor as the destination of a link or use the Apple Help API to search for and display the content identified by an anchor.
Segments. Segments divide a single HTML file into subsections, each of which can be indexed and returned as a separate hit in a search. Segments are particularly useful in help systems with lengthy topic pages.
Finally, you can specify which content in your help book should be indexed, as described in “Specifying What Is Indexed.” By using these various elements in your help book, you can greatly improve the search results for your help book and make your help book more easily accessible from your application.
Setting Keywords
Keywords are a set of additional search terms for an HTML help page. When a user searches your help book for a term that is designated as a keyword for a topic page, Help Viewer returns that page as a search result, even though the term may not appear in the body of the page. Using keywords, you can specify a set of synonyms and common misspellings for topics covered in your help book.
You can specify keywords for a help page using the KEYWORDS meta tag in the header of the help page’s HTML file. The following example shows keywords that you could set for a help page that describes how to use the Trash:
<head> |
<title>Importing Files</title> |
<meta name="KEYWORDS" content="discard, dispose, delete, clear, erase"> |
</head> |
Do not add keywords for terms that already occur on the page. Repeating a keyword that already appears on the page can cause the page to be given an incorrectly high relevance rating when Help Viewer returns it in response to a user’s query.
Adding Abstracts
An abstract is a brief description of a help topic that appears when the user places the mouse cursor over that topic in a list of search results.
Note: Beginning in Mac OS X v10.2, Help Viewer displays the default text “No summary provided“ for help topics without abstracts. Beginning in Mac OS X v10.4, you have the option of having the Help Indexer utility select a sentence from the help page to use as an abstract when no abstract has been provided (see “Generating an Index Compatible with Different Versions of Mac OS X”).
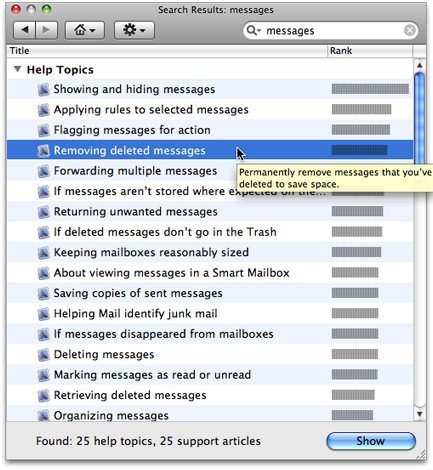
Well-written abstracts help users ascertain whether a given page, returned as a search result, in fact contains the information they were searching for. For example, SurfWriter Help contains a page describing how to import files from other formats. The page’s title, “Importing Files,” gives the user some idea of the page’s contents, but you can provide a fuller description by using an abstract phrase such as, “SurfWriter can import files of the following formats: txt, rtf, pages, and doc.”
To add an abstract to a help page, use the description meta tag in the header section of the page’s HTML file. Here is an example of how to create such an abstract:
<head> |
<title>Sorting your messages</title> |
<meta name="description" content="Permanently remove messages that you've deleted to save space."> |
</head> |
“Example of a search result showing an abstract” shows how such a page and its abstract show up as a search result.
Setting Anchors
Anchors allow you to uniquely identify topics in your help book. When a user follows a link to an anchor, Help Viewer loads the page containing the anchor. If your link includes the specific file containing the anchor (such as SurfScript.html#anchor1), Help Viewer scrolls to the anchor location (if it is not at the top of the page). For example, assume that SurfWriter has a simple scripting language called SurfScript. In the help page for SurfScript, you could specify a unique anchor for each SurfScript command, enabling Help Viewer to scroll directly to the desired text when the page loads.
If you use multiple files for your help book, you can put an anchor at the beginning of each file and direct links to the anchors so that you don’t have to know the final locations of the help files when you code your HTML. To do so, you use the help:anchor URL provided by Apple Help in your link (see “Creating a Link to an Anchor Location”).
You can also use anchors to load an anchored page from within your application by calling the Apple Help function AHLookupAnchor. To continue the example, SurfWriter could provide an online lookup function that loads the help page for a SurfScript command by calling the AHLookupAnchor function and passing the appropriate anchor name when a user Option-clicks a command name in a SurfScript document.
If you need to access your help content programmatically—as you would, for example, if you provide contextually sensitive help—you should consider using anchors to make your help easily accessible from your application. Because you can change the location of anchors within your help book without affecting your product’s code, anchors provide a simple and maintainable way for your application to access specific topics within your help book.
You can create multiple anchors in a single file. This is especially useful if you split a file into segments, as you can use the anchors to scroll directly to the beginning of each segment. Segments are described in the next section, “Creating Segments in Help Files.”
You specify an anchor using the standard HTML 4 anchor element, as shown in the following example, which creates an anchor called SurfScriptCommand_OPEN in a help page describing SurfScript’s OPEN command:
<a name="SurfScriptCommand_OPEN"></a> |
<!-- Here is the description of SurfScript’s OPEN command --> |
You link to an anchor by using an HTML anchor element and a help:anchor URL:
<a href="help:anchor=SurfCmnd_OPEN bookID=SurfWriter Help">Open command</a> |
The NSAlert, SFChooseIdentityPanel, SFCertificatePanel classes provide help buttons for dialogs. To display such a help button and link it to an anchor in your help book, use the methods setShowsHelp: and setHelpAnchor: in those classes. See NSAlert Class Reference, SFChooseIdentityPanel Class Reference, and SFCertificatePanel Class Reference for details.
Important: If you use anchors in your help book, you must turn anchor indexing on when you index your help book with the Help Indexer utility. For more information, see “Anchor Indexing.”
Setting Anchors for Generated Lists
In addition to using anchors to jump to a location in a help book, anchors are used to implement generated lists (“Generating Lists from Anchors”) and exact match searches (“Setting Up Exact Match Searching”). Unlike anchors used to jump to a specific page, each of which must be used only once, the anchors used for lists can be placed in any number of places. When you specify an anchor to generate a list, every page containing that anchor is included in the list. For example, the anchor corresponding to the “Accounts preferences” generated list in Mac Help is located in the pages for “About administrator accounts,” “About logging in and out,” “About passwords in Mac OS X,” and so forth. On the other hand, the “About administrator accounts” page (for example) includes a unique anchor used only in that file. The “About administrator accounts” page, therefore, contains one anchor used to jump to that page (mchlp1746) plus several other anchors used in generated lists, including the anchor used for the “Accounts preferences” generated list (almh10339):
<a name="mchlp1746"></a><a name="almh10045"></a><a name="almh10090"></a><a name="almh10339"></a><a name="almh10564"></a><a name="almh10334"></a> |
Creating Segments in Help Files
A large help book may contain hundreds of individual pages. Rather than using a separate HTML file for each page, you can combine several pages into one file by dividing the file into segments. Help Viewer treats segments much like separate files; each segment in a file can have a different abstract, anchor, and keyword set. The following example shows how SurfWriter Help defines a segment and specifies its abstract and keywords:
<!-- AppleSegStart="Opening a File" --> |
<!-- AppleSegDescription="How to open a SurfWriter file" --> |
<!-- AppleSegKeywords="launch, read, look , examine" --> |
<!-- Topic text goes here --> |
<div id="pagetitle"> |
<h1>How to open a SurfWriter file</h1> |
</div> |
<p>To open a SurfWriter file, you ... |
<p> |
... |
<p> |
</p> |
<!-- AppleSegEnd --> |
The beginning of the segment is marked by the AppleSegStart command. If the segment has an abstract or keywords, they are specified using the AppleSegDescription and AppleSegKeywords commands, respectively. The content of the segment follows. The AppleSegEnd command marks the end of the segment.
Specifying What Is Indexed
By default, each file in your help book is fully indexed. You can use the ROBOTS meta tag in the HTML header of a particular file to control how that file is indexed. The ROBOTS meta tag supports the values shown in Table 2-1.
Value | Meaning |
|---|---|
| Specifies that the HTML file should not be indexed. |
| Specifies that the HTML file should be indexed for keywords only. |
| Specifies that the HTML file should be indexed for the content of the segments in that file. |
| Specifes that the HTML file should be indexed for anchors only. |
Apple recommends that you do not index a page that contains only links or graphics, or a page on which you don’t want the user to land as a result of a search. For example, if you have a sequence of pages that are linked in a series, you might only want to index the first page in the sequence. To specify that a file should not be indexed, use the ROBOTS meta tag with the value NOINDEX as shown in the following example:
<meta name="ROBOTS" content="NOINDEX"> |
Specify KEYWORDS as the value of the ROBOTS meta tag if you want the indexer to pick up only your specified keywords for use as search results. If you define segments in a file, as described in “Creating Segments in Help Files,” you can supply a value of SEGMENTS in the file’s header to specify that only the content of the segments is indexed. The ANCHORS value is useful for pages which you want to be able to retrieve using anchor lookup, but which are not useful as search results, such as your title page.
Using the Help Indexer Utility
Once you have finished adding abstracts, keywords, and any other indexing information to your help book files, you must run the Help Indexer utility on your help book. The Help Indexer utility creates an index file for your help content and stores it as a separate file at the top level of the help book folder. The index file contains links to all the words (or tokens) in your help files that are equal to or greater than the minimum term length, excluding any stopwords. You use Help Indexer preferences to specify the minimum term length and the list of stopwords.
Because the index file may be invalidated if you change or rearrange the content of the help folder, be sure to update the index file after the help book content is complete and all files are in their final location.
Note: Some help books include a page labeled Index, containing a list of links to topics and to lists of topics. This Index is an HTML page created by the help book author, and is not related to the index file created by the Help Indexer utility. For information on how to generate an index list for your help book, see “Generating Lists from Anchors”
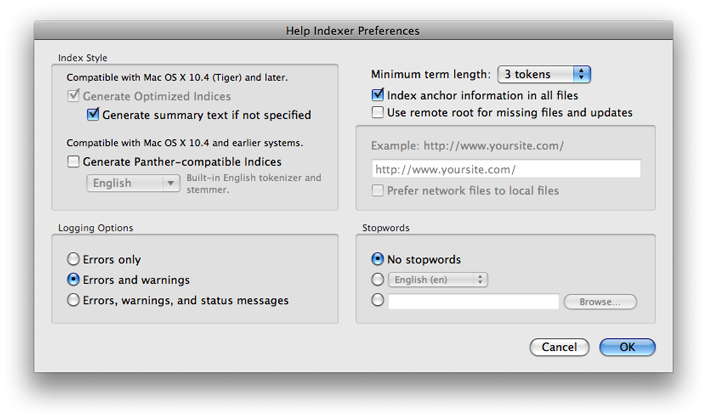
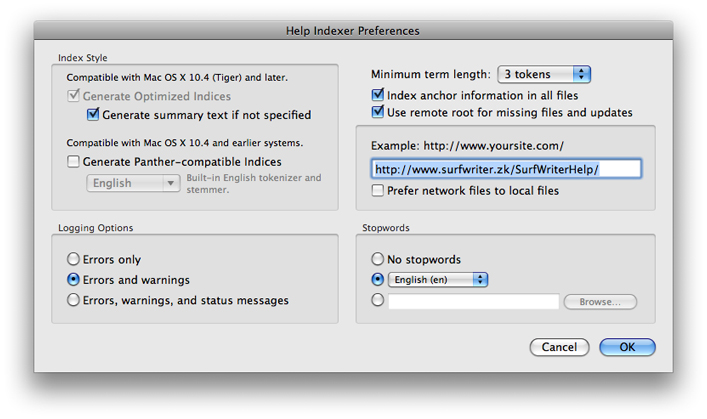
You can create an index for your help book by opening Help Indexer (/Developer/Applications/Utilities/Help Indexer.app) and entering your help book folder in the dialog that appears. You can also drag the folder containing the help book onto the Help Indexer utility, or execute the utility from a command line. The command-line interface and Help Indexer preferences are documented in the Help Indexer Help. Figure 2-13 shows the Help Indexer preferences window.
You must modify the default preference settings of the Help Indexer utility if you wish to do any of the following:
Index a help book for a language other than English.
Turn off the indexing of anchor information.
Supply help content from a remote server.
Provide an index compatible with versions of Mac OS X earlier than Mac OS X v10.4.
Specify a minimum term length other than three tokens (note that three is the recommended setting).
Specify a list of stopwords.
Have warnings or status messages returned in addition to errors.
Indexing for Languages Other Than English
Read “Localizing Your Help Book” for more information on indexing non-English help books.
Anchor Indexing
If you add anchors to your help book, you must index your help book with anchor indexing selected in the Help Indexer utility’s preferences. When anchor indexing is on, the Help Indexer puts information about the anchors in the index file and Help Viewer uses that information to follow the links to help:anchor URLs in your files (see “Setting Anchors”). Anchor indexing is on by default. If you don’t use anchors, or don’t want to use help:anchor URLs to link to your files, you can turn off anchor indexing. To toggle anchor indexing off or on, perform the following steps:
Open Help Indexer preferences by choosing Preferences from the application menu.
Click the checkbox labeled “Index anchor information in all files” (Figure 2-13).
Storing Pages on Remote Servers
As described in “Internet-Based Help Book Content,” Help Viewer supports Internet-based help. To provide updates to your help content via the Internet, you must specify a remote server from which to download updated help content. To specify a remote server for your help content, do the following:
Open Help Indexer preferences.
Click the checkbox labeled “Use remote root for missing files and updates.”
In the text field under this checkbox, enter the server address where your remote help content is available. Figure 2-14 shows a remote root specified in Help Indexer preferences.
Important: The web server you use to provide remote content for your help files must support HTTP/1.1 Conditional Get requests. Mac OS X Server does support such requests.
You can specify “Internet-primary” help by clicking the checkbox labeled “Prefer network files to local files.” When you choose Internet-primary help, before loading a page Help Viewer checks the specified server for a newer version of the page. If the local page is the same as the remote page, Help Viewer uses the local page. If the remote page is newer, Help Viewer downloads the remote page in preference to the local page. Help Viewer caches remotely accessed pages on the user’s system.
Note: If you select “Use remote root for missing files and updates” and specify a remote server, but do not choose Internet-primary help, you can provide “Internet-only” help by installing a minimal help folder on the user’s system that contains only a title page, index, and any other pages that should be quickly accessible and that don’t have to be updated. Any files that you want to provide exclusively online should be stored on the remote server, but not installed locally.
Whether you are installing a minimal help book on the local system or are placing the full contents of your help book locally, you must index your help folder with all pages installed and organized into the correct subfolders, if any.Help Viewer can also download updated index files from a remote server. When Help Viewer launches, it looks in your help book’s index file for a remote root. If you specified a remote root in Help Indexer preferences, Help Viewer contacts the server and checks for an index file at that location. If an index file is present, and if it is newer than the locally stored index, then Help Viewer downloads the file.
Important: Because the index file for your help book records the remote root at which Help Viewer can access your Internet-based help, you must include an index file in the help book folder that you install locally.
You can control how long your help pages are cached, using the two meta tags shown below:
<meta http-equiv="Expires" content="Tue, 01 Jan 1980 1:00:00 GMT"> |
<meta http-equiv="Pragma" content="no-cache"> |
The first example sets a specific expiration date for the cached page. A 24-hour clock is used, and the time zone is included when specifying a particular expiration date. The second example tells Help Viewer that the file should never be cached.
Generating an Index Compatible with Different Versions of Mac OS X
Starting with Mac OS X v10.4, the Help Indexer utility can create index files that take advantage of the Search Kit features introduced with that version of the operating system. Improvements starting with Mac OS X v10.4 include the ability to:
Extract a summary sentence from a help file to use when no
DESCRIPTIONmeta tag is provided (see “Adding Abstracts”)Specify a list of stopwords (see “Specifying a Minimum Term Length and Stopwords”)
Specify a minimum number of tokens for indexed terms (see “Specifying a Minimum Term Length and Stopwords”)
Help Viewer can use indexes created for Mac OS X v10.4 or later (file suffix .helpindex) or those created for Mac OS X v10.3 or earlier (file suffix .idx). However, to take advantage of the newer features, a *.helpindex file must be present. Starting with Mac OS X v10.5, the Help Indexer utility always creates a *.helpindex file. The Help Indexer Utility for Mac OS X versions 10.4 and 10.5 can optionally also create a *.idx index file.
If your help book is used only on Mac OS X v10.4 or later, use HTML 4.01 and use UTF-8 as the character set.
If your help book is also used on Mac OS X v10.3 or earlier, use HTML 3.2 and do not use UTF-8. If you use UTF-8, you will not be able to reliably create an index compatible with those operating systems. In this case, generate an *.idx file in addition to the *.helpindex index file by selecting the “Generate Panther-Compatible Indices” option.
If you choose to create an index for Mac OS X v10.3 and earlier systems, you must specify the language of the tokenizer to use. For Mac OS X v10.4 and later indexes, no language choice is necessary because UTF-8 supports all languages. However, you can specify a language-specific list of stopwords, as described in the following section, “Specifying a Minimum Term Length and Stopwords.” See “Indexing a Non-English Help Book” for more information.
Specifying a Minimum Term Length and Stopwords
Staring with Mac OS X v10.4, the Help Indexer utility enables you to specify the minimum length of terms to be indexed. For example, if the minimum term length is 3 tokens (the default), then the words “I,“ “to,“ and “at” are not indexed, but “and” and “but” are included in the index. Apple recommends using the default value.
To prevent commonly used or irrelevant words from being included in the index, you can also include a list of words—referred to as stopwords—to be excluded from the index. In Help Indexer preferences (Figure 2-13), you can specify whether to use no list of stopwords, one of the language-specific stopword lists provided with the Help Indexer, or your own stopword list. The provided stopword lists are the ones used by Apple, and should be adequate for most purposes.
The provided stopword lists are located in a property list in the Help Indexer application bundle at /Developer/Applications/Utilities/Help Indexer.app/Contents/Resources/Stopwords.plist.
Instead of one of the standard lists of stopwords, you can specify your own list. A stopword list must be a newline-deliminated list of words in a text file.
Setting Error Verbosity
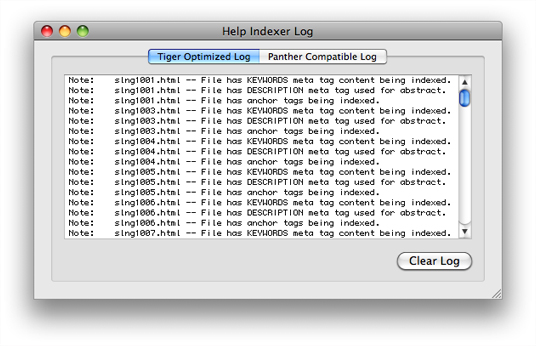
There are three levels of information you can log during a run of the Help Indexer utility: errors, warnings, and status messages. Errors are problems that prevent Help Indexer from creating an index. . Warnings are problems that don’t prevent the creation of an index, but that might cause the results to be different from what you are expecting. . Status messages indicate the progress of the utility so that you can check for expected results, such as anchors being indexed or pages being skipped due to the ROBOTS NOINDEX meta tag (see “Specifying What Is Indexed”). You use the logging options section of Help Indexer preferences (Figure 2-13) to set the level of messages you wish to have logged. If any messages are generated, the log window opens after the utility completes execution (Figure 2-15).
Running Help Indexer from the Command Line
You can run the Help Indexer utility from the command line. The command-line syntax allows you to specify any of the preferences available in the preferences window; if you don’t specify any preferences on the command line, then the utility uses the preferences last set in the preferences window, or a default set of preferences if there is no preferences file.
The command-line interface is fully documented in the Help Indexer Help text file available from the Help menu.
Adding Specialized Content to Your Help Book
You can enrich the user experience of your help book by including additional resources such as animated tutorials, scripted tasks, and other multimedia content supported by Help Viewer. This section shows you how to:
Embed QuickTime movies in your help book
Automate tasks using AppleScript scripts in your help book
Initiate Help Viewer searches from a link in your help book
Link to anchors in your help book
Adding QuickTime Movies to Your Help Book
You can use QuickTime to create animated tutorials or demos for your help book. To link to a QuickTime movie, use the standard HTML embed tag. The following example shows how to call a movie file called SurfScriptDemo.mov located in the movies subfolder of the SurfWriter Help folder:
<embed src="SurfWriter%20Help/movies/SurfScriptDemo.mov"> |
Use only legal URL characters to specify the URL for the path; for example, the folder name “SurfWriter Help” is specified as SurfWriter%20Help.
Running Other Applications from Your Help Book
You can launch other applications, such as media players or custom help applications, from your help book by using the standard HTML anchor element. Here is an example of how you would specify a link that opens an application called SurfScriptPlayer located in the SurfWriter Help folder:
<a href="SurfWriter%20Help/SurfScriptPlayer"> |
Use only legal URL characters to specify the URL for the path; for example, the folder name “SurfWriter Help” is specified as SurfWriter%20Help.
A better strategy than directly executing an application is to execute an AppleScript script that can handle errors such as a missing program, incorrect permissions, and so on. See “Automating Help Tasks with AppleScript.”
Opening an External Web Page in Help Viewer
When you include an http:// link in your help book HTML, Help Viewer ordinarily opens the link in the user’s default web browser. You can use the target-"_helpViewer" argument to cause the link to open in the Help Viewer window instead. For example, you can use a link of this sort to open a page on your customer service website in Help Viewer, making it appear to the user as if it’s part of your help book. The following line would cause the support page for iCal on the Apple, Inc. website to open in the Help Viewer window:
<a href="http://www.apple.com/support/ical" target="_helpViewer">Support Website</a> |
Using Help URLs in Your Help Book
The URLs using the Help Viewer help: protocol, introduced in “Help URLs,” allow you to access other help content, including:
Executing AppleScript scripts
Initiating Help Viewer searches
Jumping to anchor locations
Generating lists from anchors
Opening other help books
Important: The syntax used for these URLs is specific to Apple Help. You need to follow the guidelines given here exactly or the links won’t work as desired.
Automating Help Tasks with AppleScript
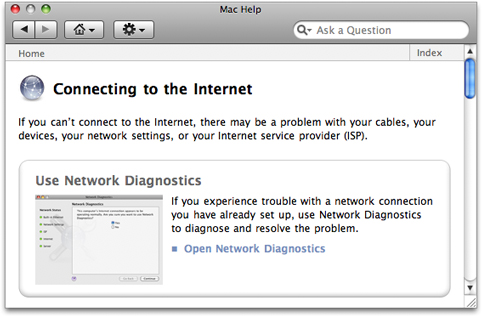
You can take advantage of AppleScript’s ability to automate Mac OS events by linking to scripts in your help book. For example, Figure 2-16 shows a page from Mac Help that uses an AppleScript script to open the Network Diagnostics utility when the user clicks the link at the bottom of the page.
The syntax for calling a script is as follows:
<a href="help:runscript=help_folder_name/subfolder/scriptnamestring='optional_string_parameter'"> |
The optional string parameter is a string value that you can pass to the script. The script is responsible for parsing the value passed in the string parameter. If the script accepts multiple parameters, use commas to separate the values. The following example shows how to specify a script called “MakeNewSaveFolder” in the scripts subfolder of the SurfWriter Help folder and pass it a folder name value in the string parameter:
<a href="help:runscript=SurfWriter%20Help/scripts/MakeNewSaveFolderstring='My Save Folder'"> |
Make sure that you enclose the entire tag value in double quotes.
If you pass the script any parameters with the help:runscript command, then you have to have a helphdhp routine inside the script to receive the parameters. For example, Mac Help has an AppleScript handler used to open an application from a Help Viewer page. The HTML command to open the Mail application looks like this:
<a href="help:runscript=MacHelp.help/Contents/Resources/English.lproj/shrd/opnbndsig.scpt string='com.apple.mail'"> Open Mail</a> |
The AppleScript handler that receives the parameter (in this case, an application bundle ID) is as follows:
on «event helphdhp» (completeParam) |
-- localizable text |
set cancelBtn to "Cancel" |
set errorText to "The item cannot be opened. It may be disabled or not installed." |
--end localizable text |
try |
tell application "Finder" |
open application file id completeParam |
end tell |
on error errMsg number errNum |
display dialog errorText buttons {cancelBtn} default button 1 with icon 0 |
return |
end try |
end «event helphdhp» |
For examples of AppleScript scripts in a help book to use as a starting point, see the scripts included in Mac Help at /Library/Documentation/Help/MacHelp.help/Contents/Resources/. Do not link to any of these scripts; however, you are welcome to make copies of them to put in your own help book.
Initiating a Search from Your Help Book
The help:search URL allows you to create a link in your help book that, when clicked by the user, initiates a search for a particular term or phrase. This is particularly useful for linking to further information about subjects that appear in multiple help pages. Rather than link to each topic page, you can simply set up a search that will find all pages in your help book in which the subject appears. The syntax for initiating a Help Viewer search is as follows:
<a href="help:search='search_term' bookID=help_book_name"> |
The bookID parameter is a string value specifying which help book Help Viewer should search. If you do not specify a book, Help Viewer searches all help books currently installed on the system. Your book must be indexed for the search to return results.
The following example creates a link to a search for topics related to importing files in the SurfWriter help book:
<a href="help:search='importing files' bookID=SurfWriter%20Help"> |
The value for the book ID should be the help book title, as defined by the AppleTitle tag in the title page of the book.
When the user clicks the resulting link, Help Viewer searches SurfWriter Help for all topics pertaining to importing files, just as if the user had typed the query string "importing files" into Help Viewer’s search field.
Creating a Link to an Anchor Location
Using the help:anchor URL, you can create a link to any help book location identified by an anchor. It is often simpler to create links using anchors than to hardcode the path to the destination in the link, and it allows a link to be moved without having to update all the pages that point to it. The syntax for linking to an anchor location is as follows:
<a href="help:anchor=anchor_name bookID=help_book_name"> |
The bookID parameter is a string value identifying the help book in which Help Viewer should search for the anchor. If no help book is specified, Help Viewer searches all of the registered help books currently on the system. The following example creates a link to the topic on opening files in SurfWriter Help:
<a href="help:anchor=openfile bookID=SurfWriter%20Help"> |
When the user clicks the link, Help Viewer takes the user to the location identified by the anchor named “openfile.” If more than one anchor is found matching the anchor name, Help Viewer displays all of the matching anchor locations in a search results page. To link to anchor locations in your help book, you must index your help book with anchor indexing turned on, as described in “Anchor Indexing.”
Generating Lists from Anchors
The help:topic_list URL allows you to generate lists of pages to which the user can jump without having to create and maintain such lists manually.
You must provide an anchor ID, a path to the book ID, a path to a template file (used by a Help Viewer XQuery script), a path to a CSS file that specifies the styling for the list, and the name of the list item. Here is the HTML in Mac Help used to generate the Accounts preferences index list:
<p><a href="help:topic_list=almh10090 bookID=Mac Help template=sty/genlist.html stylesheet=sty/genlist_style.css Other=Accounts preferences">Accounts preferences</a></p> |
Here is the XQuery template from Mac Help that is referenced by this URL:
<html> |
<head> |
<meta http-equiv="content-type" content="text/html;charset=utf-8"> |
<title>AppleTopicListOther</title> |
<meta name="robots" content="noindex"> |
<link href="AppleTopicListCSS" rel="stylesheet" media="all"> |
</head> |
<body> |
<div id="list"> |
<h1>AppleTopicListOther</h1> |
<p>Click a topic below.</p> |
<!-- AppleTopicListRowBegin --> |
<p><a href="AppleTopicListURL">AppleTopicListItemTitle</a></p> |
<!-- AppleTopicListRowEnd --></div> |
<div id="banner"> |
<div id="machelp"> |
<a class="bread" href="help:anchor='access' bookID=Mac Help">Mac Help</a></div> |
<div id="index"> |
<a class="leftborder" href="help:anchor='x1' bookID=Mac Help">Index</a></div> |
</div> |
</body> |
</html> |
This template replaces the variable AppleTopicListOther with the value passed as the Other parameter. The variable AppleTopicListURL is used to look up all instances of the anchor passed as the topic_list parameter, and the title of the page identified by that anchor is substituted for the AppleTopicListItemTitle variable. The resulting list generated for the “Accounts preferences” index item is shown in Figure 2-17. Each page in this list contains the anchor specified in the help:topic_list URL (see “Setting Anchors for Generated Lists”). To add or remove items from a generated list, you add or remove that list’s anchor ID on the relevant HTML pages in the help book and generate a new index file. Because the list is generated each time it’s requested, it always reflects the current set of relevant help pages.
For other examples of code used to generate lists, look in the help folders of Mac Help and other Apple help books. Generated lists are used to create the help book index and the See-also lists at the end of topic pages.

Opening Other Help Books
You can use the help:openbook URL to open a specified help book in Help Viewer. You can use this URL, for example, to open the help book for a related application in an application suite. The syntax for opening a help book is as follows:
<A HREF="help:openbook=help_book_name"> |
When the user clicks the link, Help Viewer opens the title page of the specified help book. For example, to create a link that opens the SurfWriter Help book to the title page, you would include the following code in your help book:
<A HREF="help:openbook=SurfWriter%20Help"> |
To create a link that jumps to a particular location in a help book, see “Creating a Link to an Anchor Location.”
Setting Up Exact Match Searching
You can provide a list of search terms and corresponding search results. When the user enters a search term that exactly matches a term in your list, Help Viewer takes the corresponding search result from your list, gives it a relevance rating of 100%, and displays it along with other search results. You can use an exact match search list, for example, to provide responses to search terms too short to normally be used in a seach (such as “CD”) or to make sure that the most relevant results receive the highest relevancy rating.
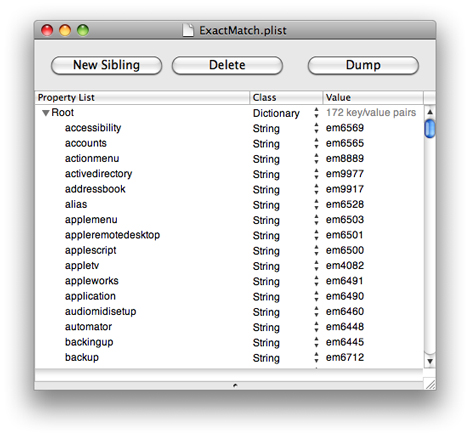
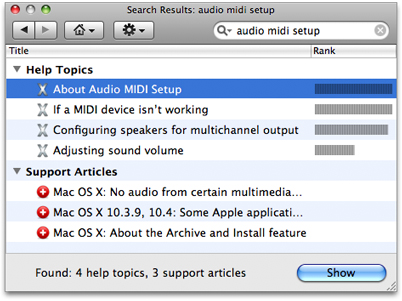
To set up exact match searching, you create a property list containing the search terms and search results and place the .plist file at the top level of the help book, along with the title page and the help book index (see “Organizing the Help Book Folder”). The property list contains a set of key-value pairs. All keys and values are strings. Each key is a search term, specified as all lowercase with all spaces removed. Hyphens and other punctuation marks are not allowed. Each corresponding value is an anchor ID. As with generated lists, each anchor can be used in any number of help book pages. When a user enters a search term, Help Viewer takes a lowercase, spaces-removed version of the search string and compares it to the keys in the exact match property list. If it finds an exact match for the entire string, Help Viewer returns every page containing the referenced anchor string, assigns it a relevancy rank of 100%, adds it to the list of search results, and displays the results. Figure 2-18 shows the exact match property list from Mac Help. Figure 2-19 shows the search results displayed when the user searches for one of the terms in that property list. The top items in the search results, with rankings of 100%, contain the anchor ID in the property list for that search term. It’s important to note that exact match searching does not return results from stems or partial matches. If you want exact match search results for “CD”, “CDs”, "VCD”, and “CD or DVD”, for example, you need four entries in the property list: cd, cds, vcd, and cdordvd.
Providing Your Own Online Support Articles
The default behavior for the Help Viewer application is to provide a listing of online support articles in addition to help book topics in response to a query. Help Viewer sends the query to Apple’s Knowledge Base support website. Instead, you can provide a URL to your own support site. To do so, provide a URL in your search script on the main page of your help book, as follows:
<meta name="AppleKnowledgeBaseURL" content="http://www.yourcompany.com/search.py?lang=en&product='product'&query='query'"/> |
Help Viewer replaces the 'query' argument of the URL with the user’s query and the optional 'product' argument with the product name. It takes the product name from the AppleKnowledgeBaseProduct meta tag, or if there is none, from the name of the help book minus the word “Help”. For example, iChat uses the following lines of HTML code to generate the URL used to communicate with the Knowledge Base support site:
<meta name="AppleKnowledgeBaseProduct" content="iChat" /> |
<meta name="AppleKnowledgeBaseURL" content="http://www.info.apple.com/searchredir.html?bucket=helpviewer&lang=en&as_oq='product'&val='query'"/> |
Help Viewer expects the returned results to be in XML, in the form of an array of dictionaries sorted in order of relevance, as follows:
<?xml version="1.0" encoding="UTF-8"?> |
<!DOCTYPE plist PUBLIC "-//Apple Computer//DTD PLIST 1.0//EN" |
"http://www.apple.com/DTDs/PropertyList-1.0.dtd"> |
<plist version="1.0"> |
<array> |
<dict> |
<key>title</key> |
<string>Article title</string> |
<key>url</key> |
<string>http://kb.yourcompany.com/article.py?num=23</string> |
<key>abstract</key> |
<string>Article abstract ...</string> |
</dict> |
</array> |
</plist> |
Return no more than 25 articles, the maximum that Help Viewer will display.
If there are no results for the given query, return the following XML:
<?xml version="1.0" encoding="UTF-8"?> |
<!DOCTYPE plist PUBLIC "-//Apple Computer//DTD PLIST 1.0//EN" |
"http://www.apple.com/DTDs/PropertyList-1.0.dtd"> |
<plist version="1.0"> |
<array> |
<dict> |
<key>NoResultsFound</key> |
<string>No results were found.</string> |
</dict> |
</array> </plist> |
Localizing Your Help Book
If your application will be used in more than one part of the world, your help book should be localized for every relevant language, country, or cultural region where it will be used. Localizing your help book involves translating the text of your help content and customizing graphics and other resources used in your help book.
This section shows you how you can ensure that your localized help content appears correctly in Help Viewer.
For more information on internationalization and HTML, see http://www.w3.org/International/
Language-Specific Resource Directories
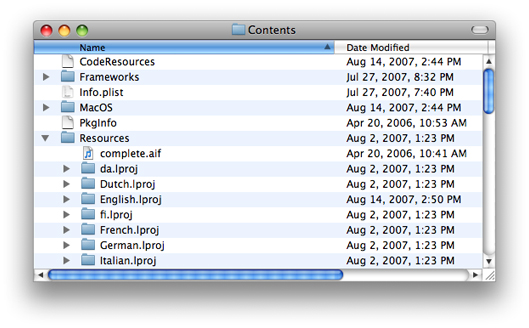
For each language you support, you must provide a complete, localized help book in its own resource subdirectory within the Resources directory in the software bundle. Figure 2-20 shows a set of resource subdirectories (each with a prefix specifying the language and the .lproj extension) in an application bundle.
Each localized version of the help book should have a localized book name and localized meta tags, including AppleTitle, AppleKnowledgeBaseProduct/URL, Keywords, and so forth) as appropriate.
Specifying Character Encoding
To specify the character encoding used by your help book, use the standard HTML 4 syntax, as shown in the example below, which specifies the UTF-8 character encoding:
<meta http-equiv="content-type" content="text/html;charset=UTF-8"> |
Important: Starting with Mac OS X v10.4, UTF-8 is recommended for all your content. See “Generating an Index Compatible with Different Versions of Mac OS X.”
Indexing a Non-English Help Book
Once you have created your localized help book, you must run the Help Indexer utility on the book. For indexes compatible with Mac OS X v10.3 and earlier, you must specify a tokenizer compatible with the language of the help book. To do so, open the Preferences dialog in the Help Indexer utility, check the “Generate Panther-compatible indices” checkbox, and select a tokenizer from the pop-up menu).
The use of UTF-8 character encoding enables Help Indexer to support all languages for indexers compatible with Mac OS X v 10.4 and later. See “Generating an Index Compatible with Different Versions of Mac OS X” for information about creating indexes compatible with different versions of Mac OS X.
© 2003, 2007 Apple Inc. All Rights Reserved. (Last updated: 2007-10-31)