Documentation Access
Documentation is an important resource of the software development process. As you develop products with Xcode, you’re likely to use documentation to learn about Apple technologies, read about system frameworks, and look up API reference. You may also need to consult documentation provided by other vendors—for example, if you use a third-party framework to develop an application.
Xcode provides two ways to access documentation:
The Research Assistant
The Documentation window
The Research Assistant is a lightweight window that provides a condensed view of the API reference and links to related documentation for the selected system or build setting without taking the focus away from the editor in which the item is located. The Research Assistant allows you to continue editing code or a build setting’s value while viewing relevant documentation at the same time.
The Documentation window lets you browse and search the developer documentation installed on your computer. It provides access to a wider and more detailed view of the documentation than the Research Assistant.
The Apple Developer Connection (ADC) Reference Library contains all the developer documentation Apple publishes. You can view the entire library on the web at developer.apple.com.
To reduce Xcode’s documentation footprint on your computer, only guides and API reference are placed in your file system. However, the Documentation window displays the titles of all document types. Xcode opens nonresident documents in your web browser (you must have a working connection to the Internet to access such documents).
The Documentation window lets you view documentation sets (also known as doc sets). Each doc set contains HTML-based content as well as indexes into that content, which Xcode uses to perform quick documentation searches. When searching for documentation in the Documentation window, you can search a single doc set—resulting in fast, focused searches—or all doc sets.
These are some of the doc sets that Apple publishes:
Developer Tools Reference Library
Core Reference Library
Java Reference Library
WebObjects Reference Library
When you install Xcode, you can choose which doc sets to place on your file system (except for the Developer Tools Library doc set, which is always installed).
This chapter discusses the documentation-viewing experience Xcode provides through the Documentation window and the Research Assistant. It describes how to tell Xcode where to get the documentation it displays, how to perform documentation searches, and how to view man pages for the UNIX developer tools installed in your file system.
In this section:
Viewing Documentation
Browsing Documentation
Searching Documentation
Searching API Reference from the Text Editor
Using Documentation Bookmarks
Using the Research Assistant
Viewing Man Pages
Subscribing to Documentation Feeds
Documentation Preferences
Viewing Documentation
The Documentation window lets you view HTML-based documents that are part of the documentation sets installed on your computer. (Xcode opens PDF-based documents in your PDF-file viewer.) The Documentation window also provides access to documents known to a doc set but stored elsewhere.
To open the Documentation window, choose Help > Documentation.
The Documentation window operates in two modes: browse and search. In browse mode you can browse the documents in a doc set using its category hierarchy. In search mode you can find documents by API symbol name, document title, or document content.
In browse mode you select documents in the documentation browser view. In search mode you select them in the documentation detail view. In both modes, you view documentation in the content pane, which displays category information or a document page. To display the current page in another window or in your web browser, use the content pane’s shortcut menu. You can use the hyperlink shortcut menu to open cross-referenced documents in another window or in your web browser, as well.
Browsing Documentation
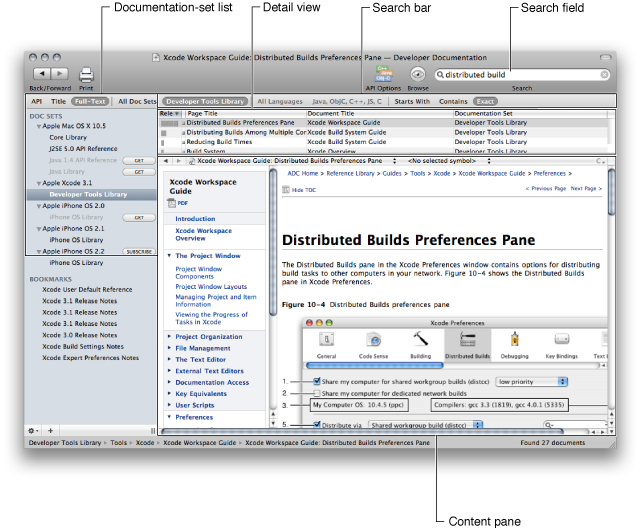
Figure 5-1 shows the Documentation window in browse mode. It identifies the documentation-set list, the browser view, and the content pane.

To browse documentation:
In the Documentation window toolbar, click the Browse button so that its icon changes from grayscale to color.
In the documentation-set list, select the doc set you want to browse.
In the browser view, select the categories in which you’re interested.
As you select each category, the content pane shows a page describing the category. When you select a category that doesn’t have subcategories, you can select one of the documents that the category encompasses. When you select a document in the browser view, depending on its type and location, it may be displayed in the content pane, your PDF viewer, or your web browser.
Searching Documentation
When you know the subject you’re looking for, searching is often the fastest way to find documentation. A documentation search is composed of several components:
Search term. The text that must be present in the documents that make up the search results.
Search type. The Documentation window supports three types of search:
API reference search: Finds the available reference for a symbol name.
Title search: Finds the documents whose titles start with, contain, or match the search term.
Full-text search: Finds the documents whose content matches a search term. The search term can be a word or phrase or may be an elaborate expression using Boolean operators and wildcard characters
Search scope. The doc sets in which Xcode searches for the search term. You can search one doc set or all doc sets.
When defining a documentation search, you use the following Documentation window controls (identified in Figure 5-2):
The search field to specify the search term.
The search bar to specify the search type, search scope, search language (for API reference searches only), and match criterion (for full-text searches only).
The documentation-set list to identify the doc set to be searched (when the search is limited to one doc set).
The set of documents that meet search criteria (the search result) appears in the detail view.
The following sections provide more details about each type of documentation search.
API Reference Search
When you are writing code, you often need to find documentation for a method, function, or data type. The API reference search lets you quickly find the information you need.
To perform an API reference search:
In the documentation-set list, select the doc set in which you want search. To search all doc sets, click All Doc Sets in the search bar.
In the search bar, click API and specify the programming language you’re using.
You can click the API Options button in the toolbar to configure the list of languages the search bar shows.
In the search field, enter the name of the symbol whose reference you want to view.
The detail view displays the documents that match the name entered. Xcode reduces the list of matches as you complete the symbol name.
Title Search
When you are relatively sure of the name of the technology for which you want to find documentation, a title search may provide very relevant results because each of the documents in the search results is guaranteed to address the subject at a useful level.
To perform a title search:
In the documentation-set list, select the doc set you want to search. To search all doc sets, click All Doc Sets in the search bar.
In the search bar, click Title.
In the search field, enter the search term.
The detail view displays the documents whose titles contain the words in the search term.
Full-Text Search
A full-text search lets you find documentation based on words, terms, and wildcard characters.
To perform a full-text search:
In the documentation-set list, select the doc set you want to search. To search all doc sets, click All Doc Sets in the search bar.
In the search bar, click Full-Text and click the match criterion you want to use: Starts With, Contains, or Exact:
Starts With. Matches documents that contain words that begin with the words specified in the search term. For example, with the
NS CFsearch term, the search result is made up of documents that contain words such as “NSWindow” and “CFString,” each document containing at least one word that starts with the string “NS” and one word that starts with the string “CF”.Contains. Matches documents that have words that contain the words specified in the search term. For example, the search term
stringWith UTFreturns documents that contain words such as “stringWithFormat” and “initWithUTF8String,” each document containing at least one word that contains the string “stringWith” and one word that contains the string “UTF”.Exact. Matches documents that contain words that exactly match the words specified in the search term, each document containing all the words specified in the search term.
In the search field, enter the search term and press Return.
Using Boolean operators, specifying required terms, and using wildcards allow you to define more precise search terms, which produce smaller but more accurate results.
Using Boolean Operators
If you wish to further restrict the parameters of your search, you can combine search conditions using Boolean operators. You can create arbitrarily complex queries to narrow your search to fit your particular criteria.
Note: The smallest unit at which search results are evaluated is a single HTML file; in Apple's developer documentation, this typically corresponds to a section in a chapter, a group of function descriptions, or a class. If your search term is too restrictive, you may not get any results at all.
Xcode supports the following Boolean operators, listed in order of precedence from highest to lowest:
() | logical grouping |
! | NOT |
& | AND |
| | OR |
For example, to find documents about the Fonts window that deal with underlining or coloring text, you want to find documents that contain the words fonts, window, underline, and color, with “underline” and “color” each grouped with “fonts” and “window.” You can do that with the following search term:
(fonts window underline) | (fonts window color)
Specifying Required Terms
Simpler than a Boolean search term, a required-terms search lets you search for terms that must or must not appear in documents returned as a search result. A required terms search uses the following operators:
+ | Indicates a term that must appear in any document returned. |
- | Indicates a term that must not appear in any document returned. |
For example, entering +window returns all documents containing the word “window,” similar to the behavior you get by simply entering window as a search term. However, if you enter +window -dialog, you get all documents containing the word “window” but not the word “dialog.”
Using Boolean operators to construct the previous search term, you would write:
window & (!dialog)
Using Wildcards
If you are not sure how a particular term appears in the documentation, you can use a wildcard search to include all variations of a search term in the search results. For example, if you are looking for all documentation about buttons in Mac OS X, you probably really want to see all documentation containing either the word “button” or the word “buttons.” Rather than specifying each of these as separate terms, you can simply use the wildcard character to construct the following search term, which returns all documents containing the word “button” or any word with the prefix “button.”
button*
You can use the wildcard character anywhere within a search string. Using a wildcard character at a location other than at the end of a search term may result in longer search times.
Searching API Reference from the Text Editor
There are two ways to search for API reference from the Xcode text editor:
Option–double-click a symbol name.
Select an expression and choose Help > Find Selected Text in API Reference.
Both editor-based API reference search mechanisms bring up the Documentation window and, using the current API reference search criteria, perform an API search of the selected symbol.
Using Documentation Bookmarks
The Documentation window also supports bookmarks, to provide easy access to documentation that you use frequently. Xcode includes a default set of bookmarks, but you can delete any of these default bookmarks or create your own.
To add a bookmark, choose Edit > Add to Bookmarks.
This command bookmarks the page currently open in the content view and adds the bookmark to the Bookmarks list. You can also add a bookmark by dragging the document proxy icon in the Documentation window titlebar to the Bookmarks list.
To open a bookmarked location, select the bookmark in the Bookmarks list. To rename or delete a bookmark, use the bookmark’s shortcut menu.
Using the Research Assistant
The Research Assistant is a lightweight window that provides a condensed view of the API reference for the selected item (a symbol or build setting) without taking your focus away from the editor in which the item is located. This window provides an unobtrusive way to consult API reference without using the Documentation window. However, when you need to delve deeper into the reference, the Documentation window is just a click away.
To display the Research Assistant, choose Help > Show Research Assistant.
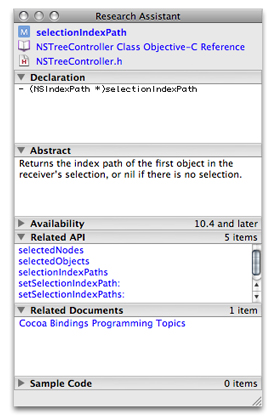
The top part of the Research Assistant (Figure 5-3) contains links to the item’s related reference and header file. The rest of the window is made up of several sections, which you can open or close depending on what information you’re interested in. These sections include the symbols declaration, abstract, availability, related API, related documents, and sample code.
You can use the Research Assistant in the text editor and the build settings editor.
Viewing Man Pages
Online manual (or "man") pages provide reference documentation for BSD and POSIX functions and tools, as well as command-line tools such as xcodebuild. You can find man pages in Xcode in either of the following ways:
Type the name of the tool or function into the search field of the Documentation window. Xcode includes the man page entries for standard C and C++ system calls in its API reference search and includes all man page entries in its full-text search. Note that you must have C language searching enabled to find man pages for system calls using the API reference search.
Choose Help > Open man page.
Use the “man page name” option to display documentation on a command-line tool. You can optionally specify a man page section—for example,
access(5). Use the “search string” option to find commands that are related to a keyword.
Subscribing to Documentation Feeds
Xcode uses documentation sets as the source of the content is displays in the Documentation window. The entities (organizations or individuals) that create documentation sets are known as documentation-set publishers. Apple is one such publisher, but other entities can create and publish their own doc sets. They usually make them available to developers through documentation feeds. A documentation feed is an RSS-style web feed that Xcode can check periodically to determine when a publisher makes available updates to a doc set or releases a new doc set.
If you want Xcode to let you know when a publisher whose doc sets you are interested in releases new content, subscribe to that publisher’s documentation feed. To subscribe to a documentation feed, click the Subscribe button next to the publisher’s (or feed) name in the documentation-set list. When you don’t have any of a publisher’s doc sets installed on your computer, create a subscription by choosing New Subscription from the action menu in the bottom-left corner of the Documentation window. In the dialog that appears, enter the feed’s URL, which you obtain from the publisher.
When a new doc set becomes available, it’s listed under the feed name with a Get button next to it. Click the button to download and install the doc set.
When a new release of a doc set you have on your computer is available, an Update button appears next to the doc set’s name. Click the button to download and install the new version of the doc set.
Note: If you do not subscribe to a documentation feed, Xcode does not notify you of documentation updates the publisher of that feed makes.
Documentation Preferences
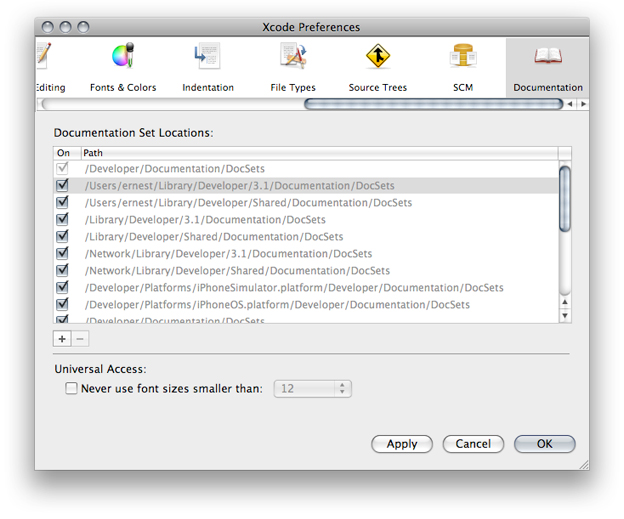
The Documentation pane of Xcode preferences (Figure 5-4) provides options for specifying the location of doc sets in your file system and setting the minimum font size used in the content pane in the Documentation window.
Here’s what the pane contains:
Documentation Set Locations. This list identifies the directories that contain documentation sets. You can customize this list to relocate documentation sets or if you want to share documentation sets between multiple Xcode releases installed on your computer. (You must manually move each doc set to its new location.) Note that for each Xcode release you cannot relocate the Developer Tools Library documentation set.
Universal Access.
“Never use font sizes smaller than”. Specifies the minimum font size to use in the content pane of the Documentation window.
© 2009 Apple Inc. All Rights Reserved. (Last updated: 2009-01-06)