Table of Contents Previous Section

Create the Main component

Now that you have a way to maintain and validate the list of registrants, it's time to create the user interface. Start by creating the Main.wo component in WebObjects Builder.

This Main component is similar to the Main component you created in the GuestBook tutorial. It contains three input fields in which users enter information about themselves. There are two differences between this component and the component used in the GuestBook tutorial: This component contains a WOString dynamic element that displays a message indicating success or failure, and it has multiple submit buttons.

Create the Main component's interface

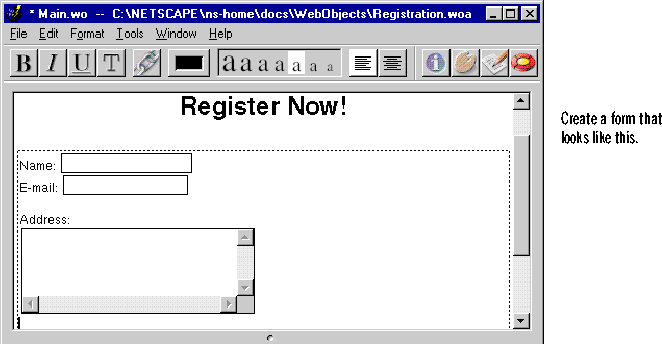
  1. In WebObjects Builder, create a heading in the Main component window with the text "Register Now!"

  2. Create a form with two text fields and a multi-line text element like the one shown below. (See "Creating a Simple WebObjects Application" if you need help with this step.)

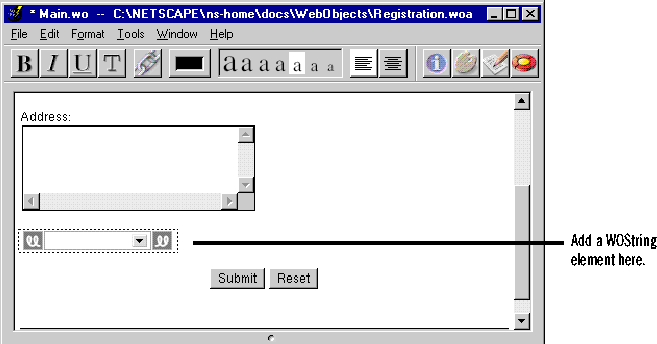
  3. Create space below the multi-line text element, and then drag a WOString from the Abstract Elements palette.

Create a dictionary class

As stated previously, the Registration application is similar to the GuestBook application from the first tutorial in this book. Like GuestBook, Registration keeps a list of people along with information about each person. In GuestBook, you represented the information about a given person as a dictionary, and you'll do the same in Registration. So just like you did with GuestBook, you have to define a dictionary class. You do this at the application level so that the class can be used in all of the application's components.

  1. In WebObjects Builder, go to Registration's application window.

  2. Click the Application tab.

  3. Choose Tools Classes to bring up the Classes window.
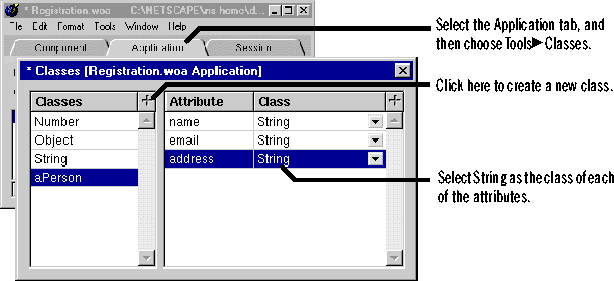
  4. Click the plus sign to create a new class.

  5. Name the class aPerson.

  6. Define three attributes for the aPerson class: name, email, and address.

  7. Set the class for each of these three attributes to be the String class.

  8. Close the Classes window.

Create and bind variables

You have defined all of the component's interface elements. Now you need a way to bind the interface to the component's logic. You do this the same way whether you're using Java or WebScript-you add variables in the object browser and bind them to the component's dynamic elements.

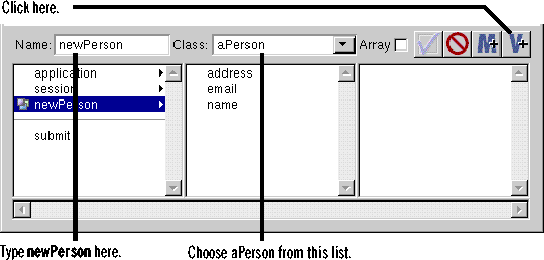
  1. In the Main component window, create a variable of type aPerson. Name the variable newPerson.

    This creates a dictionary variable newPerson that has three attributes: name, email, and address.

  2. Select the text field labeled Name in the top part of the window.

  3. Bind the text field labeled Name to newPerson name by selecting the text field and double-clicking newPerson name.

    Double-clicking binds newPerson name to the Name text field's value attribute.
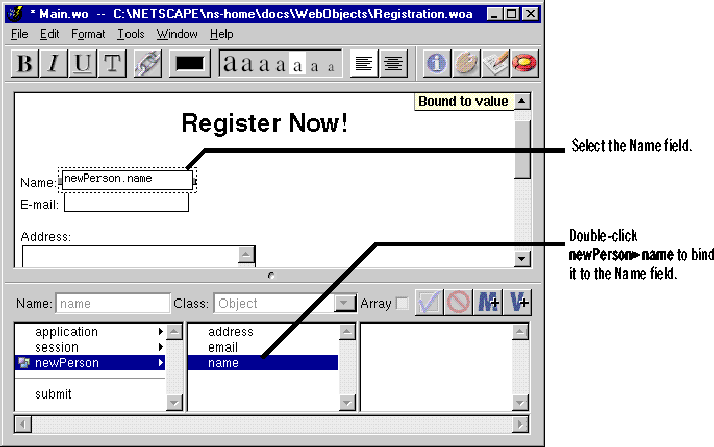
  4. Bind the text field labeled E-mail to newPerson email.

  5. Bind the text area labeled Address to newPerson address.

    Now newPerson is set up to contain the information from the Name, E-mail, and Address fields when the Submit button is clicked.

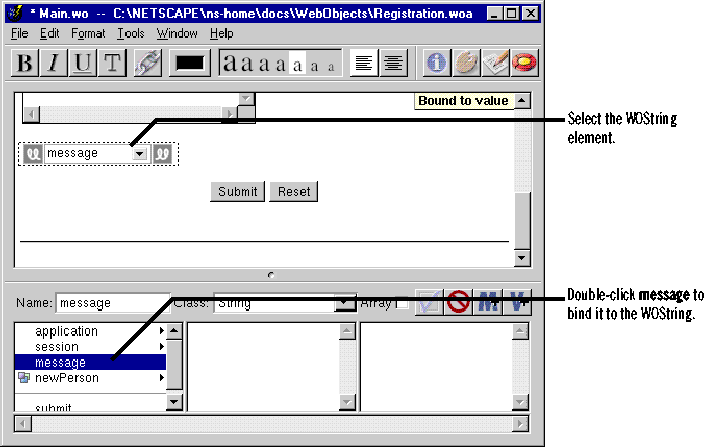
  6. Create another new variable, name it message, and set its class to String.

  7. Bind the WOString element to the message variable.

    This sets up the WOString to display a message indicating success or failure.
Create multiple submit buttons

Now, create the form's buttons. The default form provides two buttons: a reset button and a submit button. You need an additional submit button, and you need to change the names of the existing buttons. You also need to set up the form so that it allows multiple submit buttons.

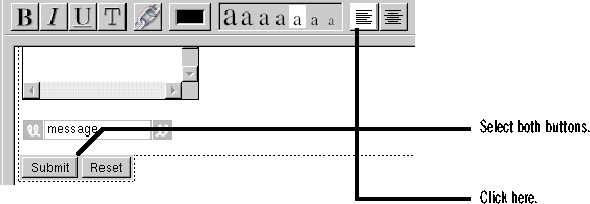
  1. Drag the cursor across the submit and reset buttons to select them. Click the left-align icon in the toolbar so that the buttons are no longer centered on the page.

  2. Select the submit button.

  3. Double-click the word "Submit" inside the button.

  4. Type Register.

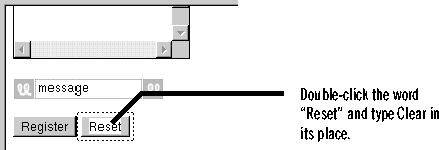
  5. Select the word "Reset" inside the reset button, and type Clear in its place.

  6. Place the cursor after the Clear button, and choose the menu command Format Form Add Submit Button to add another submit button.

  7. Select the word "Submit" inside the new submit button and type Show All Registrants in its place.

  8. Select the entire form by clicking to the right of the String element or the multi-line text element.

  9. Click the inspector button to bring up the inspector panel.

    The inspector panel's icon path contains two icons, one for the page's HTML attributes and one for the form's bindings.
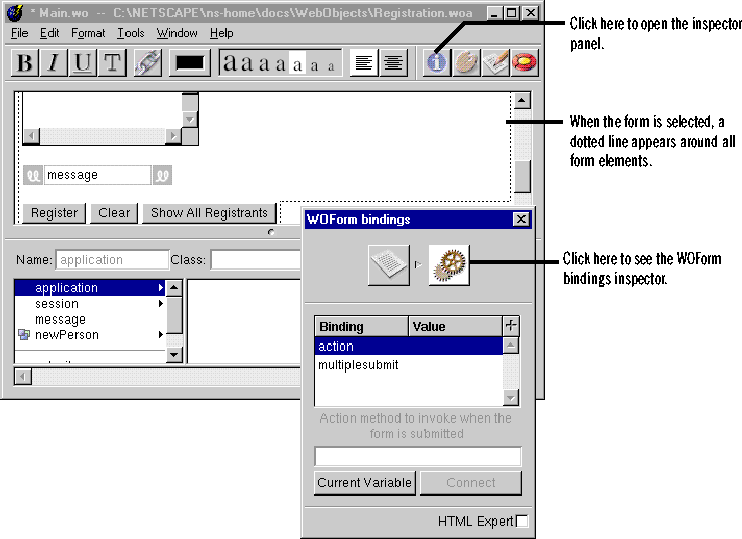
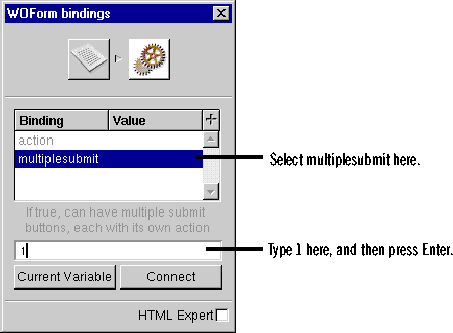
  10. Select the multiplesubmit attribute, type the number 1 in the text field, and press Enter.

    This binds the value 1 (or true) to the WOForm multiplesubmit attribute, enabling multiple submit buttons in the form.

Implement the methods

Now you need to define actions for the submit buttons.

  1. In the Main component window, click the Script button to display the Script window.

    The Script window displays the Main.java file. Main.java defines your component, Main, to be a subclass of Component. Main.java defines two instance variables and two methods. The instance variables are newPerson and message, which you defined earlier using the object browser. The methods are submit and submit_2. These methods were created automatically when you created the submit buttons.

  2. Change the name of the submit method to register and type this as its implementation:
    	public Component register() {
    		Person aPerson = new Person(newPerson);
    		ImmutableHashtable results = 
    			((Application) 
    			application()).manager().registerPerson(aPerson);
    
    		if (((String)results.get("valid")).compareTo("No") == 0)
    			message = ((String)(results.get("failureReason")));
    		else
    			message = "You have been succesfully registered.";
    		return this;
    	}
    

    This method uses the two custom classes that you wrote earlier: Person and RegistrationManager. (Recall that Application's manager method returns the RegistrationManager object.) The Person class's constructor creates an object that represents the current user. RegistrationManager's registerPerson method verifies that the user has provided all necessary information, returning a dictionary that indicates two things: whether the information is valid and if not, the error message that should be displayed. If the information is not valid, the message variable is set to the error message and is displayed by the WOString element. If the information is valid, the message "You have been successfully registered" is displayed.

  3. Change submit_2 to the showRegistrants method shown below:
    	public Component showRegistrants() {
    		Component registrants = 
    			application().pageWithName("Registrants");
    		return registrants;
    	}
    

    showRegistrants returns the second page of the application, the page that displays the list of all who have registered.

  4. Add a constructor for the Main class.
    	public Main() {
    		super();
    		if (newPerson == null) {
    			newPerson = new MutableHashtable();
    		}
    		message = "";
    	}
    

  5. Change newPerson's declaration from Object to MutableHashtable.

    When you created the newPerson variable, you specified that its class was aPerson, which is a dictionary class. The dictionary can be one of two NeXT Java classes: ImmutableHashtable or MutableHashtable. WebObjects Builder isn't able to recognize custom dictionary classes, so it declared the variable as being of type Object rather than type MutableHashtable. The constructor you implemented in the previous step initializes the newPerson variable to be an empty MutableHashtable, so you must make sure that newPerson's declaration matches its initialization.

  6. Save the component and close the Script window.

Bind the submit buttons

Now that you've implement the button actions, you need to bind the buttons to the actions.

  1. In the Main component window, select the Register button and double-click the register method.

    This binds the action attribute of the button to the register method, meaning that when the user clicks Register, the register method is invoked.

  2. Select the Show All Registrants button and double-click the showRegistrants method.

  3. Save the component.
You're through with the Main component, so you can close its window now.

Table of Contents Next Section