User Input
Like other graphical user interfaces, Mac OS X is optimized for use with a pointing device, such as a mouse. Many users, however, prefer or need to interact with the computer using the keyboard instead of the mouse. In Mac OS X, users have the option of enabling keyboard access for all functions available using a point-and-click device.
In this section:
The Mouse and Other Pointing Devices
The Keyboard
Selecting
Editing Text
The Mouse and Other Pointing Devices
In the Macintosh interface, the standard pointing device is the mouse. Users can substitute other devices—such as trackballs and stylus pens—that maintain the behavior of direct manipulation of objects on screen.
Moving the mouse without pressing the mouse button moves the cursor, or pointer. The onscreen cursor can assume different shapes according to the context of the application and the cursor’s position. For example, in a word processor, the cursor takes the I-beam shape while it’s over the text and changes to an arrow when it’s over a tools palette. Change the cursor’s shape only to provide information to the user about changes in the cursor’s function. More information on using cursors correctly can be found in “Cursors”
Just moving the mouse changes only the pointer’s location, and possibly its shape. Pressing the mouse button indicates the intention to do something, and releasing the mouse button completes the action.
These guidelines apply to single-button mice and to the primary button of multi-button mice. Note that users can select which button of a multi-button mouse to designate as the primary button in the Keyboard & Mouse System Preferences.
Clicking
Clicking has two components: pushing down on the mouse button and releasing it without moving the mouse. (If the mouse moves between button down and button up, it’s dragging, not clicking.)
The effect of a click should be immediate and obvious. If the function of the click is to cause an action (such as clicking a button), the selection is made when the button is pressed, and the action takes place when the button is released. For example, if a user presses down the mouse button while the pointer is over an onscreen button, thereby putting the button in a selected state, and then moves the pointer off the button before releasing the mouse button, the onscreen button is not clicked. If the user presses an onscreen button and rolls over another button before releasing the mouse, neither button is clicked.
Double-Clicking
Double-clicking involves a second click that follows immediately after the first click. If the two clicks are close enough to each other in terms of time (as set by the user in Keyboard & Mouse preferences) and location (usually within a couple of points), they constitute a double click.
Double-clicking is most commonly used as a shortcut for other actions, such as pressing Command-O to open a document or dragging to select a word. Because not everyone is physically able to perform a double click, it should never be the only way to perform an action.
Some applications support triple-clicking. For example, in a word processor, the first click sets the insertion point, the second click selects the whole word, and the third click selects the whole sentence or paragraph. Supporting more than three clicks is inadvisable.
Pressing and Holding
Pressing means holding down the mouse button while the mouse remains stationary. Pressing by itself should have no more effect than clicking does, except in well-defined areas such as scroll arrows, where it has the same effect as repeated clicking, or in a Dock tile, where it displays a menu. For example, pressing a Finder icon should select the icon but not open it.
Dragging
Dragging means pressing the mouse button, moving the mouse to a new position, and releasing the mouse button. The uses of dragging include selecting blocks of text, choosing a menu item, selecting a range of objects, moving an icon from one place to another, and shrinking or expanding an object.
Dragging a graphic object should move the entire object (or a transparent representation of it), not just the object’s outline.
Your application can restrict an object from being moved past certain boundaries, such as the edge of a window. If the user drags an object and releases the mouse button outside the boundary, the object stays in the original location. If the user drags the item out of the boundary and then back in before releasing the mouse button, the object moves to the new location. Your application can also automatically scroll a document if the user moves an object beyond the boundary of a window (see “Automatic Scrolling”).
If the user drags a proxy object to an area that would cause that proxy object to disappear, display the poof cursor to indicate that the proxy object will disappear if dragged to that location.
If the user selects an item and begins a drag but releases the item after having moved it three or fewer pixels, the item does not move.
See “Drag and Drop” for more information about dragging and automatic scrolling.
The Keyboard
The keyboard’s primary use is to enter text. The keyboard may also be used for navigation, but it should always be an alternative to using the mouse. For more information about using the keyboard instead of the mouse, see “Keyboard Focus and Navigation”
Important: Avoid assigning any key combinations listed in the tables in this section to commands other than those specified in the tables. Even if your application doesn’t support all the keyboard equivalents shown, don’t assign unused combinations to commands that conflict with those specified in this section.
The Functions of Specific Keys
There are four kinds of keys: character keys, modifier keys, arrow keys, and function keys. A character key sends a character to the computer. When the user holds down a modifier key, it alters the meaning of the character key being pressed or the meaning of a mouse action.
Note: Not all the keys described here exist on all keyboards. Don’t depend on a key as the only way for users to accomplish a task. You cannot assume anything about which keyboard (if any) is connected to a computer.
Character Keys
Character keys include letters, numbers, punctuation, the Space bar, and nonprinting characters—Tab, Enter, Return, Delete (or Backspace), Clear, and Esc (Escape). It is essential that your application use these keys consistently.
Space Bar
In text, pressing the Space bar enters a space between characters.
When full keyboard access is turned on, pressing the Space bar selects the item that currently has the keyboard navigation focus (the equivalent of clicking the mouse button).
Tab
In text-oriented applications, the Tab key moves the insertion point to the next tab stop. In other contexts, Tab is a signal to proceed; it means “move to the next item in a sequence.” The next item can be a table cell or a dialog text field. Shift-Tab navigates in the reverse direction. Pressing Tab can cause data to be entered before focus moves to the next item. For more details about navigating with the Tab key, see “Keyboard Focus and Navigation”
Enter
Most applications add information to a document as soon as the user enters it. In some cases, however, the application may need to wait until a whole collection of information is available before processing it. The Enter key tells the application that the user has finished entering information in a particular area of the document, such as a text field. While the user is entering text into a text document, pressing Enter has no effect.
If a dialog has a default button, pressing Enter (or Return) is the same as clicking it.
Return
In text, the Return key inserts a carriage return (a line break) and moves the insertion point to the beginning of the next line. In arrays, the Return key signals movement to the leftmost field one step lower (like a carriage return on a typewriter). As with Tab, pressing Return can cause data to be entered before focus moves to the next item.
If a dialog has a default button, pressing Return (or Enter) is the same as clicking it.
Delete (or Backspace)
Generally, if an item is selected, pressing Delete (or Backspace) removes the selection without putting it on the Clipboard. If nothing is selected, pressing Delete removes the character preceding the insertion point without putting it on the Clipboard. The Delete key has the same effect as the Delete command in the Edit menu.
Note: The Delete key is different from the Forward Delete (Fwd Del) key (labeled Del), which removes characters following the insertion point. See “Forward Delete (Fwd Del)”
The Option key can be used to extend a deletion to the next semantic unit (such as a word). The Command key can extend a deletion to the next semantic unit beyond that supported by Option. Recommended key combinations for text applications are Command-Delete to delete the previous word and Command–Fwd Del to delete the next word. Option-Delete could delete either the word containing the insertion point or the part of the word to the left of the insertion point, depending on what makes the most sense in your application; Option–Fwd Del could delete the part of the word to the right of the insertion point.
Clear
The Clear key has the same effect as the Delete command in the Edit menu: It removes the selection without putting it on the Clipboard. Not all keyboards have a Clear key, so don’t require its use in your application.
Esc (Escape)
The Esc (Escape) key basically means “let me out of here.” It has specific meanings in certain contexts. The user can press Esc in the following situations:
In a dialog, instead of clicking Cancel
To stop an operation in progress (such as printing), instead of pressing Command-period
To cancel renaming a file or an item in a list
To cancel a drag in progress
Pressing Esc should never cause the user to back out of an operation that would require extensive time or work to reenter. When the user presses Esc during a lengthy operation, display a confirmation dialog to be sure that the key wasn’t pressed accidentally.
Modifier Keys
Modifier keys alter the way other keystrokes or mouse clicks are interpreted. You should use these keys—Shift, Caps Lock, Option, Command, and Control—consistently as described here.
Shift
When pressed at the same time as a character key, the Shift key produces the uppercase alphabetic letter or the upper symbol on the key.
The Shift key is also used with the mouse for extending a selection or for constraining movements in graphics applications. For example, in some applications pressing Shift while using a rectangle tool draws squares.
Caps Lock
When activated, the Caps Lock key has the same effect on alphabetic keys as the Shift key, but it has no effect on nonalphabetic keys. When the Caps Lock key is down, the user must press Shift to type the upper character on a nonalphabetic key.
Option
When used with other keys, the Option key produces special symbols. The Keyboard Viewer, which users can add to the Input menu in the International pane of System Preferences, shows which keys generate each symbol.
The Option key can also be used with the mouse to modify the effect of a click or drag. For example, in some applications pressing Option while dragging an object makes a copy of the object.
Command
On most keyboards, the Command key is labeled with a cloverleaf symbol (![]() ) and an Apple logo (
) and an Apple logo (![]() ). Pressing the Command key at the same time as a character key tells the application to interpret the key as a command rather than a character. It can also be used with the mouse to modify the effect of a click or drag. Key combinations that use the Command key are described in “Keyboard Shortcuts”
). Pressing the Command key at the same time as a character key tells the application to interpret the key as a command rather than a character. It can also be used with the mouse to modify the effect of a click or drag. Key combinations that use the Command key are described in “Keyboard Shortcuts”
Control
The Control key is used to modify the functions of other keys. Combined with a mouse click, it displays contextual menus (see “Contextual Menus”).
Control-F7 temporarily overrides a user’s preference for default navigation or full keyboard navigation in windows and dialogs. For more information, see “Keyboard Focus and Navigation”
Cocoa: In Cocoa applications, the Control key has additional defined behaviors, as described in “Text System Defaults and Key Bindings” in Cocoa Event-Handling Guide in Cocoa Events & Other Input Documentation.
Arrow Keys
Apple keyboards have four arrow keys: Up Arrow, Down Arrow, Left Arrow, and Right Arrow. They can be used alone or in combination with other keys. Keyboard combinations using the arrow keys should be used only for shortcuts for mouse actions. It is never appropriate to implement only a keyboard combination and not provide a mouse-based way to perform the same action.
Appropriate Uses for the Arrow Keys
You can use arrow keys in these ways:
In text, the arrow keys move the insertion point. When used with the Shift key, they extend or shrink the selection. If the user makes a selection and then presses the Right Arrow or Left Arrow key, the selection shrinks to zero length and the insertion point moves to the right or left edge of the selection.
In lists, the arrow keys change the selection.
In a graphics application, the arrow keys can be used to move a selected object the smallest possible increment (one pixel or one grid unit).
In full keyboard access mode, the arrow keys move between values within a control.
Don’t use the arrow keys to:
Move the mouse pointer onscreen
Duplicate the function of the scroll bars
Moving the Insertion Point
When the insertion point moves vertically in a text document, its horizontal position is maintained in terms of screen pixels, not characters (in other words, the insertion point could move from the twenty-fifth character in a line down to the fiftieth character, depending on the font and size). As the insertion point moves from line to line, keep it as close as possible to its original horizontal position, moving it slightly left or right to the nearest character boundary.
The Option and Command keys are used as semantic modifiers with the arrow keys. As a general rule, the Option key increases the size of the semantic unit by 1 compared to the arrow keys alone, and the Command key enlarges the semantic unit again. The application determines what the semantic units are. In a word processor, typically the units are characters, words, lines, paragraphs, and documents. In a spreadsheet, a basic semantic unit could be a cell.
Table 8-1 describes the appropriate behavior of the arrow keys in text documents and fields. In some cases, the behavior describes what happens when the indicated keys are pressed more than once in succession.
Key | Moves insertion point |
|---|---|
One character to the right | |
One character to the left | |
To the line above, to the nearest character boundary at the same horizontal location | |
To the line below, to the nearest character boundary at the same horizontal location | |
To the end of current word, then to the end of the next word | |
Option–Left Arrow | To the beginning of the current word, then to the beginning of the previous word |
Option–Up Arrow | To the beginning of the current paragraph, then to the beginning of the previous paragraph |
Option–Down Arrow | To the end of the current paragraph, then to the end of the next paragraph (not to the blank line after the paragraph, if there is one) |
To the next semantic unit, typically the end of the current line, then the end of the next line | |
To the previous semantic unit, typically the beginning of the current line, then the previous unit | |
Upward in the next semantic unit, typically the beginning of the document | |
Downward in the next semantic unit, typically the end of the document |
Note: For non-Roman script systems, Command–Left Arrow and Command–Right Arrow are reserved for changing the direction of keyboard input.
Extending Text Selection With the Shift and Arrow Keys
Table 8-2 describes how to extend text selection by pressing the Shift key with the arrow keys.
Keys | Extends selection |
|---|---|
Shift–Right Arrow | One character to the right |
Shift–Left Arrow | One character to the left |
Shift–Up Arrow | To the line above, to the nearest character boundary at the same horizontal location |
Shift–Down Arrow | To the line below, to the nearest character boundary at the same horizontal location |
To the end of the current word, then to the end of the next word | |
Shift–Option–Left Arrow | To the beginning of the current word, then to the beginning of the previous word |
Shift–Option–Up Arrow | To the beginning of the current paragraph, then to the beginning of the next paragraph |
Shift–Option–Down Arrow | To the end of the current paragraph, then to the end of the next paragraph (include the blank line between paragraphs in cut, copy, and paste operations) |
To the next semantic unit, typically the end of the current line | |
To the previous semantic unit, typically the beginning of the current line | |
Upward in the next semantic unit, typically the beginning of the document | |
Downward in the next semantic unit, typically the end of the document |
If no text is selected, the extension begins at the insertion point. If text is selected by dragging, then the extension begins at the selection boundary. For example, in the phrase stop time, if the user places the insertion point between the “s” and “t” and then presses Shift–Option–Right Arrow, top is selected. However, if the user double-clicks so the whole word is selected, and then extends the selection left or up, it’s as if the insertion point were before the “s.” If the user extends the selection right or down, it’s as if the insertion point were between the “p” and the space after the word.
Reversing the direction of the selection deselects the appropriate unit. In the previous example, if the word stop is selected and the user presses Shift–Option–Right Arrow, so stop time is selected, and then presses Shift–Option–Left Arrow, time is deselected and stop remains selected.
Moving the Insertion Point in “Empty” Documents
Various text-editing programs treat empty documents in different ways. Some assume that an empty document contains no characters, in which case clicking at the bottom of a blank window causes the insertion point to appear at the top. In this situation, Down Arrow cannot move the insertion point into the blank space because there are no characters there.
Other applications treat an empty document as a page of space characters, in which case clicking at the bottom of a blank window puts the insertion point where the user has clicked and lets the user type characters there, overwriting the spaces. Whichever of these methods you choose for your application, it’s essential that you be consistent throughout.
Function Keys
There are 15 nondedicated function keys on desktop Macintosh keyboards (F1 through F15). Desktop Macintosh keyboards provide the following six dedicated function keys with standard behaviors. Because not all Macintosh computers have all function keys, don’t rely on these keys for critical keyboard shortcuts. For example, portable computers usually have 12 nondedicated function keys (F1 through F12), not 15 and don’t have Help keys or Forward Delete keys.
Help
Pressing the Help key may invoke the application’s help in Help Viewer. The key combination Command-Shift-/ (sometimes shortened to Command-?) should always display the application’s help in Help Viewer.
Forward Delete (Fwd Del)
Pressing the Forward Delete (labeled Del) key deletes the character after the insertion point, shifting everything following the removed character one position back. The effect is that the insertion point remains stationary while it “vacuums” the character or selection ahead of it.
If something is selected when Fwd Del is pressed, it has the same effect as pressing Delete (Backspace) or choosing Delete from the Edit menu.
You can support Option–Fwd Del to delete the next larger semantic unit, as described in “Moving the Insertion Point” but deleting more than one word at a time is inadvisable. Users prefer to select large amounts of text with the mouse so they have more control over what they’re deleting.
Home, End
Pressing the Home key is equivalent to moving the scrollers all the way to the top and to the left. In a text document, for example, pressing Home scrolls to the beginning of the document; in a spreadsheet, it may scroll to the beginning of the spreadsheet or to the beginning of a row. These keys should also work in scrolling lists to display the top or bottom of the list.
End is the opposite of Home: It scrolls to the end of a document.
If the beginning or end of the document is already reached, pressing Home or End produces a system alert sound. Pressing the Home or End key has no effect on the location of the insertion point or selected data.
Page Up, Page Down
Pressing Page Up or Page Down scrolls the document up or down one page. If an entire page can’t be displayed in the window, these keys first scroll incrementally up or down, until the top or bottom of the page is visible, before scrolling to the next page. These keys should also work in scrolling lists.
If the beginning or end of the document is reached, pressing Page Up or Page Down produces a system alert sound. Pressing the Page Up or Page Down key has no effect on the location of the insertion point or selected data.
Keyboard Shortcuts
Keyboard shortcuts are used throughout Mac OS X to provide quick ways for users to initiate certain actions. Many are provided by the operating system to meet both general usability needs and accessibility needs. The operating system therefore reserves certain keys and keyboard combinations for its use. These combinations, listed in Table 8-3 and Table 8-4 affect all applications and should not be used for any other function. Other keyboard shortcuts are used by the Universal Access features in Mac OS X and should be avoided.
In addition to the keyboard shortcuts reserved by the system, there are a large number of keyboard shortcuts that have a well established meaning, such as Command-S for Save and Command-Q for Quit. Users accustomed to running applications in Mac OS X expect these keyboard shortcuts to be available and to mean the same thing in each application they use. An application that overrides these shortcuts, such as one that uses Command-Q for a Query command instead of Quit, runs the risk of unnecessarily confusing and frustrating its users.
These common keyboard shortcuts are not reserved by the system, but they are highly recommended for applications that offer the associated commands. If your application does not offer all of these common commands, be sure you don't override these keyboard shortcuts and associate them with other commands your application does implement. A complete list of both system-reserved and commonly used keyboard shortcuts in Mac OS X is provided in “Keyboard Shortcuts Quick Reference”
You may also define keyboard shortcuts in your application for frequently used commands. Some guidelines on how to create appropriate shortcuts are in “Creating Your Own Keyboard Shortcuts” Other sections of this document list recommended keyboard shortcuts, where appropriate, to help you provide a consistent and familiar user experience in your application.
Reserved Keyboard Shortcuts
Don’t use the keys and key combinations in Table 8-3 for actions other than those listed in the table.
Keys | Action |
|---|---|
Esc | Cancel the current action |
Command-Tab | Activate the most recently used open application |
Command-Shift-Tab | Activate the least recently used open application |
Command-Option-D | Show or hide the Dock |
Command-H | Hide the active application |
Command-Option-H | Hide other applications (all but the active one) |
Command-Shift-Q | Log out |
Command-Shift-Option-Q | Log out without confirmation |
Command-Shift-Option-Control-Q | Force log out without confirmation |
Command–Space bar | Show or hide Spotlight search field |
Command-Option-Esc | Open the Force Quit dialog |
Command-F5 | Turn VoiceOver on or off |
Control-F1 | Turn full keyboard navigation on or off |
Control-F7 | Toggle keyboard navigation in windows and dialogs |
F9 | Tile or untile all open windows |
F10 | Tile or untile all open windows in current application |
F11 | Hide or show all open windows |
F12 | Display or hide Dashboard |
Mac OS X also provides full keyboard access mode, in which users can navigate through windows and dialogs. When this mode is active, other keyboard combinations may be reserved by default. (See Accessibility Overview.)
Important: Your application should not override the implementation of keyboard focus and navigation in Mac OS X. These features provide functionality for users with special needs.
Table 8-4 shows several key combinations that are reserved for use with localized versions of system software, localized keyboards, keyboard layouts, and input methods. These key combinations don’t correspond directly to menu commands.
Keys | Action |
|---|---|
Rotate through enabled script systems | |
Rotate through keyboard layouts and input methods within a script | |
Apple reserved | |
Change keyboard layout to current layout of Roman script | |
Change keyboard layout to current layout of system script |
Creating Your Own Keyboard Shortcuts
Apple may reserve other keyboard shortcuts in the future, so be careful about adding your own. Before you consider creating a keyboard shortcut, be sure to look at the keyboard shortcuts listed in “Keyboard Shortcuts Quick Reference” so you can avoid overriding the shortcuts users already know.
You might also consider examining the keyboard shortcuts used in other applications that target the same user audience your application targets. If your users are likely to be familiar with these other applications, you should try to avoid overriding the shortcuts they're used to using.
You should provide keyboard shortcuts only for frequently used commands, not for every command. Presenting the user with too many keyboard shortcuts can be overwhelming and can make an application's user interface seem difficult to learn.
Use the Command key as the main modifier key for keyboard equivalents. For a command that complements another more common command, you can add Shift. The table below shows some recommended keyboard equivalents using Shift and their relation with the command they complement.
Keys | Command | Complemented command |
|---|---|---|
Command-Shift-A | Deselect All | Command-A (Select All) |
Command-Shift-G | Find Previous | Command-G (Find Again) |
Command-Shift-P | Page Setup | Command-P (Print) |
Command-Shift-S | Save As | Command-S (Save) |
Command-Shift-V | Paste as (Paste as Quotation, for example) | Command-V (Paste) |
Command-Shift-Z | Redo | Command-Z (Undo) |
Note: Command-Shift-Z would be used for Redo only if Undo and Redo are separate commands (rather than toggled using Command-Z).
If there’s a third, less common command that’s related to a pair of commands that use Command and Command-Shift, you can use Command-Option for the third command’s keyboard equivalent. In the example in Table 8-6 Save All could be a dynamic menu item (see “Naming Menu Items”) that appears in place of Save when the user presses the Option key (rather than a separate menu item). Use combinations like these very rarely.
Keys | Command |
|---|---|
Command-S | Save |
Command-Shift-S | Save As |
Command-Option-S | Save All |
Also use Option for a keyboard shortcut that is a convenience or power-user feature. For example, the Finder uses Command-Option-W for Close All Windows and Command-Option-M for Minimize All Windows.
Because the Control key is already used by some of the universal access features as well as in Cocoa text fields where Emacs-style key bindings are often used, it should be used as a modifier key only when necessary.
Remember that other languages may require modifier keys to generate certain characters. For example, on a French keyboard, Option-5 generates the “{“ character. You can safely use the Command key as a modifier, but avoid using Command and an additional modifier with characters not available on all keyboards. If you must use a modifier key in addition to the Command key, try to use it only with the alphabetic characters (a through z).
When adding custom keyboard shortcuts, try to avoid shortcuts that add a modifier key (such as Option or Shift) to an existing shortcut if the shortcuts have an unrelated function. For example, don’t use Shift-Command-Z as a keyboard shortcut for a command that is unrelated to Undo. Using that shortcut for Redo is appropriate, but using it for something like Calculate or Check Mail is confusing. If you can’t find a unique and easy-to-use keyboard shortcut for a command, don’t use one at all; keep in mind that users may have difficulty pressing multiple modifier keys anyway.
User-Defined Keyboard Shortcuts
Users may modify your application’s keyboard shortcuts and some of the system in Keyboard & Mouse preferences. Even though users can remap keyboard shortcuts, you should adhere to the shortcuts recommended throughout this document. Doing so provides a more consistent user experience. See “Keyboard Shortcuts Quick Reference” for a list of all the reserved and recommended combinations.
Keyboard Focus and Navigation
In default keyboard access mode,focus moves only between fields that receive keyboard input. Mac OS X also provides the option of full keyboard access mode, in which users can navigate through windows and dialogs. This section discusses the default keyboard access mode. For information on the full keyboard access mode, see Accessibility Overview.
When using the mouse is undesirable, difficult, or impossible, users can use the keyboard to move the onscreen focus (highlight) to text entry fields, list boxes that support type-ahead, scrolling lists, column views, and list views. In Roman systems, focus always begins at the first field that accepts keyboard input and follows a reading path from upper left to bottom right.
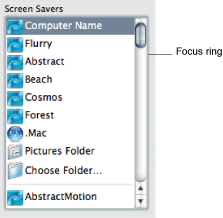
Focus is indicated with a ring in the appearance color (Aqua or Graphite) as shown in Figure 8-1 and Figure 8-2

In list and column views, selected items should be highlighted to the full column width or row height. In column view, the selected item has a dark highlight and the parent item has a lighter highlight. When a window becomes inactive, all selections inside it should become the lighter highlight color.

Pressing the Tab key navigates between controls. Shift-Tab navigates in the reverse direction. The arrow keys provide navigation within controls. In list views, the Right Arrow and Left Arrow keys open and close disclosure triangles.
Type-Ahead and Key-Repeat
When the user types faster than the computer can handle or when the computer is unable to process the keystrokes, the keystrokes are queued for later processing. This queuing is called type-ahead. There is a limit (varying with the computer) to the number of keystrokes that can be queued, but it’s usually not reached unless the user types while the application is performing a lengthy operation.
When a character key is held down for a certain amount of time, it starts repeating automatically. The user can make adjustments to this feature, called key-repeat, in Keyboard & Mouse preferences.
An application can tell whether keystrokes are generated by key-repeat or by the same key being pressed numerous times. Your application can disregard key-repeat keystrokes; it should ignore them in keyboard shortcuts that begin with the Command key.
Key-repeat works only when the application is ready to accept keyboard input; it does not function during type-ahead.
Selecting
Before performing an operation on an object, the user must select it to distinguish it from other objects. There is always immediate visual feedback to show that something is selected.
Selecting an object never alters the object itself, and a selection is always undoable by clicking outside the selection.
How something is selected depends on what it is. It’s useful to distinguish among three types of objects that are each dealt with in a different way when selected:
Text. An application considers all text appearing together in a particular context as a block of text—a one-dimensional string of characters. A block of text can range from a single field, as in a dialog, to an entire document, as in a word processor. Regardless of where it appears, text is edited in the same way.
Arrays of fields. A one-dimensional array of fields is a list and a two-dimensional array is a table. Each field contains information such as text or graphics.
Graphics. For the purposes of this discussion, a graphic, or picture, is a discrete object that can be selected individually.
The following sections discuss the general methods of selecting and the specific methods that apply to text, arrays, and graphics.
Selection Methods
This section describes selection techniques.
Selection by Clicking
The most straightforward method of selecting an object is by clicking it once. Icons, for example, are selected in this way in the Finder.

Selection by Dragging
The user can select a range of some objects by following this procedure:
The user positions the pointer at one corner of the range and presses the mouse button. This position is called the anchor point of the range.
Without releasing the mouse button, the user moves the pointer in any direction.
As the pointer moves, visual feedback indicates the objects that would be selected if the mouse button is released. For text and arrays, the selected area is continuously highlighted. For graphics, a dotted rectangle expands or contracts to show the selected area. If appropriate, the view should scroll to allow extending the selection beyond a window.
When the desired range is selected, the user releases the mouse button. The point at which the button is released is called the active end of the range.

Changing a Selection
A user can extend a selection by holding down the Shift key and clicking the mouse button. This action is called Shift-clicking.
In text, if the user Shift-clicks within an already selected range, the new range is smaller than the old range.
In an array, a Shift-click can extend the selected range or it can move the selection from the current cell to wherever the user Shift-clicks.
There are two models for extending a continuous selection using Shift-click. In the addition model, new text is added to a current selection. In the fixed-point model, the user can extend the selection on either side of the insertion point. Figure 8-6 illustrates the results of consecutive steps in both models.
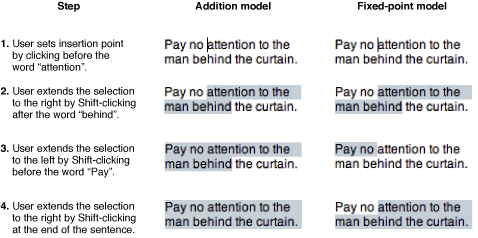
When considering which model to use in your application, keep in mind that the addition model provides more flexibility by allowing users to extend a selection in both directions.
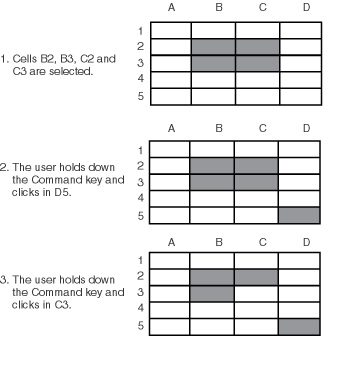
A Shift-click should result in a continuous selection—the selection is extended to include everything between the old anchor point and the new active end. A Command-click should result in a discontinuous selection. With discontinuous selection, in which the user can extend a selection by adding nonadjacent objects to already selected objects, the objects between the current selection and the new object are not included in the selection.

In arrays and text in which a Shift-click extends a continuous selection, the user can make discontinuous selections by holding down the Command key and clicking. Each Command-click adds the new object to the existing selection. If one of the objects selected with Command-click is already within an existing part of the selection, then it is removed from the selection instead of being added.
Not all applications support discontinuous selections, and those that do might restrict the operations a user can perform on them. For example, a word processor might allow the user to choose a font after making a discontinuous selection, but not allow the user to type replacement characters, because it wouldn’t be obvious which part of the selection the characters would replace.
Selections in Text
A block of text is a string of characters. A text selection is a substring of this string, which has any length from zero characters to the whole block.
The insertion point (a zero-length text selection) shows where text will be inserted when the user starts typing, or where the contents of the Clipboard will be pasted. The user establishes the location of the insertion point by clicking somewhere in the text; the insertion point appears at the nearest character boundary. If the user clicks anywhere to the right of the last character on a line, the insertion point appears immediately after the last character. If the user clicks to the left of the first character on a line, the insertion point appears immediately before the first character.
Selected text in a window is highlighted with the color chosen by the user in Appearance preferences. When the window becomes inactive, the text should remain highlighted, but in the secondary color, which is a percentage of the original highlight color. Both Carbon and Cocoa provide a way to return the current highlight color, as well as other important colors in the user interface. Your application should use these defined colors in any custom controls you create, rather than hard-coding specific color values.
Selecting With the Mouse
The user can select a range of text by dragging. A range can consist of characters, words, lines, or paragraphs, as defined by the application.
In text fields, clicking should perform the following actions:
Single-clicking places the insertion point at the pointer’s location in the text.
Double-clicking within a word selects the word. The selection should provide “smart” behavior; if the user deletes the selected word, for example, the space after the word should also be deleted.
Double-clicking in a space selects the space.
Triple-clicking selects the next logical unit, as defined by the application. In a word-processing document, triple-clicking in a word selects the paragraph containing the word.
What Constitutes a Word
The following definition of a word applies in the United States, Canada, and some other countries. In many countries, the definition differs to reflect local formats for numbers, dates, and currency. Double-clicking a character not in the list below results in the selection of only that character.
A word is defined as any continuous string that contains any of the following characters:
A letter
A digit
A nonbreaking space (Option–Space bar or Command–Space bar)
A currency symbol ($, ¢, £, ¥)
A percent sign
A comma between digits
A period before a digit
An apostrophe between letters or digits
A hyphen, but not an en dash (Option–hyphen) or em dash (Shift–Option–hyphen)
These are examples of words:
$123,456.78
shouldn’t
3 1/2 (with a nonbreaking space)
0.5%
These are examples of strings treated as more than one word:
7/10/6
Blue cheese (with a regular space)
“Wow!” (The quotation marks and exclamation point are not part of the word.)
In some contexts—in a programming language, for example—it may be appropriate to allow users to select both the left and right parentheses (or braces or brackets) in a pair, as well as all the characters between them, by double-clicking either one of them. That would mean that a user could select the entire expression
[x+y–(4*3)^(n–1)]
by double-clicking [ or ].
Selecting Text With the Arrow Keys
See “Extending Text Selection With the Shift and Arrow Keys”
Selections in Spreadsheets
To select a single field (cell), the user clicks in it. The user can also select a field by moving to it with the Tab or Return key.
To select part of the contents of a field, the user must first select the field, then click again to select a part.
A user should be able to quickly select a row or column in a table—for example, clicking a column heading should select the column. Tables can also support Command-click for selecting discontinuous fields.
Pressing the Tab key cycles through the fields in an order determined by your application, and Shift-Tab navigates in the opposite direction. Typically, the sequence is from left to right, then from top to bottom. Pressing Tab from the last field selects the first field.
If the concept of rows doesn’t make sense in a particular context, the Return key should have the same effect as the Tab key.
Selections in Graphics
There are several conventions for selecting graphic objects. This section describes two ways to show selection feedback; other situations may require other solutions.
An object-based graphics document is a collection of individual graphic objects. To select an object, the user clicks it once. The object is then bracketed with handles, which the user can use to move or resize the object.
In object-based graphics documents, users can select with the mouse alone or a combination of the mouse and the keyboard. A user can drag a dotted rectangle and select every object that is included, even partially, within the rectangle’s outline. The user can also select an initial object and then use Shift-click or Command-click to select other objects. If the objects have a defined order, Shift-click should result in a continuous selection and Command-click should provide a discontinuous selection. If the order is not defined, then both actions result in a discontinuous selection. Examples of continuous and discontinuous selections are shown in “Selection Methods”
In a bitmap-based graphics document—in which images are a series of pixels rather than discrete objects—a user selects the range of pixels enclosed within a selection tool.
Editing Text
In addition to the methods for selecting text, there are a number of standard ways to edit text.
Inserting Text
To insert text, the user positions the insertion point by clicking where the text is to go, then starts typing. The application moves the insertion point to the right (or left, depending on the language) as each new character is added.
Applications with multiple-line text blocks should support word wrap, the automatic continuation of text from the end of one line to the beginning of the next without breaking in the middle of a word.
Deleting Text
When the user presses the Delete (or Backspace) key, one of two things happens:
If text is selected, the entire selection is deleted.
If there is no current selection, the character preceding the insertion point is deleted.
In either case, the insertion point replaces the deleted character or characters in the document. The deleted characters don’t go on to the Clipboard, but the user can undo the deletion by immediately choosing Undo from the Edit menu.
You can also implement the keyboard combination Option-Delete (or Option-Backspace) to delete the word that currently contains the insertion point or to delete the part of the word to the left of the insertion point. Be sure to document this behavior if you implement it.
If a keyboard has a Forward Delete (Fwd Del) key, the character following the insertion point is deleted each time the user presses the key.
Replacing a Selection
If the user starts typing when one or more characters are selected, the typed characters replace the selection. The deleted characters don’t go on to the Clipboard, but the user can undo the replacement by immediately choosing Undo from the Edit menu.
Intelligent Cut and Paste
Intelligent cut and paste is a set of editing features that take into account the need for spaces between words. To understand why this feature is helpful, consider the following sequence of events in a text application without intelligent cut and paste:
A sentence in the user’s document reads
Returns are only accepted if the merchandise is damaged.
The user wants to change this to
Returns are accepted only if the merchandise is damaged.
The user selects the word only by double-clicking. The letters are highlighted, but neither adjacent space is selected.
The user chooses Cut from the Edit menu, clicks just before the word if, and chooses Paste.
The sentence now reads
Returns are
 accepted onlyif the merchandise is damaged.
To correct the sentence, the user has to remove the extra space between are and accepted, and add a space between only and if.
If your application supports intelligent cut and paste, follow these guidelines:
If the user selects a word or a range of words, the selection itself is highlighted, but spaces adjacent to the selection are not highlighted.
When the user chooses Cut, if the character preceding the selection is a space, cut that space along with the selection. If the character preceding the selection is not a space, but the character following the selection is a space, cut that space along with the selection.
When the user chooses Paste, if the character to the left or right of the current selection is part of a word (but not inside a word), insert a space before pasting.
Use intelligent cut and paste only if the application supports the definition of a word as described in “What Constitutes a Word” These rules apply to any selection consisting of one or more whole words, no matter how the user made the selection.
Note: Intelligent cut and paste doesn’t apply to all languages. Thai, Chinese, and Japanese, for example, don’t contain spaces.
Editing Text Fields
If your application isn’t primarily a text application, but it has text entry fields in dialogs, for example, you may not need to provide the full text-editing features described in this section. Ideally, an application that includes text editing should support the following features:
The user can select the whole field and type in a new value, delete text, select a substring of the field and replace it, and select a word by double-clicking.
The user can choose Undo, Cut, Copy, Paste, and Delete, as described in “The Edit Menu”
The application performs appropriate edit checks. For example, if the only legitimate value for a field is a string of digits, the application should alert the user if any nondigits are typed. For a more complete discussion of when to check for errors and apply changes in text fields, see “Accepting Changes”
When possible, support automatically filling in text fields as users type. You might fill in a field with frequently typed information or information from a history list. If you do this, indicate what you are automatically filling in, perhaps by highlighting it, so it is clear what the user has typed and what information your application is providing.
If your application requires specific pieces of information from the user, you might assume that you should display an asterisk or custom icon next to each required text field and selection control. Doing so, however, can make your user interface appear cluttered and unappealing. To avoid this, begin by designing your user interface so that it’s easy for the user to comply with your requests. Then, if the user forgets to fill in a specific text field, you can display an asterisk or custom icon next to that field to draw attention to it. For example, if your application requires information to set up a service, make choices easy for the user by ensuring that radio buttons, pop-up menus, and other selection controls do not allow an empty selection. For text fields, wait until the user attempts to leave the current context (for example, by clicking Continue or OK), then display the “required” icon next to fields that are still empty. For some further guidelines on providing a good setup experience for your users, see “Setup Assistants”
Entering Passwords
When a user types a password into a text field, each typed character should appear as a bullet, matching the number of characters typed by the user. If the user deletes a character with the Delete key, one bullet is deleted from the text field and the insertion point moves back one bullet, as if the bullet represented an actual character. Double-clicking bulleted text in a password field selects all the bullets in the text field.
When the user leaves the text field (by pressing Tab, for example), the number of bullets in the text field should be modified so that the field does not reflect the actual number of characters in the password.
© 1992, 2001-2003, 2008 Apple Inc. All Rights Reserved. (Last updated: 2008-06-09)