Basics of the Final Cut Pro XML Interchange Format
This chapter provides an introduction to the basic features of the Final Cut Pro XML Interchange Format. In particular, it explains how the interchange format can encode a clip, a sequence, a project, and an effect.
For examples of applying the interchange format to specific tasks, see “Applications of the Interchange Format”
For reference documentation about the elements of the interchange format, see “Elements of the Interchange Format”
For information about the various versions of the interchange format, see “Versions of the Interchange Format”
This chapter contains the following sections:
“Special Conventions” introduces the inheritance and
idconventions of the interchange format.“Encoding a Clip” shows how to encode a clip.
“Encoding a Sequence” details encoding a sequence.
“Encoding a Project” explains the requirements for encoding a project.
“Encoding Effects” looks at encoding effects.
“Managing Project Components” explains how to swap new components into a project.
“Managing QuickTime Metadata” discusses QuickTime metadata in Final Cut Pro.
“Notes on the XML Interchange Format” provides information about some important details on the interchange format.
Special Conventions
The Final Cut Pro XML Interchange Format uses a set of special conventions beyond the base conventions of XML that affect how a document is parsed and translated when you import it into Final Cut Pro. These conventions—inheritance and the id attribute— make it possible to efficiently construct more concise interchange format documents.
Note: Interchange format documents you export from Final Cut Pro only use these conventions in certain circumstances.
Inheritance
Information for various components of a project is frequently redundant. For example, a sequence and its contents usually have the same frame rate; most clips share the same source media file across multiple tracks; multiple clips in a batch list are likely share the same Reel/Tape identifier, and so on.
You can explicitly encode all the information for each component in a project. Alternatively, you can use the inheritance convention of the Final Cut Pro XML Interchange Format with certain elements to encode shared information just once. For example, you can encode a sequence and specify a frame rate of 29.97 fps for the sequence. Clips that are subelements of this sequence inherit this frame rate unless you specifically encode a different rate for a particular clip.
An example of the inheritance convention appears in Listing 3-4
The id Attribute
The id attribute lets you share information between certain "peer" elements—elements that are not in an element/subelement relationship with each other. If an element provides an id attribute, Final Cut Pro registers this element in a reference table during import and translation. Then, during subsequent translation, other elements can reference this registered information.
For example, the clip information for a video track in a sequence may be identical to the clip information in an audio track in the same sequence. Rather than repeating this information for both tracks, you can encode it once and then reference the information using the id attribute.
Note: Not all elements support the use of the id attribute. See “Elements of the Interchange Format” for information about the id attribute for specific elements.
An example of the id convention appears in Listing 3-14
Encoding a Clip
A clip represents a virtual piece of time-based media. A clip element has three required subelements: name, duration, and rate. (When a clip appears in a sequence, you also need to specify start and end subelements.) Listing 3-1 shows an example of a minimum clip:
Listing 3-1 A minimum clip
<?xml version="1.0" encoding="UTF-8"?>// 1 |
<!DOCTYPE xmeml>// 2 |
<xmeml version="4">// 3 |
<clip> |
<name>Jeremy Solo</name> |
<duration>188</duration>// 4 |
<rate>// 5 |
<ntsc>TRUE</ntsc> |
<timebase>30</timebase> |
</rate> |
</clip> |
</xmeml> |
Note: The Final Cut Pro application uses the internal name xmeml for the Final Cut Pro XML Interchange Format.
Lines numbered 1 and 2 are the prolog section. Line numbered 1 declares the version of XML and the text encoding; line numbered 2 the document type. Line numbered 3 is the start tag for the root element xmeml that contains all the other elements in an interchange format document. The version attribute in this start tag specifies the version of the Final Cut Pro XML Interchange Format.
At line numbered 4, the duration element encodes the total number of frames in the clip. This value does not change even if you set In and Out points for the clip using the in and out elements. (It is the equivalent of the Length timing property, rather than the Duration property.)
At line numbered 5, the rate element defines the frame rate for the clip—in this case, an NTSC clip with a frame rate of 29.97 fps. Note that this frame rate is specified using the ntsc subelement, which takes a Boolean value, and the timebase subelement, which takes an integer value (30). The NTSC frame rate variant is defined as a 0.01 percent reduction in frame rate. The actual mathematical value of this variant is 29.970029970029... (repeating). The decimal 29.97 is not an accurate representation of this number. Using an interger and an NTSC indicator flag allows any application to process the rate information in its own manner. See Table B-1 for a complete listing of the possible settings for timebase and ntsc.
Listing 3-2 shows a clip with more information, including In and Out points, master clip, logging, label, and comment information.
Listing 3-2 A clip with additional information
<?xml version="1.0" encoding="UTF-8"?> |
<!DOCTYPE xmeml> |
<xmeml version="4"> |
<clip id="Jeremy Solo"> |
<name>Jeremy Solo</name> |
<duration>188</duration> |
<rate> |
<ntsc>TRUE</ntsc> |
<timebase>30</timebase> |
</rate> |
<in>14</in> |
<out>149</out> |
<masterclipid>Jeremy Solo</masterclipid>// 1 |
<ismasterclip>TRUE</ismasterclip>// 2 |
<logginginfo> |
<description>solo male</description> |
<scene>ballroom</scene> |
<shottake>Shot1/Take1</shottake> |
<lognote>LogNote1</lognote> |
<good>TRUE</good> |
</logginginfo> |
<filmdata> . . . </filmdata> |
<labels> |
<label>Good Take</label> |
<label2>Label 2 (1)</label2> |
</labels> |
<comments> |
<mastercomment1>MC1</mastercomment1> |
<mastercomment2>MC2</mastercomment2> |
<mastercomment3>MC3</mastercomment3> |
<mastercomment4>MC4</mastercomment4> |
<clipcommenta>CommentA</clipcommenta> |
<clipcommentb>CommentB</clipcommentb> |
</comments> |
</clip> |
</xmeml> |
At line numbered 1, the masterclipid element provides a reference to the master clip’s clip id attribute. (As in this example, a master clip lists its own clip id attribute.)
At line numbered 2, the ismasterclip element indicates whether or not a clip is a master clip. (In this case, it is.)
For details about the other elements in this listing, see the reference information in “Elements of the Interchange Format” Check the index to locate a particular element.
Associating Media With a Clip
To associate media with a clip, you use the file element. Listing 3-3 shows a clip associated with a media file.
Listing 3-3 A clip with associated media
<?xml version="1.0" encoding="UTF-8"?> |
<!DOCTYPE xmeml> |
<xmeml version="4"> |
<clip id ="Jeremy Solo"> |
<name>Jeremy Solo</name> |
<duration>188</duration> |
<rate> |
<ntsc>TRUE</ntsc> |
<timebase>30</timebase> |
</rate> |
<file id="Jeremy Solo1"> |
<name>Jeremy Solo1</name> |
<pathurl>file://localhost/Jeremy%20Solo</pathurl>// 1 |
<rate>// 2 |
<timebase>30</timebase> |
<ntsc>TRUE</ntsc> |
</rate> |
<duration>188</duration>// 3 |
</file> |
</clip> |
</xmeml> |
At line numbered 1, the pathurl element specifies the location of the media. Note that the name of the file includes a space, which is encoded by the escape character (%) and the hexadecimal value for the space character (20). See“pathurl” for more details.
At lines numbered 2 and 3, the rate and duration subelements are required for the file element. However, because they are specified earlier in the document by the parent element, the file element can inherit this information . Listing 3-4 shows how this works.
Listing 3-4 A clip using inheritance
<?xml version="1.0" encoding="UTF-8"?> |
<!DOCTYPE xmeml> |
<xmeml version="4"> |
<clip id ="Jeremy Solo"> |
<name>Jeremy Solo</name> |
<duration>188</duration> |
<rate> |
<ntsc>TRUE</ntsc> |
<timebase>30</timebase> |
</rate> |
<file id="Jeremy Solo1"> |
<name>Jeremy Solo1</name> |
<pathurl>file://localhost/Jeremy%20Solo</pathurl> |
</file> |
</clip> |
</xmeml> |
Note: Some subelements may be inherited, others may not. “Elements of the Interchange Format” indicates if a subelement can be inheritied or not.
The file element can also have optional subelements: timecode and media. Listing 3-5 is an example.
Listing 3-5 A clip with timecode and media
<?xml version="1.0" encoding="UTF-8"?> |
<!DOCTYPE xmeml> |
<xmeml version="4"> |
<clip id ="Jeremy Solo"> |
<name>Jeremy Solo</name> |
<duration>188</duration> |
<rate> |
<ntsc>TRUE</ntsc> |
<timebase>30</timebase> |
</rate> |
<file id="Jeremy Solo1"> |
<name>Jeremy Solo1</name> |
<pathurl>file://localhost/Jeremy%20Solo</pathurl> |
<timecode>// 1 |
<string>02:42:35;14</string> |
<frame>292372</frame> |
<displayformat>DF</displayformat> |
<source>source</source> |
<reel> |
<name>002</name> |
</reel> |
</timecode> |
<media>// 2 |
<video> |
<duration>188</duration> |
<samplecharacteristics> |
<width>720</width> |
<height>480</height> |
</samplecharacteristics> |
</video> |
</media> |
</file> |
</clip> |
</xmeml> |
At line numbered 1, the timecode element encodes the media starting point. It includes the subelements string, which specifies the starting timecode in SMPTE format; frame, which specifies the starting frame count; and displayformat, which specifies drop frame or non-drop frame format. Note that either the element string, or the elements frame and format are required, but not all three. Other subelements include source, which categorizes the timecode as a source timecode from the tape, and reel.
At line numbered 2, the media element encodes information about the media, including the height and width in pixels.
Encoding Audio Information
Media can also include audio tracks. You use the audio element to specify information about these tracks, as seen in Listing 3-6 .
Listing 3-6 Encoding audio information
<file> |
<name>myFile.mov</name> |
<pathurl> file://localhost/myFile.mov</pathurl> |
<rate> |
<timebase>24</timebase> |
<ntsc>TRUE</ntsc> |
</rate> |
<duration>3671</duration> |
<media> |
<video>...</video> |
<audio>// 1 |
<samplecharacteristics> |
<samplerate>48000</samplerate> |
<depth>16</depth> |
</samplecharacteristics> |
<layout>stereo</layout> |
<channelcount>2</channelcount> |
<audiochannel> |
<channellabel>right</channellabel> |
</audiochannel> |
<audiochannel> |
<channellabel>left</channellabel> |
</audiochannel> |
</audio> |
<audio>// 2 |
<samplecharacteristics> |
<samplerate>48000</samplerate> |
<depth>16</depth> |
</samplecharacteristics> |
<channelcount>2</channelcount> |
</audio> |
</media> |
</file> |
At line numbered 1, the first stereo audio track is encoded. It has two channels. The first channel is specified as the right channel, the second as the left channel. (This is the reverse of the default settings.)
At line numbered 2, the second audio track in the media is encoded. When layout is not specified, stereo is assumed
See “Elements of the Interchange Format” for more information about the subelements used to encode audio information.
Exporting a Clip from the Browser
When you export a single clip from the Browser, the resulting listing includes the media element with track information. Listing 3-7 shows excerpts from such an export.
Listing 3-7 An exported Browser clip
<?xml version="1.0" encoding="UTF-8"?> |
<!DOCTYPE xmeml> |
<xmeml version="4"> |
<clip id="Jeremy Solo"> |
<uuid>970C270C-8692-4E6A-A58C-F378CC3EB776</uuid>// 1 |
<updatebehavior>add</updatebehavior> |
<name>Jeremy Solo</name> |
<duration>188</duration> |
<rate> |
<ntsc>TRUE</ntsc> |
<timebase>30</timebase> |
</rate> |
<in>14</in>// 2 |
<out>149</out> |
<masterclipid>Jeremy Solo</masterclipid> |
<logginginfo> |
<good>FALSE</good> |
</logginginfo> |
<media> |
<video>// 3 |
<track>// 4 |
<clipitem>// 5 |
<name>Jeremy Solo</name> |
<duration>188</duration> |
<rate> |
<ntsc>TRUE</ntsc> |
<timebase>30</timebase> |
</rate> |
<enabled>TRUE</enabled> |
<anamorphic>FALSE</anamorphic> |
<alphatype>none</alphatype> |
<file id="Jeremy Solo1"> |
. . . |
</file> |
<sourcetrack> |
<mediatype>video</mediatype> |
</sourcetrack> |
</clipitem> |
<enabled>TRUE</enabled> |
<locked>FALSE</locked> |
</track> |
</video> |
</media> |
</clip> |
</xmeml> |
At line numbered 1, the uuid element and the updatebehavior element in the next line let you manage project components. See “Managing Project Components” You can also use updatebehavior to manage QuickTime metadata. See “Managing QuickTime Metadata”
At line numbered 3, the video element identifies the type of media.
At line numbered 4, the track element starts the encoding for the first (and only) track in the media.
At line numbered 5, the clipitem element encodes information that is specific to the associated media.
Encoding a Subclip
You could use the clip encoded in Listing 3-7 to generate a subclip. Listing 3-8 shows the results (with some details omitted).
Listing 3-8 A subclip
<?xml version="1.0" encoding="UTF-8"?> |
<!DOCTYPE xmeml> |
<xmeml version="4"> |
<clip id="Jeremy Solo Subclip"> |
<name>Jeremy Solo Subclip</name> |
<duration>135</duration>// 1 |
<rate> |
<ntsc>TRUE</ntsc> |
<timebase>30</timebase> |
</rate> |
<in>-1</in>// 2 |
<out>-1</out> |
<masterclipid>Jeremy Solo Subclip</masterclipid> |
. . . |
<media> |
<video> |
<track> |
<clipitem> |
<name>Jeremy Solo Subclip</name> |
<duration>135</duration> |
. . . |
<in>0</in> |
<out>135</out> |
<start>0</start> |
<end>135</end> |
<subclipinfo>// 3 |
<startoffset>14</startoffset> |
<endoffset>39</endoffset> |
</subclipinfo> |
. . . |
<file id="Jeremy Solo"> |
. . . |
<media> |
<video> |
<duration>188</duration>// 4 |
<samplecharacteristics> |
<width>720</width> |
<height>480</height> |
</samplecharacteristics> |
</video> |
</media> |
</file> |
<sourcetrack> |
<mediatype>video</mediatype> |
</sourcetrack> |
</clipitem> |
<enabled>TRUE</enabled> |
<locked>FALSE</locked> |
</track> |
</video> |
</media> |
</clip> |
</xmeml> |
At line numbered 1, the duration of the subclip is 135.
At line numbered 2, the values for in and out are –1, indicating that no In and Out points are set.
At line numbered 3, the subclipinfo element indicates the starting offset and ending offset for the subclip. These values are offsets in frames from the media start and media end of the associated media file, calculated using the in and out points for the clip from which the subclip was generated. (See Listing 3-7 line numbered 1.)
At line numbered 4, the value for the duration element for the media associated with the subclip remains at 188, compared to the value of 135 at line numbered 2.
Encoding a Multiclip
Multiclips let you group multiple camera angle clips together and switch or cut between angles in real time. You can also make a multiclip with multiple audio tracks. A video multiclip is represented by Listing 3-9
Listing 3-9 A video multiclip
<clip id="Billiards1"> |
<name>Billiards1</name> |
<duration>2700</duration> |
<rate> |
<ntsc>TRUE</ntsc> |
<timebase>30</timebase> |
</rate> |
<in>-1</in> |
<out>-1</out> |
<ismasterclip>FALSE</ismasterclip> |
<media> |
<video> |
<track> |
<clipitem> |
<name>Billiards1</name> |
<duration>2700</duration> |
. . . |
<multiclip id="Multiclip 1 ">// 1 |
<name>Multiclip 1</name> |
<collapsed>FALSE</collapsed> |
<synctype>1</synctype> |
<angle>// 2 |
<activevideoangle>TRUE</activevideoangle> |
<activeaudioangle>TRUE</activeaudioangle> |
<clip id="Billards1"/> |
</angle> |
<angle> |
<clip id="Billiards2"> |
<name>Billiards2</name> |
<duration>2700</duration> |
. . . |
<defaultangle>2</defaultangle>// 3 |
</clip> |
</angle> |
<angle> |
<clip id="Billiards3"> |
<name>Billards3</name> |
<duration>2700</duration> |
. . . |
<defaultangle>3</defaultangle> |
</clip> |
</angle> |
</multiclip> |
<mediadelay>900</mediadelay>// 4 |
</clipitem> |
<enabled>TRUE</enabled> |
<locked>FALSE</locked> |
</track> |
</video> |
</media> |
</clip> |
At line numbered 1, the multiclip element is a subelement of clipitem. It has two required subelements: name and angle. Other subelements include collapsed, which indicates if the multiclip is collapsed or not, and synctype, which spcifies how the the angles in the muticlip should be synchronized.
At line numbered 2, the angle element includes the optional subelements activevideoangle and activeaudioangle. These take Boolean values (TRUE or FALSE) and indicate whether an angle is active or not. (Only one angle in a multiclip can be active at a time.) If these elements are not specificed in an angle, the default settings are false. If no angles in a multiclip are encoded with these subelements, the first angle is assumed to be the active angle.
At line numbered 3, the element defaultangle is used for clips in the Browser. It encodes identifying information (a number or a letter) about the camera angle.
At line numbered 4, the element mediadelay is a subelement of clipitem. It shifts the multiclip sync point from the start of the clip item to the specified delay. (See “Note.”)
Encoding a Sequence
To encode a sequence in the Final Cut Pro XML Interchange Format, you use the sequence element. You specify subelements for the name of the sequence, the duration, the frame rate, and the starting timecode. You also use the media element to encode subelements for the video and audio tracks.
Listing 3-10 shows an empty sequence with one video track and two audio tracks.
Listing 3-10 An empty sequence
<?xml version="1.0" encoding="UTF-8"?> |
<xmeml version="4"> |
<sequence> |
<name>Sequence 1</name> |
<duration></duration> |
<rate>. . .</rate> |
<timecode>. . .</timecode> |
<media> |
<video> |
<format></format>// 1 |
<track></track> |
</video> |
<audio> |
<format></format>// 2 |
<outputs></outputs>// 3 |
<track></track> |
<track></track> |
</audio> |
</media> |
</sequence> |
</xmeml> |
Format and Outputs
At lines numbered 1 and 2, the format element in Listing 3-10 encodes information about the video and audio media, while, at line numbered 3, the outputs element encodes information about the audio media. These elements and their subelements are equivalent to the sequence settings in Final Cut Pro.
Listing 3-11 shows sample format information for a video track. See “Elements of the Interchange Format” for details about the elements displayed here.
Listing 3-11 Format information for a video track
<video> |
<format> |
<samplecharacteristics> |
<width>720</width> |
<height>480</height> |
<anamorphic>FALSE</anamorphic> |
<pixelaspectratio>NTSC-CCIR-601</pixelaspectratio> |
<fielddominance>lower</fielddominance> |
<rate> |
<ntsc>TRUE</ntsc> |
<timebase>30</timebase> |
</rate> |
<colordepth>24</colordepth> |
<codec> |
<name>Apple DV - NTSC</name> |
<appspecificdata> |
<appname>Final Cut Pro</appname> |
<appmanufacturer>Apple Computer, Inc.</appmanufacturer> |
<appversion>4.0</appversion> |
<data> |
<qtcodec>// 1 |
. . . |
</qtcodec> |
</data> |
</appspecificdata> |
</codec> |
</samplecharacteristics> |
<appspecificdata> |
<appname>Final Cut Pro</appname> |
<appmanufacturer>Apple Computer, Inc.</appmanufacturer> |
<appversion>4.0</appversion> |
<data> |
<fcpimageprocessing>// 2 |
<useyuv>TRUE</useyuv> |
<usesuperwhite>FALSE</usesuperwhite> |
<rendermode>YUV8BPP</rendermode> |
</fcpimageprocessing> |
</data> |
</appspecificdata> |
</format> |
. . . |
</video> |
At line numbered 1, the qtcodec element provides information (omitted) about a QuickTime codec.
At line numbered 2, the fcpimageprocessing element encodes details about image processing settings.
Listing 3-12 shows sample format and outputs information for an audio track.
Listing 3-12 Format information for an audio track
<audio> |
<format> |
<samplecharacteristics>// 1 |
<depth>16</depth> |
<samplerate>48000</samplerate> |
</samplecharacteristics> |
</format> |
<outputs>// 2 |
<group> |
<index>1</index> |
<numchannels>2</numchannels> |
<downmix>4</downmix> |
<channel> |
<index>1</index> |
</channel> |
<channel> |
<index>2</index> |
</channel> |
</group> |
</outputs> |
At line numbered 1, the samplecharacteristics element encodes information about the audio depth and sample rate.
At line numbered 2, the outputs element specifies information about the audio output settings.
Media in a Sequence
To add media to a sequence, you use a clipitem subelement in the track element.
Listing 3-13 A sequence with a video track
<sequence id = "Sequence 1"> |
. . . |
<media> |
<video> |
<format> |
. . . |
</format> |
<track> |
<clipitem id = "Seq1Clip1"> |
<name>Rob Dialog</name> |
<duration>751</duration> |
<in>0</in>// 1 |
<out>751</out> |
<start>0</start>// 2 |
<end>751</end> |
. . . |
<file id = "Rob Dialog"> |
<name>Rob Dialog</name> |
<pathurl>. . .</pathurl> |
<duration>751</duration> |
. . . |
</file> |
<sourcetrack>// 3 |
<mediatype>video</mediatype> |
<trackindex>1</trackindex> |
</sourcetrack> |
</clipitem> |
</track> |
</video> |
</media> |
. . . |
</sequence> |
A clipitem encoded in a track is similar to a clip in the Browser. It has a name, duration, timecode, associated media file, and so on.
At line numbered 1, it has in and out subelements that indicate the portion of the source media file to reference. At line numbered 2, it has start and end subelements that specify the relative position of the clip in the parent sequence. (See “Timing Values.”)
At line numbered 3, the sourcetrack element indicates the media track to use in the source media file; in this case, video track 1.
To encode the stereo audio that goes with this video clip, you use an audio element and the first two track subelements within it.12
Listing 3-14 An audio element with two tracks
<sequence id = "Sequence 1"> |
. . . |
<media> |
<video> |
<format> |
. . . |
</format> |
<track> |
<clipitem id = "Seq1Clip1">// 1 |
<name>Rob Dialog</name> |
<duration>751</duration> |
<in>0</in> |
<out>751</out> |
<start>0</start> |
<end>751</end> |
<file id = "Rob Dialog"> |
. . . |
</file> |
. . . |
</clipitem> |
</track> |
</video> |
<audio>// 2 |
<format> |
. . . |
</format> |
<outputs> |
. . . |
</outputs> |
<track> |
<clipitem id = "Seq1Clip1">// 3 |
<file id = "Rob Dialog"/>// 4 |
<sourcetrack>// 5 |
<mediatype>audio</mediatype> |
<trackindex>1</trackindex> |
</sourcetrack> |
</clipitem> |
</track> |
<track>// 6 |
<clipitem id = "Seq1Clip1"> |
<file id = "Rob Dialog"/> |
<sourcetrack> |
<mediatype>audio</mediatype> |
<trackindex>2</trackindex> |
</sourcetrack> |
</clipitem> |
</track> |
</audio> |
</media> |
. . . |
</sequence> |
At line numbered 2, you have the start tag of the audio element.
At line numbered 3, you can reference the id attribute specified earlier at line numbered 1. See “The id Attribute” You don't have to repeat all the information for duration, the in and out points, and so on.
At line numbered 4, you can reference the id attribute for the media file and then override the source track information at line numbered 5. You are using the same source media that you used for the video track, but are now referencing audio track 1. Starting at line numbered 6, you can construct the information for the second audio track in the same manner.
Linking
With the video track and the two audio tracks encoded, you now need to link the tracks together so that they are managed as a single component within the sequence. You do this using the link element.
Listing 3-15 The link element
<media> |
<video> |
<format> ... </format> |
<track> |
<clipitem id = "Seq1Clip1"> |
<name>Rob Dialog</name> |
<duration>751</duration> |
<in>0</in> |
<out>751</out> |
<start>0</start> |
<end>751</end> |
. . . |
<link>// 1 |
<mediatype>video</mediatype> |
<trackindex>1</trackindex> |
<clipindex>1</clipindex> |
</link> |
<link> |
<mediatype>audio</mediatype> |
<trackindex>1</trackindex> |
<clipindex>1</clipindex> |
<groupindex>1</groupindex> |
</link> |
<link> |
<mediatype>audio</mediatype> |
<trackindex>2</trackindex> |
<clipindex>1</clipindex> |
<groupindex>1</groupindex> |
</link> |
<file id = "Rob Dialog"> |
. . . |
</file> |
</clipitem> |
</track> |
</video> |
<audio> |
<format> . . . </format> |
<outputs> . . . </outputs> |
<track> |
<clipitem id = "Seq1Clip1"> |
<file id = "Rob Dialog"> |
. . . |
</file> |
</clipitem> |
</track> |
<track> |
<clipitem id = "Seq1Clip1"> |
<file id = "Rob Dialog"> |
. . . |
</file> |
</clipitem> |
</track> |
</audio> |
</media> |
The link information always appears in the first track in the group of tracks that you are linking together. Here, this is the video track at line numbered 1, which is linked with the two audio tracks. Since the two audio clips use the id convention to reference the contents of the video clip, all three clips use the same link information.
Alternatively, you can link tracks together using the id attribute and the linkclipref element.
Listing 3-16 The linkclipref element
<media> |
<video> |
<format> . . .</format> |
<track> |
<clipitem id = "Seq1Clip1v"> |
<name>Clip 001</name> |
<duration>751</duration> |
<in>0</in> |
<out>751</out> |
<start>0</start> |
<end>751</end> |
<link> |
<linkclipref>Seq1Clip1v</linkclipref>// 1 |
</link> |
<link> |
<linkclipref>Seq1Clip1a1</linkclipref>// 2 |
<groupindex>1</groupindex> |
</link> |
<link> |
<linkclipref>Seq1Clip1a2</linkclipref>// 3 |
<groupindex>1</groupindex> |
</link> |
<file id = "Rob Dialog"> |
. . . |
</file> |
</clipitem> |
</track> |
</video> |
<audio> |
<format> . . . </format> |
<outputs> . . . </outputs> |
<track> |
<clipitem id = "Seq1Clip1a1"> |
<file id="Rob Dialog"/> |
</clipitem> |
</track> |
<track> |
<clipitem id = "Seq1Clip1a2"> |
<file id="Rob Dialog"/> |
</clipitem> |
</track> |
</audio> |
</media> |
Note that you cannot use linkclipref for multiple clips in a track with the same ID.
Transitions
A sequence usually includes transitions between video clips you can encode with a transitionitem element. Listing 3-17 shows an example of a sequence with a single video track with a transition between two clips.
Listing 3-17 A transition between video clips
<sequence> |
<name>Sequence 1</name> |
<duration>243</duration> |
. . . |
<media> |
<video> |
<format> . . . </format> |
<track> |
<clipitem> |
<name>Bloomies</name> |
<duration>248</duration> |
<in>74</in> |
<out>227</out>// 1 |
<start>0</start> |
<end>-1</end>// 2 |
<file id = "Bloomies1"> |
<duration>248</duration> |
. . . |
</file> |
. . . |
</clipitem> |
<transitionitem>// 3 |
<rate>. . .</rate> |
<start>123</start> |
<end>153</end> |
<alignment>center</alignment> |
<effect>// 4 |
<name>Cross Dissolve</name> |
<!-- encoding details for the effect --> |
</effect> |
</transitionitem> |
<clipitem> |
<name>Jeremy Solo</name> |
<duration>188</duration> |
<in>36</in>// 5 |
<out>156</out> |
<start>-1</start>// 6 |
<end>243</end> |
<file id = "Jeremy Solo"> |
<duration>188</duration> |
. . . |
</file> |
. . . |
</clipitem> |
</track> |
</video> |
</media> |
</sequence> |
At line numbered 3, the transitionitem element encodes the start and end of the transition.
At line numbered 4, the effect subelement determines the specific transition that is used. See “Encoding Effects” for a discussion of effects.
In the Viewer, the Out point for the first clip in the sequence (Bloomies) was set at 212. Note that at line numbered 1, the Out point is extended to 227 to provide additional frames for input into the transition effect. In a similar fashion, the In point for the second clip (Jeremy Solo) at line numbered 5 is changed to 36 from its original setting of 51. Also, because the end time for the first clip now depends on the next item in the sequence, the end element at line numbered 2 is set to –1. This indicates that the value should be computed. Similarly, the start element for the second clip at line numbered 6 is set to –1.
PSD Files as Sequences
Final Cut encodes a Photoshop PSD file with multiple layers as a sequence (rather than a clip) when you import it into the Browser. The stillframe element is set to TRUE and the layerindex element is used to specify the various layers in the file.
Encoding a Project
Listing 3-18 shows skeleton XML for a Final Cut Pro project that has two bins and one sequence.
Listing 3-18 A project
<?xml version="1.0" encoding="UTF-8"?> |
<!DOCTYPE xmeml> |
<xmeml version="4"> |
<project>// 1 |
<name>Swing</name> |
<children>// 2 |
<bin>// 3 |
<name>Audio</name> |
<children>// 4 |
<clip id="Jumptown.aif"> |
<name>Jumptown.aif</name> |
. . . |
</clip> |
</children> |
</bin> |
<sequence id="Dance">// 5 |
<name>Dance</name> |
. . . |
</sequence> |
<bin>// 6 |
<name>Video</name> |
<children> |
<clip id="Bloomies"> |
<name>Bloomies</name> |
. . . |
</clip> |
<clip id="Jeremy Solo"> |
<name>Jeremy Solo</name> |
. . . |
</clip> |
<clip id="Johnny n Cari"> |
<name>Johnny n Cari</name> |
. . . |
</clip> |
<clip id="Overhead"> |
<name>Overhead</name> |
. . . |
</clip> |
<clip id="Rob Dialog"> |
<name>Rob Dialog</name> |
. . . |
</clip> |
<clip id="Round n Round"> |
<name>Round n Round</name> |
. . . |
</clip> |
</children> |
</bin> |
</children> |
</project> |
</xmeml> |
At line numbered 1, the project start-tag initiates the encoding for the project. The next line specifies the name of the project (Swing).
At lines numbered 2 and 4, the required children elements enclose elements in a project or bin.
At line numbered 3, the first bin (Audio) is encoded. It contains a single audio clip.
At line numbered 5, the sequence (Dance) is encoded. Note that a children subelement is not specified.
At line numbered 6, the second bin (Video) is encoded. In contains six clips.
Encoding Effects
Effects in Final Cut Pro are generally categorized as transition effects or filter effects. You encode an effect using either the transitionitem or filter element, and the effect subelement. Listing 3-17 at lines numbered 3 and 4 shows a skeleton example of a transition effect (a cross dissolve). Listing 3-19 shows the encoding for a filter effect (a gaussian blur).
Listing 3-19 A gaussian blur effect
<filter> |
<start>-1</start> |
<end>-1</end> |
<effect> |
<name>Gaussian Blur</name>// 1 |
<effectid>Gaussian Blur</effectid>// 2 |
<effectcategory>Blur</effectcategory> |
<effecttype>filter</effecttype>// 3 |
<mediatype>video</mediatype>// 4 |
<parameter> |
<parameterid>channel</parameterid>// 5 |
<name>Channel</name> |
<valuemin>1</valuemin> |
<valuemax>7</valuemax> |
<valuelist>// 6 |
<valueentry> |
<name>Alpha+RGB</name> |
<value>1</value> |
</valueentry> |
<valueentry> |
<name>Alpha</name> |
<value>2</value> |
</valueentry> |
<valueentry> |
<name>RGB</name> |
<value>3</value> |
</valueentry> |
<valueentry> |
<name>Red</name> |
<value>4</value> |
</valueentry> |
<valueentry> |
<name>Green</name> |
<value>5</value> |
</valueentry> |
<valueentry> |
<name>Blue</name> |
<value>6</value> |
</valueentry> |
<valueentry> |
<name>Luminance</name> |
<value>7</value> |
</valueentry> |
</valuelist> |
<value>1</value>// 7 |
</parameter> |
<parameter> |
<parameterid>radius</parameterid> |
<name>Radius</name> |
<valuemin>0</valuemin> |
<valuemax>100</valuemax> |
<value>2</value>// 8 |
</parameter> |
</effect> |
</filter> |
At lines numbered 1 and 2, either the element name or the element effectid is required to identify a particular effect. The element effectid is language independent. The element name may be localized, depending on the application generating the document. (When parsing installed effects, applications should look first at effectid and use name as a fallback if no matching effect is found.)
At lines numbered 3 and 4, both elements effecttype and mediatype are required in order to provide the application parsing the document with enough information to correctly identify the effect, or to map it to a reasonable substitute. (The mediatype element also allows inherited effects to be propagated to the correct type of track or clip.)
The gaussian blur effect has two parameters: channel and radius. Both parameters use parameterid and name. The element parameterid is language independent, while name can be localized.
At line numbered 5, the channel parameter is a pop-up list with seven choices. At line numbered 6, the valuelist element encodes the names and ordinal value of each of these choices. The encoding for the actual selection from the list occurs at line numbered 7, where value is set to 1. Alternatively, you can use the name of the pop-up list choice for the value element (<value>Alpha+RGB</value>).
Important: The valuelist element is not required for import. When you export an effect with a pop-up list parameter, valuelist provides a convenient summary of the pop-up options. In general, this document does not provide detailed information about effects and their parameters in the Final Cut Pro XML Interchange Format. To see the interchange format details for an effect, you can apply the effect to a clip and then export that clip in XML.
Keyframes
At line numbered 8 in Listing 3-19 the radius parameter is encoded with a static value of 2. Suppose, however, that you want to use keyframes to modify the effect over time. (A keyframe is a combination of a time value and optional curve or interpolation information.)
Listing 3-20 shows the radius parameter encoded with three keyframe elements, which replace the value element at line numbered 7 in Listing 3-19 To "smooth out" the behavior of the effect, you can add Bezier handles for the last two keyframe elements.
Listing 3-20 Radius parameter with keyframes and Bezier handles
<parameter> |
<parameterid>radius</parameterid> |
<name>Radius</name> |
<interpolation>// 1 |
<name>FCPCurve</name> |
</interpolation> |
<keyframe>// 2 |
<when>35</when> |
<value>5</value> |
</keyframe> |
<keyframe>// 3 |
<when>50</when> |
<value>17</value> |
<inscale>0</inscale> |
<inbez> |
<horiz>9.5</horiz> |
<vert>3.14159</vert> |
</inbez> |
<outscale>0</outscale> |
<outbez> |
<horiz>9.5</horiz> |
<vert>0</vert> |
</outbez> |
</keyframe> |
<keyframe>// 4 |
<when>88</when> |
<value>4</value> |
<inscale>0</inscale> |
<inbez> |
<horiz>9.5</horiz> |
<vert>-3.14159</vert> |
</inbez> |
</keyframe> |
</parameter> |
At line numbered 1, the interpolation element identifies the interpolation method for the keyframes. Since this clip is for use in Final Cut Pro, the interpolation method is FCPCurve. See “Keyframe Interpolation” for details of the Final Cut Pro interpolation method.
At line numbered 2, the encoding for the first keyframe sets when at 35 and value at 5.
At line numbered 3, the second keyframe includes information for a Bezier handle that is specific to the FCPCurve format. It consists of an offset (inbez and outbez) and a magnitude (inscale and outscale).
At line numbered 4, note that the last keyframe has a one-sided Bezier handle.
You can also set the range of an effect. By default, an effect uses the in and out values from its parent clip. The effect modifies the media within this range. You can alter this by encoding specific start and end points for filter or transitionitem.
Managing Project Components
The Final Cut Pro XML Interchange Format lets you modify or update open projects using the elements uuid and updatebehavior. As well, you can use the itemhistory element to track the edit history of a clipitem.
The uuid and updatebehavior Elements
The uuid element uniquely and persistently identifies individual components (clips, bins, and sequences) in a project. Since it is saved with the project file, you can use it to track detailed changes during your workflow.
Important: A uuid entry is only guaranteed uniqueness on a per project basis. If you copy a clip from one project to another, the uuid entry for the clip remains the same. Likewise, if you export a clip and then import it into a different project, the uuid entry is unchanged. If you then modify the clip in one project, the clip in the other project has a matching UUID but is no longer identical. The UUID has ceased to be a unique identifier.
The updatebehavior element allows you to modify UUID-identified components in an open project. The target component in a project can be a clip, bin, or sequence. As well, you can use updatebehavior to modify metadata in a QuickTime file. (See “Managing QuickTime Metadata”)
A target component is identified by its uuid entry. For example, here is a XML snippet that replaces a clip in the Browser:
Listing 3-21 Replacing a Clip in the Browser
<?xml version="1.0" encoding="UTF-8"?> |
<!DOCTYPE xmeml> |
<xmeml version="4"> |
<clip id="clip2 "> |
<uuid>7ACBD5FC-C166-40F9-AE36-55B39476D8E6</uuid> |
<updatebehavior>replaceiffound</updatebehavior> |
<!--Information about the replacement clip --> |
</clip> |
When this snippet is imported, Final Cut Pro looks for a component in the project with a matching UUID. If it finds one, it replaces the component with the clip specified in the interchange format document. (In this case, the replacement clip appears at the topmost level of the Browser.) If it doesn’t find the target clip, nothing happens.
To replace a clip in a bin, you have to specify the bin and all its contents. For example, Listing 3-22 replaces a clip in Bin 1.
Listing 3-22 Replacing a Clip in a Bin
<?xml version="1.0" encoding="UTF-8"?> |
<!DOCTYPE xmeml> |
<xmeml version="4"> |
<bin> |
<uuid>4FDDECFA-D312-4272-8DE8-BE98E4BA5F92</uuid> |
<updatebehavior>replaceiffound</updatebehavior> |
<name>Bin 1</name> |
<children> |
<clip id="clip2 "> |
<uuid>7ACBD5FC-C166-40F9-AE36-55B39476D8E6</uuid> |
<updatebehavior>add</updatebehavior> |
<!-- Information about the replacement clip --> |
</clip> |
</bin> |
Similarly, to replace a particular clipitem in a sequence, you must replace the entire sequence.
The way you specify the location of the replacement component in the import document has precedence. For example, if the target clip is in Bin 1 and if you import a snippet such as Listing 3-21 Final Cut Pro removes the clip from Bin 1 and puts the replacement clip at the top level of the Browser.
The desired behavior at the time of import is specified by the entry for updatebehavior. The valid entries are:
replaceiffound- Replaces the target component if found. If not found, does nothing.
replaceoradd- Replaces the target component if found. If not found, adds the imported component to the project.
addifnotfound- Adds the imported component to the project provided the target component is not found. If the target component is found, does nothing.
add- Adds the imported component to the project. If a component with the same
uuidentry is present, changes theuuidentry of the imported object. remove- Removes the target object if found. If not found, does nothing.
The itemhistory Element
The first time you export the XML for a clipitem, Final Cut creates a UUID for the item. If you modify the clipitem and export it again, Final Cut generates a new UUID for the item. The element itemhistory encodes a list of the UUIDs associated with a particular clipitem. The top UUID in the list is the current UUID for the item and is guaranteed to be unique. The rest of the list is a historical record of the UUIDs associated with the item. (The bottom UUID item in the list is the initial UUID generated for the clipitem or the UUID of the original item from which the current item was derived.)
For example, suppose you export a clipitem for the first time. It is assigned an initial UUID:
<itemhistory> |
<uuid>3510A3C8-5C79-4AA4-9A81-38B40397C0DC </uuid> |
</itemhistory> |
You then blade the clipitem and export both items. The XML for the first item is:
<itemhistory> |
<uuid>CC70F2BC-1777-4FF6-8846-58A8A3D2DA0E</uuid> |
<uuid>3510A3C8-5C79-4AA4-9A81-38B40397C0DC</uuid> |
</itemhistory> |
The XML for the second item is:
<itemhistory> |
<uuid>DD30375E-5CF3-4EB7-B209-36624768C4BB</uuid> |
<uuid>3510A3C8-5C79-4AA4-9A81-38B40397C0DC</uuid> |
</itemhistory> |
The common final UUID for the two items shows that they have a common origin.
Managing QuickTime Metadata
Final Cut Pro 5.1.2 supports metadata in QuickTime files. When Final Cut Pro opens or re-reads a QuickTime file with metadata, it caches a copy of the metadata in the project. (The file is the authoritative source of the metadata; if the file changes, the cached copy changes.)
To manage QuickTime metadata, version 3 of the Final Cut Pro XML Interchange Format provides the element metadata and its subelements. (See “QuickTime Metadata”) With these new elements, you can display the metadata in a project by exporting an interchange format document. In additionl, you can actually modify the metadata in a QuickTime file by importing an interchange format document with appropriately specified elements.
In Final Cut Pro, QuickTime metadata appears at the movie or track levels; that is, the parents of metadata can be file, video, or audio. Here is an XML fragment that displays some metadata at the movie level.
Listing 3-23 Sample Metadata
<file id="clouds"> |
<name>clouds</name> |
<pathurl>file://localhost/Users/. . .</pathurl> |
<rate> |
<timebase>8</timebase> |
</rate> |
<duration>91</duration> |
<metadata> |
<storage>QuickTime</storage> |
<key>com.mycompany.myapp.myid.mymd</key> |
<size>11</size> |
<type>UTF8</type> |
<value>My metadata</value> |
</metadata> |
<media> |
. . . |
When you import interchange format documents with metadata information, Final Cut Pro caches the imported metadata. However, when Final Cut Pro reconnects referenced QuickTime files to the project, the metadata in these files replaces the metadata you imported.
You can permanently alter the metadata in a QuickTime file by using the element updatebehavior as a subelement of metadata. In this context, updatebehavior has two valid entries: add or remove. Here is an XML fragment using add.
Listing 3-24 Adding Metadata
<metadata> |
<updatebehavior>add</updatebehavior> |
<storage>QuickTime</storage> |
<key>com.mycompany.myapp.myid.mymd</key> |
<size>22</size> |
<type>UTF8</type> |
<value>My additional metadata</value> |
</metadata> |
Metadata in QuickTime files is stored as a key-value pair. In Listing 3-24 the value and the key are added to the metadata in the file. If the file already has an identical key, the imported value does not replace any existing values. Instead, the new value is stored alongside the existing values for that key. Note that a key is specified with a reverse-dns string to help ensure uniqueness.
Using remove, on the other hand, does affect existing metadata in a file. Here is an example:
Listing 3-25 Removing Metadata
<metadata> |
<updatebehavior>remove</updatebehavior> |
<storage>QuickTime</storage> |
<key>com.mycompany.myapp.myid.mymd</key> |
</metadata> |
This removes the specified key and all its associated values from the file. (Note that it is not necessary to specify the subelements type, size, or value.)
When you import an interchange format document with metadata specifications, Final Cut Pro first processes the specifications with remove, and then those with add. (This allows you to easily replace values for a particular key from a single import document.)
Timing Values
Figure 3-1 illustrates the timing elements that encode the relation between clips, subclips and media.
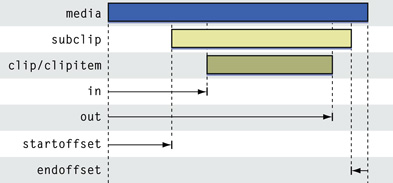
The elements in and out encode the initial and final points that specify the media content associated with a clip or clipitem. (In contrast, the elements start and end illustrated below specify the placement of a clipitem in a sequence.) The elements startoffset and endoffset encode the offset values specifying a subclip.
To convert in and out to timecode values, use the starting timecode in the media, if there is one. For media without timecodes, the default starting timecode is 00:00:00:00. For media with more than one timecode (such as media with source, aux1, aux2), look for the primarytimecode subelement and use that value.
Figure 3-2 illustrates the elements that encode timing values for a clipitem in a sequence.
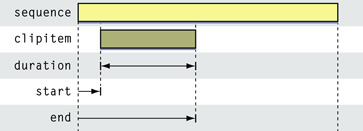
The elements start and end encode the start and end of a clipitem in an enclosing sequence. The element duration encodes the length of a clipitem.
To convert start and end to timecode values, use the timecode in the containing sequence, or, for Browser clips, the timecode on the file of the containing clip.
Figure 3-3 illustrates the relationships of timing elements for a multiclip and multiclip angles.
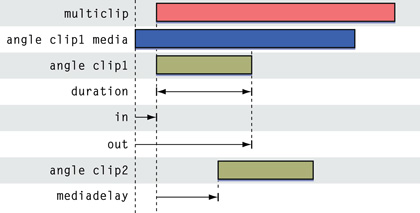
The angle encoding for clip 1 shows that an angle clip can use in and out encoding to indicate which portion of the media should be used for the clip.
Syncing by in point (synctype 1) means that all the in points for each angle clip are lined up at the beginning of the multiclip. In that case no mediadelay is required.
The simplified angle encoding for clip 2 shows how you can line up angle clips in a multiclip. The second angle will be black from the beginning of the multiclip for the duration specified in mediadelay. Then the second angle clip is displayed. (Note that it doesn't make sense for the mediadelay to be negative since you can simply mark a later in on the clip to achieve the same result.)
A good way to understand these timing values is to create the desired multiclip alignment in Final Cut Pro, then modify something (like the in point for one clip) and make another multiclip, then compare the XML for the multiclips and see where they differ.
Notes on the XML Interchange Format
Here are some additional details about the Interchange Format.
You cannot encode user interface information such as the size and position of a window, the source and destination settings for a track, or the height of a sequence track in an XML interchange format document.
Transitions or filters in the Browser are not included in an XML export.
Custom names for columns in the Browser are not included in an XML export. Exporting a project with custom column names and then reimporting it causes loss of data.
The drop/non-drop character of a timecode value is not included in an XML export.
Third party effects and custom master templates are not exported with the XML. If you export a sequence using one and then import the sequence on a machine where the effect or template is not available, the system replaces it with a default effect or default master template.
If you create a transition between two clips in a sequence, export the sequence, and then import it into the same project, the icon on the transition in the original sequence may lose its name.
The volume level for the audio track of a clip is encoded by the
Audio Levelseffect. The parameterLevelexpresses linear gain rather than decibels. To convert gain to decibels, use the formuladecibels = 20 * log10(Level). Conversely, to convert decibels to gain, useLevel = 10 ^ (decibels / 20).
XML Changes in Final Cut Pro 6.0.2
The end-of-line delimiter in an exported XML file is now the LF (line feed) character, rather than the CR (carriage return) character. This facilitates editing with standard text editors.
An empty element instance (such as
<value></value>, or<value/>) is now treated as an empty string rather than 0. But an instance that references another instance with an id (for example,<file id = "FooBar"/>), is processed as if it were a duplicate of referenced instance.Only the filters specified are added when an XML document is imported into Final Cut Pro. For example, no Shift Field filter is added automatically when an imported clip is brought into a sequence with a different field dominance setting.
The element
importoptionslets you control options for importing an XML document into Final Cut Pro. Specifying the subelementscreatenewprojectanddefsequencepresetnamesuppresses the Import XML dialog. You no longer need to specify the subelementtargetprojectnameto do this. (This means you can import the XML into the default project and still suppress the dialog.)The
anamorphicsetting in the imported XML document is now respected even if a media file has a different property. If necessary, the user must change theanamorphicsetting in the sequence by hand to conform to the actual property of the media.There are several new Apple Events provided in Final Cut Pro 6.0.2. See “Apple Events and Final Cut Pro.”
© 2003, 2009 Apple Inc. All Rights Reserved. (Last updated: 2009-02-04)