Quick Start for Property Lists
This mini-tutorial gives you a quick, practical introduction to property lists. You start by specifying a short property list in XML. Then you design an application that, when it launches, reads and converts the elements of the XML property list into their object equivalents and stores these objects in instance variables. The application displays these object values in the user interface and allows you to change them. When you quit the application, it writes out the modified property list as XML. When you relaunch the application, the new values are displayed.
In this section:
Create the XML Property List
Define Storage for the Property-List Objects
Create the User Interface
Read in the Property List
Write Out the Property List
Run and Test the Application
Create the XML Property List
In Xcode, create a simple Cocoa application project—call it PropertyListExample. Then select the Resources folder of the project and choose New File from the File menu. In the “Other” template category, select the Property List template and click Next. Name the file “Data.plist”.
Double-click the Data.plist file in Xcode (you’ll find it in the Resources folder). Xcode displays an empty property list in a special editor. Edit the property list so that it looks like the following example:
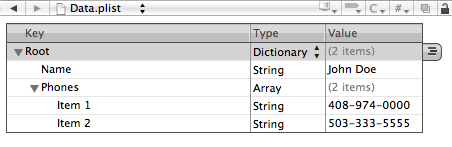
You can also edit the property list in a text editor such as TextEdit or BBEdit. When you’re finished, it should look like the following XML code.
<?xml version="1.0" encoding="UTF-8"?>
<!DOCTYPE plist PUBLIC "-//Apple//DTD PLIST 1.0//EN" "http://www.apple.com/DTDs/PropertyList-1.0.dtd">
<plist version="1.0">
<dict>
    <key>Name</key>
    <string>John Doe</string>
    <key>Phones</key>
    <array>
        <string>408-974-0000</string>
        <string>503-333-5555</string>
    </array>
</dict>
</plist> |
Define Storage for the Property-List Objects
In this step, you’ll add a coordinating controller class to the project and declare properties to hold the property-list objects defined in Data.plist. (Note the distinction here between declared property and property-list object.)
In Xcode, select the Classes folder and choose New File from the File menu. Select the Objective-C Class template and name the files “Controller.h” and “Controller.m”. Make the following declarations in Controller.h.
#import <Cocoa/Cocoa.h> |
@interface Controller : NSObject { |
NSString *personName; |
NSMutableArray *phoneNumbers; |
} |
@property (copy, nonatomic) NSString *personName; |
@property (retain, nonatomic) NSMutableArray *phoneNumbers; |
@end |
In Controller.m, have the compiler synthesize accessor methods for these properties:
@implementation Controller |
@synthesize personName; |
@synthesize phoneNumbers; |
@end |
Create the User Interface
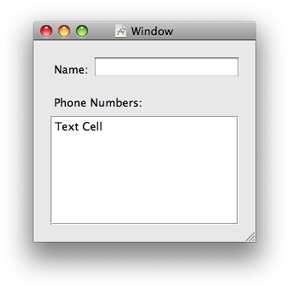
Double-click the project’s nib file to open it in Interface Builder. Create a simple user interface similar to the following:
Note: This mini-tutorial shows user-interface techniques and programming interfaces that are specific to Mac OS X. If you want to use an iPhone OS application for this example, you must use techniques and API that are appropriate to that platform.
The table view should have a single column that is editable.
For reasons of simplicity and efficiency, you’ll next bind the text field to the personName property. But your Controller object will act as a data source for the table. Let’s start with the text field.
Drag an generic Object proxy from the Library into the nib document window. Select it and, in the Identify pane of the inspector, type or select “Controller” for its class identity.
Drag an Object Controller object from the Library into the nib document window. Control-drag (or right-click-drag) a line from Object Controller to Controller and, in the connection window that pops up, select “content”.
Select the editable text field and, in the Bindings pane of the inspector, bind the value attribute of the text field according to the following:
Bind to: Object Controller
Controller Key: selection
Model Key Path: personName
Next, Control-drag a line from File’s Owner in the nib document window (File’s Owner in this case represents the global NSApplication object) to the Controller object and then select delegate in the connection window. As you’ll see, the application delegate (Controller) plays a role in saving the property list to its XML representation.
For the table view, Control-drag a line from the table view to the Controller object in the nib document window. Select the dataSource outlet in the connection window. Save the nib file. Copy the code in Listing 1-1 to Controller.m.
Listing 1-1 Implementation code for table view’s data source
- (NSInteger)numberOfRowsInTableView:(NSTableView *)tableView { |
return self.phoneNumbers.count; |
} |
- (id)tableView:(NSTableView *)tableView |
objectValueForTableColumn:(NSTableColumn *)tableColumn |
row:(NSInteger)row { |
return [phoneNumbers objectAtIndex:row]; |
} |
- (void)tableView:(NSTableView *)tableView setObjectValue:(id)object |
forTableColumn:(NSTableColumn *)tableColumn row:(NSInteger)row { |
[phoneNumbers replaceObjectsAtIndexes:[NSIndexSet indexSetWithIndex:row] |
withObjects:[NSArray arrayWithObject:object]]; |
} |
Note that the last method synchronizes changes to items in the table view with the phoneNumbers mutable array that backs it.
Read in the Property List
Now that the necessary user-interface tasks are completed, we can focus on code that is specific to property lists. In its init method, the Controller object reads in the XML property list from the application bundle and converts its elements into the corresponding property-list objects. Listing 1-2 shows how it does this.
Listing 1-2 Reading in and converting the XML property list
- (id) init { |
if (self = [super init]) { |
NSString *errorDesc = nil; |
NSPropertyListFormat format; |
NSString *plistPath = [[NSBundle mainBundle] pathForResource:@"Data" ofType:@"plist"]; |
NSData *plistXML = [[NSFileManager defaultManager] contentsAtPath:plistPath]; |
NSDictionary *temp = (NSDictionary *)[NSPropertyListSerialization |
propertyListFromData:plistXML |
mutabilityOption:NSPropertyListMutableContainersAndLeaves |
format:&format errorDescription:&errorDesc]; |
if (!temp) { |
NSLog(errorDesc); |
[errorDesc release]; |
} |
self.personName = [temp objectForKey:@"Name"]; |
self.phoneNumbers = [NSMutableArray arrayWithArray:[temp objectForKey:@"Phones"]]; |
} |
return self; |
} |
This code first gets the file-system path to the file containing the XML property list (Data.plist) in the application bundle and then uses the NSFileManager method contentsAtPath: to read it into memory as an NSData object. Then it calls the NSPropertyListSerialization class method propertyListFromData:mutabilityOption:format:errorDescription: to convert the static property list into the corresponding property-list objects—specifically, a dictionary containing a string and an array of strings. It assigns the string and the array of strings to the appropriate properties of the Controller object.
Write Out the Property List
When the user quits the application, you want to save the current values of the personName and phoneNumbers properties in a dictionary object, convert those property-list objects to a static XML representation, and then write that XML data to the application bundle. The applicationShouldTerminate: delegation method of NSApplication is the appropriate place to write the code shown in Listing 1-3.
Listing 1-3 Converting and writing the property list to the application bundle
- (NSApplicationTerminateReply)applicationShouldTerminate:(NSApplication *)sender { |
NSString *errorDesc; |
NSString *bundlePath = [[NSBundle mainBundle] pathForResource:@"Data" ofType:@"plist"]; |
NSDictionary *plistDict = [NSDictionary dictionaryWithObjects: |
[NSArray arrayWithObjects: personName, phoneNumbers, nil] |
forKeys:[NSArray arrayWithObjects: @"Name", @"Phones", nil]]; |
NSData *plistData = [NSPropertyListSerialization dataFromPropertyList:plistDict |
format:NSPropertyListXMLFormat_v1_0 |
errorDescription:&errorDesc]; |
if (plistData) { |
[plistData writeToFile:bundlePath atomically:YES]; |
} |
else { |
NSLog(errorDesc); |
[errorDesc release]; |
} |
return NSTerminateNow; |
} |
This code creates an NSDictionary object containing the values of the personName and phoneNumbers properties and associates these with the keys “Name” and “Phones”. Then, using the dataFromPropertyList:format:errorDescription: class method of NSPropertyListSerialization, it converts this top-level dictionary and the other property-list objects it contains into XML data. Finally, it writes the XML data to Data.plist in the application bundle.
Run and Test the Application
Build and and run the application. The window appears with the name and phone numbers you specified in the XML property list. Modify the name and a phone number and quit the application. Find the application bundle in the Finder, open it, and look at the Data.plist file in a text editor. You’ll see that the changes you made in the user interface are reflected in the XML property list. If you launch the application again, it displays the changed values.
© 2008 Apple Inc. All Rights Reserved. (Last updated: 2008-11-19)