Building a Text Editor in 15 Minutes
This article shows how you can use Cocoa to create a simple but highly capable text editor in less than 15 minutes using Xcode and Interface Builder. The Cocoa document architecture provides many of the features required for this type of application automatically, requiring you to write a minimal amount of code.
Here is a simplified summary of the steps needed to complete this task:
Use Xcode to create a new document-based application.
Use Interface Builder to add an NSTextView object to the application’s window.
Add some code to the document’s controller class.
Connect the user interface to the code.
You can build and test the application at several stages of completion. The following steps expand and explain this procedure. The steps assume that you have a basic acquaintance with Xcode and Interface Builder.
Contents:
Create the User Interface
Implement Document Archiving
Create the User Interface
This section shows how to use Xcode and Interface Builder to create the project and build its user interface.
In Xcode, create a new Cocoa Document-based Application project.
Open the
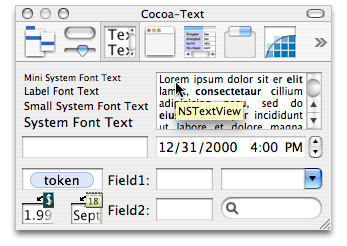
MyDocument.nibfile, which is in the Resources folder. Double-click theMyDocument.nibicon, which launches Interface Builder.Delete the label reading “Your document contents here” from the Window object. Drag an NSTextView object from the Cocoa-Text palette, which is shown in Figure 1. Resize the text view to almost fill the window, leaving margins as indicated by Interface Builder’s guide lines.
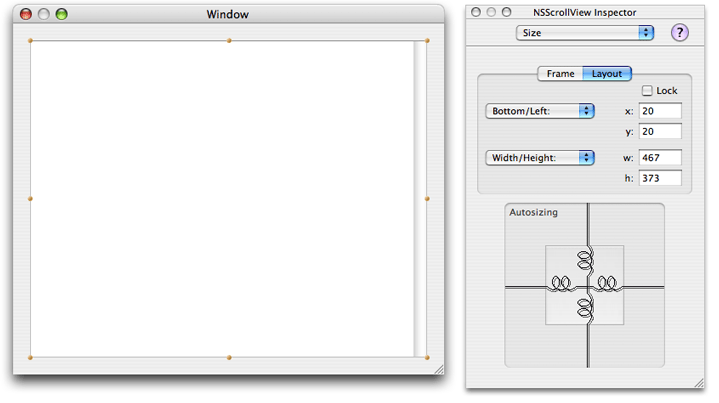
Click once inside the text view and choose Show Inspector from the Tools menu to open the Inspector window. Choose Size from the pop-up menu, and set the view to resize with the window, by clicking on the inner set of crossed lines, which changes their appearance to springs, as shown in Figure 2.
Choose Attributes from the pop-up menu of the Inspector window, and ensure that the following options are selected: Editable, Multiple fonts allowed, Undo allowed, Continuous Spell Checking, Uses Find Panel, and Show Scroller.
Choose Test Interface from Interface Builder's File menu, and resize the window to ensure that the text view resizes properly along with the window. Note that you can already edit text in the text view. When you drag the NSTextView object from the Cocoa Text Controls palette, Interface Builder automatically instantiates all the Cocoa text objects required for a complete editing and layout implementation. Choose Quit Interface Builder to leave interface test mode (Interface Builder should continue running).
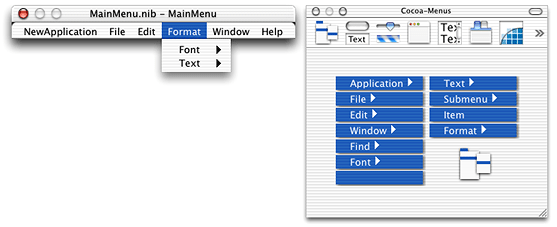
Add a Format menu to the application. In Xcode, double-click the
MainMenu.nibicon to open the MainMenu window, which represents the new application’s menu bar. From the Cocoa-Menus palette, drag a Format menu to the menu bar. Typically, a Format menu goes to the right of the Edit menu, as shown in Figure 3.Save both nib files and return to Xcode. Build and test the new application.
At this stage of your editor’s development, it has many sophisticated features. You should be able to enter, edit, cut, copy, and paste text. You can find and replace text using the Find window. You can undo and redo editing actions. You can also format text, setting its font, size, style, and color attributes. You can control text alignment, justification, baseline position, kerning, and ligatures. You can display a ruler that provides a graphical interface to manipulate many text and layout attributes, as well as setting tab stops. You can even use the spelling checker.
In addition to its many editing features, your editor can open multiple documents, each with its own text view and contents. What it lacks most prominently are the abilities to open files and save text in files (that is, archiving and unarchiving documents). It also lacks such features as displaying its name in its menu bar, having its own icon, and having useful information in its About window.
Quit your new application before proceeding to the next section.
Implement Document Archiving
This section explains how to enable your editor to open and save documents in files.
Add an instance variable for the text view, so you can connect the text view with the code in your NSDocument subclass that handles archiving and unarchiving of documents in files. You also need to add an instance variable to hold the text string being edited (the document’s data model). Put the variable declarations in
MyDocument.has follows:#import <Cocoa/Cocoa.h>
@interface MyDocument: NSDocument
{IBOutlet NSTextView *textView;
NSAttributedString *mString;
}
@end
Initialize the string instance variable. Put the following lines in the
initmethod (which has a stub implementation) inMyDocument.m:if (mString == nil) {mString = [[NSAttributedString alloc] initWithString:@""];
}
Write getter and setter methods for the string instance variable. Put them in
MyDocument.mas follows:- (NSAttributedString *) string { return [[mString retain] autorelease]; }- (void) setString: (NSAttributedString *) newValue {if (mString != newValue) {if (mString) [mString release];
mString = [newValue copy];
}
}
Add method declarations for the getter and setter methods to the header file.
MyDocument.hshould now appear as follows:#import <Cocoa/Cocoa.h>
@interface MyDocument: NSDocument
{IBOutlet NSTextView *textView;
NSAttributedString *mString;
}
- (NSAttributedString *) string;
- (void) setString: (NSAttributedString *) value;
@end
From Xcode, drag the
MyDocument.hfile icon onto the Instances pane ofMyDocument.nib, which is in Interface Builder. This step informs the MyDocument.nib file that the MyDocument interface now has an outlet variable namedtextView.In Interface Builder, click twice inside the text view to select the NSTextView object. Be sure you connect to the NSTextView and not its containing NSScrollView.
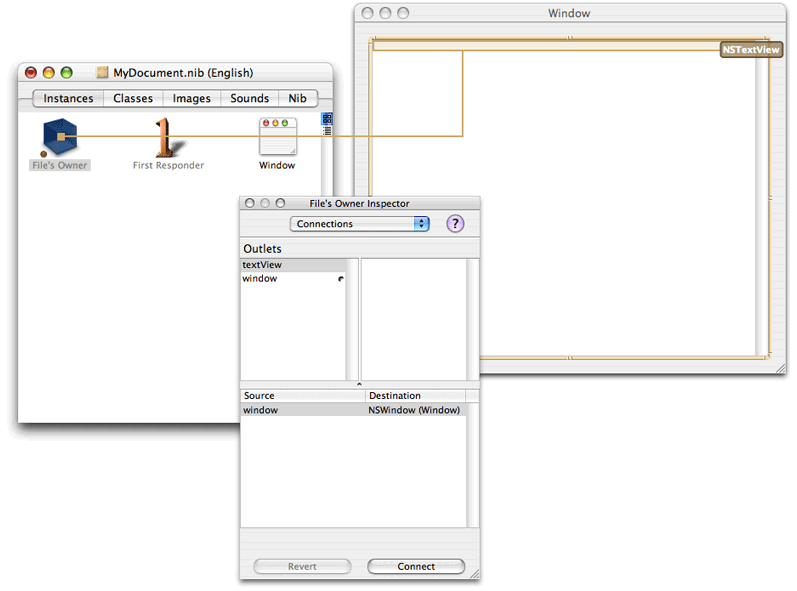
Connect the
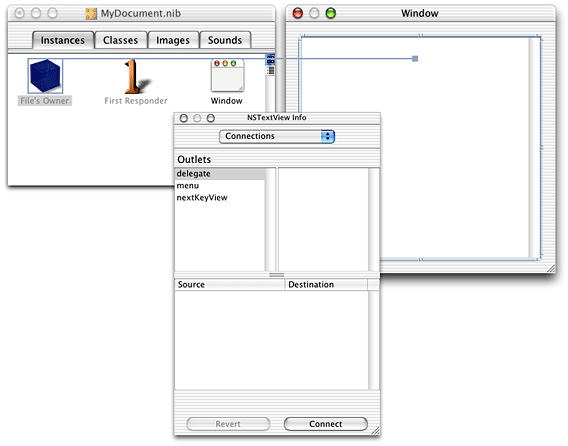
textViewoutlet of the File's Owner by Control-dragging from the File's Owner icon in the Instances pane ofMyDocument.nibto the text view in the window, as shown in Figure 4. Use the File's Owner Inspector to make the connection by double-clicking thetextViewoutlet or by selecting thetextViewoutlet and clicking the Connect button.In Interface Builder, make the File’s Owner (that is, the MyDocument object) the delegate of the text view. Double-click to select the text view in the window and Control-drag from the text view to the File’s Owner icon, as shown in Figure 5. Use the Connections pane of the NSTextView Inspector window to make the connection by double-clicking the
delegateoutlet or by selecting thedelegateoutlet and clicking the Connect button.Implement the text view’s delegate method
textDidChangeinMyDocument.mto synchronize the text string in the document’s data model (themStringinstance variable) with the text storage belonging to the text view, whenever the user changes the text.- (void) textDidChange: (NSNotification *) notification
{[self setString: [textView textStorage]];
}
Implement the archiving and unarchiving methods. When you initially created the project, Xcode placed stubs for these methods in
MyDocument.m. Fill in the method bodies as follows:- (NSData *)dataRepresentationOfType:(NSString *)aType
{NSData *data;
[self setString:[textView textStorage]];
data = [NSArchiver archivedDataWithRootObject:[self string]];
return data;
}
- (BOOL)loadDataRepresentation:(NSData *)data ofType:(NSString *)aType
{NSAttributedString *tempString = [NSUnarchiver unarchiveObjectWithData: data];
[self setString:tempString];
return YES;
}
Applications targeted for Mac OS X v10.4 or later systems should override
dataOfType:error:andreadFromData:ofType:error:instead of the methods shown in this step.Add one line of code to the
windowControllerDidLoadNibmethod to place the contents of the window’s data model into the text view when the window’s nib file is initially loaded. Leave the call to the superclasswindowControllerDidLoadNibmethod and add the following line after it:if ([self string] != nil) {[[textView textStorage] setAttributedString: [self string]];
}
Build and test your application.
Your editor should now be able to save documents that you create into files, and it should be able to open those documents again and continue editing them. If you attempt to close a document that has been changed since it was last saved, the editor displays a warning sheet and lets you save the document.
At this stage of its development, your editor opens and saves documents only with an extension of ????. To enable your application to save and open documents with a recognized file type, you need to use Xcode to configure the application’s document types settings as described in “Storing Document Types Information in the Application's Property List” in Document-Based Applications Overview. For complete details about application property lists, see Runtime Configuration Guidelines.
For more examples of Cocoa text applications, refer to the following URL:
http://developer.apple.com/samplecode/Cocoa/idxTextFonts-date.html
Additional examples, including source code for TextEdit, are contained in the following directory installed with Xcode Tools:
/Developer/Examples/AppKit/
© 1997, 2009 Apple Inc. All Rights Reserved. (Last updated: 2009-04-08)