Creating Projects
As soon as you know what product you are working on, you need an Xcode project. If the product is new, you can create an Xcode project from scratch. Xcode provides project templates to help you create a wide variety of products.
If you are working on an existing product, you probably already have a project. If you have an existing Xcode project, you can simply open the project in Xcode, as described in “Opening and Closing Projects.”
This chapter shows you how to create a project and describes the available project templates.
In this section:
Choosing a Project Template
Specifying the Project Name
Opening and Closing Projects
Choosing the Project Format
Choosing a Project Template
Fairly early in your design process, you make decisions related to the type of product (application, library, command-line tool, and so on) and language or languages (Objective-C, Objective-C++, or C) you plan to use. You also decide which Apple technologies and frameworks to use.
After you’ve resolved these issues, you’ll find that Xcode provides a wide variety of project templates to support your goals. The New Project dialog groups these templates under several product-type groups, such as applications, frameworks, Automator actions, and so on. The dialog provides descriptions for each of the templates available.
Table 3-1 lists the available product types.
Template group | Description |
|---|---|
Application | Templates that build applications. |
Audio Unit | Templates that build audio units. An audio unit is a digital audio plug-in based on Core Audio. See. Audio Unit Programming Guide for details. |
Automator Action | Templates that build Automator actions. Automator actions are loadable bundles that perform discrete tasks for users to link together in a workflow, using the Automator application. For more information, see Automator Programming Guide. |
Bundle | A bundle is a file-system directory that stores executable code and the software resources related to that code. Bundle templates are for loadable bundles—code (such as application plug-ins) that can be loaded when it is needed. For more information, see Bundle Programming Guide. |
Command-Line Utility | A command-line tool is a utility without a graphical user interface. Command-line utilities are typically used in the command-line environment. |
Dynamic Library | A dynamic library is a library for which binding of undefined symbols is delayed until execution; code in dynamic shared libraries can be shared by multiple, concurrently running programs. For details about dynamic libraries, see Dynamic Library Programming Topics. |
Framework | A framework is a hierarchical directory that encapsulates a dynamic library and shared resources in a single package. You access many Apple technologies in Xcode through frameworks. For more information, see Framework Programming Guide. Note that Cocoa is an application framework—one which supplies the basic building blocks of an application, to which you add your own code and features—that is implemented as a framework. |
Java | Templates that build Java products, such as applets, and JNI applications. |
Kernel Extension | A kernel extension (or KEXT) is a piece of code that can be dynamically loaded into the Mac OS X kernel. A driver is a kernel extension that supports one or more devices. For information about kernel extensions, see Kernel Extension Programming Topics |
Standard Apple Plug-in | Templates that build plug-ins for several Apple products, including Address Book action plug-ins, Interface Builder plug-ins, and Spotlight plug-ins. |
Static Library | A library for which all referenced symbols are bound at link time. |
iPhone OS: For information about the iPhone project templates, see About iPhone OS Development and “Creating an iPhone Project” in iPhone Development Guide.
Mac OS X: To learn about the Mac OS X products you can create, see Software Development Overview.
Two additional templates create an empty project and a project that uses an external build system.
The project template you choose specifies a default target and also determines the default source files, resources, framework references, and other information that Xcode includes automatically in the project. A project generally contains all the information it needs to build a product for its default target. This includes a minimal set of source files that you can compile into a running product, as well as default build settings.
The project template names and descriptions should give you a good idea of which project template is right for your product. One way to learn more about a project template is to create a project with that template, examine its contents, and see what happens when you build it. Project templates may change, and new templates are added from time to time with releases of Xcode, but by trying out a template, you can easily examine its default contents in that version of Xcode.
Importing projects: Xcode doesn’t import Project Builder and ProjectBuilderWO projects. For these projects, you must create an Xcode project and add the older project’s files to it.
Specifying the Project Name
The name of your project may consist of uppercase and lowercase letters (a–z), numbers (0–9), dashes (-), and underscores (_). See Uniform Type Identifiers Overview for more information.
Opening and Closing Projects
To open any project, choose File > Open, navigate to the project directory, and choose the .xcodeproj file package you want to open. To open a project you’ve recently used, choose the project from the Recent Projects submenu in the File menu. To close a project, you can choose File > Close Project, or close the project window.
You can have Xcode automatically remember the state of a project’s windows and restore them when you next open the project. To do so, choose Xcode > Preferences, click General, and select “Save window state” in the Environment options. If this option is unselected, opening a project displays only the project window. If this option is selected, opening the project restores the project window and any other open windows to the state they were in when you last closed the project.
Choosing the Project Format
You may work in a team in which some team members may need to use an Xcode release different from the one you use; for example, some developers may need to use Xcode 2.5 while you may want to use Xcode 3.1 to take advantage of features that are not available in earlier releases. If you use Xcode 3.0 to work on the same projects that an Xcode 2.5 user also works on, you have to make sure that you don’t use Xcode 3.0 features on those projects; otherwise, your Xcode 2.5–using colleague may have trouble working on or even opening the projects.
To help keep shared projects usable by developers using different Xcode releases, Xcode allows you to specify the release with which a project must remain compatible. This feature is based on project formats. A project format tells Xcode how to store the project configuration into the project file inside the project package (see “The Project Directory” for details). A project configuration is the set of development features, project attributes, and project and target build settings used in a project.
Project formats allow you to specify an Xcode release with which a project must be compatible. This feature lets you use a later release of Xcode to work on a project created with an earlier release while ensuring that the project remains compatible with the earlier release.
Note: Another approach to working on a development team that must use multiple Xcode releases is to install multiple Xcode releases on your computer. For example, you can have Xcode 2.5 and Xcode 3.1 on your computer, allowing you to work on Xcode 2.5–based projects and Xcode 3.1–based projects side by side. See Xcode Installation Guide for more information.
The following sections describe how to choose a project format for a project and how to view and resolve conflicts that arise between the project configuration and the chosen format.
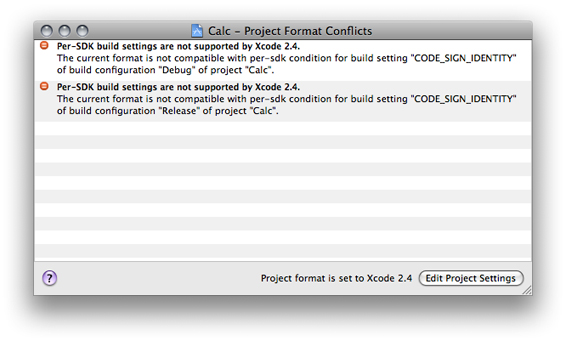
You specify the project format for a project in the General pane of the Project Info window (Figure 1-3). The Project Format menu lists the project formats Xcode supports. When you choose a project format that doesn’t support the project configuration (for example, when a build setting isn’t supported by the chosen format), Xcode notifies you of the incompatibility as shown in “Executables.”

To view the details of the incompatibility, click the Show Conflicts button (this button is available only when there’s at least one conflict). See “Viewing Project Format Conflicts” for more information.
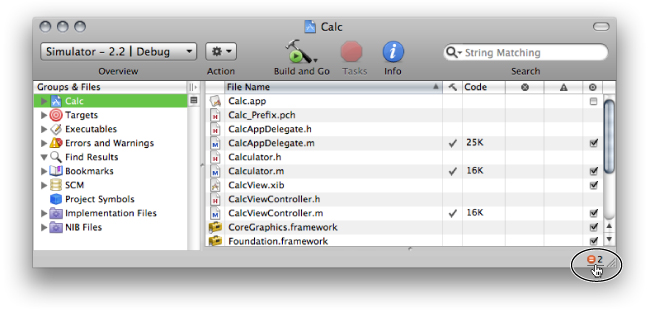
After choosing a project format, if you make use of features that are not supported by that format, Xcode notifies you of the existence of conflicts in the status bar of the project window, as shown in “Product Information.”
Important: When using cross-project references, ensure that the referenced projects use the same project format as the referencing project. If the project formats differ, you may encounter build errors.
Viewing Project Format Conflicts
When a project uses Xcode features that are not supported by the chosen project format, Xcode displays the unsupported features (or conflicts) in the project format conflicts window, shown in Figure 3-3.
This window appears when you click the Show Conflicts button in the Project Info window or the project-conflict notification in the status bar (see “Choosing the Project Format” for details). You have two options for solving these conflicts:
Change the project format to one that supports the feature that’s causing the conflict.
Other developers working on the same project must use a release of Xcode that supports the same project format.
Change the project configuration so that it doesn’t use the feature that’s causing the conflict.
© 2009 Apple Inc. All Rights Reserved. (Last updated: 2009-01-06)