Finding Information in a Project
Being able to find information—knowing how to locate items in a project, as well as knowing how to find information about your project—is critical to working effectively in Xcode.
The Xcode gives you many ways to locate project information and items. Xcode Workspace Guide describes the common paradigms of the Xcode user interface that let you find and manage project contents, including the Groups & Files list, which lets you organize and access the items in your project in an outline view, and the detail view, which lets you quickly filter your project contents. In addition, the Activity Viewer lets you see additional information on Xcode operations, while Info windows let you examine and modify items in your project.
Xcode also maintains a great deal of information about your project’s contents, which it uses to assist you in the development process. The Xcode feature called Code Sense maintains an index that contains symbolic information for your project; Xcode uses this information as the basis for a number of features that let you browse the symbols in your project, view the class hierarchy of projects that use an object-oriented programming language, and search your project for symbol definitions.
This chapter describes how to use Xcode to find information about your project’s contents. It covers:
Searching your project for text, symbols, or using regular expressions
Using the Project Symbols smart group to find information on the symbols in your project
Viewing classes and class members for projects that include object-oriented code, using the class browser
In this section:
Searching in a Project
Viewing Project Symbols and Classes
Searching in a Project
Xcode provides a number of ways to search for information in your project. You can search for text, regular expressions, or symbol definitions in a single file or across multiple files in your project. You can also easily substitute replacement text for one or more instances of matching text or symbols, either within a file or throughout the entire project.
This section describes how to use projectwide search features in Xcode to search through multiple files in your project and its included frameworks for text, regular expressions, and symbol definitions. This section also describes how to view search results. The single-file find and shortcuts for performing searches from an Xcode editor window are discussed further in “Navigating Source Files” in Xcode Workspace Guide.
For more information on Code Sense, the technology that provides symbol definition searches, see “Code Sense.”
The Project Find Window
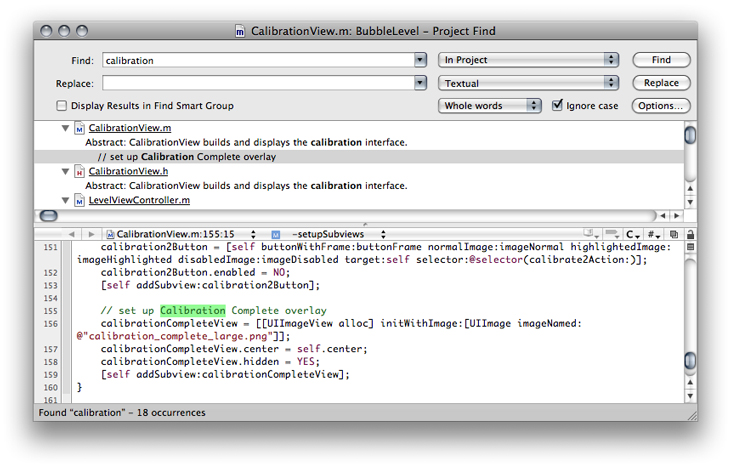
The Project Find window allows you to search for information in some or all of the files included in your project. Using the Project Find window, you can search your project for text, symbol definitions, or regular expressions. To open the Project Find window, choose Edit > Find > Find In Project. A window similar to the one in Figure 5-1appears.
Note: In the All-In-One project window layout, choosing Edit > Find > Find In Project opens the Project Find pane in the project page. The Project Find pane contains the same information as the Project Find window shown in Figure 5-1.
Choosing What to Search For
Using the fields and menus at the top of the Project Find window, you can control what Xcode searches for.
The Find field specifies what to find. Xcode interprets this field differently, depending on the value of the pop-up menu to the right of the Replace field.
The pop-up menu to the right of the Replace field specifies the type of search; it contains the following options:
Textual. Finds any text that matches the text in the Find field.
Regular Expression. Finds any text that matches the regular expression in the Find field. Xcode uses the ICU library for regular expression matching; for more information, see the ICU User Guide.
Definitions. Finds any symbol definition matching the symbol name in the Find field.
Symbol. Finds code that uses the symbol identified in the Find field.
Important: Xcode uses Spotlight to find symbols. Therefore the volume on which the source code you’re searching through must be indexed by Spotlight. If the source code is stored on a disk image, you must mount the disk image and tell Spotlight to index the volume it represents using this command:
> sudo mdutil -i on /Volumes/<volume_name>
The pop-up menu to the right of the Display Results in Find Smart Group option controls how Xcode determines a match to the contents of the Find field. The available options are:
Contains. Choose this option to find text or symbol definitions that contain what is in the Find field.
Starts with. Choose this option to find text or symbol definitions that begin with the contents of the Find field.
Whole words. Choose this option to find text or symbol definitions that contain only what is in the Find field.
Ends with. Choose this option to find text or symbol definitions that end with the contents of the Find field.
The “Ignore case” option specifies whether or not the search is case sensitive.
As a shortcut, you can also perform a quick search of selected text or regular expressions in an editor window, as described in “Shortcuts for Finding Text and Symbol Definitions” in Xcode Workspace Guide.
Specifying Which Files to Search
To control the scope of a search, use the pop-up menu to the right of the Find field in the Project Find window. This menu contains sets of search options that specify which projects and frameworks to search in. Xcode provides the following default sets of search options:
In Project. Search the files that are directly included in your project.
In Project and Frameworks. Search the files and the frameworks included in your project.
In Frameworks. Search files that are in the frameworks included by your project.
In All Open Files. Search all open files.
In Selected Project Items. Search only in the currently selected project items.
You can further tailor these default sets of search options or define your own sets with the Batch Find Options window, described in “Creating Sets of Search Options.”
Creating Sets of Search Options
The Batch Find Options window lets you further tailor the scope of the search. You can further narrow which files and projects are searched, filter the list of files to be searched according to a regular expression, and add directories to the list of locations to search.
You can modify default sets of search options or define your own sets. Defining your own set is particularly useful if you find yourself searching the same set of files over and over again. Instead of configuring the set of files to search each time, simply configure it once and save it as a search option set. To reuse the search option set, simply choose it from the pop-up menu next to the Find button in the Project Find window.
To open the Batch Find Options window, click the Options button in the Project Find window. You should see a window similar to the one in Figure 5-2.
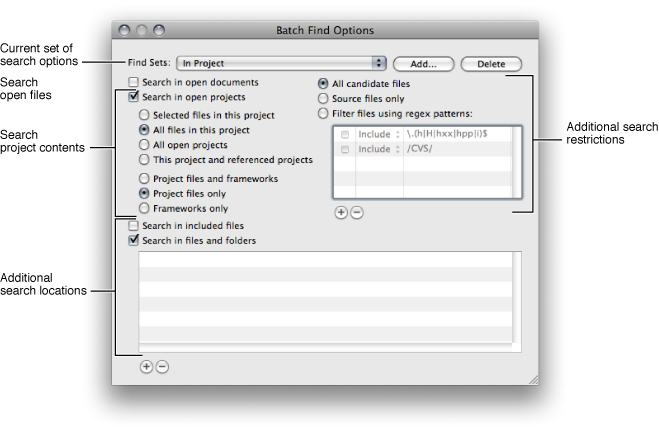
The Find Sets menu at the top of the Batch Find Options windows lists the available search option sets. To create a new set, click Add. Specify a name for the new set in the dialog that appears. Xcode creates a new set of search options with default values. To delete a set of search options, choose that set from the Find Sets menu and click Delete.
To edit a search option set, choose that set from the Find Sets menu and set the search options you wish to include. The Batch Find Options window provides the following options to control which files Xcode searches:
“Search in open documents” includes all files that are open in an editor in the search.
“Search in open projects” includes open projects in the search. You can further control which files in those projects are searched using the radio buttons below the “Search in open projects” option.
The top set of radio buttons controls which projects are searched and bottom set of radio buttons lets you specify whether to include project or framework files in the search.
“Search in files and folders” allows you to add specific files or directories to the search. Any files or directories listed in the table below this option are included in the search. To add an entry to this table, click the plus (+) button and choose a file or directory from the dialog that appears, or drag the file or directory from the Finder. You can also click in the table and press Return. To delete a file or directory from this table, select the entry and click the minus (-) button.
You can further restrict the files that are searched by a search option set using the radio buttons on the right side of the Batch Find Options window. You have the following options:
“All candidate files” does not limit the searched files further. This searches all of the files in the search scope specified by the other options in the Batch Find Options window.
“Source files only” limits the search to files containing source code.
“Filter files using regex patterns” lets you filter the files to search using one or more regular expressions. These regular expressions are specified in the table beneath this radio button. To add an expression to this list, click the plus (+) button.
The first column in the table specifies whether to use the corresponding regular expression. The second column specifies whether to return the files that match a given regular expression or the files that do not match the regular expression.
Viewing Search Results
When you perform a projectwide find, the results of the search are listed below the search criteria; results are organized according to the file in which they appear. You can view a particular search result in the file it was found in by selecting it in the Project Find window; Xcode opens the file to the matching text and displays it in the attached editor. Double-click a search result to open it in a separate editor window.
Each search, and its results, is also collected in the Find Results smart group that appears in the Groups & Files list of the project window, as shown in Figure 5-1. If you select the Display Results in Find Smart Group option, Xcode automatically brings the project window to the front and discloses the contents of the Find Results smart group when you perform a search, instead of showing the results in the Project Find window.
You can see all the searches you have performed by clicking the disclosure triangle next to the Find Results smart group in the Groups & Files list. To view the results of a given search, select that search in the Groups & Files list and, if necessary, open a detail view. The detail view shows all of the results for the selected search, as shown in Figure 5-3. You can view the combined results of several searches by selecting those searches in the Groups & Files list. Double-clicking an item in the Find Results group in the Groups & Files list opens a Project Find window with the corresponding search specification as well as a detailed find results list. This allows you to rerun previous searches.
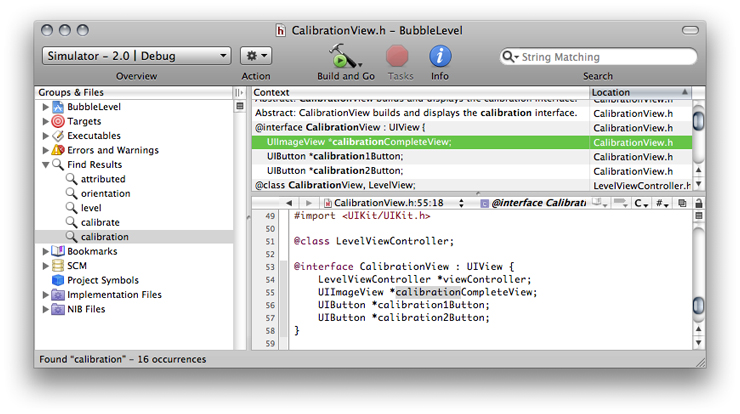
The detail view shows the context for each search result and the file in which the match occurs. The context of a search result is the surrounding text in which it appears for text searches, and the type and name of the matching symbol for a symbol definition search. To show or hide either of these two columns, use the View > Detail View Columns menu items or Control-click in any column header and choose the desired column from the contextual menu.
To view the source for a particular result, select the result in the detail view. If the project window or detail view has an attached editor, selecting a search result displays the source in the editor. You can double-click a search result to open the source for the result in a separate window.
You can sort the results of a search according to the file in which they occur. Click the Location column heading to sort the detail view by location. You can also filter the search results using the search field in the project window toolbar. Using the location of the search result as an example again, you can type all or part of a filename to see only those results that occur in the file of that name.
Replacing Text in Multiple Files
You can use the Project Find window to replace some or all occurrences of the search string specified in the Find field. To replace text in multiple files:
Type the substitution text in the Replace field
Select one or more entries to replace. To choose which occurrences of the given search string to replace, do either of the following:
Select one or more entries to replace in the find results pane of the Project Find window.
Choose a search from the Find Results smart group in the project window. In the detail view, select one or more occurrences of the search string to replace.
Click the Replace button in the Project Find window.
If the contents of the Project Find window’s find results pane are disclosed, Xcode uses the selection in the Project Find window to determine which occurrences to replace. If the find results group is closed, Xcode uses the selection in the detail view of the project window.
Viewing Project Symbols and Classes
Xcode includes a technology called Code Sense that maintains detailed information about the symbols in and utilized by your project to assist you in the development process. Code Sense uses the information in this symbol index, allowing you to browse the symbols and classes in your project, and perform symbol definition searches. It also uses this information to provide completion suggestions when editing source code, as described in “Completing Code” in Xcode Workspace Guide.
This section introduces Code Sense and discusses two of the features that it enables: the Project Symbols smart group and the class browser. In this section you learn how you can use the Project Symbols smart group to view symbols and how you can take advantage of the class browser to find information on the classes defined in your project and its included frameworks. The other features provided by Code Sense are described in other parts of this document.
Code Sense
Code Sense makes it simple to find and view information about your code and to gain easy access to project symbols. Code Sense maintains detailed information about the code in your project and in libraries used by your project; this information is stored in a project index. Using this project index, Code Sense provides support for features such as the following:
Code completion. Code completion, described in “Completing Code” in Xcode Workspace Guide, assists you in writing code by providing completion suggestions from within the editor. Code completion uses the stored information about the symbols, as well as the contextual information from your source code, to offer a list of classes, methods, functions, or other appropriate symbols for the code you are working on.
Class browser. Using the class browser, you can view the classes in your project and its included frameworks. From the class browser, you can easily access declarations, source code, and documentation for these classes and their members. The class browser is discussed in the section “Viewing Your Class Hierarchy in the Class Browser.”
Project Symbol smart group. The Project Symbol smart group allows you to view all of the symbols in your project directly in the project window. You can search these symbols or sort them according to type or name to quickly find the symbols you need. The Project Symbols smart group also gives you easy access to a symbol’s definition. The Project Symbols smart group is described in “Viewing the Symbols in Your Project.”
Searching. Xcode offers numerous ways to search for symbols and other information in your project. For instance, you can perform a projectwide search for symbol definitions, or you can select an identifier in an editor window and jump to its definition. These and other search features are described in “Searching in a Project.”
The project index used by Code Sense is created the first time you open a project. Thereafter, the index is updated in the background as you make changes to your project. Indexing occurs on a background thread, to keep it from interfering with other operations in Xcode. The index can be completely rebuilt, if necessary, by opening the General pane in the Project Info window and clicking the Rebuild Code Sense Index button.
Indexing is enabled by default. You can disable indexing for all projects that you open. To do so, choose Xcode > Preferences, click Code Sense, and deselect the “Enable for all projects” option in the Indexing section.
Note that if you turn off indexing, you will be unable to use those features that rely on the project index, such as code completion, the class browser, and the other features mentioned in this section. You can specify whether Xcode includes a particular file in the project index using the “Include in index” checkbox in the File Info window, described in “Viewing File Information” in Xcode Workspace Guide.
Viewing the Symbols in Your Project
The Project Symbols smart group, one of the built-in smart groups provided by Xcode, allows you to view all of the symbols defined in your project. You can sort symbols by type, name, file, and file path, and you can search for symbols that match a string. To see the symbols defined in your project, select the Project Symbols smart group in the Groups & Files list. The detail view displays the symbols in your project. When you select the Project Symbols group for a project, you get a view like the one shown in Figure 5-4.
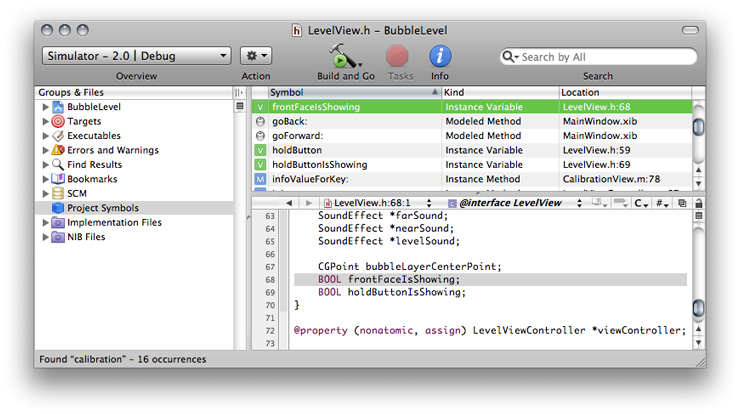
The detail view shows the following information for each symbol:
An icon indicating the symbol type, such as structure, function, or method. The icon is a visual cue that allows you to glance at a group of symbols and easily discern the type. The letter in the icon reflects the symbol type; for example, “M” for method, or “V” for variable. The color of the icon indicates the relative grouping of the symbols. For instance, purple icons indicate top-level elements such as Classes or Categories while orange icons represent basic types like structures, unions, typedefs and others.
The symbol name.
The symbol type. While the symbol type icon provides a handy visual cue as to the symbol type, the Kind column states the type explicitly.
The file containing the symbol definition or declaration, and the line number at which the symbol appears.
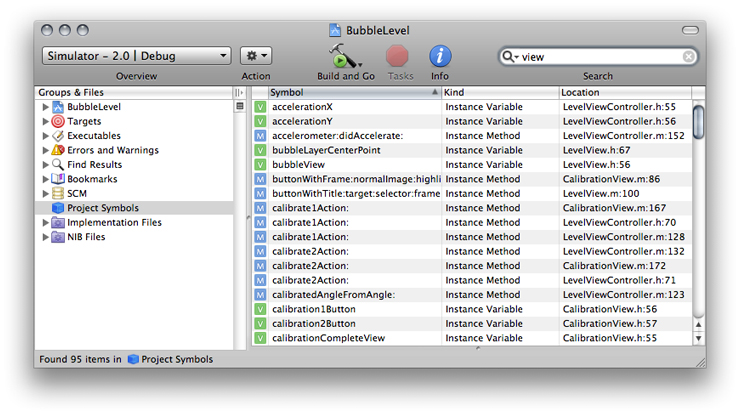
To sort the symbols listed in the project window according to any of these categories, simply click the appropriate category heading. In addition, you can use the search field in the project window toolbar to narrow the list of symbols to those matching a string or keyword. You can search the contents of any one of the categories—symbol name, symbol kind, or location—or you can search them all. In the BubbleLevel project, for example, you can search for all symbols declared in files pertaining to views by choosing “Search By Location” from the pop-up menu in the search field and typing view. The symbols listed in the detail view are narrowed to include only those symbols defined in files whose names contain the word “view,” as shown in Figure 5-5. By default, the search field searches the content of all categories in the detail view.
You can configure which information is displayed in the detail view, as described in “The Detail View” in Xcode Workspace Guide.
To view the symbol definition, select the symbol in the detail view. If you have an editor open in the project window or detail view, the symbol definition appears there. If you prefer a separate editor window, double-click the symbol to open the file containing the symbol definition in a separate editor.
If you Control-click a symbol in the detail view, Xcode displays the symbol’s shortcut (or contextual) menu, which contains a number of useful commands. The commands available to you are:
Reveal in Class Browser. If the selected symbol can be displayed in a class browser—for example, a class or a method—choosing this menu item opens the class browser window and selects the symbol in the browser. You can also reveal the selected symbol by choosing View > Reveal in Class Browser.
Find Symbol Name in Project. When you choose this item, Xcode searches your project for the selected symbol name. It performs a textual search, just as if you had typed the symbol name into the Project Find window and selected Textual from the search type menu. The results of the search are displayed in the Find Results smart group.
Copy Declaration for Method/Function. This command copies the declaration for the selected symbol to the clipboard; you can then paste this declaration into any text field or editor using Command-V. This command works only for functions and methods.
Copy Invocation for Method/Function. This command copies the invocation string for the selected symbol to the clipboard, which you can then paste into any text field or editor. The invocation string is the same string that is inserted into your code when you select a code completion option. This command works only for functions and methods.
Note: The availability of these commands in a symbol’s contextual menu depends on how you configure the class browser. See “Choosing What the Class Browser Displays” for details.
You can also reveal the file in which the selected symbol is defined in the Groups & Files list by choosing View > Reveal in Group Tree.
Viewing Your Class Hierarchy in the Class Browser
If you are programming in an object-oriented language, you can view the class hierarchy of your project using the Xcode class browser. To open the class browser, choose Project > Class Browser. You can also open the class browser by selecting a symbol in the Project Symbols smart group and choosing View > Reveal in Class Browser. Figure 5-6 shows the class browser.
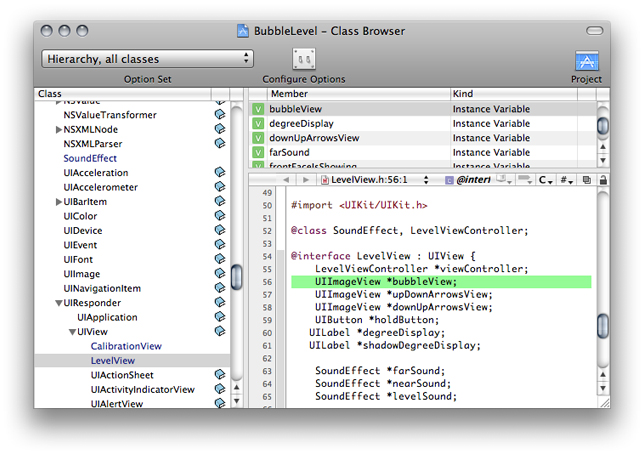
Classes and other top-level symbols—protocols, interfaces, and categories—are listed in the Class pane on the left side of the class browser. When you select a class from this list, Xcode displays the members of that class in the table to the right of the Class pane. When you select a member name from this table, the declaration of that member item is displayed in the editor pane below. To see the item’s definition, Option-click its name.
If the class browser does not list any classes, your project may not be indexed. To rebuild the index, select your project and open the Info window. Open the General pane and click Rebuild Code Sense Index.
A book icon beside a class or member’s name indicates that documentation is available for that member. You can view this documentation by clicking the book icon.
The class browser uses fonts to distinguish between different types of classes and class members:
Classes defined in your project’s source code are in blue. Classes defined in a framework are in black.
Members defined in the class are black. Inherited members are gray.
The Option Set pop-up menu and Configure Options button in the toolbar of the class browser window control which classes and class members are displayed in the browser.
To see the file that a class or member in your project is declared in, select the class or member in the class browser and choose View > Reveal in Group Tree. This option is also available in the contextual menu for classes and class members. Xcode reveals the file in the Groups & Files list in the project window.
You can bookmark a class or class member by selecting it in the class browser and choosing Find > Add to Bookmarks or by choosing Add to Bookmarks from the shortcut menu. Xcode creates a bookmark to the class or member’s definition.
Choosing What the Class Browser Displays
You choose which information Xcode displays in the class browser using the Option Set pop-up menu at the top of the browser window. This menu lets you switch between sets of display options. Xcode provides a few sets of predefined display options that allow you to choose:
Whether to view all classes included in your project or just those defined in your project
Whether to view classes as a flat list or a hierarchical list
When you view classes as a hierarchical list, you can see the subclasses of a class by clicking the disclosure triangle next to that class.
To create your own set of display options or to make changes to an existing set, click the Configure Options button. Xcode displays a dialog, shown in Figure 5-7, that lets you further refine which information is displayed in the class browser. The Class List Display Settings group, on the left half of the dialog, controls what is displayed in the Class list. The Member List Display Settings group, on the right, controls what is displayed in the members list.
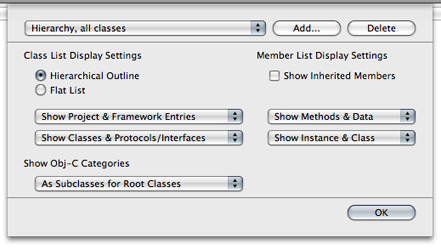
To choose how to display classes, use the radio buttons under Class List Display Settings:
Choose Hierarchical Outline to view a hierarchical list of classes, where subclasses are listed under their superclasses.
Choose Flat List to view an alphabetical list of classes, where all classes are at the same level and sorted alphabetically.
The pop-up menus under the Class List Display Settings options let you choose which items the class browser displays in the Class list. The first pop-up menu determines which classes the class browser shows:
Show Project Entries Only. Shows only those classes defined in your project.
Show Framework Entries Only. Shows only those classes defined in the frameworks that your project includes.
Show Project & Framework Entries. Shows all of the classes defined in your project and in the frameworks that your project includes.
The second pop-up menu determines whether to show only classes, only protocols and interfaces, or classes, protocols and interfaces.
If you are programming in Objective-C, the Show Obj-C Categories menu lets you choose how Xcode displays Objective-C categories in the Class list:
As Subclasses. The class browser lists categories under the classes that they extend.
As Subclasses for Root Classes. The class browser lists categories under the root class of the classes that they extend.
Always Merged into Class. The class browser lists all members of a class and any categories that extend that class together. The category does not appear as a separate entry in the Class list.
The Member List Display Settings let you control which items are included in the class members table in the class browser. You can choose the following:
Whether to display members inherited from the class’s superclass. To display inherited members, select the Show Inherited Members option.
The inherited members that the class browser shows are limited by the scope of the selection in the first pop-up menu under Class List Display Settings. For example, if you have Show Project Entries Only selected, the class browser displays only inherited members from inherited classes in the project. To see all inherited members from all classes, choose Show Project & Framework Entries from the first pop-up menu in the Class List Display Settings group.
Whether to display only methods, only data members, or both methods and data members, using the first pop-up menu in the section.
Whether to display only instance members, only class members, or both instance and class members, using the second pop-up menu in the section.
Saving and Reusing Class Browser Options
You can save and reuse sets of class browser options. To reuse an existing set, choose it from the Options Set pop-up menu above the Class list.
To create a new set of search options, click the Configure Options button, click Add, enter a name for your options set, and configure your options.
To remove a set of search options, click the Configure Options button, choose the options set from the pop-up menu, and click Delete.
© 2009 Apple Inc. All Rights Reserved. (Last updated: 2009-01-06)