Source Control
Using Xcode Source Control you can easily perform the most common source control operations from the Xcode user interface instead of your source control client’s command-line interface.
Note: Features of particular SCM clients (such as the Subversion global-ignores feature) are not accessible through Xcode. You need to use your client’s user interface to take advantage of these features.
The following sections describe how to have Xcode connect to source control repositories, how to work with managed files and projects, and how to view, compare, and restore change sets stored in repositories.
In this section:
Connecting to Repositories
Managing Files Under Source Control
Managing Revisions
Connecting to Repositories
Xcode provides an easy-to-use interface to your source control system. You can perform most source control tasks as you perform normal development tasks, including checking out projects, publishing your changes, and comparing revisions.
Important: To take advantage of all of your SCM system’s capabilities you should be familiar with its operation using its client tool.
This chapter explains how to create repository configurations, how to use the Repositories window to navigate and modify repositories, and how to configure Xcode’s comparison and differencing operations.
Repository Configurations
A repository configuration is a set of data that tells Xcode how to use a particular source control client tool to access a specific repository.
This section describes how to create repository configurations and how to browse and modify repositories.
SCM Preferences
The SCM pane of Xcode preferences is where you create repository configurations that tell Xcode how to access the repositories that store the projects you work on. This section describes how to create repository configurations, set up source control comparison and differencing options, and provide passwords for the SSH keys stored in your keychain.
Repository List
The Repositories pane (Figure 2-1) contains the list of repository configurations you have created. Each repository configuration points to a particular path within a repository. Therefore, you may have more than one repository configuration that references the same repository.
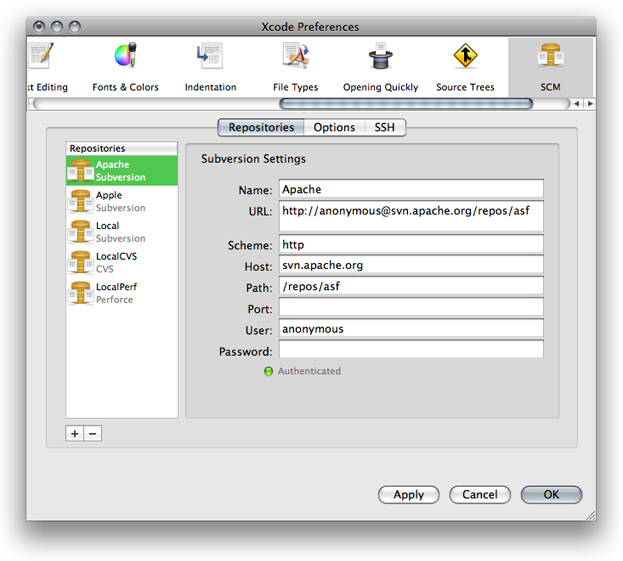
To the right of the repository list are the settings that apply to the repository selected in the list. Figure 2-1 shows the settings used for a Subversion repository.
To learn how to create repository configurations, see “Creating Repository Configurations.”
Comparison and Differencing Options
The Options pane (Figure 2-2) contains settings that let you specify how Xcode performs source control and file comparison operations.
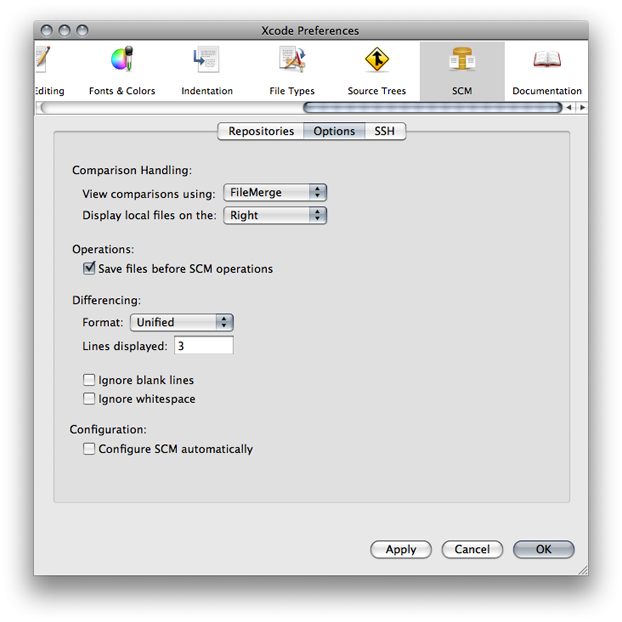
Comparison Handling. Specifies how Xcode compares files using the Compare command, described in “The Compare Command.” These options are:
View comparisons using. Specifies the application used to compare files.
Display local files on. Specifies the side of the window on which you want the local version of the file to appear when comparing file revisions.
Operations.
Save files before SCM operations. Specifies whether Xcode automatically saves changed files before performing any source control operations.
Differencing. These options specify how Xcode performs file comparisons using the
diffcommand:Format. Specifies the format in which the output from the
diffcommand is displayed. For a list of the possible formats, see “Comparison and Differencing Options.”Lines displayed. Specifies the number of lines of context displayed around each difference.
Ignore blank lines. Specifies whether blank lines are skipped when differencing files.
Ignore whitespace. Specifies whether to ignore whitespace when differencing files.
Configuration.
Configure SCM automatically. Specifies whether Xcode chooses an appropriate SCM repository for a project after checking it out using the Repositories window. See “Checking Out Directories” for more information.
SSH Keys
The SSH pane contains the list of SSH keys stored in your keychain.
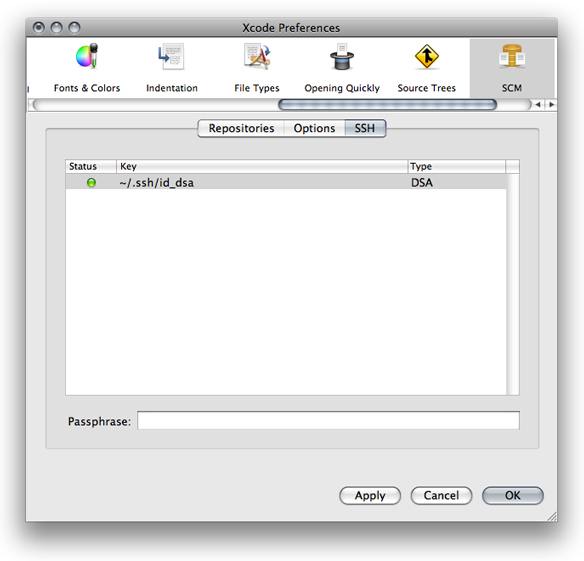
The Status column indicates whether Xcode is able to access a particular SSH key.
To have Xcode ask you for a passphrase when it needs to use a particular SSH key, enter the passphrase in the Passphrase text field.
Repositories Window
After you’ve added at least one repository configuration in Xcode SCM Preferences, you can browse the contents of repositories in the Repositories window (Figure 2-4). To open the Repositories window:
Choose SCM > Repositories
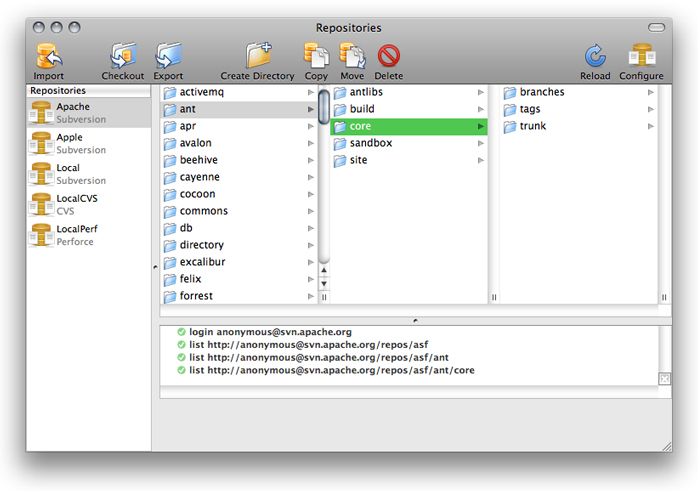
The Repositories window contains three parts:
Repository list. Lists the repository configurations you’ve created.
Repository browser. Allows you to navigate the structure of the repository selected in the repository list.
Operation log. Lists the source control operations Xcode performs as you navigate or modify a repository.
Creating Repository Configurations
To create a repository configuration:
Open Xcode > SCM Preferences.
Click the Add (+) button below the repositories list.
In the dialog that appears, enter a name for the repository configuration and choose the source control system you want to use.
In the repository settings pane, enter the appropriate information for the source control system you selected. (Consult your SCM system’s documentation to find out the appropriate values for the pane’s fields.)
If you’re using Subversion, you may enter the repository URL entirely in the URL field or piece by piece in the fields below it (except the Password field).
Enter the password (if required) in the Password field.
When accessing a repository using SSH, Xcode offers to store your SSH key in your keychain. With your SSH keys stored in the keychain, Xcode doesn’t prompt you to authenticate every time it talks to your source control system. See “SSH Keys” for more information.
Browsing and Modifying Repositories
The Repositories window, described in “Repositories Window,” allows you to navigate the repositories that your repository configurations reference. You may also perform repository management operations, such as importing and exporting projects, creating and deleting directories, and copying and renaming/moving directories. (Because not all of the supported source control systems provide API for each of these operations, some of them may not be executable through the Xcode user interface.)
Importing Directories
To import a directory into a repository:
Drag a reference to it from the Groups & Files list or the Organizer window to the Repositories window.
Or perform these steps:
Open the Repositories window.
Select the repository into which you want to import the project.
Navigate to the location within the repository at which you want to place the project.
Click Import.
Select the directory to import.
Enter a comment about the operation.
Click Import.
Checking Out Directories
To check out a directory from a repository:
Drag the directory from the Repositories window to a Finder window.
Or perform these steps:
Open the Repositories window.
Select the repository from which you want to export a project.
Navigate to the directory you want to check out.
Click Checkout.
Select a location in your file system into which to place the working copy of the project.
Click Checkout.
If you selected “Configure SCM automatically” in SCM preferences, after checking out a project directory Xcode configures the project package so that you can perform SCM operations immediately.
Creating Directories
To create a directory in a repository:
Open the Repositories window.
Select the repository on which you want to create the directory.
Navigate to the location on which you want to create the directory.
Click Create Directory.
In the dialog, enter the directory name and a comment for the operation.
Click Create Directory.
Copying Directories
To copy a directory:
Open the Repositories window.
Select the repository on which you want to create the copy.
Select the directory you want to copy.
Click Copy.
In the dialog:
Enter the name of the copy.
Select the copy’s location.
Enter a comment for the operation.
Click Copy.
Moving Directories
To move/rename a directory:
Open the Repositories window.
Select the repository on which you want to operate.
Select the directory you want to move or rename.
Click Move.
In the dialog,
Enter the new name for the directory.
Select the new location for the directory.
Enter a comment for the operation.
Click Move.
Excluding the build Directory from Source Control Operations
A project’s build directory contains many files generated by the Xcode build system. These files should not go into a source control repository because of their volatility and little need to be tracked by such a system.
In managed projects, you should move the projects’ build directory to a location outside the realm of source control operations; that is, outside the project’s project root.
To specify custom location for the build directory, use Xcode Preferences > Building.
Managing Files Under Source Control
Version control allows you to maintain a history of a project’s development and lets you share projects with other developers. Xcode, in conjunction with your version control system, allows you to stay up to date with your team’s progress. Through the Xcode user interface, you can perform most of the version control tasks needed to work on a software project successfully.
This chapter introduces common version control tasks and explains how to accomplish them in Xcode. It also provides the recommended workflow you should follow when working on managed Xcode projects.
File Management Essentials
There are a few essential concepts you need to understand to fully take advantage of source control in Xcode. In an Xcode project directory (the directory that contains the project’s source files, resource files, and other files needed to build the project’s products), the project package (with the extension .xcodeproj) contains two files that you need to pay particular attention to in order to keep the project package in sync with the rest of the files in the project and to maintain personal project settings in the repository: The project file and the user file.
The project file. The project file, which Xcode maintains in the project package under the name
project.xcodeproj, stores project-related information, such as the files that are part of the project, the groups in the Groups & Files list, build settings, target definitions, and so on. Xcode constantly writes out this file; therefore, most of the time its status is M (for details on file status codes, see “Viewing File Status”).If you make structural changes to the project, such as adding or removing files, you must commit this file along with the other changes (for example, when you commit a file you added to your working copy, you must also commit the project package). Otherwise, the project file may become out of sync with the rest of the project’s files (source code files, resource files, and so on).
The user file. The user file stores user-related information, such as bookmarks, the active build configuration, and the name of a repository configuration. Xcode maintains this file inside the project package as
<username>.pbxuser. So, for the user nameclare, the corresponding user file is calledclare.pbxuser.Xcode adds your user file to a project package when you open the project if there isn’t a user file for you inside the package. You should include your user file in your commits and updates if you want to safeguard your personal settings for the project in the repository or if you work on the project on more than one computer and want to use the same settings on all of them.
When working on a project comprised of several Xcode projects, each project should have the same project root. The project root is the directory at which source control operations are rooted. By default, a project’s project root is the project directory. In a software effort that involves only one project, the default project root is usually adequate. However, if you work on an endeavor that comprises more than one project, all the member projects should have the same project root so that source control operations are part of the entire effort instead of only one project. Using a shared project root, you can always view your changes to the endeavor as a whole, regardless of which project is the active project at a particular point. See "Managing Project Information" in Xcode Project Management Guide to learn how to set the a project’s project root.
Note: Xcode provides commands that operate on the entire project. These commands operate on the files in the project root directory (and its subdirectories), even if they’re not referenced in the project file.
File Status
As you work on a project, the version control status of its files in relation to the repository change. Xcode tells you which files you have changed in your local copy of the project, which files need to be updated to the latest version in the repository, and so forth.
Xcode uses a one-letter code to represent the status of each file. Here’s what each code means:
Blank. The file is up to date with the latest version in the repository. You haven’t changed your local copy of it.
? Unknown. The file is not in the repository. See “Adding Files.”
! Unmanaged. The file is not in the repository.
- Dash. The file is in a directory that’s not in the repository, or this is a directory that’s not in the repository. To add a directory to the repository, you must use your client tool. After that, add the files in the directory using Xcode. If you don’t use Xcode to add the files, Xcode will not add the files to the project file. In turn, when you commit your changes, Xcode will not notify other developers that files have been added to the project.
U Update. The latest version of the file in the repository is newer than your version. To check for conflicts between your version and the latest revision and then get the latest revision if there are no conflicts, select the file in the detail view and choose SCM > Update To > Latest.
C Conflict. Your changes may conflict with the changes in the latest version. To see conflicts, select the file in the detail view and choose SCM > Compare With > Latest.
M Modified. The next time you commit your changes to the file, either by selecting it and choosing SCM > Commit Changes or by choosing SCM > Commit Entire Project, the modified version of this file is added to the repository.
A Added. The next time you commit your changes, this file is added to the repository.
R Removed. The next time you commit your changes, this file is removed from the repository.
You can view the source control status of files in several places: The SCM smart group, the detail view, and the SCM Results window.
Note: You can refresh the status of the files in your project anytime by choosing SCM > Refresh Entire Project.
SCM Smart Group
The SCM group in the Groups & Files list in the project window shows the status of all the files that differ from the latest version in the repository or for which you’ve specified a version control operation to be performed later, such as adding a new file to the repository. “The SCM group in the Groups & Files list” shows the SCM group.
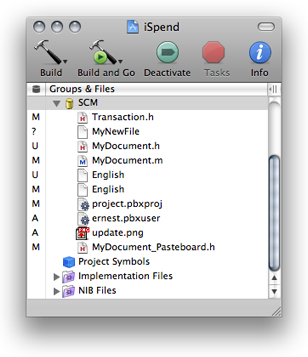
You can also use the SCM column in the Groups & Files list, to see the status of your project's files in the outline view.
Note: The SCM group displays all files under source control in the project root directory, even files that are not part of the project.
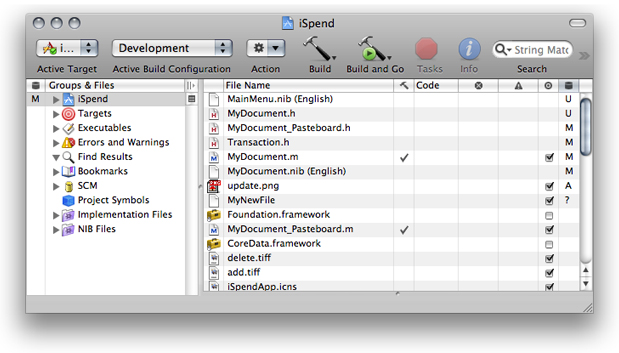
Detail View
The detail view lists all the files in a project. When using version control, you can add the SCM column to the detail view by using the shortcut menu of the detail view header. The SCM column shows the status of each file in the project. “The SCM column in Xcode’s detail view” shows the SCM column (the rightmost column) in the detail view.
SCM Results Window
The SCM Results window provides the same information the SCM group does, plus a log of SCM operations. The window appears when you double-click the SCM group or when you choose:
SCM > SCM Results
“The SCM Results and editor panes in the SCM Results window” shows the SCM Results window.
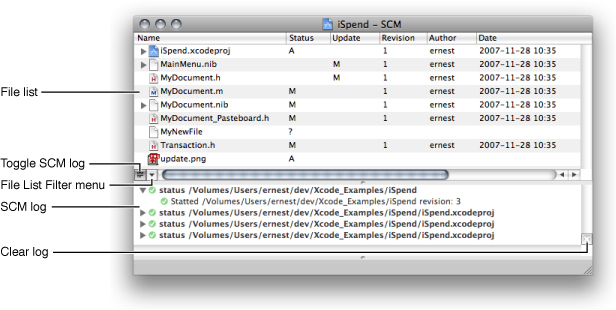
These are the window’s controls:
Files list. List of files in the project. You can filter this list using the File List Filter pop-up menu.
File List Filter menu. Specifies which files are displayed in the file list. The options are:
All. No filter.
Interesting. Hierarchical list of files with nonblank source control status.
Flat. Flat list of files with nonblank source control status.
Toggle SCM log. Shows/hides the SCM log.
SCM log. Lists the SCM operations Xcode performs.
Clear log. Clears the SCM log.
Adding Files
After you add a file to your local copy of a managed directory, its status is ? (unknown). This means that the file is not part of the repository. If you want to add the file to the repository the next time you commit your changes, select the file in the project window or the SCM Results window and choose:
SCM > Add to Repository
The status of the file changes from ? to A.
When you commit file additions, you must commit the project file (project.xcodeproj) at the same time. This lets other developers know there’s a new file in the project as soon as you commit the addition. If you don’t commit the project file when you commit the file addition (that is, if you select a file with a status of A, and commit its changes to the repository without also selecting the project file), other developers will not be able to get the added file into their local copies of the project, because Xcode wouldn’t know that a file was added to the project.
Updating Files
When a file in your local copy of a project becomes outdated, Xcode assigns it a status of U. This means that another developer has submitted changes to that file to the repository and your working copy doesn’t include them.
To update your local copy of a file that needs updating select the file in the project window and choose:
SCM > Update To > Latest
To update your local copy all the files in the project root that need updating, choose:
SCM > Update Entire Project
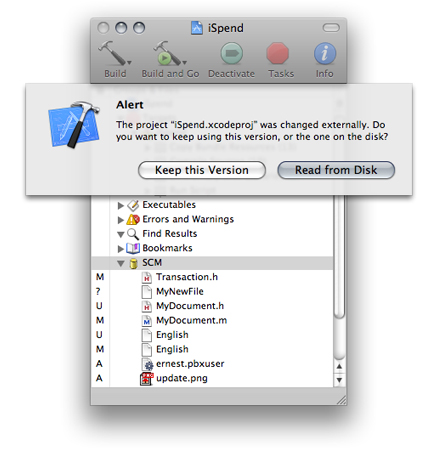
When the project package (project.xcodeproj) has a status of U, you need to update the project package and reopen the project in Xcode. “The SCM group in an Xcode project whose project package needs to be updated” shows the SCM group of an Xcode project whose project package needs to be updated.
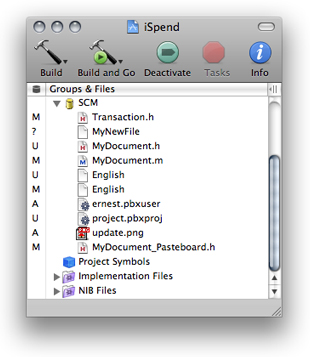
To update the project package, select project.xcodeproj in the SCM group and choose:
SCM > Update To > Latest
Alternatively, you can choose:
SCM > Update Entire Project
After the update operation is completed, you may get a dialog (Figure 2-9) that tells you that the project package was changed in the file system and asks you whether to keep using the version in memory or reload the project from the file system. To work with the latest version of the project package in the repository, choose to reload the project.
If you updated only the project package, when you reopen the project, the SCM group may display files with a status of U using red text. These files were added to the project after your last update. To get the new files into your working copy, perform the Update To Latest command on them. To refresh the status of the files in your working copy after the update operation is complete, choose:
SCM > Refresh Entire Project
Removing Files
To remove a file from your local copy of a project and from the repository when you commit the operation, remove the file as you normally would; that is, select the file in the project window and choose:
Edit > Delete
If you choose to delete the file, the Remove From SCM Repository dialog, shown in “The Remove From SCM Repository dialog,” appears.
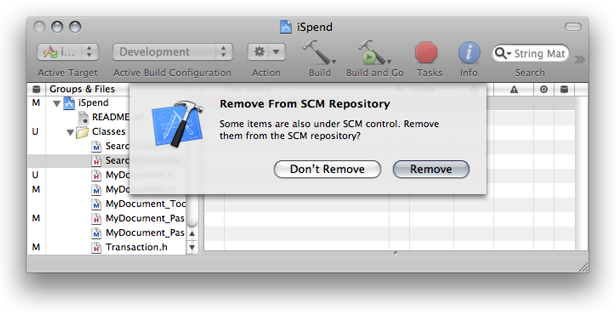
To tell Xcode you want the file removed from the repository, click Remove. The file’s status changes to R and the filename appears in gray in the Groups & Files list and the detail view.
When you commit the file-removal operation, you must commit the project file (project.xcodeproj), at the same time. Other developers can then keep their project files in sync with the project directory by updating their local copies. If you don’t commit the project file when you commit the file-removal operation (for example, if you select a file with a status of R, and commit it without also selecting the project file), Xcode notifies other developers that the file you removed needs to be updated. When they update their local copy with the repository, the file is removed from their local copy, but their copy of the project file still references the nonpresent file, and the file appears in red in the detail view. This may confuse developers, who will then have to find out why a file that’s supposed to be in their project directories is missing.
Renaming Files
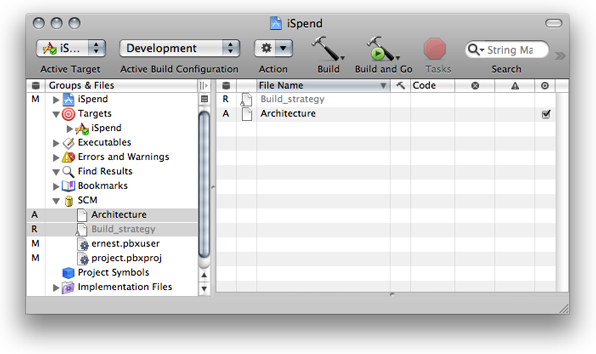
Renaming a file produces two version control operations: the removal of the file under the old name and the addition of the file with the new name. Therefore, Xcode shows the R status next to the old name and the A status next to the new name.
Warning: When you rename a managed file, the change information for the file under the old name is unavailable under the new name.
To rename a file, rename it in the Groups & Files list select the file in the project window and choose:
File > Rename
The Rename dialog appears, as shown in “Renaming a managed file.”
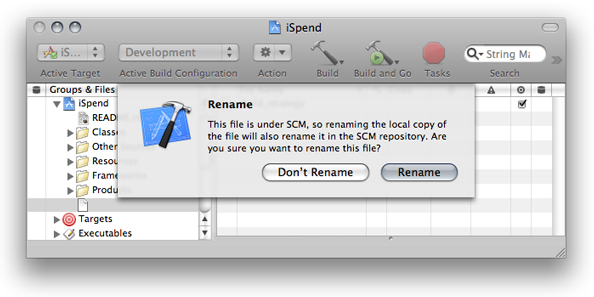
To proceed with the rename, click Rename. The SCM group in the Groups & Files list, as well as the detail view, show that the file under the old name will be removed and the file with the new name will be added, as shown in “Uncommitted rename operation.”
Working Offline
You can control access to the version control system you are using with the SCM > Go Online and SCM > Go Offline menu items. These items allow you to temporarily turn off or reenable access to the version control system if you move to a different network or lose your network connection. For example, if you are going to be somewhere without network access, you can take your project offline to prevent Xcode from attempting to access the version control system.
To take your project offline, choose:
SCM > Go Offline
To take your project online, choose:
SCM > Go Online
If version control goes offline due to a network disruption, access automatically goes back online when the network is reconnected.
Managing Revisions
Committing Your Work
When you’re done making changes to a file and you want to submit your modifications to the repository, you can tell Xcode to commit the file in one of two ways:
Select the file in the project window and choose SCM > Commit Changes.
Choose SCM > Commit Entire Project.
This command commits pending changes in the project root. Files with pending changes that are part of the project are listed in the Groups & Files list with status A, M, or R.
Both actions bring up a dialog with a text field in which you enter a message describing your changes. To execute the command, click Commit.
Viewing Revisions
You can view the revisions for an entire project or the revisions that pertain to a particular file using the project editor or the file-info editor, respectively. “Info window displaying the revisions of a file” shows the SCM pane of the file-info editor.
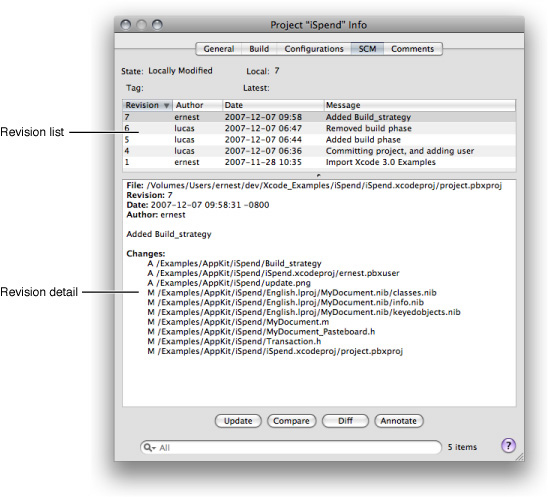
The SCM pane has these controls:
Revision list. Lists the revisions for the project/file. You can use the search field to narrow the items shown.
The information displayed in the list includes the revision number, the author, and a message about the changes made.
Revision detail. Shows detailed information about the revision selected in the revision list.
Update button. Updates your copy of the project/file to the selected revision.
Compare button. Compares either a selected revision and the project/file or two selected revisions against each other.
Diff button. Differences either a selected revision and the project/file or two selected revisions against each other.
Annotate button. Lets you add an annotation to the project package (in the project editor) or the selected file (in the file-info editor).
Search field. Filters the revisions shown in the revision list.
Comparing Revisions
You can compare different versions of a file in a project. This way, you can see changes made to a file from version to version. For example, you can compare your locally modified version of a file with the latest revision submitted by another member of your team. Or you can compare the two most recent revisions in the repository to see what has changed.
To compare your version of a file or project with a version in the repository, use either:
SCM > Compare With
SCM > Diff With
You can also select any two revisions of a file in its file-info editor and compare them using the Compare and Diff buttons.
Xcode gives you a choice of tools to use when comparing files. The Compare With command lets you compare files using a visual tool, such as FileMerge. Alternatively, you can have Xcode perform the comparison using the differencing facility of your client.
You can specify several comparison and differencing options. See “Comparison and Differencing Options” for details.
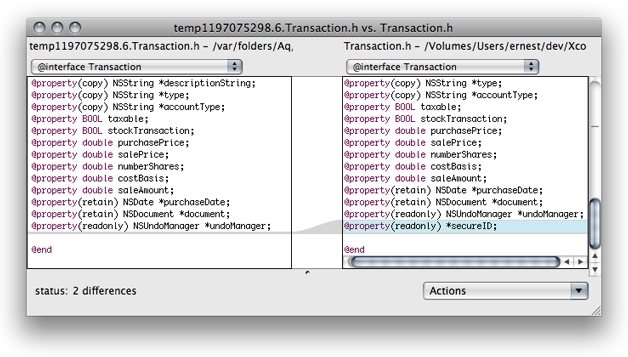
The Compare Command
The Compare With command allows you to compare files using a visual tool. “Comparing two revisions of a file using FileMerge” shows the result of comparing two revisions of a file.
To compare your version of a file with a revision in the repository:
Select the file in the project window.
Choose SCM > Compare With.
and select the revision to compare against:
Latest. Choose this option to compare a file with the latest version in the repository.
Base. Choose this option to compare a file with the version you checked out of the repository.
Revision. Choose this option to get the revision list for the selected file. This option is useful if you’re not sure of the revision you want to compare against.
Specific Revision. When you know the revision you want to compare against, choose this option and enter the revision number in the dialog that appears.
File. Choose this option to compare a file in your project with any file on the file system. Choose the other file from the dialog that appears.
You can also compare any two revisions of a file in its file-info editor by selecting the revisions you want to compare in the revision list and clicking Compare.
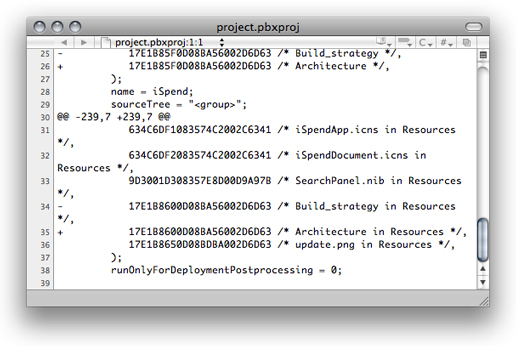
The Diff Command
Another way to compare revisions using Xcode is to identify the differences between them by using the differencing facility of your client tool. Xcode displays the output of the diff command in a separate editor window. “Identifying differences between two revisions of a file” compares two revisions of a file using svn diff.
You can specify the format used in the comparison in Xcode Preferences > SCM. See “Specifying Comparison and Differencing Options” for details.
To identify the differences between your copy of a file with a revision in the repository, select the file in the project window, choose:
SCM > Diff With
and choose a version to compare against. The options you can choose from are:
Latest. Choose this option to compare a file with the latest revision in the repository.
Base. Choose this option to compare a file with the revision you checked out of the repository.
Revision. Choose this option to get the revision list for the selected file. This option is useful if you’re not sure which revision you want to compare against.
Specific Revision. When you know the revision you want to compare against, choose this option and enter the revision number in the dialog that appears.
You can also identify the differences between any two revisions of a file in its file-info editor by selecting the revisions you want to compare in the revision list and clicking Diff.
Resolving Conflicts
A file with a status of C contains changes that clash with the latest revision in the repository. For example, you may have removed a method from a class definition that another developer published changes to before you committed your own changes. To view how your version of a file in conflict differs from the latest revision, use the Compare or Diff commands. See “Comparing Revisions” for details.
Version control systems cannot resolve conflicts. They can only make you aware of the presence of conflicts. In some cases, you may be able to resolve the conflict yourself. However, in the majority of cases (if you work in a team), you need to communicate with the person who published the changes that conflict with your own before determining the best way to resolve the conflict.
There are two ways of resolving a conflict between your version of a file and the latest revision in the repository:
Merge the changes published to the repository with your local changes and edit the resulting file as necessary:
In the project window, select the file with the conflict.
Choose SCM > Update To > Latest.
Edit the file to resolve the conflicts.
Save the file. If you’re using Subversion, you must also choose SCM > Resolved.
Discard your copy of the file in favor of the latest revision in the repository:
Select the file in the project window and choose SCM > Discard Changes.
Conflicts in the project package (project.xcodeproj) occur when developers add, remove, or rename files from their local copies and commit those files without committing the project file at the same time. You cannot resolve conflicts in the project package. If your copy of the project package gets a status of C, choose:
SCM > Update Entire Project
or select the project file in the project window and choose:
SCM > Update To > Latest
If you Xcode displays a dialog asking whether to discard your changes, discard them. You may need to reopen or re-read the project (see “Updating Files” for more information).
If Xcode is unable to open your project because the project package is corrupt, you must use your client tool to update the project file to the latest version in the repository. See your tool’s documentation for details.
© 2009 Apple Inc. All Rights Reserved. (Last updated: 2009-01-06)