Legacy Document
Important: The information in this document is obsolete and should not be used for new development.
Class Modeling With Xcode Design Tools
The Xcode class modeling tool helps you to explore and understand the classes in your project, whether they’re written in Objective-C, C++, Java, or a mixture of those languages. It allows you to see class relationships (subclass and superclass relationships—including support for multiple inheritance in C++), protocols (or Interfaces in Java), and categories. In the diagram view, color and text coding help you to quickly distinguish between classes, categories, and protocols; and between project and framework code. The visibility (public, private, protected) of member functions and variables is shown appropriately. (If you are not familiar with any of these terms, you should consult suitable programming texts.)
You can use the tool as an index into your project. From within the tool, you can navigate to the source code of your own classes (both the declaration and implementation), to the declaration in framework classes (those for which you do not have source code), and to corresponding documentation. You can create models that persist as part of your project to communicate design details to other team members, and you can create temporary models (quick models) that serve to illuminate an immediate problem.
The tool’s basic features and behavior are described in “Common Features of the Xcode Design Tools.” This chapter describes features and behavior that are unique to the class modeler.
In this section:
Creating Models
Indexing and Tracking
The Diagram View for Class Modeling
The Browser View for Class Modeling
Creating Models
Xcode allows you to create models in two ways, as quick models and as project class model files (model files you create with the New File Assistant). At first glance it may appear that the two sorts of class model are somehow different. It is important to realize that they are functionally the same but created in different ways and usually with a different immediate purpose in mind.
When you create a model, you add the source or the header files (or both), or containers (such as groups, targets, or projects, but not smartgroups, build phases, find results, and so on) that you want to contribute to the model. A model is dynamic, though. It is continuously updated in response to changes in your source code and the organization of your project. For this reason, you might add both a file and a group containing that file to a model, so that if the file is moved out of group it remains in the model (this strategy may be particularly useful early in a project’s lifetime when groups are likely to change).
Note that since class model files depend on the project index, they can’t survive outside the project. Note also that when you add a class to a model, its immediate superclass is implicitly added to the model (even if it’s not in the project).
Creating a Quick Model
To create a Quick Model, select in the Groups & Files list the files and containers that you want to contribute to the model. Then choose Design > Class Model > Quick Model . Xcode displays the class browser and diagram.
A quick model is untitled and ephemeral. It does not appear in the project file browser, and if unchanged, it is closed without warning. If you make changes, however, you are prompted to save when the project is closed. You can also save the model at any point using Save or Save As if you decide you want to keep the model.
Creating a Class Model File
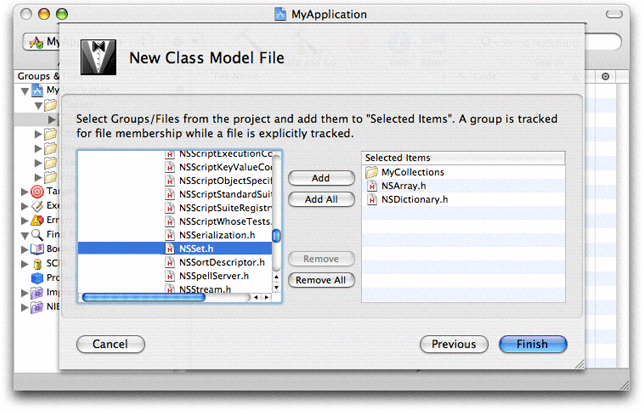
To create a class model file, choose File > New File and select Class Model from the Design group. You then name the file, and click Next. From the subsequent panel, shown in Figure 11-1, you select the files and containers that you want to contribute to the model.
When you click Finish, Xcode creates the model file, adds it to the project, and displays the class browser and diagram.
Indexing and Tracking
The tool uses the project indexer to track changes to your project. The class models always represent the actual classes in the files and groups in your project, and are automatically updated as you change your source code—even if you add, remove, or refactor classes. In order to function properly, therefore, the class model requires that the project indexer be enabled.
If the project indexing is not complete, the model pane simply displays the word “Indexing” until indexing is complete. If indexing is disabled, or you open a project on a read-only partition, you see an appropriate warning.
To change the list of tracked items that belong to the model you can use the Tracking pane of the Info window (inspector) as shown in Figure 11-2. Click the plus sign or minus sign (in the lower left of the pane) to add or remove files and groups respectively.
As you add and remove files from any project groups that make up a model, corresponding classes appear in and disappear from the browser and diagram as appropriate.
The Diagram View for Class Modeling
The diagram contains two important shapes, rounded rectangular nodes and lines. It may also contain annotations. Although you can change the layout and visual appearance of the nodes and lines (and optionally hide classes, properties and so forth), you can modify classes, the relationships between them, their properties, and so forth only by editing source files. For editing annotations, see “Annotations.”
Nodes in a Class Model
In class models, nodes can be classes, categories, or protocols (interfaces). The name is given in the title bar, and for C++/Java, includes the namespace or package. Nodes are color-coded to help you readily identify different types; different text styles help to further differentiate element and method types. Compartments within a node represent features of the class —properties for instance variables, operations for methods.
You can use the nodes for navigation. To go to your source files (or to the header file for system files), you can click the (>) symbol in the title bar; you can also use the Design -> Class Model menu or the contextual menu to navigate to any declaration, definition, or documentation that is available.
Text and Color Coding
The names of classes, categories, and protocols are represented differently: Class names appear unadorned; category names are surrounded by parentheses, and protocol names are surrounded by angle brackets. If an operation name is underlined, it is a class method .
By default, classes are represented in blue, categories in gray, and protocols (interfaces) in red. Project and framework classes are further differentiated by the saturation of the color (externals are dimmer) . You can change both the default colors and colors for individual nodes (see “Common Features of the Xcode Design Tools”).
Compartments and View Options
Compartments within a node represent features of the class . The Properties compartment lists instance variables ; the Operations compartment lists methods—class method are underlined.
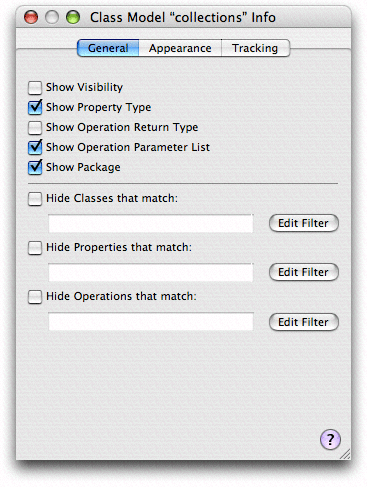
Within a node, you can display additional information. Using the General pane of the Info window (shown in Figure 11-3), you can choose whether or not to show:
Visibility flags (public, private, and protected may be indicated by an icon in the compartment)
Property type (for each property, shown after a colon in the compartment)
Operation return types and parameter types
Package information
You have further control over what is displayed in the diagram—see “Filtering and Hiding.”
Lines
Lines indicate different things depending on whether they are solid or dashed, what sort of arrowhead is present, and what objects they connect.
A solid line with an open arrowhead:
Denotes inheritance when it connects classes
Specifies the class of which the category is a category when it connects a class and a category
A dashed line with an open arrowhead denotes implementation of a protocol (or interface in Java).
You cannot edit lines other than to or from annotations—they are created automatically based on the contents of your project.
Annotations
You can add annotations to the diagram to provide explanatory text using the text tool. You have full access to text styling options from the Format menu. You can connect a comment to a class using the line tool.
Filtering and Hiding
Sometimes diagrams contain more information than you want to see, and it can be useful to reduce clutter. Removing irrelevant classes makes it easier to concentrate on important ones—for example, you might remove NSObject from a class diagram to make it easier to see other relationships; or it may be that a tracked file contains definitions of several classes, and you are interested in only one of them. You might also want to hide other details, such as private variables, or instance variables whose name starts with an underscore.
You can use a predicate to filter what classes and methods are shown in the diagram. On a class level, you can choose to use or override the filter. You can show a class if a filter would normally hide it, and vice versa.
Filtering and hiding settings affect only the diagram. The browser view still lists all the contents (you need a way to be able to select a class if it’s hidden!). Filtering and hiding are different from tracking. Tracking determines whether or not files contribute to the model at all.
Filtering
Filters apply as changes are made to files that contribute to the model. If you chose, for example, to hide all classes whose names begin with “XYZ”, then in your header file you rename the class “XYZWidget” to “WXYWidget”, a node for “WXYWidget” will appear in your diagram. To set up filtering, you use the General pane of the Info window, shown in Figure 11-4.
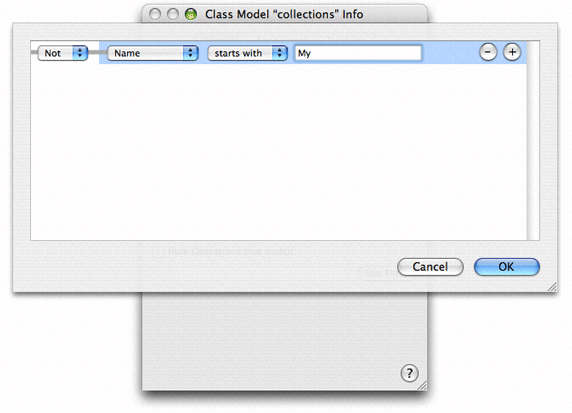
You can set up independent filters for classes, properties, and operations, based on their name and kind. You can also toggle filters on and off as required. If you click Edit Filter, a sheet in which you can edit the filter appears, as shown in Figure 11-5. You can either enter a predicate directly into the appropriate text field or use the predicate builder (see “The Predicate Builder”).
Note: Filters are labeled to hide classes, properties, or operations. Sometimes you want to show only a subset. You can apply a “NOT” expression to a predicate to invert its meaning. Therefore if you wanted to show only those classes whose names begin with “XYZ”, you hide those whose names do not begin with “XYZ”.
Hiding
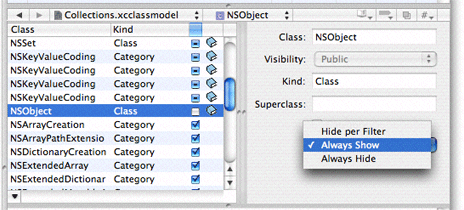
Hiding allows you to override the filtered state of a class (or protocol, or category). You can specify that an element should follow the filtered setting, or be either always shown or always hidden. You can set the hiding state using the browser view, in either the Hidden column in the property pane or using the pop-up menu in the detail pane, as shown in Figure 11-6 .
In the detail pane, you choose the setting from the pop-up menu. The browser has a three state checkbox you can use to modify the hiding setting. The states correspond to the same states defined in the pop-up menu.
Note: If you find you are making frequent changes to the hiding settings, you may consider creating different models to provide different perspectives. Models are lightweight, so do not consume significant system resources, and they use tracking so are always up to date.
The Browser View for Class Modeling
Most features of the browser view behavior are common to both the class model and the data model, and described in “Common Features of the Xcode Design Tools.”
The table view in the left-most pane lists the classes, categories, and protocols in the model. The columns in the class list show the element name, the element type (class, category, or protocol), the hidden status, and a link to documentation if there is any associated with the element.
The table view in the properties pane shows summary information about the properties and methods associated with the current selection in the classes table, including the name, type, and visibility, and again a link to documentation if there is any associated with the element.
The detail pane shows information about the most recently selected element in the classes or properties table. You use the detail panel to set the hidden status of individual class elements. This setting affects what is displayed in the diagram view, as described in “Hiding.”
© 2004, 2006 Apple Computer, Inc. All Rights Reserved. (Last updated: 2006-11-07)


