Using Cross-Development
This chapter describes how to use cross-development in your projects. The provided steps cover the configuration process for both Xcode and makefile-based projects.
To use cross-development, you take these steps (in addition to installing the SDKs when you install the Xcode development tools):
Configure your project. You choose the SDK for the version of Mac OS X you wish to target, as well as a deployment target, which specifies the earliest version of Mac OS X that your software will run on.
Supply a prefix file that takes into account the selected SDK.
If your software uses features from a newer OS version that aren’t available in an earlier version it is targeted to run on, prepare your code to handle undefined function calls.
If you will be building the same source code using different SDKs, you may wish to compile code conditionally based on the SDK in use.
These steps are described in the sections that follow.
In this section:
Configuring Your Project for Cross Development
Set the Prefix File
Check for Undefined Function Calls
Conditionally Compile for Different SDKs
Finding Deprecated API
Configuring Your Project for Cross Development
You can configure both Xcode projects and makefile-based projects to use cross-development. For either type of project, you must make two choices:
Select an SDK to develop for, such as Mac OS X version 10.2.8. The software can use features available in system versions up to and including the one you select.
If you do not select an SDK, the default is to build for the current operating system.
If your software must run on a range of operating system versions, choose a Mac OS X deployment OS, such as v10.2. The deployment OS identifies the earliest system version on which the software can run.
If you do not select a deployment OS, the default is to target the current operating system.
Configuring an Xcode Project
To use cross-development, you must choose an SDK and a deployment target for your project and its targets. In Xcode, you make these choices in the project and target inspectors.
Select an OS SDK to Develop With
To select an SDK in Xcode, you take the following steps:
Select the project group in the Groups & Files list.
Open an Info window for the project by choosing Project > Get Info or by typing Command-I.
Choose an SDK in the Cross-Develop Using Target SDK pop-up menu.
The result is shown in Figure 2-1. All targets in the project are built with the selected SDK, as described in “How SDK Settings Affect The Build.” The value of
MAC_OS_X_VERSION_MAX_ALLOWEDis automatically set to correspond to the selected SDK.Alternatively you can use the text field or the Choose button to select an SDK other than a Mac OS X SDK, or to choose a Mac OS X SDK that is stored in a nonstandard location (for example, relative to your project).
For each target in the project, you'll also have to perform the step described in “Set the Prefix File.”

Select a Deployment OS
In Xcode, you can set the deployment OS for individual targets or for all targets in the project, using the project-level build setting. To select a deployment OS for a target in Xcode, you use the following steps:
Select a target in the Targets group in the Groups & Files list.
Open an Inspector window for the target.
Select Build to open the Build pane.
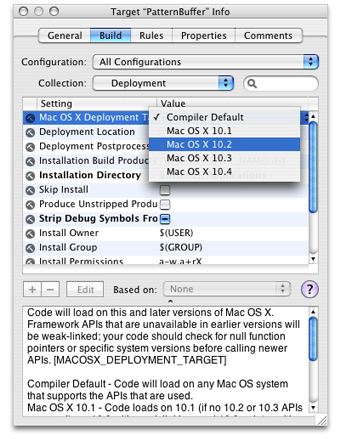
Find the Mac OS X Deployment Target build setting, located in the Deployment collection.
Use the pop-up menu in the Value column next to Mac OS X Deployment Target to choose a deployment OS value, such as 10.2 or 10.3, as shown in “Selecting the deployment OS in Xcode.”
When you build the target for which you just set the deployment OS value, the build is based on the selected version, as described in “How SDK Settings Affect The Build.” The software can run on system versions as early as the one you specify. You can use features from later system versions, but you must be prepared to check for the availability of those features, as described in “Check for Undefined Function Calls” and “Limitations.”
Setting the Mac OS X Deployment Target build setting automatically sets
MAC_OS_X_VERSION_MIN_REQUIREDto the same value.
You can use the same steps in the Build pane of the project inspector to set the deployment OS for all targets in the project. Note that any value explicitly assigned to the Mac OS X Deployment Target build setting in the target inspector overrides, for that target, the value assigned to the setting in the project inspector.
Important: In Xcode, you should not manually override the build setting MACOSX_DEPLOYMENT_TARGET and set it to any value other than 10.1, 10.2, 10.3, or 10.4. If you do, it will revert to 10.0.
Configuring a Makefile-Based Project
If you have a makefile-based project, you can also take advantage of cross-development, by adding the appropriate options to your compile and link commands. These are described in the following sections.
Select an OS SDK to Develop With
To select an SDK for a makefile, you add the appropriate options to your project's compile and link commands. For the compiler, you add the -isysroot option. For the linker, you add the -syslibroot option. If you are using GCC 4.0 to compile and link, you should add both commands to the command line.
Both -isysroot and -syslibroot require that you specify the full path to the desired SDK directory. It is usually best to create a makefile directory to specify this path. The following example shows these flags assigned to makefile variables for a simple C program:
SDK=/Developer/SDKs/MacOSX10.4.0.sdk |
CFLAGS= -isysroot ${SDK} |
LDFLAGS= -isysroot ${SDK} -Wl,-syslibroot,${SDK} |
Note: If your makefile passes LDFLAGS directly to ld instead of gcc, you should specify the linker flags as LDFLAGS= -syslibroot ${SDK}, as ld does not support the -Wl syntax.
The SDK directories are located in /Developer/SDKs. Your own linker flags would naturally contain any additional compiler or linker options required for your program.
Important: Support for the -isysroot flag is available in the GCC 4.0 compiler but is not documented in the compiler man page because support for this feature is likely to change in the future. When support for the feature is officially added to the compiler, the man page will be updated with the correct information. This flag is not supported in older versions of the compiler.
Select a Deployment OS
To set the deployment target in a makefile, use another makefile variable of the form:
ENVP= MACOSX_DEPLOYMENT_TARGET=10.3 |
The value you specify for MACOSX_DEPLOYMENT_TARGET determines the minimum target system for your software. In the preceding example, the target system is 10.3 . To use this variable in your makefile, include it in front of your compile and link commands. For example, a simple C program might use the following build commands:
testapp: main.o |
${ENVP} ${CC} ${LDFLAGS} -o testapp main.o |
main.o: |
${ENVP} ${CC} ${CFLAGS} -c main.c -o main.o |
Set the Prefix File
In both Xcode and makefile projects, the prefix file is typically a header file belonging to the project. However, some developers have set the prefix file to an umbrella header file, such as /System/Library/Frameworks/Carbon.framework/Headers/Carbon.h). This does not work with SDK Support as it defines an absolute path.
To include umbrella framework headers, it is best to define your own prefix file and add the appropriate #include <Framework/Framework.h> directives to your file. With this technique, the compiler always chooses the headers from the appropriate SDK directory.
For example, if your project is named CarbonTest and it has a prefix file CarbonTest_Prefix.pch, you could add the following line to that file:
#include <Carbon/Carbon.h> |
Check for Undefined Function Calls
As described in “Loading,” in some situations your object code may successfully load, using weak linking, but certain function calls may be undefined because they are not available in the current system. To run successfully, your code must avoid calling those functions in system versions that do not support them. It can do this either by checking the system version at run time and globally taking a different code path based on the version, or by checking each function pointer for a null value before calling it.
For example, suppose you build your application to use features in Mac OS X version 10.3 (Panther) and to deploy back to Mac OS X version 10.2. (Jaguar). To use the HIAboutBox function, first available in Panther, you could use code like the following:
Listing 2-1 A function that checks for a null function pointer
void MyAboutBox(void) |
{ |
if(HIAboutBox != NULL) |
{ |
HIAboutBox(NULL); |
} |
else |
{ |
// Lots of code to display an about box with earlier technology. |
} |
} |
Important: When checking for the existence of a symbol, you must explicitly compare it to NULL or nil in your code. You cannot use the negation operator ( ! ) to negate the address of the symbol.
When your code runs in Panther, it calls HIAboutBox to display the minimal default standard About box. When it runs in Jaguar, it displays an About box based on the code you wrote for Jaguar.
If you build this code with different settings, you should see the following results:
If you select an SDK setting of Mac OS X 10.2.8:
The build fails because
HIAboutBoxis not defined in those system versions.With an SDK setting of Mac OS X 10.3.9, if you set the deployment OS to:
10.3: The software should run only in Panther and fail to launch in Jaguar or Puma (Mac OS X version 10.1).
10.2: The software should run in Panther and Jaguar but fail to launch in Puma.
10.1: The software should run in Panther but fail to launch in Puma because weak linking is not supported in Puma.
Note: As described in “Limitations,” software built for Panther with a deployment OS of 10.1 will not launch in Jaguar.
Conditionally Compile for Different SDKs
If you will be building the same source code using different SDKs, you may want to compile code conditionally based on the SDK in use. You can do this by using preprocessor directives with the macros defined in AvailabilityMacros.h.
Important: AvailabilityMacros.h is included automatically by the Carbon and Cocoa frameworks in the SDKs for 10.2 and later, but not by the 10.1 SDK. If you wish to use these macros with the 10.1 SDK, you should manually include the file, typically by adding the following line to your project's prefix header:
#include <AvailabilityMacros.h>
If you fail to add this line, code that builds successfully with the other SDKs will fail silently when built with the 10.1 SDK.
For example suppose the function shown in Listing 2-1 must be compiled against the 10.2.8 SDK (or by other developers using 10.2 and no SDK). Even referring to the HIAboutBox function will cause a compiler failure, so you must exclude that code altogether unless the 10.3 header files are in use. You could do so with code like the following:
void MyAboutBox(void) |
{ |
#if (MAC_OS_X_VERSION_MAX_ALLOWED >= MAC_OS_X_VERSION_10_3) |
if(HIAboutBox != NULL) |
{ |
HIAboutBox(NULL); |
} |
else |
{ |
#endif |
// Lots of code to display an about box with earlier technology. |
#if (MAC_OS_X_VERSION_MAX_ALLOWED >= MAC_OS_X_VERSION_10_3) |
} |
#endif |
} |
With this technique, the source file can be built on native 10.1 or 10.2 systems (or using the 10.1 or 10.2 SDKs) without compilation errors.
Finding Deprecated API
As Mac OS X evolves, the list of APIs and technologies it encompasses are sometimes changed to meet the needs of developers. As part of this evolution, less efficient interfaces may be deprecated in favor of newer, more efficient ones. Apple makes these changes only when it is deemed absolutely necessary and uses the availability macros (defined in /usr/include/AvailabilityMacros.h) to help you find deprecated interfaces.
Note: Deprecation does not mean the deletion of an interface from a framework or library. It is simply a way to flag interfaces for which better alternatives exists. For example, an older interface may be discouraged in favor of a newer, more efficient interface. You may still use deprecated interfaces in your code; however, Apple recommends you migrate to newer interfaces as soon as possible. Check the header files or documentation of the deprecated interface for information about any recommended replacement interfaces.
Each deprecated interface is tagged with a macro that identifies the version of Mac OS X in which it was marked as deprecated. For example, an interface that was introduced in Mac OS X version 10.0 but deprecated in version 10.3 might have the following macro after its header-file declaration:
AVAILABLE_MAC_OS_X_VERSION_10_0_AND_LATER_BUT_DEPRECATED_IN_MAC_OS_X_VERSION_10_3
If you compiled your project to run on Mac OS X version 10.3 and used an interface tagged with this macro, you would get a warning that the interface is now deprecated. The macro accomplishes this by adding the following attribute to the interface declaration:
__attribute__((deprecated))
When your code references a function that is tagged with this attribute, the compiler generates a warning. The warning includes the name of the deprecated interface and where in your code it was referenced. For example, if the HPurge function were deprecated, you might get an error similar to the following:
'HPurge' is deprecated (declared at /Users/steve/MyProject/main.c:51)
To locate references to deprecated interfaces, you can look for warnings of this type. If your project has a lot of warnings, you can use the search field in Xcode to filter the list based on the “deprecated” keyword.
© 2006 Apple Computer, Inc. All Rights Reserved. (Last updated: 2006-11-07)