Building a Simple QTKit Capture Application
In this chapter, you’ll build a QTKit capture player, a simple yet powerful application that demonstrates how you can take advantage of some of the new capture classes and methods available in the next iteration of the QuickTime Kit framework. When completed, your QTKit capture player application will allow you to capture a video stream and record the media to a QuickTime movie. You won’t have to write more than 20 or 30 lines of Objective-C code to implement this capture player.
Using Xcode 3 as your integrated development environment (IDE), along with Interface Builder 3, you’ll see how easy it is to work with the QuickTime Kit framework. In this example, you’ll use the new QTKit capture control provided in the library of controls available in Interface Builder 3. The QTKit capture control will perform much of the work for you in implementing the design of the user interface for this application.
Following the steps in this guide, you’ll be able to build a functioning capture player application that controls the capture of QuickTime movies, adding simple start and stop buttons, and allowing you to output and display your captured files in QuickTime Player. For this project, you’ll need an iSight camera, either built-in or plugged into your Macintosh. You’ll also need Mac OS X v10.5, the latest release of Mac OS X, installed in your system.
In building your QTKit capture application, you’ll work with the following three classes:
QTCaptureSession. The primary interface for capturing media streams.QTCaptureMovieFileOutput. The output destination for a QTCaptureSession object that writes captured media to QuickTime movie files.QTCaptureDeviceInput. The input source for media devices, such as cameras and microphones.
For purposes of this tutorial, you won’t need to have a complete understanding of the methods that belong to these capture classes. As you extend your knowledge of the QTKit framework, you should refer to the QTKit Framework Reference, which describes in detail the methods, notifications, attributes, constants, and types that comprise the collection of classes in the QTKit API.
In this section:
First Steps
Create the Project Using Xcode 3
Create the User Interface Using Interface Builder 3
Set Up a Preview of the Captured Video Output
Wire the Start and Stop Buttons
Complete the Project Nib File in Xcode
Implement and Build Your Capture Application
First Steps
If you’ve worked with Cocoa and Xcode before, you know that every Cocoa application starts out as a project. A project is simply a repository for all the elements that go into the application, such as source code files, frameworks, libraries, the application’s user interface, sounds, and images. You use Xcode to create and manage your project.
The QTKit capture player application should serve as a good learning example for developers who may be new to Cocoa and QuickTime. If you already know Cocoa, you probably won’t be surprised at how quickly and effortlessly you can build this capture player application.
What You Need
Before you get started with your QTKit capture player project, be sure that you are running Mac OS X v10.5 and have the following items installed on your system:
Xcode 3 and Interface Builder 3. Note that although you can use Xcode 2.2 to build your project, to take full advantage of the new programming features available, you’ll want to use Xcode 3. Also, Interface Builder 3 provides a new paradigm for working with and building the user interface for your application. Palettes are no longer provided; instead, you’ll work with a new library of controls that are designed to enable you to hook up the components of your user interface with greater ease and efficiency. In the end, you’ll be able to build applications faster and take advantage of this rich, new library of controls.
The QuickTime Kit framework, which resides in the Mac OS X v10.5
System/Library/Frameworksdirectory asQTKit.framework.An iSight camera connected to your computer.
Important: The complete sample code discussed in this and the next chapter is available for download at Sample Code: QuickTime Cocoa, as
MyRecorder.Note: The
MyRecordersample code, as explained in this chapter, will not support DV cameras, which are of typeQTMediaTypeMuxed, rather thanQTMediaTypeVideo. The next chapter in this programming guide, “Adding Audio Input and DV Camera Support,” explains how you can add code that lets you work with DV cameras and use theQTMediaTypeMuxedtype.
Prototype the Capture Player
Interface Builder lets you specify the windows, menus, and views of your application, while Xcode enables you to define the behavior behind them. Interface Builder provides the basic support you need for configuring the items in your user interface. Beyond that, most of the work you do in constructing your application takes place in Xcode.
When designing your application, start by defining your application’s data model in Xcode. Once you’ve constructed a workable data model, you can use Interface Builder to create a set of basic windows, menus, and views for presenting that data. Depending on the complexity of your design, you may also need to create custom views and controls, and then integrate them into Interface Builder and add them to your nib files.
Creating the controller objects and tying them to your data model in your user interface is the final step in the design process.
Of course, you can just jump right in and start assembling windows and menus in Interface Builder. However, using Interface Builder 3, which is the latest iteration, it’s important to have a good understanding of your application’s desired behavior first. Knowing your application’s data model, and knowing what operations will occur on that data, will help you piece together the design elements you need to show in order to convey that information to the end user.
You may want to start by creating a rough sketch of your QTKit capture application. Think of what design elements you want to incorporate into the application. Rather than simply jumping into Interface Builder and doing your prototype there, you may want to visualize the elements first in your rough sketch, as shown in Figure 2-1.

In this design prototype, you can start with three simple objects: a capture view and two control buttons. These will be the building blocks for your application. After you’ve sketched them out, you can begin to think of how you’ll be able to hook them up in Interface Builder and what code you need in your Xcode project to make this happen.
Create the Project Using Xcode 3
To create the project, follow these steps:
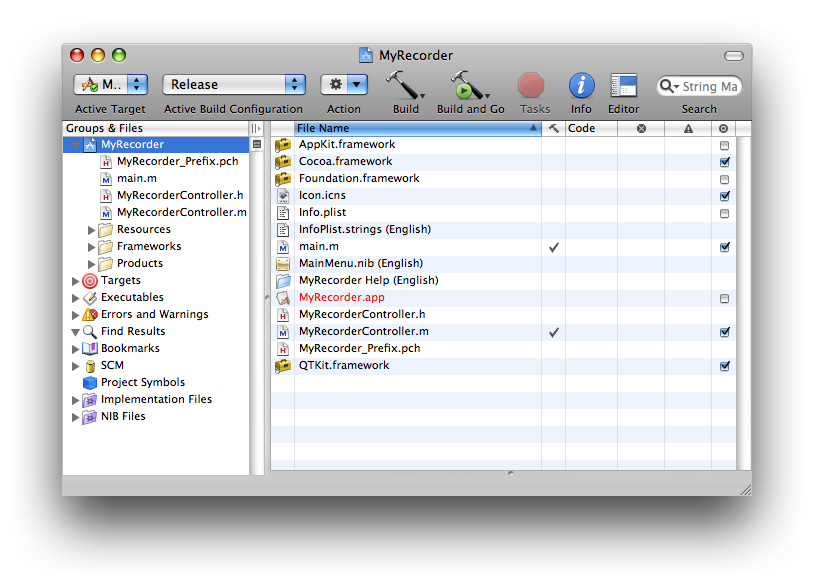
Launch Xcode 3 (shown in Figure 2-2) and choose File > New Project.
When the new project window appears, select Cocoa Application.
Name the project
MyRecorderand navigate to the location where you want the Xcode application to create the project folder. Now the Xcode project window appears, as shown in Figure 2-3.Next, you need to add the QuickTime Kit framework to your
MyRecorderproject. Although obvious, this step is sometimes easy to forget. Note that you don’t need to add the QuickTime framework to your project, just the QuickTime Kit framework. Choose Project > Add to Project.The QuickTime Kit framework resides in the
System/Library/Frameworksdirectory. SelectQTKit.framework, and click Add when the Add To Targets window appears to add it to your project.Important: This completes the first sequence of steps in your project. In the next sequence, you’ll move ahead to define actions and outlets in Xcode before working with Interface Builder. This may involve something of a paradigm shift in how you may be used to building and constructing an application with versions of Interface Builder prior to Interface Builder 3. Because you’ve already prototyped your QTKit capture application, at least in rough form with a clearly defined data model, you can now determine which actions and outlets need to be implemented. In this case, you have a
QTCaptureViewobject, which is a subclass ofNSView, and two simple buttons to start and stop the recording of your captured media content.
Name the Project Files and Import the QTKit Headers
Choose File > New File. In the panel, scroll down and select Cocoa > Objective-C class, which includes the
Cocoa.Cocoa.h. files.Name your implementation file
MyRecorderController.m. You’ll also check the item to name your declaration fileMyRecorderController.h.In your
MyRecorderController.hfile, add#import <QTKit/QTkit.h>.
Determine the Actions and Outlets You Want
Now you can begin adding outlets and actions. In your
MyRecorderController.hfile, add the instance variablemCaptureViewin the following line of code:IBOutlet QTCaptureView *mCaptureView;
You also want to add these two actions:
- (IBAction)startRecording:(id)sender;
- (IBAction)stopRecording:(id)sender;
Now open your
MyRecorderController.mfile and add the following actions, along with the requisite braces:- (IBAction)startRecording:(id)sender
{}
- (IBAction)stopRecording:(id)sender
{}
At this point the code in your MyRecorderController.h file should look like this.
#import <Cocoa/Cocoa.h> |
#import <QTKit/QTKit.h> |
@interface MyRecorderController : NSObject { |
IBOutlet QTCaptureView *mCaptureView; |
} |
- (IBAction)startRecording:(id)sender; |
- (IBAction)stopRecording:(id)sender; |
@end |
This completes the second stage of your project. Now you’ll need to shift gears and work with Interface Builder 3 to construct the user interface for your project.
Create the User Interface Using Interface Builder 3
In the next phase of your project you’ll see how seamlessly Interface Builder and Xcode work together, enabling you to construct and implement the various elements in your project more efficiently and with less overhead.
Open Interface Builder 3 (Figure 2-4) and drag the
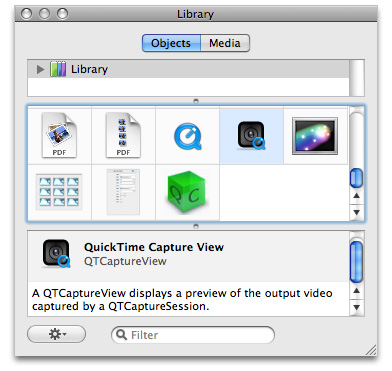
MainMenu.nibfile in your Xcode project window on the Interface Builder 3 icon. Because of the new integration between Xcode 3 and Interface Builder 3, you’ll find the actions and outlets you’ve declared in yourMyRecorderController.hfile are also synchronously updated in Interface Builder 3. This will become apparent once you open your nib file and begin to work with the library of controls available in Interface Builder 3.In Interface Builder 3, you’ll find a new library of controls. Scroll down until you find the QuickTime Capture View control, as shown in Figure 2-5.
The
QTCaptureViewobject provides you with an instance of a view subclass to display a preview of the video output that is captured by a capture session.Drag the
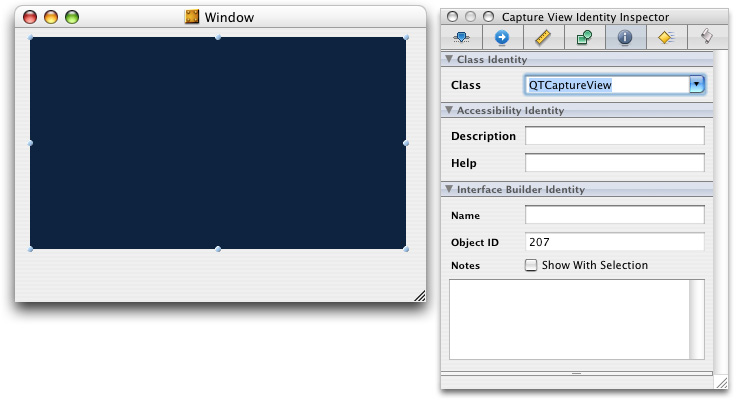
QTCaptureViewobject into your window and resize the object to fit the window, allowing room for the two Start and Stop buttons in your QTKit capture player.Choose Tools > Inspector. In the Identity Inspector, select the information (“i”) icon. Click in the field Class and your
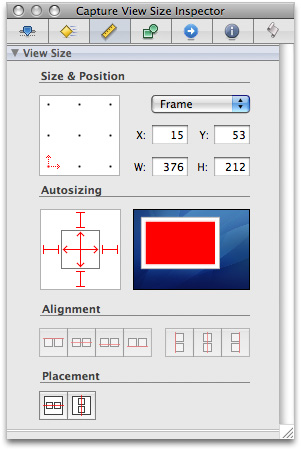
QTCaptureViewobject appears, as shown in Figure 2-6.Set the autosizing for the object in the Capture View Size Inspector, as shown in Figure 2-7.
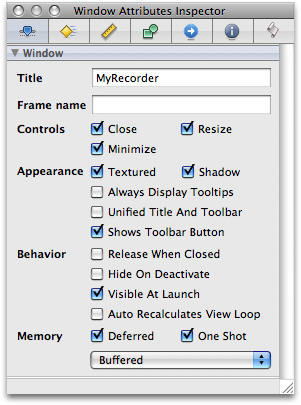
Define the attributes of your MyRecorder Window, as shown in Figure 2-8.
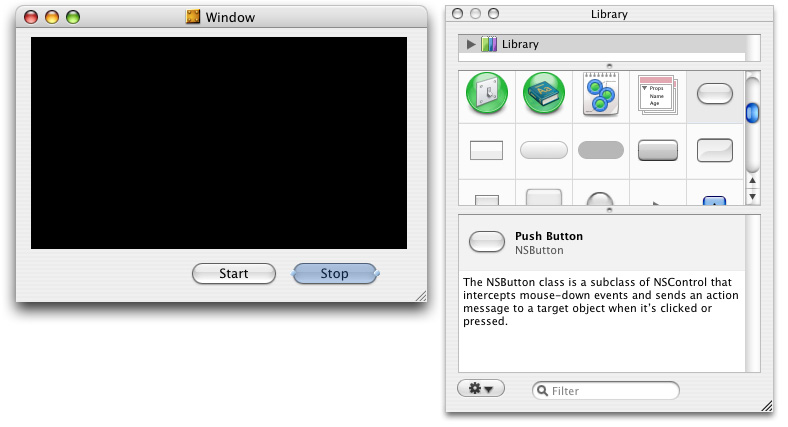
In the Library, select the Push Button control and drag it to the Window, as shown in Figure 2-9. Enter the text Start and duplicate the button to create another button as Stop. In autosizing, set the struts for both buttons at the bottom and right outside corners, leaving the inside struts untouched.
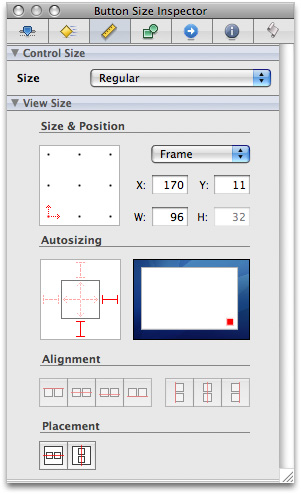
Set up the autosizing for your buttons by selecting the button and clicking the Button Size Inspector shown in Figure 2-10.
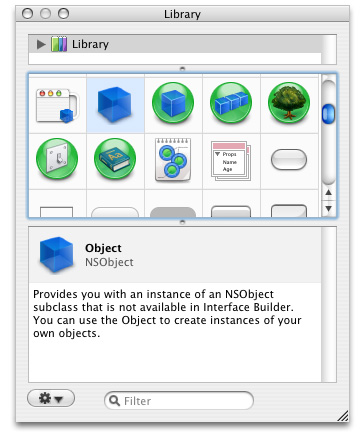
In the Library, scroll down and select the blue cube control shown in Figure 2-11, which is an object (
NSObject) you can instantiate as your controller.Drag the object into your
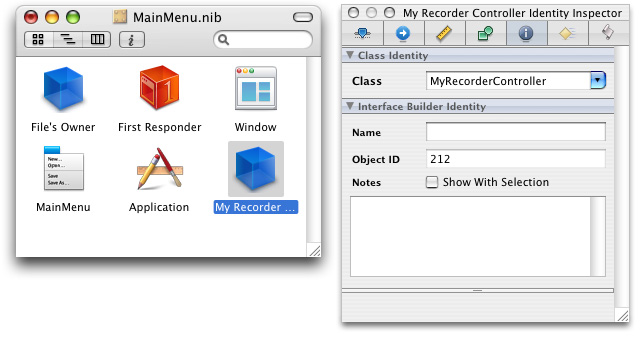
MainMenu.nibwindow, as shown in Figure 2-12.Select the object and enter its name as My Recorder Controller. Then click the information icon in the Inspector. When you click the Class Identity field, the
MyRecorderControllerobject appears. Interface Builder has automatically updated theMyRecorderControllerclass specified in your Xcode implementation file. You don’t need to enter the name of this class in the Class Identity field. Note that to verify and reconfirm that an update has occurred, press Return. If the identify field is not automatically updated, you may need to specify manually that it is aMyRecorderControllerobject.
Set Up a Preview of the Captured Video Output
In the next phase of your project, you’ll see how seamlessly Interface Builder and Xcode work together, enabling you to construct and implement the various elements in your project more efficiently and with less overhead.
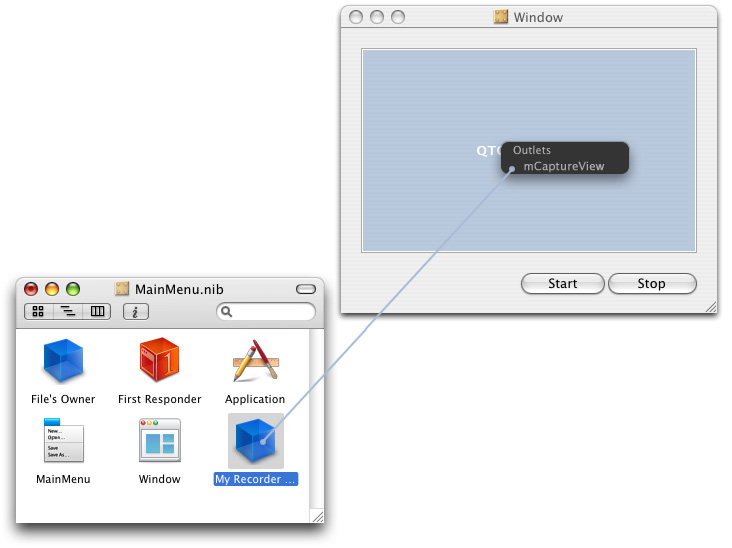
In Interface Builder, hook up the
MyRecorderControllerobject to theQTCaptureViewobject. Control-drag from theMyRecorderControllerobject in your nib file to theQTCaptureViewobject. A transparent panel will appear, as shown in Figure 2-13, displaying theIBOutletinstance variable,mCaptureView, that you’ve specified in your declaration file.Click the Interface Builder outlet
mCaptureViewto wire up the two objects.
Wire the Start and Stop Buttons
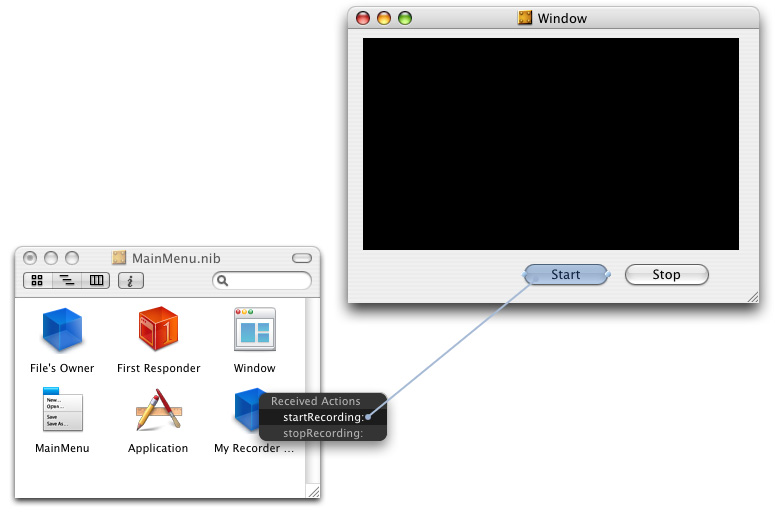
Now you’re ready to add your Start and Stop push buttons and wire them up in your MainMenu.nib window.
Control-drag each of the Start and Stop buttons from the window to the MyRecorderController object, as shown in Figure 2-14. Click the
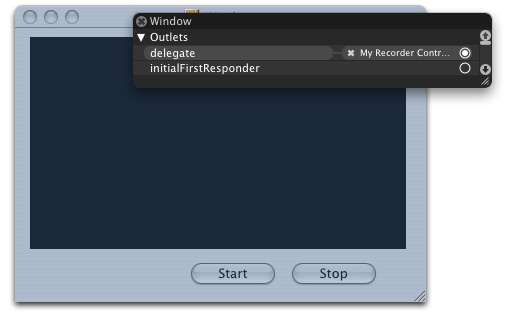
startRecording:method in the transparent Received Actions panel to connect the Start button, and likewise, thestopRecording:method in the Received Actions panel to connect the Stop button.Now you’ll need to hook up the window and the
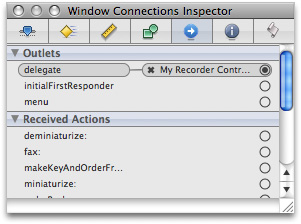
MyRecorderControllerobject as a delegate, shown in Figure 2-15. Control-drag a connection from the window to theMyRecorderControllerobject and click the outlet, connecting the two objects.To verify that you’ve correctly wired up your window object to your delegate object, select the Window and click the Window Connections Inspector icon, shown in Figure 2-16.
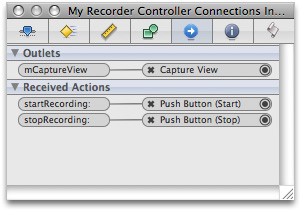
Verify that you’ve correctly wired up your outlets and received actions. Select the My Recorder Controller object and click the My Recorder Controller Connections Inspector icon, shown in Figure 2-17.
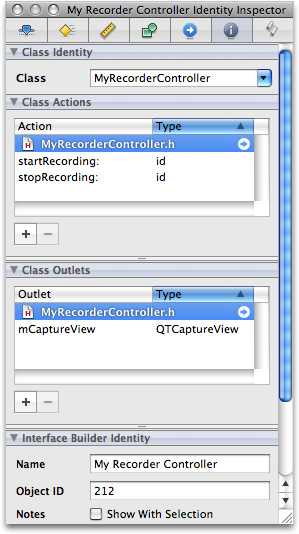
Check the My Recorder Controller Identity Inspector panel to confirm the class actions and class outlets, shown in Figure 2-18.
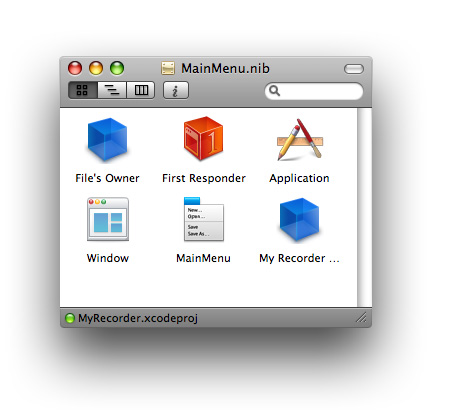
Click the
MainMenu.nibfile to verify that Interface Builder and Xcode have worked together to synchronize the actions and outlets you’ve specified. A small green light appears at the left bottom corner of theMainMenu.nibfile next toMyRecorder.xcodeprojto confirm this synchronization, as shown in Figure 2-19.Save your nib file.
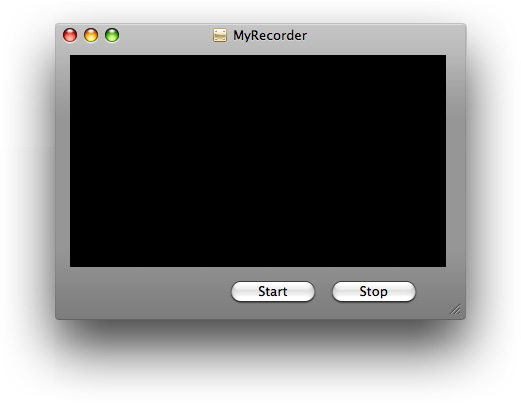
Verify that your QTKit MyRecorder capture application appears as shown in Figure 2-20.
You’ve now completed your work in Interface Builder 3. In this next sequence of steps, you’ll return to your Xcode project, adding a few lines of code in both your declaration and implemention files to build and compile the QTKit capture player application.
Complete the Project Nib File in Xcode
To complete the project nib file, you’ll need to declare the outlet you set up and connected in Interface Builder, and define the instance variables that point to the capture session, as well as to the input and output objects.
In your Xcode project, you need to add the instance variables to the interface declaration. Add these lines of code in your
MyRecorderController.hdeclaration file:@interface MyRecorderController : NSObject {QTCaptureSession *mCaptureSession;
QTCaptureMovieFileOutput *mCaptureMovieFileOutput;
QTCaptureDeviceInput *mCaptureDeviceInput;
The
mCaptureSessioninstance variable points to theQTCaptureSessionobject, and themCaptureMovieFileOutputinstance variable points to theQTCaptureMovieFileOutputobject. The last line declares that themCaptureDeviceInputinstance variable points to theQTCaptureDeviceInputobject.The complete code for your declaration file should look like this:
// MyRecorderController.h
#import <Cocoa/Cocoa.h>
#import <QTKit/QTkit.h>
@interface MyRecorderController : NSObject {IBOutlet QTCaptureView *mCaptureView;
QTCaptureSession *mCaptureSession;
QTCaptureMovieFileOutput *mCaptureMovieFileOutput;
QTCaptureDeviceInput *mCaptureDeviceInput;
}
- (IBAction)startRecording:(id)sender;
- (IBAction)stopRecording:(id)sender;
@end
In your
MyRecorderController.mimplementation file, add these lines of code, following your@implementation MyRecordControllerdirective:Important: There is a specific, though not rigid, order of steps you want to follow in constructing your code. These are the steps you need to follow:
Create the capture session.
Find the device and create the device input. Then add it to the session.
Create the movie file output and add it to the session.
Associate the capture view in the user interface with the session.
- (void)awakeFromNib
{//Create the capture session
mCaptureSession = [[QTCaptureSession alloc] init];
//Connect inputs and outputs to the session
BOOL success = NO;
NSError *error;
// Find a video device
QTCaptureDevice *device = [QTCaptureDevice defaultInputDeviceWithMediaType:QTMediaTypeVideo];
if (device) {success = [device open:&error];
if (!success) {// Handle error
}
// Add the video device to the session as device input
mCaptureDeviceInput = [[QTCaptureDeviceInput alloc] initWithDevice:device];
success = [mCaptureSession addInput:mCaptureDeviceInput error:&error];
if (!success) {// Handle error
}
// Create the movie file output and add it to the session
mCaptureMovieFileOutput = [[QTCaptureMovieFileOutput alloc] init];
success = [mCaptureSession addOutput:mCaptureMovieFileOutput error:&error];
if (!success) {// Handle error
}
// Set the controller be the movie file output delegate.
[mCaptureMovieFileOutput setDelegate:self];
// Associate the capture view in the UI with the session
[mCaptureView setCaptureSession:mCaptureSession];
}
// Start the capture session running
[mCaptureSession startRunning];
}
Add these lines to handle window closing notifications for your device input and stop the capture session.
- (void)windowWillClose:(NSNotification *)notification
{[mCaptureSession stopRunning];
[[mCaptureDeviceInput device] close];
}
Insert the following block of code to handle deallocation of memory for your capture objects.
- (void)dealloc
{[mCaptureSession release];
[mCaptureDeviceInput release];
[mCaptureMovieFileOutput release];
[super dealloc];
}
Implement these start and stop actions, then add the following lines of code to specify the output destination for your recorded media, in this case a QuickTime movie (
.mov) in your/Users/Sharedfolder.- (IBAction)startRecording:(id)sender
{[mCaptureMovieFileOutput recordToOutputFileURL:[NSURL fileURLWithPath:@"/Users/Shared/My Recorded Movie.mov"]];
}
- (IBAction)stopRecording:(id)sender
{[mCaptureMovieFileOutput recordToOutputFileURL:nil];
}
Add these lines of code to finish recording and then launch your recording as a QuickTime movie on your Desktop.
- (void)captureOutput:(QTCaptureFileOutput *)captureOutput didFinishRecordingToOutputFileAtURL:(NSURL *)outputFileURL forConnections:(NSArray *)connections dueToError:(NSError *)error
{[[NSWorkspace sharedWorkspace] openURL:outputFileURL];
// Do something with the movie at /Users/Shared/My Recorded Movie.mov
}
Implement and Build Your Capture Application
After you’ve saved your project, click Build and Go. After compiling, click the Start button to record, and the Stop button to stop recording. The output of your captured session is saved as a QuickTime movie in the path you’ve specified in this code sample.
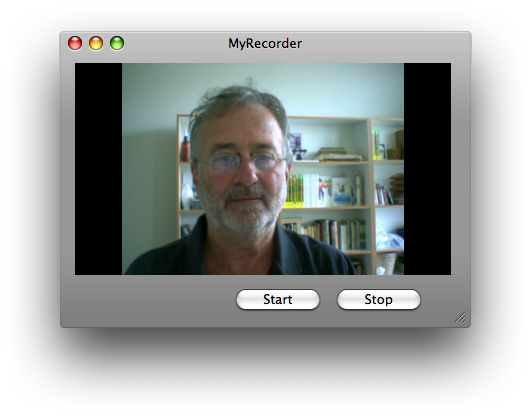
Now you can begin capturing and recording with your QTKit capture player application, as shown in Figure 2-21. Using a simple iSight camera, you can capture and record media, and then output your recording to a QuickTime movie. .
In the next chapter you’ll see how easy it is to add audio input capability to your QTKit capture player application. Only a half dozen lines of code are required. You can build on what you’ve already written for your MyRecorder project, and add audio, along with support for DV cameras other than your iSight camera, with a minimum of programming effort.
© 2007 Apple Inc. All Rights Reserved. (Last updated: 2007-10-31)