Some Useful Examples and Scenarios
This chapter contains a number of examples that can help you pull together all of the material in this book by examining the atom structure that results from a number of different scenarios.
The chapter is divided into the following topics:
“Creating, Copying, and Disposing of Atom Containers” discusses the various ways you can work with atom containers, along with illustrations and sample code that show usage.
“Creating an Effect Description” discusses how you create an effect description by creating an atom container, inserting a QT atom that specifies the effect, and inserting a set of QT atoms that set its parameters.
“Creating Movies With Modifier Tracks” provides sample code showing you how to create a movie with modifier tracks.
“Authoring Movies With External Movie Targets” discusses how to author movies with external targets, using two new target atoms introduced in QuickTime 4.
“Adding Wired Actions To a Flash Track” explains the steps you need to follow in order to add wired actions to a Macromedia Flash track.
“Creating Video Tracks at 30 Frames-per-Second” discusses creating 30 fps video.
“Creating Video Tracks at 29.97 Frames-per-Second” describes creating 29.97 fps video.
“Creating Audio Tracks at 44.1 Khz” provides an example of creating an audio track.
“Creating a Timecode Track for 29.97 FPS Video” presents a timecode track example.
“Playing With Edit Lists” discusses how to interpret edit list data.
“Interleaving Movie Data” shows how a movie’s tracks are interleaved in the movie data file.
“Referencing Two Data Files With a Single Track” shows how track data may reside in more than one file.
“Getting the Name of a QuickTime VR Node” discusses how you can use standard QuickTime atom container functions to retrieve the information in a QuickTime VR node header atom.
“Adding Custom Atoms in a QuickTime VR Movie” describes how to add custom atoms to either the QuickTime VR world or node information atom containers.
“Adding Atom Containers in a QuickTime VR Movie” shows the code you would use to add VR world and node information atom containers to a QTVR track.
“Optimizing QuickTime VR Movies for Web Playback” describes how to use the QTVR Flattener, a movie export component that converts an existing QuickTime VR single node movie into a new movie that is optimized for viewing on the Web.
Creating, Copying, and Disposing of Atom Containers
Before you can add atoms to an atom container,
you must first create the container by calling QTNewAtomContainer.
The code sample shown in Listing 5-1 calls QTNewAtomContainer to
create an atom container.
Listing 5-1 Creating a new atom container
QTAtomContainer spriteData; |
OSErr err |
// create an atom container to hold a sprite’s data |
err=QTNewAtomContainer (&spriteData); |
When you have finished using an atom container, you should
dispose of it by calling the QTDisposeAtomContainer function.
The sample code shown in Listing 5-2 calls QTDisposeAtomContainer to
dispose of the spriteData atom
container.
Listing 5-2 Disposing of an atom container
if (spriteData) |
QTDisposeAtomContainer (spriteData); |
Creating New Atoms
You can use the QTInsertChild function
to create new atoms and insert them in a QT atom container. The QTInsertChild function
creates a new child atom for a parent atom. The caller specifies
an atom type and atom ID for the new atom. If you specify a value of 0 for the
atom ID, QTInsertChild assigns
a unique ID to the atom.
QTInsertChild inserts
the atom in the parent’s child list at the index specified by
the index parameter;
any existing atoms at the same index or greater are moved toward
the end of the child list. If you specify a value of 0 for the index parameter, QTInsertChild inserts
the atom at the end of the child list.
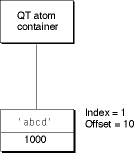
The code sample in Listing 5-3 creates a new QT atom container and calls QTInsertChild to add
an atom. The resulting QT atom container is shown in Figure 5-1. The
offset value 10 is returned in the firstAtom parameter.
Listing 5-3 Creating a new QT atom container and
calling QTInsertChild to
add an atom.
QTAtom firstAtom; |
QTAtomContainer container; |
OSErr err |
err = QTNewAtomContainer (&container); |
if (!err) |
err = QTInsertChild (container, kParentAtomIsContainer, 'abcd', |
1000, 1, 0, nil, &firstAtom); |
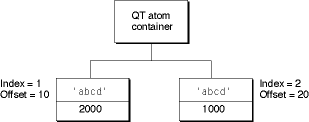
The following code sample calls QTInsertChild to
create a second child atom. Because a value of 1 is specified for
the index parameter,
the second atom is inserted in front of the first atom in the child
list; the index of the first atom is changed to 2. The resulting
QT atom container is shown in Figure 5-2.
QTAtom secondAtom; |
FailOSErr (QTInsertChild (container, kParentAtomIsContainer, 'abcd', |
2000, 1, 0, nil, &secondAtom)); |
You can call the QTFindChildByID function
to retrieve the changed offset of the first atom that was inserted,
as shown in the following example. In this example, the QTFindChildByID function
returns an offset of 20.
firstAtom = QTFindChildByID (container, kParentAtomIsContainer, 'abcd', |
1000, nil); |
Listing 5-4 shows how the QTInsertChild function
inserts a leaf atom into the atom container sprite.
The new leaf atom contains a sprite image index as its data.
Listing 5-4 Inserting a child atom
if ((propertyAtom = QTFindChildByIndex (sprite, kParentAtomIsContainer, |
kSpritePropertyImageIndex, 1, nil)) == 0) |
FailOSErr (QTInsertChild (sprite, kParentAtomIsContainer, |
kSpritePropertyImageIndex, 1, 1, sizeof(short),&imageIndex, |
nil)); |
Copying Existing Atoms
QuickTime provides several functions for copying existing
atoms within an atom container. The QTInsertChildren function
inserts a container of atoms as children of a parent atom in another
atom container. Figure 5-3 shows two example QT atom containers, A and B.
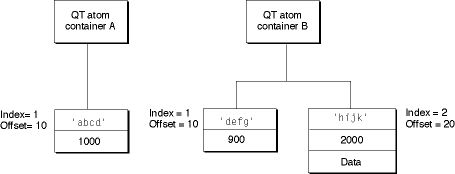
The following code sample calls QTFindChildByID to
retrieve the offset of the atom in container A. Then, the code sample
calls the QTInsertChildren function
to insert the atoms in container B as children of the atom in container
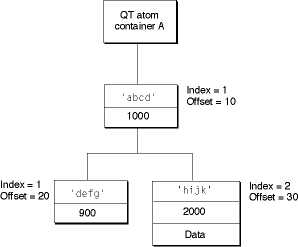
A. Figure 5-4 shows
what container A looks like after the atoms from container B have
been inserted.
QTAtom targetAtom; |
targetAtom = QTFindChildByID (containerA, kParentAtomIsContainer, 'abcd', |
1000, nil); |
FailOSErr (QTInsertChildren (containerA, targetAtom, containerB)); |
In Listing 5-5, the QTInsertChild function
inserts a parent atom into the atom container theSample.
Then, the code calls QTInsertChildren to
insert the container theSprite into
the container theSample.
The parent atom is newSpriteAtom.
Listing 5-5 Inserting a container into another container
FailOSErr (QTInsertChild (theSample, kParentAtomIsContainer, |
kSpriteAtomType, spriteID, 0, 0, nil, &newSpriteAtom)); |
FailOSErr (QTInsertChildren (theSample, newSpriteAtom, theSprite)); |
QuickTime provides three other functions you can use to manipulate
atoms in an atom container. The QTReplaceAtom function
replaces an atom and its children with a different atom and its
children. You can call the QTSwapAtoms function
to swap the contents of two atoms in an atom container; after swapping,
the ID and index of each atom remains the same. The QTCopyAtom function
copies an atom and its children to a new atom container.
Retrieving Atoms From an Atom Container
QuickTime provides functions you can use to retrieve information about the types of a parent atom’s children, to search for a specific atom, and to retrieve a leaf atom’s data.
You can use the QTCountChildrenOfType and QTGetNextChildType functions
to retrieve information about the types of an atom’s children.
The QTCountChildrenOfType function returns
the number of children of a given atom type for a parent atom. The QTGetNextChildType function
returns the next atom type in the child list of a parent atom.
You can use the QTFindChildByIndex, QTFindChildByID,
and QTNextChildAnyType functions to
retrieve an atom. You call the QTFindChildByIndex function
to search for and retrieve a parent atom’s child by its type and
index within that type.
Listing 5-6 shows the sample code function SetSpriteData,
which updates an atom container that describes a sprite. (For more
information about sprites and the Sprite Toolbox, refer to the book
Programming With Wired Movies and Sprite Animation, available at http://developer.apple.com/techpubs/quicktime/qtdevdocs/RM/PDF.htm.)
For each property of the sprite that needs to be updated, SetSpriteData calls QTFindChildByIndex to
retrieve the appropriate atom from the atom container. If the atom is
found, SetSpriteData calls QTSetAtomData to
replace the atom’s data with the new value of the property. If
the atom is not found, SetSpriteData calls QTInsertChild to
add a new atom for the property.
Listing 5-6 Finding a child atom by index
OSErr SetSpriteData (QTAtomContainer sprite, Point *location, |
short *visible, short *layer, short *imageIndex) |
{ |
OSErr err = noErr; |
QTAtom propertyAtom; |
// if the sprite’s visible property has a new value |
if (visible) |
{ |
// retrieve the atom for the visible property -- |
// if none exists, insert one |
if ((propertyAtom = QTFindChildByIndex (sprite, |
kParentAtomIsContainer, kSpritePropertyVisible, 1, |
nil)) == 0) |
FailOSErr (QTInsertChild (sprite, kParentAtomIsContainer, |
kSpritePropertyVisible, 1, 1, sizeof(short), visible, |
nil)) |
// if an atom does exist, update its data |
else |
FailOSErr (QTSetAtomData (sprite, propertyAtom, |
sizeof(short), visible)); |
} |
// ... |
// handle other sprite properties |
// ... |
} |
You can call the QTFindChildByID function
to search for and retrieve a parent atom’s child by its type and
ID. The sample code function AddSpriteToSample,
shown in Listing 5-7, adds a sprite, represented by an atom container,
to a key sample, represented by another atom container. AddSpriteToSample calls QTFindChildByID to
determine whether the atom container theSample contains
an atom of type kSpriteAtomType with
the ID spriteID. If not, AddSpriteToSample calls QTInsertChild to
insert an atom with that type and ID. A value of 0 is passed for
the index parameter to
indicate that the atom should be inserted at the end of the child
list. A value of 0 is passed for the dataSize parameter
to indicate that the atom does not have any data. Then, AddSpriteToSample calls QTInsertChildren to
insert the atoms in the container theSprite as
children of the new atom. FailIf and FailOSErr are
macros that exit the current function when an error occurs.
Listing 5-7 Finding a child atom by ID
OSErr AddSpriteToSample (QTAtomContainer theSample, |
QTAtomContainer theSprite, short spriteID) |
{ |
OSErr err = noErr; |
QTAtom newSpriteAtom; |
FailIf (QTFindChildByID (theSample, kParentAtomIsContainer, |
kSpriteAtomType, spriteID, nil), paramErr); |
FailOSErr (QTInsertChild (theSample, kParentAtomIsContainer, |
kSpriteAtomType, spriteID, 0, 0, nil, &newSpriteAtom)); |
FailOSErr (QTInsertChildren (theSample, newSpriteAtom, theSprite)); |
} |
Once you have retrieved a child atom, you can call QTNextChildAnyType function
to retrieve subsequent children of a parent atom. QTNextChildAnyType returns
an offset to the next atom of any type in a parent atom’s child
list. This function is useful for iterating through a parent atom’s
children quickly.
QuickTime also provides functions for retrieving an atom’s
type, ID, and data. You can call QTGetAtomTypeAndID function
to retrieve an atom’s type and ID. You can access an atom’s data
in one of three ways.
To copy an atom’s data to a handle, you can use the
QTCopyAtomDataToHandlefunction.To copy an atom’s data to a pointer, you can use the
QTCopyAtomDataToPtrfunction.To access an atom’s data directly, you should lock the atom container in memory by calling
QTLockContainer. Once the container is locked, you can callQTGetAtomDataPtrto retrieve a pointer to an atom’s data. When you have finished accessing the atom’s data, you should call theQTUnlockContainerfunction to unlock the container in memory.
Modifying Atoms
QuickTime provides functions that you can call to modify attributes
or data associated with an atom in an atom container. To modify
an atom’s ID, you call the function QTSetAtomID.
You use the QTSetAtomData function
to update the data associated with a leaf atom in an atom container.
The QTSetAtomData function
replaces a leaf atom’s data with new data. The code sample in Listing 5-8 calls
QTFindChildByIndex to
determine whether an atom container contains a sprite’s visible property.
If so, the sample calls QTSetAtomData to
replace the atom’s data with a new visible property.
Listing 5-8 Modifying an atom’s data
QTAtom propertyAtom; |
// if the atom isn’t in the container, add it |
if ((propertyAtom = QTFindChildByIndex (sprite, kParentAtomIsContainer, |
kSpritePropertyVisible, 1, nil)) == 0) |
FailOSErr (QTInsertChild (sprite, kParentAtomIsContainer, |
kSpritePropertyVisible, 1, 0, sizeof(short), visible, nil)) |
// if the atom is in the container, replace its data |
else |
FailOSErr (QTSetAtomData (sprite, propertyAtom, sizeof(short), |
visible)); |
Removing Atoms From an Atom Container
To remove atoms from an atom container, you can use the QTRemoveAtom and QTRemoveChildren functions.
The QTRemoveAtom function
removes an atom and its children, if any, from a container. The QTRemoveChildren function
removes an atom’s children from a container, but does not remove
the atom itself. You can also use QTRemoveChildren to remove
all the atoms in an atom container. To do so, you should pass the
constant kParentAtomIsContainer for
the atom parameter.
The code sample shown in Listing 5-9 adds override samples
to a sprite track to animate the sprites in the sprite track. The sample and spriteData variables
are atom containers. The spriteData atom
container contains atoms that describe a single sprite. The sample atom container
contains atoms that describes an override sample.
Each iteration of the for loop
calls QTRemoveChildren to
remove all atoms from both the sample and
the spriteData containers.
The sample code updates the index of the image to be used for the
sprite and the sprite’s location and calls SetSpriteData (Listing 5-6), which adds
the appropriate atoms to the spriteData atom
container. Then, the sample code calls AddSpriteToSample (Listing 5-7) to
add the spriteData atom
container to the sample atom container.
Finally, when all the sprites have been updated, the sample code
calls AddSpriteSampleToMedia to
add the override sample to the sprite track.
Listing 5-9 Removing atoms from a container
QTAtomContainer sample, spriteData; |
// ... |
// add the sprite key sample |
// ... |
// add override samples to make the sprites spin and move |
for (i = 1; i <= kNumOverrideSamples; i++) |
{ |
QTRemoveChildren (sample, kParentAtomIsContainer); |
QTRemoveChildren (spriteData, kParentAtomIsContainer); |
// ... |
// update the sprite: |
// - update the imageIndex |
// - update the location |
// ... |
// add atoms to spriteData atom container |
SetSpriteData (spriteData, &location, nil, nil, &imageIndex); |
// add the spriteData atom container to sample |
err = AddSpriteToSample (sample, spriteData, 2); |
// ... |
// update other sprites |
// ... |
// add the sample to the media |
err = AddSpriteSampleToMedia (newMedia, sample, |
kSpriteMediaFrameDuration, false); |
} |
Creating an Effect Description
An effect description tells QuickTime which effect to execute and contains the parameters that control how the effect behaves at runtime. You create an effect description by creating an atom container, inserting a QT atom that specifies the effect, and inserting a set of QT atoms that set its parameters.
There are support functions you can call to assist you in
this process. QTCreateStandardParameterDialog returns
a complete effect description that you can use, including user-selected
settings; you only need to add kEffectSourceName atoms
to the description for effects that require sources. At a lower
level, QTGetEffectsList returns
a list of the available effects and ImageCodecGetParameterList will
return a description of the parameters for an effect, including
the default value for each parameter in the form of a QT atom that
can be inserted directly into an effect description.
Structure of an Effect Description
An effect
description is the sole media sample for an effect track. An effect
description is implemented as a QTAtomContainer structure,
the general QuickTime structure for holding a set of QuickTime atoms.
All effect descriptions must contain the set of required atoms, which
specify attributes such as which effect component to use. In addition,
effect descriptions can contain a variable number of parameter atoms,
which hold the values of the parameters for the effect.
Each atom contains either data or a set of child atoms. If a parameter atom contains data, the data is the value of the parameter, and this value remains constant while the effect executes. If a parameter atom contains a set of child atoms, they typically contain a tween entry so the value of the parameter will be interpolated for the duration of the effect.
You assemble an effect description by adding the appropriate
set of atoms to a QTAtomContainer structure.
You can find out what the appropriate atoms are by making
an ImageCodecGetParameterList call
to the effect component. This fills an atom container with a set
of parameter description atoms. These atoms contain descriptions
of the effect parameters, such as each parameter’s atom type,
data range, default value, and so on. The default value in each
description atom is itself a QTAtom that
can be inserted directly into your effect description.
You can modify the data in the parameter atoms directly, or
let the user set them by calling QTCreateStandardParameterDialog,
which returns a complete effect description (you need to add kEffectSourceName atoms
for effects that require sources).
You then add the effect description to the media of the effect track.
Required Atoms of an Effects Description
There are several required atoms that an effect description
must contain. The first is the kParameterWhatName atom.
The kParameterWhatName atom
contains the name of the effect. This specifies which of the available
effects to use.
The code snippet shown in Listing 5-10 adds a kParameterWhatName atom
to the atom container effectDescription.
The constant kCrossFadeTransitionType contains
the name of the cross-fade effect.
Listing 5-10 Adding a kParameterWhatName atom
to the atom container effectDescription
effectCode = kCrossFadeTransitionType; |
QTInsertChild(effectDescription, kParentAtomIsContainer, |
kParameterWhatName, kParameterWhatID, 0, |
sizeof(effectCode), &effectCode, nil); |
In addition to the kParameterWhatName atom,
the effect description for an effect that uses sources must contain
one or more kEffectSourceName atoms.
Each of these atoms contains the name of one of the effect’s sources.
An input map is used to map these names to the actual tracks of
the movie that are the sources. “Creating an Input Map” describes
how to create the input map.
Parameter Atoms of an Effects Description
In addition to the required atoms, the effects description contains a variable number of parameter atoms. The number and types of parameter atoms vary from effect to effect. For example, the cross fade effect has only one parameter, while the general convolution filter effect has nine. Some effects have no parameters at all, and do not require any parameter atoms.
You can obtain the list of parameter atoms for a given effect
by calling the effect component using ImageCodecGetParameterList.
The parameter description atoms it returns include default settings
for each parameter in the form of parameter atoms that you can insert
into your effect description.
The QTInsertChild function
is used to add these parameters to the effect description, as seen
in the code example in Listing 5-10.
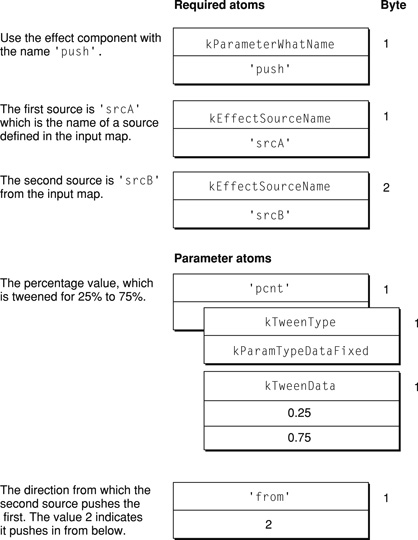
Consider, for instance, the push effect. Its effect description
contains a kParameterWhatName atom,
two kEffectSourceName atoms,
and two parameter atoms, one of which is a tween.
The kParameterWhatName atom
specifies that this is a 'push' effect.
The two kEffectSourceName atoms
specify the two sources that this effect will use, in this case 'srcA' and 'srcB'.
The names correspond to entries in the effect track’s input map.
The 'pcnt' parameter
atom defines which frames of the effect are shown. This parameter contains
a tween entry, so that the value of this parameter is interpolated
as the effect runs . The interpolation of the 'pcnt' parameter
causes consecutive frames of the effect to be rendered, creating
the push effect.
The 'from' parameter
determines the direction of the push. This parameter is set from
an enumeration list, with 2 being defined as the bottom of the screen.
In this example, the source 'srcB' will
push in from the bottom, covering the source 'srcA'.
The 'pcnt' parameter
is normally tweened from 0 to 100, so that the effect renders completely,
from 0 to 100 percent. In this example, the 'pcnt' parameter
is tweened from 25 to 75, so the effect will start 25% of the way
through (with 'srcB' already
partly on screen) and finish 75% of the way through (with part of 'srcA' still
visible).
Figure 5-5 shows the set of atoms that must be added to the entry description.
An important property of effect parameters is that most can
be tweened (and some must be tweened). Tweening is QuickTime’s
general purpose interpolation mechanism (see “Tween Media” for more information).
For many parameters, it is desirable to allow the value of the parameter
to change as the effect executes. In the example shown in Figure 5-5, the 'pcnt' parameter
must be a tween. This parameter controls which frame of the effect is
rendered at any given time, so it must change for the effect to
progress. The 'from' parameter
is not a tween in the example above, but it could be if we wanted
the direction of the push to change during the course of the effect.
Creating an Input Map
The input map is another QT atom container that you attach to the effects track. It describes the sources used in the effect and gives a name to each source. This name is used to refer to the source in the effects description.
An input map works in concert with track reference atoms in
the source tracks. A track reference atom of type kTrackModifierReference is
added to each source track, which causes that source track’s output
to be redirected to the effects track. An input map is added to
the effects track to identify the source tracks and give a name
to each source, such as 'srcA' and 'srcB'.
The effect can then refer to the sources by name, specifying that 'srcB' should
slide in over 'srcA',
for example.
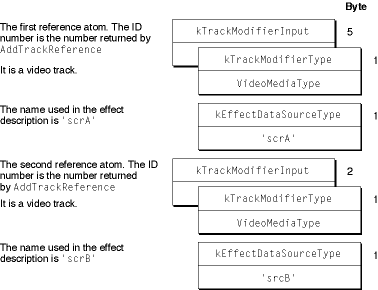
Structure of an Input Map
The input map contains a set of atoms that refer to the tracks
used as sources for the effect. Each source track is represented
by one track reference atom of type kTrackModifierInput.
Each modifier input atom contains two children, one of type kEffectDataSourceType,
and one of type kTrackModifierType,
which hold the name and type of the source.
The name of the source is a unique identifier that you create, which is used in the effect description to reference the track. Any four-character name is valid, as long as it is unique in the set of source names.
Important:
Apple recommends you adopt the standard naming convention 'srcX',
where X is a letter of the alphabet. Thus, your first source would
be named 'srcA', the
second 'srcB', and so
forth. This convention is used here in this chapter.
The child atom of type kTrackModifierType indicates
the type of the track being referenced. For a video track the type
is VideoMediaType, for
a sprite track it is SpriteMediaType,
and so forth. Video tracks are the most common track type used as
sources for effects. Only tracks that have a visible output, such
as video and sprite tracks, can be used as sources for an effect.
This means, for example, that sound tracks cannot be sources for
an effect.
Figure 5-6 shows a completed input map that references two sources.
The first source is a video track and is called 'srcA'.
The second source, also a video track, is called 'srcB'.
You refer to a kTrackModifierInput atom
by its index number, which is returned by the AddTrackReference function
when you create the atom.
Building Input Maps
The first step in creating an input map is to create a new QTAtomContainer to
hold the map. You use the standard QuickTime container creation
function.
QTNewAtomContainer(&inputMap); |
For each source you are creating, you need to call the AddTrackReference function.
The track IDs of the effects track and the source track are passed
as parameters to AddTrackReference,
which creates an atom of type kTrackModifierReference and
returns an index number. You use this index as the ID of the atom
when you need to refer to it. You then insert the reference into
the input map as an atom of type kTrackModifierInput.
The code in Listing 5-11 creates a reference to the track firstSourceTrack,
and adds it to the input map.
Listing 5-11 Adding an input reference atom to an input map
AddTrackReference(theEffectsTrack, firstSourceTrack, |
kTrackModifierReference, &referenceIndex); |
QTInsertChild(inputMap, kParentAtomIsContainer, |
kTrackModifierInput, referenceIndex, 0, 0, nil, &inputAtom); |
The QTInsertChild function
returns the offset of the new modifier input atom in the inputAtom parameter.
You now need to add the name and type of the source track
to the modifier input atom. Again, calling the QTInsertChild function
does this, as shown in the following code snippet:
inputType = VideoMediaType; |
QTInsertChild(inputMap, inputAtom, |
kTrackModifierType, 1, 0, sizeof(inputType), &inputType, |
nil); |
aType = 'srcA'; |
QTInsertChild(inputMap, inputAtom, kEffectDataSourceType, 1, 0, |
sizeof(aType), &aType, nil); |
This process is repeated for each source for the effect.
Creating Movies with Modifier Tracks
QuickTime 2.1 added additional functionality for media handlers. By way of modifier tracks, a media handler can send its data to another media handler rather than presenting its media directly. See “Modifier Tracks” for a complete discussion of this feature.
To create a movie with modifier tracks,
first you create a movie with all the desired tracks, then you create
the modifier track. To link the modifier track to the track that
it modifies, you use the AddTrackReference function
as shown in Listing 5-12.
Listing 5-12 Linking a modifier track to the track it modifies
long addedIndex; |
AddTrackReference(aVideoTrack, aModifierTrack, |
kTrackModifierReference, &addedIndex); |
The reference doesn’t completely describe the modifier track’s relationship to the track it modifies. Instead, the reference simply tells the modifier track to send its data to the specified track. The receiving track doesn’t “know” what it should do with that data. A single track may also be receiving data from more than one modifier track.
To describe how each modifier input should be used, each track’s
media also has an input map. The media’s input map describes how
the data being sent to each input of a track should be interpreted
by the receiving track. After creating the reference, it is necessary
to update the receiving track’s media input map. When AddTrackReference is
called, it returns the index of the reference added. That index
is the index of the input that needs to be described in the media
input map. If the modifier track created above contains regions
to change the shape of the video track, the code shown in Listing 5-13 updates
the input map appropriately.
Listing 5-13 Updating the input map
QTAtomContainer inputMap; |
QTAtom inputAtom; |
OSType inputType; |
Media aVideoMedia = GetTrackMedia(aVideoTrack); |
GetMediaInputMap (aVideoMedia, &inputMap); |
QTInsertChild(inputMap, kParentAtomIsContainer, kTrackModifierInput, |
addedIndex, 0,0, nil, &inputAtom); |
inputType = kTrackModifierTypeClip; |
QTInsertChild (inputMap, inputAtom, kTrackModifierType, 1, 0, |
sizeof(inputType), &inputType, nil); |
SetMediaInputMap(aVideoMedia, inputMap); |
QTDisposeAtomContainer(inputMap); |
The media input map allows you to store additional information for each input. In the preceding example, only the type of the input is specified. In other types of references, you may need to specify additional data.
When a modifier track is playing an empty track edit, or is disabled or deleted, all receiving tracks are notified that the track input is inactive. When an input becomes inactive, it is reset to its default value. For example, if a track is receiving data from a clip modifier track and that input becomes inactive, the shape of the track reverts to the shape it would have if there were no clip modifier track.
Authoring Movies with External Movie Targets
QuickTime 4 enables you to author movies with external movie targets. To specify an action that targets an element of an external movie, you must identify the external movie by either its name or its ID. Two new target atom types have been introduced for this purpose; these atoms are used in addition to the existing target atoms, which you may use to specify that the element is a particular track or object within a track, such as a sprite.
These additional target atoms provided in QuickTime 4:
[(ActionTargetAtoms)] = |
<kActionTarget> |
<kTargetMovieName> |
[Pstring MovieName] |
OR |
<kTargetMovieID> |
[long MovieID] |
OR |
[(kExpressionAtoms)] |
To tag a movie with a name or ID, you add a user data item
of type 'plug' to the
movie’s user data. The index of the user data does not matter.
The data specifies the name or ID.
You add a user data item of type 'plug'
to the movie’s user data with its data set to
"Movieid=MovieName" |
where MovieName is
the name of the movie.
You add a user data item of type 'plug'
to the movie’s user data with its data set to
"Movieid=MovieID" |
where the ID is a signed long integer.
The QuickTime plug-in additionally supports EMBED tag parameters, which allow
you to override a movie’s name or ID within an HTML page.
Target Atoms for Embedded Movies
QuickTime 4.1 introduced target atoms to accommodate the addition of embedded movies. These target atoms allow for paths to be specified in a hierarchical movie tree.
Target movies may be an external movie, the default movie, or any movie embedded within another movie. Targets are specified by using a movie path that may include parent and child movie relationships, and may additionally include track and track object target atoms as needed.
By using embedded kActionTarget atoms
along with parent and child movie target atoms, you can build up
paths for movie targets. Note that QuickTime looks for these embedded kActionTarget atoms
only when evaluating a movie target, and any movie target type may contain
a sibling kActionTarget atom.
Paths begin from the current movie, which is the movie containing
the object that is handling an event. You may go up the tree using
a kTargetParentMovie atom,
or down the tree using one of five new child movie atoms. You may
use a kTargetRootMovie atom
as a shortcut to get to the top of the tree containing an embedded
movie and may use the movieByName and movieByID atoms
to specify a root external movie.
The target atoms are:
kTargetRootMovie(leaf atom, no data). This is the root movie containing the action handler.kTargetParentMovie(leaf atom, no data). This is the parent movie.
Note that there are five ways to specify an embedded child movie. Three of them specify movie track properties. Two specify properties of the currently loaded movie in a movie track.
kTargetChildMovieTrackName.A child movie track specified by track name.kTargetChildMovieTrackID. A child movie track specified by track ID.kTargetChildMovieTrackIndex. A child movie track specified by track index.kTargetChildMovieMovieName. A child movie specified by the currently loaded movie’s movie name. The child movie must containmovieNameuser data with the specified name.kTargetChildMovieMovieID. A child movie specified by the currently loaded movie’s movie ID. The child movie must containmovieIDuser data with the specified ID.
Adding Wired Actions To a Flash Track
This section explains the steps you need to follow in order to add wired actions to a Macromedia Flash track. The Flash media handler was introduced in QuickTime 4 to enable a SWF 3.0 file to be treated as a track within a QuickTime movie. See “Flash Media” for more information about the Flash media handler.
Sample code (AddFlashActions)
is provided on the QuickTime
SDK, as well as on the QuickTime developer website, that lets you
add wired actions to a Flash track.
Note: For more detailed
information about working with Flash, you can download the Macromedia
SWF File Format Specification at http://www.macromedia.com/software/flash/open/spec/,
along with the SWF File Parser code also at the Macromedia website.
Extending the SWF Format
QuickTime 4 extends the SWF file format to allow the execution of any of its wired actions, in addition to the much smaller set of Flash actions. For example, you may use a SWF file as a user interface element in a QuickTime movie, controlling properties of the movie and other tracks. QuickTime also allows SWF files to be compressed using the zlib data compressor. This can significantly lower the bandwidth required when downloading a SWF file when it is in a QuickTime movie.
By using wired actions within a Flash track, compressing your Flash tracks, and combining Flash tracks with other types of QuickTime media, you can create compact and sophisticated multimedia content.
The SWF File Format Specification consists of a header followed
by a series of tagged data blocks. The types of tagged data blocks
you need to use are the DefineButton2 and DoAction.
The DefineButton2 block
allows Flash actions to be associated with a mouse state transition. DoAction allows
actions to be executed when the tag is encountered. These are analogous
to mouse-related QT event handlers and the frame loaded event in
wired movies.
Flash actions are stored in an action record. Each Flash action
has its own tag, such as ActionPlay and ActionNextFrame.
QuickTime defines one new tag: QuickTimeActions, which
is 0xAA. The data for
the QuickTime actions tag is simply a QT atom container with the
QuickTime wired actions to execute in it.
There are also fields you need to change in order to add wired actions to a SWF file. Additionally, there is one tag missing from the SWF file format that is described below.
What You Need to Modify
For defineButton2,
you need to modify or add the following fields: file length, action records
offset, the action offset, the condition, the record header size
portion, and add action record.
File Length
A 32-bit field in the SWF file header.
RecordHeader for
the defineButton2
RecordHeader contains
the tag ID and length. You need to update the length. Note that
there are short and long formats for record headers, depending on
the size of the record. The tag ID for defineButton2 is
34.
ActionRecordsOffset
The action records offset, a 16-bit field, is missing from the SWF File Format Specification. It occurs between the flags and buttons fields. It is initially set to 0 if there are no actions for the button. If there are actions for the button, then it must contain the offset from the point in the SWF file following this 16-bit value to the beginning of the action offset field.
DefineButton2 = |
Header |
ButtonID |
Flags |
ActionRecordsOffset (this is missing from the spec) |
Buttons |
ButtonEndFlag |
Button2ActionCode |
ActionOffset |
Condition |
Action [ActionRecords] |
ActionEndFlag |
ActionOffset
There is one action offset per condition (mouse overDownToIdle).
This is the offset used to skip over the condition and the following
actions (the ActionRecord)
for the condition. You need to update this value when adding actions.
Condition
The condition field is roughly equivalent to a wired movie event. The actions associated with button state transition condition are triggered when the transition occurs. You need to add or edit this field.
Actions
Flash actions each have their own action tag code. QuickTime
actions use a single QuickTime actions code: 'AA'.
You may add a list of actions to a single QuickTime actions tag.
The format of the QuickTime actions tag is as follows:
1 byte: // Tag = 'AA' |
2 bytes: // data length (size of the QTAtomContainer) |
n bytes // the data which is the QTAtomContainer holding the |
// wired actions |
DoAction
For DoAction, you
need to modify a subset of the defineButton2 fields
in the same manner as described above. These fields are file length,
the record header size portion, and the action record.
Note that you need to write the length fields in little-endian format.
Creating Video Tracks at 30 Frames per Second
The duration of a video frame is stored in the time-to-sample atom contained within a sample table atom. This duration cannot be interpreted without the media’s time scale, which defines the units-per-second for the duration. In this example, each frame has the same duration, so the time-to-sample atom has one entry, which applies to all video frames in the media.
As long as the ratio between frame duration and media time scale remains 1:30, any combination of values can be used for the duration and time scale. The larger the time scale the shorter the maximum duration. Since a movie defaults to a time scale of 600, this is a good number to use. It is also the least common multiple for 24, 25, and 30, making it handy for much of the math you are likely to encounter when making a movie.
The movie time scale is independent of the media time scale. Since you want to avoid movie edits that don’t land on frame boundaries, it is a good idea to keep the movie time scale and the media time scale the same, or the movie time scale should be an even multiple of the media time scale. The movie time scale is stored in the movie header atom.
With a time scale of 600 in the media header atom, the time-to-sample atom would contain the following data values:
Atom size |
24 |
Atom type |
|
Version/Flags |
0 |
Number of entries |
1 |
Sample count |
n |
Sample duration |
20 |
Creating Video Tracks at 29.97 Frames per Second
NTSC color video is not 30 frames per second (fps), but actually 29.97 fps. The previous example showed how the media time scale and the duration of the frames specify the video’s frame rate. By setting the media’s time scale to 2997 units per second and setting the frame durations to 100 units each, the effective rate is 29.97 fps exactly.
In this situation, it is also a good idea to set the movie time scale to 2997 in order to avoid movie edits that don’t land on frame boundaries. The movie’s time scale is stored in the movie header atom.
With a time scale of 2997 in the media header atom, the time-to-sample atom would contain the following data values:
Atom size |
24 |
Atom type |
|
Version/Flags |
0 |
Number of entries |
1 |
Sample count |
n |
Sample duration |
100 |
Creating Audio Tracks at 44.1 kHz
The duration of an audio sample is stored in the time-to-sample atom contained in a sample table atom. This duration cannot be interpreted without the media’s time scale, which defines the units per second for the duration. With audio, the duration of each audio sample is typically 1, so the time-to-sample atom has one entry, which applies to all audio samples.
With a time scale of 44100 in the media header atom, the time-to-sample atom would contain the following data values:
Atom size |
24 |
Atom type |
|
Version/Flags |
0 |
Number of entries |
1 |
Sample count |
n |
Sample duration |
1 |
This atom does not indicate whether the audio is stereo or mono or whether it contains 8-bit or 16-bit samples. That information is stored in the sound sample description atom, which is contained in the sample table atom.
Creating a Timecode Track for 29.97 FPS Video
A timecode track specifies timecode information for other tracks. The timecode keeps track of the timecodes of the original source of the video and audio. After a movie has been edited, the timecode can be extracted to determine the source tape and the timecodes of the frames.
It is important that the timecode track have the same time scale as the video track. Otherwise, the timecode will not tick at the exact same time as the video track.
For each contiguous source tape segment, there is a single timecode sample that specifies the timecode value corresponding to the start of the segment. From this sample, the timecode value can be determined for any point in the segment.
The sample description for a timecode track specifies the timecode system being used (for example, a 30-fps drop frame) and the source information. Each sample is a timecode value.
Since the timecode media handler is a derived from the base media handler, the media information atom starts with a generic media header atom. The timecode atoms would contain the following data values:
Atom size |
77 |
||
Atom type |
|
||
Atom size |
69 |
||
Atom type |
|
||
Version/Flags |
0 |
||
Graphics mode |
0x0040 |
||
Opcolor (red) |
0x8000 |
||
Opcolor (green) |
0x8000 |
||
Opcolor (blue) |
0x8000 |
||
Balance |
0 |
||
Reserved |
0 |
||
Atom size |
45 |
||
Atom type |
|
||
Atom size |
37 |
||
Atom type |
|
||
Version/Flags |
0 |
||
Text font |
0 (system font) |
||
Text face |
0 (plain) |
||
Text size |
12 |
||
Text color (red) |
0 |
||
Text color (green) |
0 |
||
Text color (blue) |
0 |
||
Background color (red) |
0 |
||
Background color (green) |
0 |
||
Background color (blue) |
0 |
||
Font name |
|
The sample table atom contains all the standard sample atoms and has the following data values:
Atom size |
174 |
||
Atom type |
|
||
Atom size |
74 |
||
Atom type |
|
||
Version/Flags |
0 |
||
Number of entries |
1 |
||
Sample description size [1] |
58 |
||
Data format [1] |
|
||
Reserved [1] |
0 |
||
Data reference index [1] |
1 |
||
Flags[1] |
0 |
||
Flags (timecode) [1] |
7 (drop frame + 24 hour + negative times OK) |
||
Time scale[1] |
2997 |
||
Frame duration[1] |
100 |
||
Number of frames [1] |
20 |
||
Atom size |
24 |
||
Atom type |
|
||
String length |
12 |
||
Language code |
0 (English) |
||
Name |
“my tape name” |
||
Atom size |
24 |
||
Atom type |
|
||
Version/Flags |
0 |
||
Number of entries |
1 |
||
Sample count[1] |
1 |
||
Sample duration[1] |
1 |
||
Atom size |
28 |
||
Atom type |
|
||
Version/Flags |
0 |
||
Number of entries |
1 |
||
First chunk[1] |
1 |
||
Samples per chunk[1] |
1 |
||
Sample description ID[1] |
1 |
||
Atom size |
20 |
||
Atom type |
|
||
Version/Flags |
0 |
||
Sample size |
4 |
||
Number of entries |
1 |
||
Atom size |
20 |
||
Atom type |
|
||
Version/Flags |
0 |
||
Number of entries |
1 |
||
Offset [1] |
(offset into file of chunk 1) |
In the example, let’s assume that the segment’s beginning timecode is 1:15:32.4 (1 hour, 15 minutes, 32 seconds, and 4 frames). The time would be expressed in the data file as 0x010F2004 (0x01 = 1 hour; 0x0F = 15 minutes; 0x20 = 32 seconds; 0x04 = 4 frames).
The video and audio tracks must contain a track reference atom to indicate that they reference this timecode track. The track reference is the same for both and is contained in the track atom (at the same level as the track header and media atoms).
This track reference would contain the following data values:
Atom size |
12 |
Atom type |
|
Reference type |
|
Track ID of referenced track (timecode track) |
3 |
In this example, the video and sound tracks are tracks 1 and 2. The timecode track is track 3.
Playing with Edit Lists
A segment of a movie can be repeated without duplicating media data by using edit lists. Suppose you have a single-track movie whose media time scale is 100 and track duration is 1000 (10 seconds). For this example the movie’s time scale is 600. If there are no edits in the movie, the edit atom would contain the following data values:
Atom size |
36 |
|
Atom type |
|
|
Atom size |
28 |
|
Atom type |
|
|
Version/Flags |
0 |
|
Number of entries |
2 |
|
Track duration |
6000 (10 seconds) |
|
Media time |
0 |
|
Media rate |
1.0 |
Because this is a single-track move, the track’s duration in the track header atom is 6000 and the movie’s duration in the movie header atom is 6000.
If you change the track to play the media from time 0 to time 2 seconds, and then play the media from time 0 to time 10 seconds, the edit atom would now contain these data values:
Atom size |
48 |
|
Atom type |
|
|
Atom size |
40 |
|
Atom type |
|
|
Version/Flags |
0 |
|
Number of entries |
2 |
|
Track duration[1] |
1200 (2 seconds) |
|
Media time[1] |
0 |
|
Media rate[1] |
1.0 |
|
Track duration[2] |
6000 (10 seconds) |
|
Media time[2] |
0 |
|
Media rate[2] |
1.0 |
Because the track is now 2 seconds longer, the track’s duration in the track header atom must now be 7200, and the movie’s duration in the movie header atom must also be 7200.
Currently, the media plays from time 0 to time 2, then plays from time 0 to time 10. If you take that repeated segment at the beginning (time 0 to time 2) and play it at double speed to maintain the original duration, the edit atom would now contain the following values:
Atom size |
60 |
|
Atom type |
|
|
Atom size |
52 |
|
Atom type |
||
Version/Flags |
0 |
|
Number of entries |
3 |
|
Track duration[1] |
600 (1 second) |
|
Media time[1] |
0 |
|
Media rate[1] |
2.0 |
|
Track duration[2] |
600 (1 second) |
|
Media time[2] |
0 |
|
Media rate[2] |
2.0 |
|
Track duration[3] |
4800 (8 seconds) |
|
Media time[3] |
200 |
|
Media rate[3] |
1.0 |
Because the track is now back to its original duration of 10 seconds, its duration in the track header atom is 6000, and the movie’s duration in the movie header atom is 6000.
Interleaving Movie Data
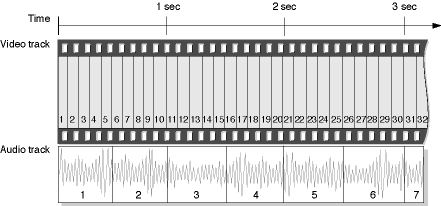
In order to get optimal movie playback, you must create the movie with interleaved data. Because the data for the movie is placed on disk in time order, the data for a particular time in the movie is close together in the file. This means that you will have to intersperse the data from different tracks. To illustrate this, consider a movie with a single video and a single audio track.
Figure 5-7 shows how the movie data was collected, and how the data would need to be played back for proper synchronization. In this example, the video data is recorded at 10 frames per second and the audio data is grouped into half-second chunks.
After the data has been interleaved on the disk, the movie data atom would contain movie data in the order shown in Figure 5-8.
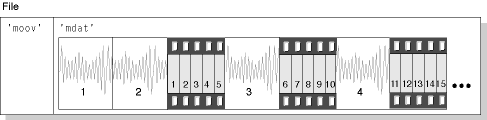
In this example, the file begins with the movie atom ('moov'),
followed by the movie data atom ('mdat').
In order to overcome any latencies in sound playback, at least one
second of sound data is placed at the beginning of the interleaved
data. This means that the sound and video data are offset from each
other in the file by one second.
Referencing Two Data Files With a Single Track
The data reference index to be used for a given media sample is stored within that sample’s sample description. Therefore, a track must contain multiple sample descriptions in order for that track to reference multiple data files. A different sample description must be used whenever the data file changes or whenever the format of the data changes. The sample-to-chunk atom determines which sample description to use for a sample.
The sample description atom would contain the following data values:
Atom size |
… |
|
Atom type |
|
|
Version/Flags |
0 |
|
Number of entries |
2 |
|
Sample description size[1] |
… |
|
Data format |
|
|
Reserved |
0 |
|
Data reference index |
1 |
|
(sample data) |
… |
|
Sample description size[1] |
… |
|
Data format |
|
|
Reserved |
0 |
|
Data reference index |
2 |
|
(sample data) |
… |
If there is only 1 sample per chunk and the first 10 samples are extracted from sample description 2 and the next 30 samples are extracted from sample description 1, the sample-to-chunk atom would contain the following data values:
Atom size |
40 |
Atom type |
|
Version/Flags |
0 |
Number of entries |
2 |
First chunk[1] |
1 |
Samples per chunk[1] |
1 |
Sample description ID[1] |
2 |
First chunk[2] |
11 |
Samples per chunk[2] |
1 |
Sample description ID[2] |
1 |
The data reference atom would contain the following data values:
Atom size |
… |
|
Atom type |
|
|
Atom size |
… |
|
Atom type |
|
|
Version/Flags |
0 |
|
Number of entries |
2 |
|
Size[1] |
… |
|
Type[1] |
|
|
Version[1] |
0 |
|
Flags[1] |
0 (not self referenced) |
|
Data reference[1] |
[alias pointing to file #1] |
|
Size[2] |
… |
|
Type[2] |
|
|
Version[2] |
0 |
|
Flags[2] |
0 (not self referenced) |
|
Data reference[2] |
[alias pointing to file #2] |
Getting the Name of a QuickTime VR Node
You can use standard QuickTime atom container functions to
retrieve the information in a QuickTime VR node header atom.
For example, the MyGetNodeName function
defined in Listing 5-14 returns the name of a node, given its node ID.
Listing 5-14 Getting a node’s name
OSErr MyGetNodeName (QTVRInstance theInstance, UInt32 theNodeID, |
StringPtr theStringPtr) |
{ |
OSErr theErr = noErr; |
QTAtomContainer theNodeInfo; |
QTVRNodeHeaderAtomPtr theNodeHeader; |
QTAtom theNodeHeaderAtom = 0; |
//Get the node information atom container. |
theErr = QTVRGetNodeInfo(theInstance, theNodeID, &theNodeInfo); |
//Get the node header atom. |
if (!theErr) |
theNodeHeaderAtom = QTFindChildByID(theNodeInfo, kParentAtomIsContainer, |
kQTVRNodeHeaderAtomType, 1, nil); |
if (theNodeHeaderAtom != 0) { |
QTLockContainer(theNodeInfo); |
//Get a pointer to the node header atom data. |
theErr = QTGetAtomDataPtr(theNodeInfo, theNodeHeaderAtom, nil, |
(Ptr *)&theNodeHeader); |
//See if there is a name atom. |
if (!theErr && theNodeHeader->nameAtomID != 0) { |
QTAtom theNameAtom; |
theNameAtom = QTFindChildByID(theNodeInfo, kParentAtomIsContainer, |
kQTVRStringAtomType, theNodeHeader->nameAtomID, nil); |
if (theNameAtom != 0) { |
VRStringAtomPtr theStringAtomPtr; |
//Get a pointer to the name atom data; copy it into the string. |
theErr = QTGetAtomDataPtr(theNodeInfo, theNameAtom, nil, |
(Ptr *)&theStringAtomPtr); |
if (!theErr) { |
short theLen = theStringAtomPtr->stringLength; |
if (theLen > 255) |
theLen = 255; |
BlockMove(theStringAtomPtr->string, &theStringPtr[1], theLen); |
theStringPtr[0] = theLen; |
} |
} |
} |
QTUnlockContainer(theNodeInfo); |
} |
QTDisposeAtomContainer(theNodeInfo); |
return(theErr); |
} |
The MyGetNodeName function
defined in Listing 5-14 retrieves the node information atom container (by
calling QTVRGetNodeInfo)
and then looks inside that container for the node header atom with
atom ID 1. If it finds one, it locks the container and then gets
a pointer to the node header atom data. The desired information,
the node name, is contained in the string atom whose atom ID is
specified by the nameAtomID field
of the node header structure. Accordingly, the MyGetNodeName function
then calls QTFindChildByID once
again to find that string atom. If the string atom is found, MyGetNodeName calls QTGetAtomDataPtr to
get a pointer to the string atom data. Finally, MyGetNodeName copies
the string data into the appropriate location and cleans up after
itself before returning.
Adding Custom Atoms in a QuickTime VR Movie
If you author a QuickTime VR movie, you may choose to add custom atoms to either the VR world or node information atom containers. Those atoms can be extracted within an application to provide additional information that the application may use.
Information that pertains to the entire scene might be stored in a custom atom within the VR world atom container. Node-specific information could be stored in the individual node information atom containers or as sibling atoms to the node location atoms within the VR world.
Custom hot spot atoms should be stored as siblings to the hot spot information atoms in the node information atom container. Generally, its atom type is the same as the custom hot spot type. You can set up an intercept procedure in your application in order to process clicks on the custom hot spots.
If you use custom atoms, you should install your hot spot intercept procedure when you open the movie. Listing 5-15 is an example of such an intercept procedure.
Listing 5-15 Typical hot spot intercept procedure
QTVRInterceptProc MyProc = NewQTVRInterceptProc (MyHotSpot); |
QTVRInstallInterceptProc (qtvr, kQTVRTriggerHotSpotSelector, myProc, 0, 0); |
pascal void MyHotSpot (QTVRInstance qtvr, QTVRInterceptPtr qtvrMsg, |
SInt32 refCon, Boolean *cancel) |
{ |
UInt32 hotSpotID = (UInt32) qtvrMsg->parameter[0]; |
QTAtomContainer nodeInfo = |
(QTAtomContainer) qtvrMsg->parameter[1]; |
QTAtom hotSpotAtom = (QTAtom) qtvrMsg->parameter[2]; |
OSType hotSpotType; |
CustomData myCustomData; |
QTAtom myAtom; |
QTVRGetHotSpotType (qtvr, hotSpotID, &hotSpotType); |
if (hotSpotType != kMyAtomType) return; |
// It's our type of hot spot - don't let anyone else handle it |
*cancel = true; |
// Find our custom atom |
myAtom = QTFindChildByID (nodeInfo, hotSpotAtom, kMyAtomType, 1, nil); |
if (myAtom != 0) { |
OSErr err; |
// Copy the custom data into our structure |
err = QTCopyAtomDataToPtr (nodeInfo, myAtom, false, |
sizeof(CustomData), &myCustomData, nil); |
if (err == noErr) |
// Do something with it |
DoMyHotSpotStuff (hotSpotID, &myCustomData); |
} |
} |
Your intercept procedure is called for clicks on any hot spot.
You should check to see if it is your type of hot spot and, if so,
extract the custom hot spot atom and do whatever is appropriate
for your hot spot type (DoMyHotSpotStuff).
When you no longer need the intercept procedure you should
call QTVRInstallInterceptProc again
with the same selector and a nil procedure
pointer and then call DisposeRoutineDescriptor on myProc.
Apple reserves all hot spot and atom types with lowercase letters. Your custom hot spot type should contain all uppercase letters.
Adding Atom Containers in a QuickTime VR Movie
Assuming you have already created the QuickTime VR world and node information atom containers, you would use the code (minus error checking) Listing 5-16 to add them to the QTVR track.
Listing 5-16 Adding atom containers to a track
long descSize; |
QTVRSampleDescriptionHandle qtvrSampleDesc; |
// Create a QTVR sample description handle |
descSize = sizeof(QTVRSampleDescription) + GetHandleSize((Handle) vrWorld) - |
sizeof(UInt32); |
qtvrSampleDesc = (QTVRSampleDescriptionHandle) NewHandleClear (descSize); |
(*qtvrSampleDesc)->size = descSize; |
(*qtvrSampleDesc)->type = kQTVRQTVRType; |
// Copy the VR world atom container data into the QTVR sample description |
BlockMove (*((Handle) vrWorld), &((*qtvrSampleDesc)->data), |
GetHandleSize((Handle) vrWorld)); |
// Now add it to the QTVR track's media |
err = BeginMediaEdits (qtvrMedia); |
err = AddMediaSample (qtvrMedia, (Handle) nodeInfo, 0, |
GetHandleSize((Handle) nodeInfo), duration, |
(SampleDescriptionHandle) qtvrSampleDesc, 1, 0, &sampleTime); |
err = EndMediaEdits (qtvrMedia); |
InsertMediaIntoTrack (qtvrTrack, trackTime, sampleTime, duration, 1L<<16); |
The duration value
is computed based on the duration of the corresponding image track samples
for the node. The value of trackTime is
the time for the beginning of the current node (zero for a single
node movie). The values of duration and sampleTime are
in the time base of the media; the value of trackTime is
in the movie’s time base.
Optimizing QuickTime VR Movies for Web Playback
Originally, both QuickTime movies and QuickTime VR movies had to be completely downloaded to the user’s local hard disk before they could be viewed. Starting with QuickTime 2.5, if the movie data is properly laid out in the file, standard linear QuickTime movies can be viewed almost immediately. The frames that have been downloaded so far are shown while subsequent frames continue to be downloaded.
The important change that took place to allow this to happen was for QuickTime to place global movie information at the beginning of the file. Originally, this information was at the end of the file. After that, the frame data simply needs to be in order in the file. Similarly, QuickTime VR files also need to be laid out in a certain manner in order to get some sort of quick feedback when viewing on the web. Roughly speaking this involves writing out all of the media samples in the file in a particular order. Apple now provides a movie export component that does this for you: the QTVR Flattener.
The QTVR Flattener
The QTVR Flattener is a movie export component that converts an existing QuickTime VR single node movie into a new movie that is optimized for the Web. Not only does the flattener reorder the media samples, but for panoramas it also creates a small preview of the panorama. When viewed on the Web, this preview appears after 5% to 10% of the movie data has been downloaded, allowing users to see a lower-resolution version of the panorama.
Using the QTVR flattener from your application is quite easy.
After you have created the QuickTime VR movie,
you simply open the QTVR Flattener component and call the MovieExportToFile routine
as shown in Listing 5-17.
Listing 5-17 Using the flattener
ComponentDescription desc; |
Component flattener; |
ComponentInstance qtvrExport = nil; |
desc.componentType = MovieExportType; |
desc.componentSubType = MovieFileType; |
desc.componentManufacturer = QTVRFlattenerType; |
flattener = FindNextComponent(nil, &desc); |
if (flattener) qtvrExport = OpenComponent (flattener); |
if (qtvrExport) |
MovieExportToFile (qtvrExport, &myFileSpec, myQTVRMovie, nil, 0, 0); |
The code fragment shown in Listing 5-17 creates a flattened
movie file specified by the myFileSpec parameter.
If your QuickTime VR movie is a panorama, the flattened movie file includes
a quarter size, blurred JPEG, compressed preview of the panorama
image.
Note: The constants MovieExportType and MovieFileType used
in Listing 5-17 are
defined in header files QuickTimeComponents.h and Movies.h respectively
and are defined as 'spit' and 'MooV'.
You can present users with the QTVR Flattener’s own dialog box to allow them to choose options such as how to compress the preview image or to select a separate preview image file. Use the following code to show the dialog box:
err = MovieExportDoUserDialog (qtvrExport, myQTVRMovie, nil, 0, 0, &cancel); |
If the user cancels the dialog box, then the Boolean cancel
is set to true.
If you do not want to present the user with the flattener’s
dialog box, you can communicate directly with the component by using
the MovieExportSetSettingsFromAtomContainer routine
as described in the following paragraphs.
If you want to specify a preview image other than the default,
you need to create a special atom container and then call MovieExportSetSettingsFromAtomContainer before
calling MovieExportToFile.
You can specify how to compress the image, what resolution to use, and
you can even specify your own preview image file to be used. The
atom container you pass in can have various atoms that specify certain
export options. These atoms must all be children of a flattener
settings parent atom.
The preview resolution atom is a 16-bit value that allows
you to specify the resolution of the preview image. This value,
which defaults to kQTVRQuarterRes,
indicates how much to reduce the preview image.
The blur preview atom is a Boolean value that indicates whether
to blur the image before compressing. Blurring usually results in
a much more highly compressed image. The default value is true.
The create preview atom is a Boolean value that indicates
whether a preview image should be created. The default value is true.
The import preview atom is a Boolean value that is used to
indicate that the preview image should be imported from an external
file rather than generated from the image in the panorama file itself.
This allows you to have any image you want as the preview for the panorama.
You can specify which file to use by also including the import specification atom,
which is an FSSpec data
structure that identifies the image file. If you do not include this
atom, then the flattener presents the user with a dialog box asking
the user to select a file. The default for import preview is false. If
an import file is used, the image is used at its natural size and
the resolution setting is ignored.
Sample Atom Container for the QTVR Flattener
The sample code in Listing 5-18 creates an atom container and adds atoms to indicate an import preview file for the flattener to use.
Listing 5-18 Specifying a preview file for the flattener to use
Boolean yes = true; |
QTAtomContainer exportData; |
QTAtom parent; |
err = QTNewAtomContainer(&exportData); |
// create a parent for the other settings atoms |
err = QTInsertChild (exportData, kParentAtomIsContainer, |
QTVRFlattenerParentAtomType, 1, 0, 0, nil, &parent); |
// Add child atom to indicate we want to import the preview from a file |
err = QTInsertChild (exportData, parent, QTVRImportPreviewAtomType, 1, 0, |
sizeof (yes), &yes, nil); |
// Add child atom to tell which file to import |
err = QTInsertChild (exportData, parent, QTVRImportSpecAtomType, 1, 0, |
sizeof (previewSpec), &previewSpec, nil); |
// Tell the export component |
MovieExportSetSettingsFromAtomContainer (qtvrExport, exportData); |
Overriding the compression settings is a bit more complicated. You need to open a standard image compression dialog component and make calls to obtain an atom container that you can then pass to the QTVR Flattener component.
Listing 5-19 Overriding the compression settings
ComponentInstance sc; |
QTAtomContainer compressorData; |
SCSpatialSettings ss; |
sc = OpenDefaultComponent(StandardCompressionType,StandardCompressionSubType); |
ss.codecType = kCinepakCodecType; |
ss.codec = nil; |
ss.depth = 0; |
ss.spatialQuality = codecHighQuality |
err = SCSetInfo(sc, scSpatialSettingsType, &ss); |
err = SCGetSettingsAsAtomContainer(sc, &compressorData); |
MovieExportSetSettingsFromAtomContainer (qtvrExport, compressorData); |
© 2004, 2007 Apple Inc. All Rights Reserved. (Last updated: 2007-09-04)