Software Installation and Software Updates
First impressions are lasting impressions, so design your installation process accordingly. If users have trouble getting your application up and running, they are going to make judgements about it even before they use it. Your software update mechanism also creates an impression. Users want to be able to get the newest version of your application easily and when it’s convenient for them. If users have trouble getting and installing the latest software updates or patches you provide, you may find your technical support costs rising.
This chapter discusses some things you can do to provide the best Macintosh experience before the user launches your application for the first time. It also describes how you can provide an unobtrusive and customizable software update experience to your users.
In this section:
Packaging
Installation
Setup Assistants
Updating Installed Applications
Packaging
Users begin making assessments of your application based on its presentation in the physical or electronic package in which it arrives. Delivering a great user experience begins with thinking about how your product is presented prior to installation. Whether you distribute your application in a box or online, your goal should be to make the packaging aesthetically pleasing and informative.
Identify System Requirements
Including system requirements on your packaging is critical. Be sure to identify which version of Mac OS X is required for your software to run. Mac OS X runs on both PowerPC-based and Intel-based Macintosh computers. If your application targets a specific platform or processor, make sure it’s clearly stated in your system requirements. Be sure to test on as wide a variety of configurations as you can. If you know your application does not work under certain conditions, make that clear by stating it on your packaging.
ADC members can take advantage of the ADC Compatibility Labs to test applications on a variety of different types of hardware and operating system versions. The labs are equipped with every supported model of Macintosh and every Apple display. Lab technicians can install different versions of operating systems on these machines. This is an excellent resource for you to test your software in many different environments. Visit Apple’s ADC Testing Facilities website for the latest details.
Bundle Your Software
If you are creating a new application, make sure it is contained in an application bundle. Application bundles provide a structure for your executables, resources, and configuration files. Application bundles also simplify the user’s interaction with your application and make it harder for the user to delete critical resources accidentally. Even applications that must support both Mac OS X and earlier versions of the Mac OS can use the bundle format. For more information on application bundles, see Bundle Programming Guide.
Installation
You should ensure that installing your software is a quick and painless experience. This section provides guidelines on how to handle the installation of your software. For more information on how to implement different installation mechanisms, see Software Delivery Guide.
Whichever installation method you choose, be sure to avoid creating application-specific subfolders in the user’s Downloads folder (which is accessible as a stack in the Dock). If you do so you degrade the utility of the Downloads stack, because clicking the stack in the Dock will no longer accurately represent the contents of the Downloads folder.
Use Internet-Enabled Disk Images
If you provide users with a downloadable version of your application on the Internet, you can simplify the installation process by packaging your software in an Internet-enabled disk image. Disk images eliminate the need to compress your files, because the disk image itself can compress the enclosed data. After the disk image is downloaded, Mac OS X automatically opens it and mounts it on the user’s desktop. All the user has to do is copy over the desired files or run the installer.
For information on how to create an Internet-enabled disk image, see Software Delivery Guide.
Drag-and-Drop Installation
Bundles make it possible to provide drag-and-drop installation for applications (for more information on application bundles, see Bundle Programming Guide). Using bundles is the preferred way to install an application for the following reasons:
It is easy for users to install and uninstall the application.
It takes less time to install (only the time needed to copy the bundle).
You don’t have to spend time developing an installer.
Providing drag-and-drop installation does not preclude you from placing files in specific places on the system. When your application is first run, it can copy any needed support files to appropriate places on the system. However, you should avoid using this technique to install additional executable code and should instead use it to install preference files, document templates, or other resources that can be regenerated as needed and are not required for the application to run.
Note: If you install additional files when your application is first run, be sure to install them in obvious places, such as in the Application Support directory. Place your resources in a directory named for your application to make it easy for the user to find these files if they ever need to uninstall your application.
Installation Packages
You should support drag-and-drop installation if your application bundle contains everything needed for the application to run. However, you might need to create an installation package if any of the following conditions is true:
You need to install frameworks or other files in specific locations on the user’s system.
You need to install software on any part of the system that requires administrative access.
If you are developing software other than an application, the need for an installation package depends on the type of software and where it is installed. For example, you might want to use an installer to install a screen saver, because it involves placing files in either the user’s Library directory or the local Library directory.
You can create an installation package with Package Maker, which is available with the Xcode Tools. For information on installers and packaging, see Software Delivery Guide.
General Installer Guidelines
When designing your product’s installation package, keep the following guidelines in mind:
Before installing anything, your installer should check the destination volume for previously installed application components.
Always provide users with a simple default installation (an “Easy Install”). Most products should also provide a custom installation; if a user has accidentally thrown away a particular file, for example, the user should be able to restore it without having to reinstall the whole application. (Your application can also check for required files every time it runs and automatically install them if they are missing.)
Provide choices and explain their impact. For example, one installation option could result in faster performance but consume more disk space; another might use less space but result in slower performance. Be sure to make these choices clear in terms that will be meaningful to your users.
Always let users choose a specific folder as the installation destination. Don’t require your application to be installed in a particular location.
Install files only in recommended locations. (For a list of system directories and their recommended content, see File System Overview.) If users want to delete your application for some reason, most will simply drag its icon to the Trash; avoid littering the user’s hard disk with remnant files. If your product uses an installer, it should include an uninstall option that lets the user delete all associated files.
Advise users about data that might be overwritten during the installation, and provide a way for them to back it up first. Don’t overwrite previous user preferences. Deal with version and format differences the first time the user opens the updated application.
Provide help where appropriate. For example, in a custom installation pane, clicking a More Info button should explain why the user would want to install the component and the consequences of not installing it.
Don’t uninstall any of the Apple system software in
/System.If your application installs software that may already be installed on the user’s system, make sure the version you install is newer than any version the user already has. Make it clear to users which version they already have and which version your application needs, and provide an option for skipping installation of that software.
Indicate progress during installation, such as the current stage and the time remaining. For related information, see “Feedback and Communication”
Provide a Cancel button. If canceling the installation would compromise the system’s stability, disable the button during those times. If a user cancels an installation, leave the destination disk in the same state it was in before the installation (in other words, delete any files installed before the process was canceled).
Consider installing any supporting files when the user first launches your application. This technique alleviates the need to create an installation package and makes it possible for your application to reinstall the files if they are accidentally deleted by the user.
Consider your application’s audience. It’s common, for example, for children to install their own games at home, so tailor your instructions for them (don’t use confusing or technical terms) and make installation as easy as possible for that audience.
Setup Assistants
For products with complex setup procedures, a setup assistant can be helpful. A setup assistant is a small application that guides users through the setup options. You store setup assistants in a location where your application can find them, such as inside your application bundle.
Your application should open a setup assistant automatically whenever appropriate—when the system detects a new hardware device or the first time the user opens your application, for example. Ideally, the user should use the assistant only once.
The assistant application’s icon should be a combination of the setup assistant icon with your application’s icon superimposed as a badge in the lower-right corner, as shown in Figure 7-1.

Figure 7-2 shows the layout for a sample setup assistant window.
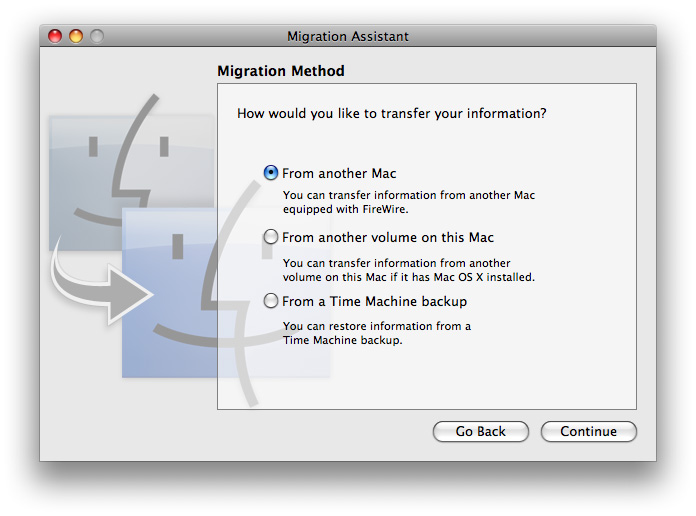
Keep the following guidelines in mind when designing a setup assistant:
While the assistant is active, display only the application menu (containing About and Quit items) and the Edit menu (containing standard items to assist users in entering text). Don’t provide a Help menu (or a Help button); the setup assistant is help.
Provide Go Back and Continue buttons for navigation.
The assistant window title bar should contain a dimmed close button, an available minimize button, and a dimmed zoom button.
Title the first pane “Introduction.” This pane should explain the purpose of subsequent panes.
Title the last pane “Conclusion.” This pane should tell users what changes were made to their system and how to modify those settings. This pane should have a default Done button and a dimmed Go Back button.
In most cases, it’s best to ask only one question per pane.
Whenever appropriate, use selection controls that do not support the empty selection to avoid having to ask for the same information more than once.
Avoid displaying an asterisk or custom icon next to each required text field. Instead, check for empty text fields when the user clicks Continue. If there are any, return to the current pane and display the asterisk or other marker next to the empty text fields.
As much as possible, use system applications and services to provide intelligent default choices to the user. For example, you can use Bonjour to determine an appropriate IP address.
Limit the total number of questions to the minimum required to get the job done. The best setup assistant gets users up and running as soon as possible, allowing the main application to present the user with opportunities to refine preferences and settings.
Provide relevant feedback when appropriate. If needed, you can display a progress bar next to the Go Back button (aligning the progress bar’s left edge with the left edge of the pane).
Don’t fill the entire screen; users should be able to access other parts of their system while the assistant is open.
Updating Installed Applications
If you need to update an already installed application, you should provide an installer that modifies only the files required for the new version. Remember that files may have been renamed or moved; don’t look only in the Applications directory and don’t rely exclusively on filenames to identify your application files. Instead, check for creation and modification dates, version numbers, file size, and so on to uniquely identify your application. If you detect multiple versions of your application, provide information about each, such as the location and creation date, so that the user can choose which one to update.
Macintosh users are accustomed to using Software Update in System Preferences to upgrade the operating system and system software. Upgrading the operating system has implications different from those for upgrading a third-party application, however, and the user experiences for these procedures must reflect this. Third-party applications should not attempt to duplicate the user experience of Software Update. If you want to provide your users with automatic updates, offer a streamlined and consistent user experience following the guidelines in this section.
The goal of a software update mechanism is to be convenient, yet unobtrusive. To achieve this, it’s essential that your application perform all software update procedures at launch time only. In particular, you should avoid checking for updates using a background process or standalone, faceless utility that executes independently of your application. If the user is unaware that such a process is running even after your application quits, the random appearance of update notifications will be unexpected and may be unsettling.
Note: If you provide a first-time user experience with your application, such as a setup assistant, it’s appropriate to perform a check for available updates while the user is engaged in this task. If a newer version of your application is available, allow the user to upgrade immediately, before the user begins working with the currently installed version. On subsequent launches, follow the guidelines below.
To provide a convenient application-update experience, follow these steps:
When your application fully launches the first time after installation, start a separate thread that checks for updates.
If a newer version is available, keep track of this fact in your application. Do not notify the user at this time.
The next time your application launches, check the state of update availability you determined in step 2. If a newer version is available, immediately notify the user.
If a newer version is not available, start a separate thread to check for updates and keep track of the results in your application. Do not notify the user at this time.
Your application then repeats step 3 every time it launches. If the user chooses to install a newer version, the upgraded application begins again with step 1.
Using this method confers several advantages:
You avoid slowing launch time by using a separate thread after your application launches.
Checking for updates frequently involves making an Internet connection. If you do this on the application’s main thread, it can significantly slow your launch time.
Users will appreciate receiving an update notification consistently and immediately at launch time, rather than at random times during their work.
Because the display of the update notification depends on the quick check of an internal state (not on the completion of a potentially lengthy search for available updates) you ensure it always arrives immediately at launch time.
You do not have to design additional dialogs that ask the user if update checks should be performed while your application is running.
You avoid startling the user with unexpected and intrusive update notifications that occur outside the context of your running application.
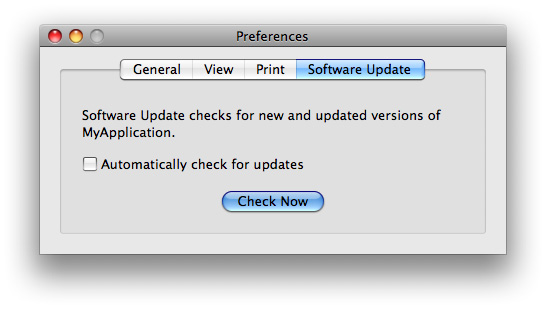
Allow the user to customize the software update behavior in your preferences window. A user should have the option to allow automatic software updates and the ability to check for updates immediately. Figure 7-3 shows an example of how a sample preferences window can be modified to do this.
When your application checks its internal update state and finds that a newer version is available, display an alert that describes the type and availability of the update and gives the user the option to get the new version. You can customize the alert for a free or for-purchase update. Figure 7-4 shows how the alert for a free update should look.
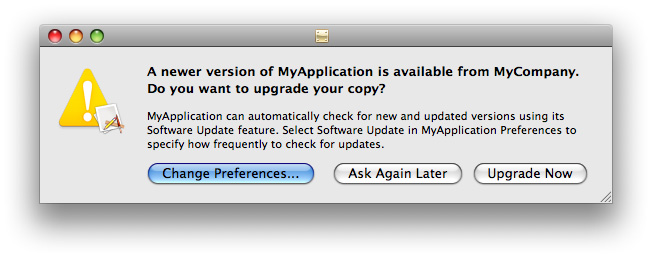
Each element of the alert shown in Figure 7-4 is required. In many cases, the only changes you need to make are to replace MyApplication and MyCompany with your application and company names and to badge the caution icon with your application icon. Note that it is important to display the caution icon in this alert because the installation of software has the potential to destroy user data. For more information about the components of an alert (and using the caution icon), see “The Elements of an Alert” You might also choose to replace the phrase “newer version of” with a phrase like “minor update to”, if appropriate.
The software update alert in Figure 7-4 displays the main message in emphasized (bold) system font and the explanatory text in small system font. A simplified alert (one that displays only the main message) is not used here because it does not give the user enough information to customize the update process.
The three required alert buttons shown in Figure 7-4 describe the actions the user can take. Each button leads to a specific set of actions your application should perform:
The Change Preferences default button removes the alert and opens the software update preferences window. After the user adjusts the software update preferences and dismisses the preferences window, your application resumes.
The Ask Again Later button leaves the internal update state unchanged and removes the alert. Because the state is still set to indicate the availability of an update, the alert will appear again the next time the user launches your application.
The Upgrade Now button resets the internal state, removes the alert, and initiates a download of the new software. After the download is complete, your application asks the user to save all open documents and updates with the downloaded version.
If you offer a software update for purchase, you should use an alert like the one shown in Figure 7-5
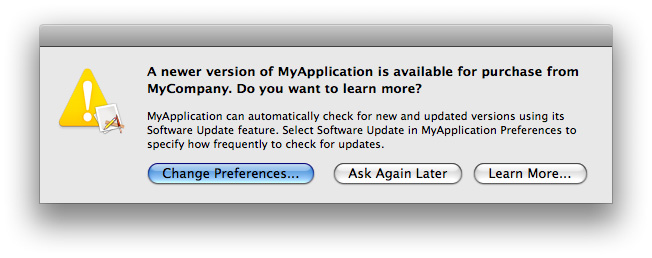
The alert in Figure 7-5 is different from the alert for a free software update in two ways:
The main message clearly states that the new version of the software is for purchase and the question leads the user to click the Learn More button if they’re interested in receiving the upgrade.
The Learn More button resets the application’s internal state, removes the alert, and leads to your company’s website where the user can learn more about the update and select a purchasing option. If the user chooses to upgrade the software, a bundle or installation package should be downloaded independently of the currently running application. The user can then install the update when it’s convenient.
© 1992, 2001-2003, 2008 Apple Inc. All Rights Reserved. (Last updated: 2008-06-09)