Nib Files
Nib files play an important role in the creation of applications in Mac OS X and iPhone OS. Nib files let you create and manipulate your user interfaces graphically, using the Interface Builder application, instead of programmatically. Because you can see the results of your changes instantly, this gives you the ability to experiment with different layouts and configurations very quickly. It also gives you the flexibility to change many aspects of your user interface later without rewriting any code.
For applications built using the AppKit or UIKit frameworks, nib files take on an extra significance. Both of these frameworks support the use of nib files both for the visual layout of windows, views, and controls and also for the integration of those items with the application’s event handling code. Interface Builder works in conjunction with these frameworks, and with Xcode, to help you connect the controls of your user interface to the objects in your project that respond to those controls. This integration significantly reduces the amount of setup that is required after a nib file is loaded and also makes it easy to change the relationships between your code and user interface later.
Because the level of support for nib files is more extensive in Cocoa applications than it is for Carbon applications, the following sections focus on the use of nib files with the AppKit and UIKit frameworks. Although Carbon applications can also use nib files, they do so in a very different way than both AppKit and UIKit, and so the use of nib files in Carbon applications is discussed separately in “Carbon Resources.”
Note: Although you can create an Objective-C application without using nib files, doing so is very rare and not recommended. Depending on your application, avoiding the use of nib files can involve overriding large amounts of framework behavior to achieve the same results you would get using a nib file.
In this section:
Anatomy of a Nib File
Nib File Design Guidelines
The Nib Object Life Cycle
Built-In Support For Nib Files
Loading Nib Files Programmatically
Connecting Menu Items Across Nib Files
Anatomy of a Nib File
Nib files are the documents produced by the Interface Builder application. A nib file describes the visual elements of your application’s user interface, including windows, views, controls, and many others. It can also describe non-visual elements, such as the objects in your application that manage your windows and views.Most importantly, a nib file describes these objects exactly as they were configured in Interface Builder. At runtime, these descriptions are used to recreate the objects and their configuration inside your application. When you load a nib file at runtime, you get an exact replica of the objects that were in your Interface Builder document. The nib-loading code instantiates the objects reestablishes all of the properties and connections that were present between the objects in Interface Builder.
The following sections describe how nib files used with the AppKit and UIKit frameworks are organized, the types of objects found in them, and how you use those objects effectively.
About Your Interface Objects
Interface objects are what you add to an Interface Builder document to implement your user interface. When a nib is loaded at runtime, the interface objects are the objects actually instantiated by the nib-loading code. Most new documents in Interface Builder have at least one interface object by default, typically a window or menu resource, and you add more interface objects to a nib file as part of your interface design. This is the most common type of object in a nib file and is typically why you create nib files in the first place.
Besides representing visual objects, such as windows, views, controls, and menus, interface objects can also represent non-visual objects. In nearly all cases, the non-visual objects you add to a nib file are extra controller objects that your application uses to manage the visual objects. Although you could create these objects in your application, it is often more convenient to add them to a nib file and configure them there. Interface Builder provides a generic object that you use specifically when adding controllers and other non-visual objects to a nib file. It also provides the controller objects that are typically used to manage Cocoa bindings.
About the File’s Owner
One of the most important objects in a nib file is the File’s Owner object. Unlike interface objects, the File’s Owner object is a proxy object that is not created when the nib file is loaded. Instead, you create this object in your code and pass it to the nib-loading code. The reason this object is so important is that it is the main link between your application code and the contents of the nib file. More specifically, it is the controller object that is responsible for the contents of the nib file.
In Interface Builder, you can create connections between the File’s Owner and the other interface objects in your nib file. When you load the nib file, the nib-loading code recreates these connections using the replacement object you specify. This allows your object to reference objects in the nib file and receive messages from the interface objects automatically.
About the First Responder
In Interface Builder, the First Responder is a proxy object that represents the first object in your application’s dynamically determined responder chain. Because the responder chain of an application cannot be determined at design time, the First Responder proxy acts as a stand-in target for any action messages that need to be directed at the application’s responder chain. Menu items commonly target the First Responder proxy. For example, the Minimize menu item in the Window menu hides the frontmost window in an application, not just a specific window, and the Copy menu item should copy the current selection, not just the selection of a single control or view. Other objects in your application can target the First Responder as well.
When you load a nib file into memory, there is nothing you have to do to manage or replace the First Responder proxy object. The AppKit and UIKit frameworks automatically set and maintain the first responder based on the application’s current configuration.
For more information about the responder chain and how it is used to dispatch events in AppKit–based applications, see Event Architecture inCocoa Event-Handling Guide. For information about the responder chains and handling actions in iPhone applications, see iPhone Application Programming Guide.
About the Top-Level Objects
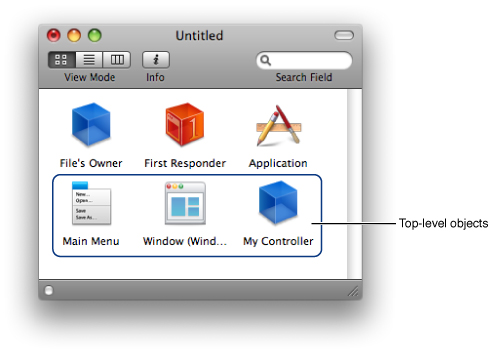
When your program loads a nib file, Cocoa recreates the entire graph of objects you created in Interface Builder. This object graph includes all of the windows, views, controls, cells, menus, and custom objects found in the nib file. The top-level objects are the subset of these objects that do not have a parent object. The top-level objects typically include only the windows, menubars, and custom controller objects that you add to the nib file. (Objects such as File’s Owner, First Responder, and Application are proxy objects and not considered top-level objects.) In Interface Builder, you can see the top-level objects in the nib document window when it is set to icon mode (see the circled items in Figure 2-1).
Typically, you use outlets in the File’s Owner object to store references to the top-level objects of a nib file. If you do not use outlets, however, you can retrieve the top-level objects from the nib-loading routines directly. You should always keep a pointer to these objects somewhere because your application is responsible for releasing them when it is through using them. For more information about the nib object behavior at load time, see “Nib Object Retention.”
About Image and Sound Resources
In Interface Builder, you can associate external image and sound resources with the contents of your nib files. Some controls and views are able to display images or play sounds as part of their default configuration. The Interface Builder library provides access to the image and sound resources of your Xcode projects so that you can link your nib files to these resources. The nib file does not store these resources directly. Instead, it stores the name of the resource file so that the nib-loading code can find it later.
When you load a nib file that contains references to image or sound resources, the nib-loading code also reads in those resource files and caches them in memory. In Mac OS X, image and sound resources are stored in named caches so that you can access them later if needed. In iPhone OS, only image resources are stored in named caches. To access images, you use the imageNamed: method of NSImage or UIImage, depending on your platform. To access cached sounds in Mac OS X, use the soundNamed: method of NSSound.
Nib File Design Guidelines
When creating your nib files, it is important to think carefully about how you intend to use the objects in that file. A very simple application might be able to store all of its user interface components in a single nib file, but for most applications, it is better to distribute components across multiple nib files. Creating smaller nib files lets you load only those portions of your interface that you need immediately. Smaller nib files results in better performance for your application. They also make it easier to debug any problems you might encounter, since there are fewer places to look for problems.
When creating your nib files, try to keep the following guidelines in mind:
Design your nib files with lazy loading in mind. Plan on loading nib files that contain only those objects you need right away.
In the main nib file for a Mac OS X application, consider storing only the application menu bar and an optional application delegate object in the nib file. Avoid including any windows or user-interface elements that will not be used until after the application has launched. Instead, place those resources in separate nib files and load them as needed after launch.
Store repeated user-interface components (such as document windows) in separate nib files.
For a window or menu that is used only occasionally, store it in a separate nib file. By storing it in a separate nib file, you load the resource into memory only if it is actually used.
Make the File’s Owner the single point-of-contact for anything outside of the nib file; see “Accessing the Contents of a Nib File.”
The Nib Object Life Cycle
When a nib file is loaded into memory, the nib-loading code takes several steps to that ensure the objects in the nib file are created and initialized properly. Understanding these steps can help you write better controller code to manage your user interfaces.
The Object Loading Process
When you use the methods of NSNib or NSBundle to load and instantiate the objects in a nib file, the underlying nib-loading code does the following:
It loads the contents of the nib file and any referenced resource files into memory:
The raw data for the entire nib object graph is loaded into memory but is not unarchived.
Any custom image resources associated with the nib file are loaded and added to the Cocoa image cache; see “About Image and Sound Resources.”
Any custom sound resources associated with the nib file are loaded and added to the Cocoa sound cache; see “About Image and Sound Resources.”
It unarchives the nib object graph data and instantiates the objects. How it initializes each new object depends on the type of the object and how it was encoded in the archive by Interface Builder. The nib-loading code uses the following rules (in order) to determine which initialization method to use.
Standard Interface Builder objects (and custom subclasses of those objects) receive an
initWithCoder:message.In Mac OS X, the list of standard objects includes the views, cells, menus, and view controllers that are provided by the system and available in the default Interface Builder library. It also includes any third-party objects that were added to the Interface Builder library using a custom plug-in. Even if you change the class of such an object, Interface Builder encodes the standard object into the nib file and then tells the archiver to swap in your custom class when the object is unarchived.
In iPhone OS, any object that conforms to the
NSCodingprotocol is initialized using theinitWithCoder:method. This includes all subclasses ofUIViewandUIViewControllerwhether they are part of the default Interface Builder library or custom classes you define.Custom views in Mac OS X receive an
initWithFrame:message.Custom views are subclasses of
NSViewfor which Interface Builder does not have an available implementation. Typically, these are views that you define in your application and use to provide custom visual content. Custom views do not include standard system views (likeNSSlider) that are part of the default Interface Builder library or part of an integrated third-party plug-in.When it encounters a custom view, Interface Builder encodes a special
NSCustomViewobject into your nib file. The custom view object includes the information it needs to build the real view subclass you specified. At load time, theNSCustomViewobject sends anallocandinitWithFrame:message to the real view class and then swaps the resulting view object in for itself. The net effect is that the real view object handles subsequent interactions during the nib-loading process.Custom views in iPhone OS do not use the
initWithFrame:method for initialization.Custom objects other than those described in the preceding steps receive an
initmessage.
It reestablishes all connections (actions, outlets, and bindings) between objects in the nib file. This includes connections to File’s Owner and other proxy objects. The approach for establishing connections differs depending on the platform:
Outlet connections
In Mac OS X, the nib-loading code tries to reconnect outlets using the object’s own methods first. For each outlet, Cocoa looks for a method of the form
setOutletName:and calls it if such a method is present. If it cannot find such a method, Cocoa searches the object for an instance variable with the corresponding outlet name and tries to set the value directly. If the instance variable cannot be found, no connection is created.In Mac OS X v10.5 and later, setting an outlet also generates a key-value observing (KVO) notification for any registered observers. These notifications may occur before all inter-object connections are reestablished and definitely occur before any
awakeFromNibmethods of the objects have been called. Prior to v10.5, these notifications are not generated. For more information about KVO notifications, see Key-Value Observing Programming Guide.In iPhone OS, the nib-loading code uses the
setValue:forKey:method to reconnect each outlet. That method similarly looks for an appropriate accessor method and falls back on other means when that fails. For more information about how this method sets values, see its description in NSKeyValueCoding Protocol Reference.Setting an outlet in iPhone OS also generates a KVO notification for any registered observers. These notifications may occur before all inter-object connections are reestablished and definitely occur before any
awakeFromNibmethods of the objects have been called. For more information about KVO notifications, see Key-Value Observing Programming Guide.
Action connections
In Mac OS X, the nib-loading code uses the source object’s
setTarget:andsetAction:methods to establish the connection to the target object. If the target object does not respond to the action method, no connection is created. If the target object isnil, the action is handled by the responder chain.In iPhone OS, the nib-loading code uses the
addTarget:action:forControlEvents:method of theUIControlobject to configure the action. If the target isnil, the action is handled by the responder chain.
Bindings
In Mac OS X, Cocoa uses the
bind:toObject:withKeyPath:options:method of the source object to create the connection between it and its target object.Bindings are not supported in iPhone OS.
It sends an
awakeFromNibmessage to the appropriate objects in the nib file that define the matching selector:In Mac OS X, this message is sent to any interface objects that define the method. It is also sent to the File’s Owner and any proxy objects that define it as well.
In iPhone OS, this message is sent only to the interface objects that were instantiated by the nib-loading code. It is not sent to File’s Owner, First Responder, or any other proxy objects.
It displays any windows whose “Visible at launch time” attribute was enabled in Interface Builder.
The order in which the nib-loading code calls the awakeFromNib methods of objects is not guaranteed. In Mac OS X, Cocoa tries to call the awakeFromNib method of File’s Owner last but does not guarantee that behavior. If you need to configure the objects in your nib file further at load time, the most appropriate time to do so is after your nib-loading call returns. At that point, all of the objects are created, initialized, and ready for use.
Nib Object Retention
Each time you ask the NSBundle or NSNib class to load a nib file, the underlying code creates a new copy of the objects in that file and returns them to you. The nib-loading code does not recycle nib file objects from a previous load attempt. Because each set of objects is a new copy, your code is responsible for releasing those objects when it is done with them. How you release the objects depends on the platform and on the memory model in use. Table 2-1 lists the supported platform and memory model configurations and the nib retention behavior associated with each one.
Configuration | Description |
|---|---|
Mac OS X - managed memory model | Objects in the nib file are initially created with a retain count of 1. As it rebuilds the object hierarchy, however, AppKit autoreleases any objects that have a parent or owning object, such as views nested inside view hierarchies. By the time the nib-loading code is done, only the top-level objects in the nib file have a positive retain count and no owning object. Your code is responsible for releasing these top-level objects. |
Mac OS X - garbage collected memory model | Most objects in the graph are kept in memory through strong references between the objects. Only the top-level objects in the nib file do not have strong references initially. Thus, your code must create strong references to these objects to prevent the object graph from being released. |
iPhone OS - managed memory model | Objects in the nib file are created with a retain count of 1 and then autoreleased. As it rebuilds the object hierarchy, however, UIKit reestablishes connections between the objects using the |
For both Mac OS X and UIKit, the recommended way to manage the top-level objects in a nib file is to create outlets for them in the File’s Owner object and then define setter methods to retain and release those objects as needed. Setter methods give you an appropriate place to include your memory-management code, even in situations where your application uses garbage collection. One easy way to implement your setter methods is to use the @property syntax and let the compiler create them for you. For more information on how to define properties, see The Objective-C 2.0 Programming Language.
Built-In Support For Nib Files
The AppKit and UIKit frameworks both provide a certain amount of automated behavior for loading and managing nib files in an application. Both frameworks provide infrastructure for loading an application’s main nib file. In addition, the AppKit framework provides support for loading other nib files through the NSDocument and NSWindowController classes. The following sections describe the built-in support for nib files, how you can take advantage of it, and ways to modify that support in your own applications.
Loading the Main Nib File
Most of the Xcode project templates for applications come preconfigured with a main nib file already in place. All you have to do is modify this default nib file in Interface Builder and build your application. At launch time, the application’s default configuration data tells the application object where to find this nib file so that it can load it. In applications based on either AppKit and UIKit, this configuration data is located in the application’s Info.plist file. When an application is first loaded, the default application startup code looks in the Info.plist file for the NSMainNibFile key. If it finds it, it looks in the application bundle for a nib file whose name (with or without the filename extension) matches the value of that key and loads it.
Document and Window Controller Nib Files
In the AppKit framework, the NSDocument class works with the default window controller to load the nib file containing your document window. The windowNibName method of NSDocument is a convenience method that you can use to specify the nib file containing the corresponding document window. When a new document is created, the document object passes the nib file name you specify to the default window controller object, which loads and manages the contents of the nib file. If you use the standard templates provided by Xcode, the only thing you have to do is add the contents of your document window to the nib file.
The NSWindowController class also provides automatic support for loading nib files. If you create custom window controllers programmatically, you have the option of initializing them with an NSWindow object or with the name of a nib file. If you choose the latter option, the NSWindowController class automatically loads the specified nib file the first time a client tries to access the window. After that, the window controller keeps the window around in memory; it does not reload it from the nib file, even if the window’s “Release when closed” attribute is set in Interface Builder.
Important: When using either NSWindowController or NSDocument to load windows automatically, it is important that your nib file be configured correctly. Both classes include a window outlet that you must connect to the window you want them to manage. If you do not connect this outlet to a window object, the nib file is loaded but the document or window controller does not display any windows. For more information about the Cocoa document architecture, see Document-Based Applications Overview.
Changing the Nib Files from the Xcode Defaults
When you create a new Cocoa application project in Xcode, the project template comes preconfigured with one or more nib files. If you have existing nib files you want to use instead, you can replace the template nib files with your custom nib files. Changing the nib file associated with a document object is easy but changing the application’s main nib file is somewhat more involved.
Each document in a Cocoa document-based application has its own nib file for storing the document window and any supporting objects. The NSDocument class finds this nib file by calling its own windowNibName method, the declaration for which is included in the default document class that comes with the Xcode template. To change the nib file associated with the document, simply change the string returned by the windowNibName method of your document class.
The main nib file is the only nib file that is required in a Cocoa application. It is loaded immediately before the application enters its main event loop, and the File’s Owner for this nib file is the NSApplication object itself. A typical main nib contains only the application menu bar and perhaps an application delegate object to handle any application-related events (such as launch-time notifications). Although many applications include other objects in this nib file, doing so is generally not recommended. Instead, it is always preferable to lazily load other resources only as they are needed. Extra objects consume more memory and require more time to load from disk, both of which can degrade launch-time performance.
In Xcode, every new Cocoa project comes configured with a main nib file, called MainMenu.xib, that contains a default menu bar for your project. To change the main nib file for your Cocoa application, do the following:
In Interface Builder, open the nib file that you want to make the main nib.
Select the File’s Owner object of the nib and open the identity inspector.
In the identity inspector, set the class of File’s Owner to
NSApplication(or to your custom subclass ofNSApplicationif you define one).Open your application project in Xcode.
In the Targets section of the Groups & Files pane, select your application target.
Open an inspector (or Info) window for the target and select the Properties tab.
In the Main Nib File field, enter the name of your new nib file.
The preceding set of steps also work if you want to change the main nib file for an iPhone application. Instead of the NSApplication class, set the class of the File’s Owner proxy to UIApplication. In addition, you might also want to add a custom object and connect it to the delegate outlet of the UIApplication. (You could create the delegate object programmatically from the UIApplicationMain function but creating it in the nib file is much more common.)
Loading Nib Files Programmatically
Both Mac OS X and iPhone OS provide convenience methods for loading nib files into your application. Both the AppKit and UIKit framework define additional methods on the NSBundle class that support the loading of nib files. In addition, the AppKit framework also provides the NSNib class, which provides similar nib-loading behavior as NSBundle but offers some additional advantages that might be useful in specific situations.
As you plan out your application, make sure any nib files you plan to load manually are configured in a way that simplifies the loading process. Choosing an appropriate object for File’s Owner and keeping your nib files small can greatly improve their ease of use and memory efficiency. For more tips on configuring your nib files, see “Nib File Design Guidelines.”
Loading Nib Files Using NSBundle
The AppKit and UIKit frameworks define additional methods on the NSBundle class (using Objective-C categories) to support the loading of nib file resources. The semantics for how you use the methods differs between the two platforms as does the syntax for the methods. In AppKit, there are more options for accessing bundles in general and so there are correspondingly more methods for loading nib files from those bundles. In UIKit, applications can load nib files only from their main bundle and so fewer options are needed. The methods available on the two platforms are as follows:
AppKit
loadNibNamed:owner:class methodloadNibFile:externalNameTable:withZone:class methodloadNibFile:externalNameTable:withZone:instance method
UIKit
loadNibNamed:owner:options:instance method
Whenever loading a nib file, you should always specify an object to act as File’s Owner of that nib file. The role of the File’s Owner is an important one. It is the primary interface between your running code and the new objects that are about to created in memory. All of the nib-loading methods provide a way to specify the File’s Owner, either directly or as a parameter in an options dictionary.
One of the semantic differences between the way the AppKit and UIKit frameworks handle nib loading is the way the top-level nib objects are returned to your application. In the AppKit framework, you must explicitly request them using one of the loadNibFile:externalNameTable:withZone: methods. In UIKit, the loadNibNamed:owner:options: method returns an array of these objects directly. The simplest way to avoid having to worry about the top-level objects in either case is to store them in outlets of your File’s Owner object and to make sure the setter methods for those outlets retain their values. Because each platform uses different retain semantics, however, you must be sure to send the proper retain or release messages when appropriate. For information about the retention semantics for nib objects, see “Nib Object Retention.”
Listing 2-1 shows a simple example of how to load a nib file using the NSBundle class in an AppKit–based application. As soon as the loadNibNamed:owner: method returns, you can begin using any outlets that refer to the nib file objects. In other words, the entire nib-loading process occurs within the confines of that single call. The nib-loading methods in the AppKit framework return a Boolean value to indicate whether the load operation was successful.
Listing 2-1 Loading a nib file from the current bundle
- (BOOL)loadMyNibFile |
{ |
// The myNib file must be in the bundle that defines self's class. |
if (![NSBundle loadNibNamed:@"myNib" owner:self]) |
{ |
NSLog(@"Warning! Could not load myNib file.\n"); |
return NO; |
} |
return YES; |
} |
Listing 2-2 shows an example of how to load a nib file in a UIKit–based application. In this case, the method checks the returned array to see if the nib objects were loaded successfully. (Every nib file should have at least one top-level object representing the contents of the nib file.) This example shows the simple case when the nib file contains no proxy objects other than the File’s Owner object. For an example of how to specify additional proxy objects, see “Replacing Proxy Objects at Load Time.”
Listing 2-2 Loading a nib in an iPhone application
- (BOOL)loadMyNibFile |
{ |
NSArray* topLevelObjs = nil; |
topLevelObjs = [[NSBundle mainBundle] loadNibNamed:@"myNib" owner:self options:nil]; |
if (topLevelObjs == nil) |
{ |
NSLog(@"Error! Could not load myNib file.\n"); |
return NO; |
} |
return YES; |
} |
Getting a Nib File’s Top-Level Objects
The easiest way to get the top-level objects of your nib file is to define outlets in the File’s Owner object along with setter methods (or better yet, properties) for accessing those objects. This approach ensures that the top-level objects are retained by your object and that you always have references to them.
Listing 2-3 shows the interface and implementation of a stripped down Cocoa class that uses an outlet to retain the nib file’s only top-level object. In this case, the only top-level object in the nib file is an NSWindow object. Because top-level objects in Cocoa have an initial retain count of 1, an extra release message is included. This is fine because by the time the release call is made, the property has already retained the window. You would not want to release top-level objects in this manner in an iPhone application.
Listing 2-3 Using outlets to get the top-level objects
// Class interface |
@interface MyController : NSObject { |
NSWindow *window; |
} |
@property(retain) IBOutlet NSWindow *window; |
- (void)loadMyWindow; |
@end |
// Class implementation |
@implementation MyController |
// The synthesized property retains the window automatically. |
@synthesize window; |
- (void)loadMyWindow |
{ |
[NSBundle loadNibNamed:@"myNib" owner:self]; |
// The window starts off with a retain count of 1 |
// and is then retained by the property, so add an extra release. |
[window release]; |
} |
@end |
If you do not want to use outlets to store references to your nib file’s top-level objects, you must retrieve those objects manually in your code. The technique for obtaining the top-level objects differs depending on the target platform. In Mac OS X, you must ask for the objects explicitly, whereas in iPhone OS they are returned to you automatically.
Listing 2-4 shows the process for getting the top-level objects of a nib file in Mac OS X. This method places a mutable array into the nameTable dictionary and associates it with the NSNibTopLevelObjects key. The nib-loading code looks for this array object and, if present, places the top-level objects in it. Because each object starts with a retain count of 1 before it is added to the array, simply releasing the array is not enough to release the objects in the array as well. As a result, this method sends a release message to each of the objects to ensure that the array is the only entity holding a reference to them.
Listing 2-4 Getting the top-level objects from a nib file at runtime
- (NSArray*)loadMyNibFile |
{ |
NSBundle* aBundle = [NSBundle mainBundle]; |
NSMutableArray* topLevelObjs = [NSMutableArray array]; |
NSDictionary* nameTable = [NSDictionary dictionaryWithObjectsAndKeys: |
self, NSNibOwner, |
topLevelObjs, NSNibTopLevelObjects, |
nil]; |
if (![aBundle loadNibFile:@"myNib" externalNameTable:nameTable withZone:nil]) |
{ |
NSLog(@"Warning! Could not load myNib file.\n"); |
return nil; |
} |
// Release the objects so that they are just owned by the array. |
[topLevelObjs makeObjectsPerformSelector:@selector(release)]; |
return topLevelObjs; |
} |
Obtaining the top-level objects in an iPhone application is much simpler and is shown in Listing 2-2. In the UIKit framework, the loadNibNamed:owner:options: method of NSBundle automatically returns an array with the top-level objects. In addition, by the time the array is returned, the retain counts on the objects are adjusted so that you do not need to send each object an extra release message. The returned array is the only owner of the objects.
Loading Nib Files Using NSNib
In Mac OS X, the AppKit framework supports the loading of nib files using the NSNib class. You can use the NSNib class to load nib files that reside outside of a bundle or in situations where you plan to load the same nib file more than once. Loading a nib file with this class is always a two-step process. First, you create an instance of the NSNib class, initializing it with the nib file’s location information. Second, you instantiate the contents of the nib file to load the objects into memory. Each time you instantiate the nib file, you specify a different File’s Owner object and can also receive a new set of top-level objects.
Note: The NSNib class is not available in iPhone OS. You should use the NSBundle class to load nib files instead.
When you want to load the same nib file multiple times, the two-step process used by NSNib offers some advantages over the NSBundle methods. An NSNib object loads the nib data into memory only once, but each time you call one of its instantiate methods, you receive a unique copy of the nib file objects. If you need to create several copies of a nib file’s objects in quick succession, the caching provided by NSNib can improve performance.
Listing 2-5 shows one way to load the contents of a nib file using the NSNib class. The array returned to you by the instantiateNibWithOwner:topLevelObjects: method comes already autoreleased. If you intend to use that array for any period of time, you should make a copy of it.
Listing 2-5 Loading a nib file using NSNib
- (NSArray*)loadMyNibFile |
{ |
NSNib* aNib = [[NSNib alloc] initWithNibNamed:@"MyPanel" bundle:nil]; |
NSArray* topLevelObjs = nil; |
if (![aNib instantiateNibWithOwner:self topLevelObjects:&topLevelObjs]) |
{ |
NSLog(@"Warning! Could not load nib file.\n"); |
return nil; |
} |
// Release the raw nib data. |
[aNib release]; |
// Release the top-level objects so that they are just owned by the array. |
[topLevelObjs makeObjectsPerformSelector:@selector(release)]; |
// Do not autorelease topLevelObjs. |
return topLevelObjs; |
} |
Replacing Proxy Objects at Load Time
In iPhone OS, it is possible to create nib files that include proxy objects besides the File’s Owner. Proxy objects represent objects created outside of the nib file but which have some connection to the nib file’s contents. Proxies are commonly used to support navigation controllers in iPhone applications. When working with navigation controllers, you typically connect the File’s Owner object to some common object such as your application delegate. Proxy objects therefore represent the parts of the navigation controller object hierarchy that are already loaded in memory, either because they were created programmatically or loaded from a different nib file.
Each proxy object you add to a nib file must have a unique name. To assign a name to an object, select the object in Interface Builder and open the inspector window. The Attributes pane of the inspector contains a Name field, which you use to specify the name for your proxy object. The name you assign should be descriptive of the object’s behavior or type, but really it can be anything you want.
When you are ready to load a nib file containing proxy objects, you must specify the replacement objects for any proxies when you call the loadNibNamed:owner:options: method. The options parameter of this method accepts a dictionary of additional information. You use this dictionary to pass in the information about your proxy objects. The dictionary must contain the UINibProxiedObjectsKey key whose value is another dictionary containing the name and object for each proxy replacement.
Listing 2-6 shows a sample version of an applicationDidFinishLaunching: method that loads the application’s main nib file manually. Because the application’s delegate object is created by the UIApplicationMain function, this method uses a proxy (with the name “AppDelegate”) in the main nib file to represent that object. The proxies dictionary stores the proxy object information and the options dictionary wraps that dictionary.
Listing 2-6 Replacing proxy objects in a nib file
- (void)applicationDidFinishLaunching:(UIApplication *)application |
{ |
NSArray* topLevelObjs = nil; |
NSDictionary* proxies = [NSDictionary dictionaryWithObject:self forKey:@"AppDelegate"]; |
NSDictionary* options = [NSDictionary dictionaryWithObject:proxies forKey:UINibProxiedObjectsKey]; |
topLevelObjs = [[NSBundle mainBundle] loadNibNamed:@"Main" owner:self options:options]; |
if ([topLevelObjs count] == 0) |
{ |
NSLog(@"Warning! Could not load myNib file.\n"); |
return; |
} |
// Show window |
[window makeKeyAndVisible]; |
} |
For more information about the options dictionary of the loadNibNamed:owner:options: method, see NSBundle UIKit Additions Reference.
Accessing the Contents of a Nib File
Upon the successful loading a nib file, its contents become ready for you to use immediately. If you configured outlets in your File’s Owner to point to nib file objects, you can now use those outlets. If you did not configure your File’s Owner with any outlets, you should make sure you obtain a reference to the top-level objects in some manner so that you can release them later.
Because outlets are populated with real objects when a nib file is loaded, you can subsequently use outlets as you would any other object you created programmatically. For example, if you have an outlet pointing to a window, you could send that window a makeKeyAndOrderFront: message to show it on the user’s screen. When you are done using the objects in your nib file, you must release them like any other objects.
Important: You are responsible for releasing the top-level objects of any nib files you load when you are finished with those objects. Failure to do so is a cause of memory leaks in many applications. After releasing the top-level objects, it is a good idea to clear any outlets pointing to objects in the nib file by setting them to nil. You should clear outlets associated with all of the nib file’s objects, not just the top-level objects.
Connecting Menu Items Across Nib Files
The items in a Mac OS X application’s menu bar often need to interact with many different objects, including your application’s documents and windows. The problem is that many of these objects cannot (or should not) be accessed directly from the main nib file. The File’s Owner of the main nib file is always set to an instance of the NSApplication class. And although you might be able to instantiate a number of custom objects in your main nib file, doing so is hardly practical or necessary. In the case of document objects, connecting directly to a specific document object is not even possible because the number of document objects can change dynamically and can even be zero.
Most menu items send action messages to one of the following:
A fixed object that always handles the command
A dynamic object, such as a document or window
Messaging fixed objects is a relatively straightforward process that is usually best handled through the application delegate. The application delegate object assists the NSApplication object in running the application and is one of the few objects that rightfully belongs in the main nib file. If the menu item refers to an application-level command, you can implement that command directly in the application delegate or just have the delegate forward the message to the appropriate object elsewhere in your application.
If you have a menu item that acts on the contents of the frontmost window, you need to link the menu item to the First Responder proxy object. If the action method associated with the menu item is specific to one of your objects (and not defined by Cocoa), you must add that action to the First Responder before creating the connection. To set up a First Responder connection in Interface Builder v3.0 and later, do the following:
For custom actions, add the action to the First Responder proxy object:
In your main nib file, select the First Responder proxy object.
Open the inspector window and select the Identity pane.
In the Class Actions section, click the plus (+) button to add the new action method. The new action’s name is initially selected.
Enter the name of your action and press Return.
Open the menu bar resource.
If you have not already done so, add your menu item to the desired menu.
Control-click the menu item and drag it to the First Responder proxy object in the nib document window.
In the Connections tab of the inspector window, select your action and click Connect.
After creating the connection, you need to implement the action method in your NSDocument or NSResponder subclass. That object should also implement the validateMenuItem: method to enable the menu item at appropriate times. For more information about how the responder chain handles commands, see Cocoa Event-Handling Guide.
© 2009 Apple Inc. All Rights Reserved. (Last updated: 2009-01-06)