Packaging Your KEXT for Distribution and Installation
This tutorial describes how to package a kernel extension (KEXT) for distribution and installation on Mac OS X. The KEXT can be any type: a device driver, file system stack, or Network Kernel Extension (NKE). The tutorial assumes that you are working in a Mac OS X development environment.
Important: The information in this document reflects versions of PackageMaker available in Mac OS X v10.3 and above.
Contents:
Why Should You Create a Package?
Anatomy of a Package
Preparation
Roadmap
Locate Your KEXT
Create a Distribution Directory
Gather Any Package Resources
Create a Read Me File
Create a Software License File
Create a Welcome File
Create a Package with PackageMaker
Examine the Package and Files
Test Installing the Package
Where to Go Next
Why Should You Create a Package?
As built, a kernel extension is not well-suited for distribution and installation. For example, some of the files in the bundle could be lost during distribution over the Web. The hierarchical tree format of a bundle leaves its contents open to accidental damage by mishandling. For example, if a KEXT were transferred to a DOS (“8.3”) file system, filenames within the bundle directory could be truncated.
In addition, a KEXT does not normally contain the sort of useful information users expect when they install software, such as licensing restrictions, descriptive information, or default installation location. Before you distribute a KEXT for installation under Mac OS X, you should prepare it by creating a package.
Anatomy of a Package
The Mac OS X package format was created to be used with the Installer application. Installer takes care of providing users with many useful features such as descriptive information and default installation location.
Like KEXTs, packages are also implemented as bundles, folders that the Finder treats as single files. Although a package appears as a single entity from a Desktop Finder window, you can Control-click the package icon and choose Show Package Contents to view the files in the package. You can also use the Terminal application to enter a package directory and view the component files. The files that make up a package are named with suffixes that indicate the type of information stored in the file.
A package provides everything the Mac OS X Installer needs to install your software. A basic package contains:
A Bill of Materials file—this is a file in binary (non-text) format that describes the contents of the archive file. PackageMaker names this file
Archive.bom.An
Info.plistfile—this is a plist-formatted file that contains the information you entered in the PackageMaker application when you created the package project.An archive file—this is an archive of the complete set of files that will be installed. PackageMaker names this file
Archive.pax[.gz]. If you choose to compress the files, the file name will include the.gzsuffix. For this tutorial, the contents of your KEXT will comprise theArchive.pax[.gz] file.A package-description file—this is a plist-formatted file that contains localizable information such as the package title. PackageMaker names this file
Description.plist.Resources (optional)—packages may contain additional (optional) supplementary resources, such as Read Me files, licensing information, pre- or postinstall scripts, and installation or volume check tools. These are package resources, used (or run) at installation time; they are not part of the KEXT's installation but are saved to disk as part of the package's receipt (located in
/Library/Receipts). Resources can include any number of localized language projects (.lprojfolders) that can contain localized versions of the Read Me, welcome, and license files, as well as a localized background image.
Because packages are implemented as bundles, their contents are also subject to possible modification during handling. To prepare a package for distribution, you should archive and (possibly) compress it into a form that can be distributed safely without changing the contents.
Preparation
Before you begin this tutorial, make sure you have met the following requirements.
Be sure you understand how to create a KEXT and what makes up a KEXT.
You should have completed and understood the material presented in a previous tutorial, “Hello Kernel: Creating a Kernel Extension With Xcode,” before beginning this one. That tutorial demonstrates how to create a simple kernel extension project and explains the contents of a KEXT.
If your KEXT is a device driver, be sure you understand the differences between a device driver and other KEXTs.
You should have completed and understood the material presented in “Hello I/O Kit: Creating a Device Driver With Xcode.” That tutorial demonstrates how to create a simple device driver (I/O Kit KEXT) project and explains the differences between device drivers and other kernel extensions.
Build a KEXT.
Before you begin this tutorial, you will need to build a KEXT that you can package and install. It doesn’t matter whether you plan to package a device driver or another type of KEXT.
This tutorial assumes you are logging in to Mac OS X as the user
adminand that this user has administrative privileges on your computer. This tutorial also assumes that your KEXT project was namedHello. In the examples below, the project files can be found at the location/Users/admin/Projects/Hello/build. The name of the KEXT isHello.kext. If you are using another account, project name, or project location, substitute the correct information in the examples below.
Roadmap
Here’s how you’ll package your KEXT:
You’ll use the Terminal application to type the commands to locate your KEXT and create a distribution tree. You’ll use the PackageMaker application to build your package. Then you will test the package with the Mac OS X Installer application.
Locate Your KEXT
If you have not yet done so, you will need to create, build, and test a KEXT, either a device driver or another type of KEXT. If you do not already have a KEXT to package, follow the instructions in one of the previous tutorials, “Hello Kernel: Creating a Kernel Extension With Xcode” or “Hello I/O Kit: Creating a Device Driver With Xcode.” It is not necessary (for this tutorial) that your KEXT actually do anything, only that it exists.
Locate your KEXT. Use the Terminal application to move to the directory that contains your KEXT.
Start the Terminal application. From a Desktop Finder window, locate and launch the Terminal application, found at
/Applications/Utilities/Terminal.Choose New from the Shell menu to start a new shell window.
In the Terminal window, move to the directory that contains your KEXT. Use the cd command to move to the appropriate directory. For example:
% cd /Users/admin/Projects/Hello/build
This directory contains your KEXT. You can use the ls command to view the contents of this directory. For example:
% ls
Hello.build
Hello.kext
Your KEXT should have a name that ends with the suffix .kext.

Warning: For purposes of packaging, distribution, and installation, the filename of the KEXT (apart from the suffix) does not matter. However, the name of the KEXT binary and its class (if a driver), as stored in the KEXT's property list, should be unique. These should use the recommended “reverse-DNS” naming convention, such as
com.MySoftwareCompany.iokit.HelloIOKit.From a Desktop Finder window, a KEXT appears as a single file (look for it from the Desktop if you like). From the Terminal application, however, a KEXT appears as a directory.
Create a Distribution Directory
When your KEXT is installed, it will be installed into the Extensions folder, at /System/Library/Extensions under Mac OS X.
Because kernel extensions contain code and data that are loaded into the kernel, the most protected environment in the operating system, their file ownership and permissions must be set to prevent unauthorized tampering. All KEXT bundles (all files and folders in the KEXT, including the KEXT binary) must be owned by the user root and the group wheel. In addition, the folders and files of the KEXT bundle must have their permissions set so that they are not writable by any user other than the super user.
For development purposes, however, you can make a root-owned copy of your KEXT binary by using the sudo command to copy the KEXT binary (Hello.kext) to the /tmp directory and creating the distribution directory there. Using the sudo command to copy the KEXT binary to /tmp gives the KEXT the super user's ownership and permissions and leaves the original KEXT alone so you can revise and save it as you choose.
Note: You should not change the ownership and permissions of any of your KEXT files in your own directory, because you will no longer be able to save them after working on them. Thus, every time you make changes to your KEXT and rebuild it, you need to repeat the following steps to copy the new version to the /tmp directory and repackage it.
To create the package, you will first make a distribution folder, then copy your KEXT into it. When the package is installed (unpacked), Installer will place the KEXT at the correct point in the user's file system.
At the prompt, you'll use the cp -R command with the sudo command to copy your KEXT to
/tmp. The cp command copies files from one place to another and the -R option tells cp to copy a directory and its entire subtree (likeHello.kext). When prompted for a password, enter youradminpassword. (Note that nothing is displayed as you type the password.)For example:
% sudo cp -R Hello.kext /tmp
Password:
Check the ownership and permissions of your driver by moving to the
/tmpdirectory and using the ls -l command:% cd /tmp
% ls -l
drwxr-xr-x 3 root wheel 102 Oct 20 10:30 Hello.kext
The -l makes the ls command display extra information about the files in a directory.
Now use the mkdir command with the sudo command to create the distribution directory. For example:
% sudo mkdir dstroot
This creates a directory folder,
dstroot(distribution root), in the/tmpdirectory.Copy your KEXT into the new
dstrootfolder using the cp command with the-Roption. For example:% sudo cp -R Hello.kext dstroot
List the contents of the new directory hierarchy. Use the find command. For example:
% find dstroot
You should see output like this (although the name of your KEXT may differ):
dstroot
dstroot/Hello.kext
dstroot/Hello.kext/Contents
dstroot/Hello.kext/Contents/Info.plist
dstroot/Hello.kext/Contents/MacOS
dstroot/Hello.kext/Contents/MacOS/Hello
dstroot/Hello.kext/Contents/Resources
dstroot/Hello.kext/Contents/Resources/English.lproj
dstroot/Hello.kext/Contents/Resources/English.lproj/InfoPlist.strings
dstroot/Hello.kext/Contents/Resources/...
Gather Any Package Resources
As described in “Anatomy of a Package,” packages may contain additional (optional) supplementary resources used by the package itself. These are used (or run) at installation time but will not be installed on disk along with the software.
There are certain special filenames that Installer will recognize and display automatically if they are present in a package. These are: a Read Me file, a software license file, and a welcome file. These files can be in any of several forms: text (.txt), HTML (.html) or Rich Text Format (.rtf). In this tutorial, you will create three files: ReadMe.rtf, License.rtf, and Welcome.rtf.
The supplementary resources will not be installed along with your KEXT, so they should not be placed in the distribution directory you created in “Create a Distribution Directory.” Instead, use the cd command to go back to the Projects directory containing the original copy of your KEXT:
% cd /Users/admin/Projects |
and create a resources directory there:
% mkdir MyResources |
You can create your supplementary Installer resources elsewhere and copy them to the resources directory, or you can create them in the directory. In this tutorial, you will create three files, ReadMe.rtf, License.rtf, and Welcome.rtf in the resources directory. Move to your resources directory using the cd command. For example:
% cd MyResources |
Create a Read Me File
If a Read Me file is present in a package, the Mac OS X Installer will display the contents of the file. A user dismisses the Read Me by clicking Continue. The presence of a ReadMe.rtf file is all that is needed to get this feature. Installer will automatically add a “Read Me” line to the bullet list presented in the left column of the application. For an example of a Read Me file displayed during installation, see Figure 6.
Start the TextEdit application. From a Desktop Finder window, locate and launch the TextEdit application, located at
/Applications/TextEdit.Enter the text of your Read Me file. Generally, a Read Me file should describe the contents of your package, version information, and any additional information a user might need to see. For example, a Read Me file could provide contact information, special hardware instructions, any known incompatibilities with other extensions, and so forth.
Save your Read Me file. Use the name
ReadMe.rtf. As the location (Where), choose theMyResourcesdirectory you created in “Gather Any Package Resources.”Close the Read Me file.
Create a Software License File
If a license file is present in a package, Installer will display the contents of the file. A user dismisses the license pane by clicking Continue. Installer then displays a dialog that requires the user to Agree to the license terms in order to proceed with installation.
The presence of a License.rtf file is all that is needed to get this feature. Installer will automatically add a "License" line to the bullet list presented in the Left column of the application.
Use the TextEdit application. Choose New from the File menu to start a new document.
Enter the text of your license file. Generally, a license file should describe the terms of use for your package, any legal disclaimers, or any pre-release software warnings.
Save your license file. Use the name
License.rtf. As the location (Where), choose theMyResourcesdirectory you created in “Gather Any Package Resources.”Close the license file.
Create a Welcome File
If a welcome file is present in a package, Installer will display the contents of the file. After the user authenticates (if required), the welcome message is the first thing displayed when a package is opened. The presence of a Welcome.rtf file is all that is needed to get this feature.
Use the TextEdit application. Choose New from the File menu to start a new document.
Enter the text of your welcome file. Generally, a welcome file is a brief introduction to the software being installed, and may contain the name of the software, its creator, and a very brief description of the software. More extensive description belongs in the Read Me file.
The text of the welcome file may not be larger than the Installer window it is displayed in because the welcome pane will not allow the user to scroll to see more text.
Save your welcome file. Use the name
Welcome.rtf. As the location (Where), choose theMyResourcesdirectory you created in “Gather Any Package Resources.”Close the welcome file.
Create a Package with PackageMaker
Now you can use PackageMaker to create a package project and build from it an installable package, which includes all of the files in your distribution and resources directories.
Start the PackageMaker application. From a Desktop Finder window, locate and launch the PackageMaker application, located at
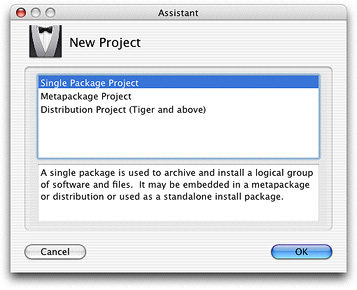
/Developer/Applications/Utilities.With PackageMaker, you can create simple packages, metapackages, and distributions (for more information on these types of installations, see Software Delivery Guide). For this tutorial, select Simple Package Project in the Assistant window and click OK, as shown in Figure 1.
After you click OK to choose the package project type, the Assistant window disappears and is replaced by the PackageMaker window. Click the Show Installer Interface Editor button (if you don't see this button, be sure the Installer Interface tab is selected in the PackageMaker window). This displays a separate window in which you can customize the background image Installer displays and add to the package your welcome, Read Me, and license files (for this tutorial, you won't customize the background image).
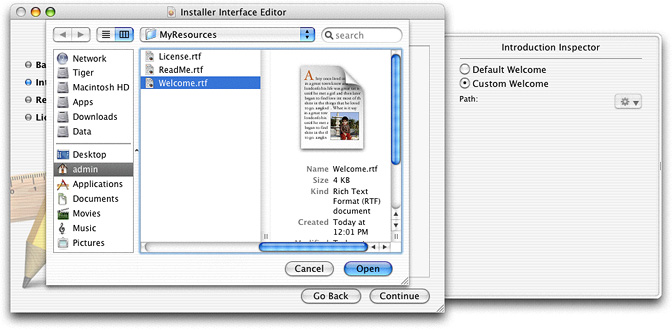
First, add to the package the welcome file you created in “Create a Welcome File.” Click the Introduction radio button on the left side of the Installer Interface Editor window. You can either drag your welcome file into the center pane or you can select Custom Welcome in the Introduction Inspector drawer on the right side of the window. If you select Custom Welcome in the Introduction Inspector, you'll see a dialog drop down in which you navigate to your welcome file and then double-click it or select it and click Open, as shown in Figure 2.
Next, perform similar steps to add the Read Me file you created in “Create a Read Me File”: Click the Read Me radio button on the left side of the Installer Interface Editor window. You can either drag your Read Me file into the center pane or you can select Custom Read Me in the Read Me Inspector drawer on the right side of the window. If you select Custom Read Me, a dialog drops down in which you navigate to your Read Me file and then double-click it or select it and click Open.
Finally, perform similar steps to add the license file you created in “Create a Software License File”: Click the License radio button on the left side of the Installer Interface Editor window. You can either drag your license file into the center pane or you can select Custom License in the License Inspector drawer on the right side of the window. If you select Custom License, a dialog drops down in which you navigate to your license file and then double-click it or select it and click Open.
Before you close the Installer Interface Editor window, save the changes you've made to the package project. In the menu bar, choose File and click Save. PackageMaker will ask you to name this project and choose a location in which to save it. For this tutorial, choose the name
Hello.pmproj.As you provide additional information in the following steps, it's a good idea to save frequently. Also, if you want to make changes to any of this information, you can edit this project later and build a new package from it.
Close the Installer Interface Editor window.
Note: You do not need to make any changes to the Installer Interface pane in the main PackageMaker window, because the package you build in this tutorial is not contained in an old-style metapackage. For more information about metapackages, see Software Delivery Guide.
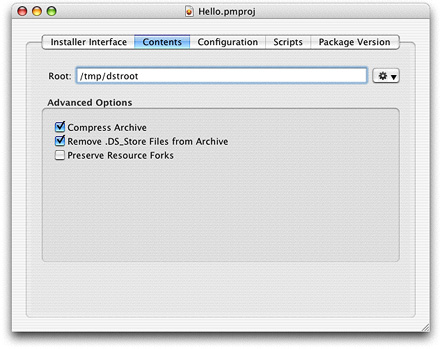
In the PackageMaker window, click Contents.
For Root, type or choose the path to the copy of your KEXT in the
/tmpdirectory. For example,/tmp/dstroot.For this tutorial, you can leave the checkboxes under Advanced Options in their default state. Specifically, you can leave the Compress Archive and the Remove .DS_Store Files from Archive checkboxes checked and the Preserve Resource Forks checkbox unchecked. Figure 3 shows the Contents pane of the PackageMaker window after you've completed this step. If you're interested in learning more about these options and how they can affect the packaging and installation of your software, see Software Delivery Guide.
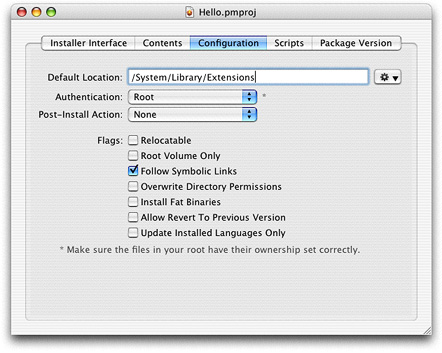
Click Configuration.
For Default Location, type or choose the path to the location in which you want your KEXT installed. For example,
/System/Library/Extensions.Select Root authentication for the authentication requirement. This allows one of Installer's tools to be run as
root. If the user installing your KEXT is logged in as therootuser, Installer will not request any authorization. If the user is logged in as theadminuser, Installer will display a dialog that requests the user to supply his or heradminpassword. Only users withrootoradminprivileges should install KEXTs.Select the appropriate restart action. For this tutorial, select None.
Set the appropriate flags. For this tutorial, check only the Follow Symbolic Links checkbox. This ensures that the user's symbolic links will be preserved.
Figure 4 shows the Configuration pane of the PackageMaker window after you've completed this step.
Click Package Version.
For Identifier, type your reverse-DNS name; for example,
com.MyTutorial.Hello.The Get Info String field contains a string the Finder displays in the Get Info window for the package. Choose a name that describes your KEXT, such as
Hello v1.0.The Version field contains the version string the Finder displays in column view. You can use the same version number you used in the Get Info string or a different one, depending on how you structure your development environment. For this tutorial, use the same version number (
1.0).
When you are finished providing the package information, click File in the menu bar and select Save. If you haven't saved earlier, PackageMaker will ask you what name to save the package project under and where to store it.
Now PackageMaker can build an installable package from the information in the project you've created. In the menu bar, choose Project and click Build.
PackageMaker will ask you what name to save the package under and where to store it:
In the Save As field, type in a name for your package. The best name to choose is one that incorporates the name of your KEXT. For example, if your KEXT is named
Hello.kext, name your packageHello.pkg(note that PackageMaker automatically supplies the.pkgextension in the Save As field).Choose a location. The default location is your home folder, but you may want to create a new folder called Packages to use for all packages you create.
When you have chosen a name and location, click Save.
Examine the Package and Files
You can now quit PackageMaker and examine your new package.
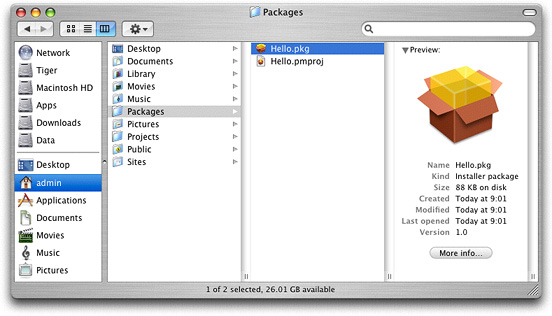
From a Desktop Finder window, navigate to the location where you told PackageMaker to save your package. For example, if you named the package Hello.pkg and told PackageMaker to store it in the Packages folder in your home folder, move to the Packages folder as shown in Figure 5.
The file
Hello.pmprojis the project that contains the information you provided in “Create a Package with PackageMaker.”From a shell window in the Terminal application, move to the directory that contains your package. For example:
% cd /Users/admin/Packages
From a Desktop Finder window, a package appears as a single file. From the Terminal application, however, a package appears as a directory.
List the contents of your package directory using the find command. Some of the files you'll see are listed below:
% find Hello.pkg
Hello.pkg
Hello.pkg/Contents
Hello.pkg/Contents/Archive.bom
Hello.pkg/Contents/Archive.pax.gz
Hello.pkg/Contents/Info.plist
Hello.pkg/Contents/PkgInfo
Hello.pkg/Contents/Resources
Hello.pkg/Contents/Resources/BundleVersions.plist
Hello.pkg/Contents/Resources/English.lproj/License.rtf
Hello.pkg/Contents/Resources/English.lproj/ReadMe.rtf
Hello.pkg/Contents/Resources/English.lproj/Welcome.rtf
Refer to “Anatomy of a Package” and “Gather Any Package Resources” for descriptions of the
Helloand.rtffiles and their contents.
Test Installing the Package
Now you can test your package. Mac OS X will run the Installer application if you double-click a package.
From a Desktop Finder window, navigate to the location where you told PackageMaker to save your package (repeat step #1 in “Examine the Package and Files”).
Select and double-click the package, for example,
Hello.pkg.The Mac OS X Installer launches.
The Introduction window will be displayed, along with the welcome file, if you created one. Click Continue.
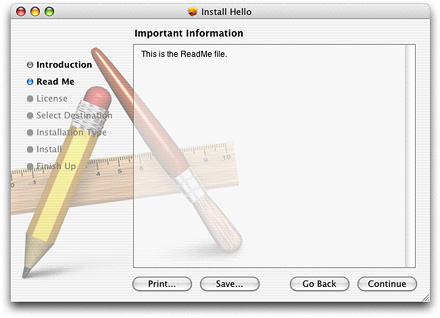
If you created a Read Me file, you should see it displayed with the heading “Important Information” as shown in Figure 6. Click Continue.
If you created a license file, you should see it displayed with the heading “Software License Agreement”. Click Continue. Installer will display a dialog requiring you to agree (or disagree) to the terms of the license. Click Agree.
If appropriate, select a destination volume and click Continue.
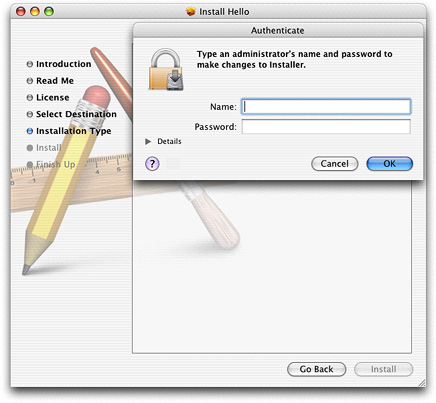
If you required a higher level of authorization than you are currently logged in at, Installer will display an authorization dialog and ask you to type your password, as in Figure 7.
Click Install (or Upgrade if you've installed this package before) and allow Installer to proceed. Click Close when Installer has finished.
Now you can check that the package was installed. Navigate to /System/Library/Extensions. You should see your KEXT (Hello.kext). Remember that the KEXT is a bundle; you can view the contents of the KEXT from a Terminal shell. If you do, you can see that the Read Me, software license, and welcome files were not installed.
Where to Go Next
Congratulations! You’ve now packaged and installed a KEXT.
This tutorial is part of a series. An additional tutorial describes how to debug a kernel extension (“Hello Debugger: Debugging a Device Driver With GDB”). This tutorial, as well as the earlier (prerequisite) tutorials, can be found in Kernel Extension Programming Topics.
© 2003, 2007 Apple Inc. All Rights Reserved. (Last updated: 2007-10-31)