Legacy Document
Important: The information in this document is obsolete and should not be used for new development.
Customizing What Installer Shows to the User
You can customize what the Installer application shows to the user by the information and resources you build into your installation package with PackageMaker. You can optionally supply localizable files that provide text for the following Installer panes:
Introduction (or Welcome)
Read Me
License
In addition, you can supply a localizable background image for the installer window and control how it is displayed.
Finally, you must provide a title and should also provide a description for your installation package. You can provide similar information for a metapackage.
For information on the order in which various Installer panes are displayed, see “Installation Steps, in Order.”
Note: The information in the sections that follow applies to both packages and metapackages, unless stated otherwise.
Contents:
Supplying a Title and Description
Supplying Text for the Introduction, Read Me, and License Panes
Supplying a Background Image
Supplying a Title and Description
For a package or a metapackage, you supply a title and description in, respectively, the Title and Description fields of the PackageMaker Description pane.
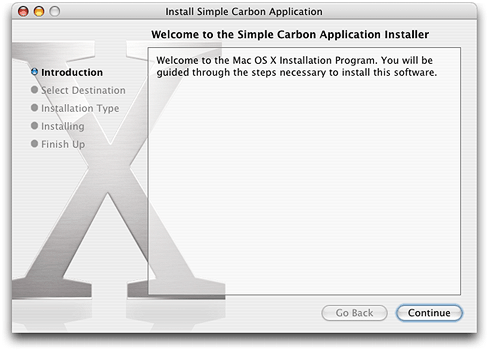
The title is required and is displayed both in the installer window title and above the Introduction pane, in a sentence of the form “Welcome to the <title> Installer”. For example, Figure 1 shows the result of supplying “Simple Carbon Application” as a package title. This figure also shows the default Welcome text you see if you do not supply your own text. If you supply a title that is too long, it currently is clipped in the window title and truncated in the Introduction pane.
The information you supply in the Description field for a package does not appear in any Installer pane if the package is installed individually. Rather, it appears when the package is part of a metapackage installation, and the user selects the package in the Custom Install pane.
Similarly, the information you supply in the Description field for a metapackage appears only if the metapackage is part of a metapackage installation and the user selects the metapackage in the Custom Install pane, as shown in Figure 1.
Supplying Text for the Introduction, Read Me, and License Panes
Installer always shows an Introduction (or Welcome) pane, followed by Read Me and License panes if the package or metapackage contains files for those panes. For a complete picture of the order in which panes are displayed, see “Installation Steps, in Order.”
You can supply text for these panes by providing localizable files named, respectively, Welcome, Read Me, and License, with the appropriate extension. The supported extensions (and file formats) are .txt (text file), .rtf (Rich Text Format), .rtfd (Rich Text Format Directory), and .html (Hypertext Markup Language). For example, a ReadMe file might be named ReadMe.rtf. Case is significant so, for example, Installer will not display a Read Me named Readme.rtf.
If you supply more than one of these files with the same name but different extensions, Installer searches by extension in this order: .rtfd, .rtf, .html and .txt. So if you supply two license files named License.rtf and License.rtfd, Installer will display the contents of License.rtfd on the License pane.
The welcome, Read Me, and license files reside in Resources directory of a package, or in a localized directory within the Resources directory. Before creating a package, you should place these files, along with any other required resources, in the Install_resources directory, as described (for packages) in “Creating a Package.”
Listing 1 shows an Install_resources directory on your hard disk (before creating a package) that includes welcome, Read Me and license files that are not localized. For information on localizing the customized information you supply, see “Localizing the Welcome, Read Me, and License Files.”
Listing 1 A resource directory with files to customize an installation
- Install_Resources |
License.rtf |
ReadMe.rtfd |
Welcome.rtfd |
When packages are included in a metapackage, only files associated with the metapackage are shown. For example, the license file in an individual package is not shown—only a license file associated with the metapackage is shown.
The Installer Introduction pane does not scroll, so the welcome file should provide a relatively brief description of the package or metapackage. A user should be able to quickly determine whether to install the software. If you do not provide a welcome file, Installer displays a default Introduction pane.
The Read Me pane is scrollable and can be printed. The Read Me file can be lengthy. For example, it may provide detailed information about hardware or software requirements, new product features, or other issues. For a metapackage that includes dissimilar types of software, the Read Me file for the metapackage should make clear why the packaged software is distributed together. If you do not provide a Read Me file, Installer does not display a Read Me pane.
The license file provides your license agreement. If the file is present, the user will be required to accept the agreement before continuing with the installation. If you do not provide a license file, Installer does not show a license agreement.
Localizing the Welcome, Read Me, and License Files
If you have only one version of your welcome, Read Me, and license files, you should put them directly inside the Install_resources directory, as described in “Creating a Package,” before creating your package (or metapackage). However, if you want to localize any of these files, you can put copies in the desired localized directories within your main Resources directory. As a result, Installer displays the appropriate file according to the user’s current Languages preference.
Files you place in your main Resources directory end up in the main Resources directory of the package. Files you place in a localized subdirectory end up in a similarly named localized subdirectory in the package.
If you place a default welcome file in a package’s main Resources directory, Installer uses that file if it can’t find an appropriate localized welcome file for the user’s current language setting. For the Read Me and license files, however, if the package has any versions in localized directories, Installer shows only one of those, and does not show a version in the main Resources directory.
Listing 2 shows an Install_resources directory on your hard disk that includes Read Me and license files localized for English and French (in the English.lproj and French.lproj subdirectories, respectively). It also includes a welcome file at the highest level (not within a localized directory). The welcome file is used in all cases, and the Read Me and license files are chosen as appropriate for the user’s language setting. For additional information on localizing the customized information you supply, see “Additional Tips for Background Images.”
Note: If a package supplies multiple localized license files, the License pane offers the user a pop-up menu of language choices.
Listing 2 A resource directory with files to customize an installation
- Install_Resources |
- English.lproj |
License.rtf |
ReadMe.rtfd |
- French.lproj |
License.rtf |
ReadMe.rtfd |
Welcome.rtfd |
Supplying a Background Image
Starting with the Installer version distributed with Mac OS X version 10.2.0, packages and metapackages can contain a custom, localizable background image that is displayed in the installer window during installation. If a package or metapackage does not contain a background image, Installer displays the default image of a CD with a large “X”.
You can specify both an alignment setting and a scaling setting for a background image. However, these settings are not yet supported in PackageMaker. For all these reasons, you must first create your package, then set the appropriate keys by editing the package’s Info.plist file. For more information on working with such keys and on how to edit the Info.plist file, see “Examining and Modifying Property Lists.”
Naming the Background Image
The background image file must be named background, with one of the following extensions: .jpg, .tif, .tiff, .gif, .pict, .eps, and .pdf. For example, a background image might have the name background.jpg. Case is significant. For example, Installer will not display an image named background.JPG.
Package Placement for the Background Image
The background image resides in a package’s Resources directory, as shown in Listing 3, or in a localized directory within the Resources directory. Before creating a package, you should place the background image file, along with any other resources for the package, in the Install_resources directory, as described in “Creating a Package.” For information on localizing, see “Additional Tips for Background Images.”
Listing 3 Package contents with nonlocalized background image
Contents |
Archive.bom |
Archive.pax.gz |
Info.plist |
Resources |
Description.plist |
background.tif |
Aligning the Background Image
The key for aligning a background image is IFPkgFlagBackgroundAlignment, and it takes any of the following string values: topleft, top, topright, left, center, right, bottomleft, bottom, bottomright. These values align the image as their names suggest.
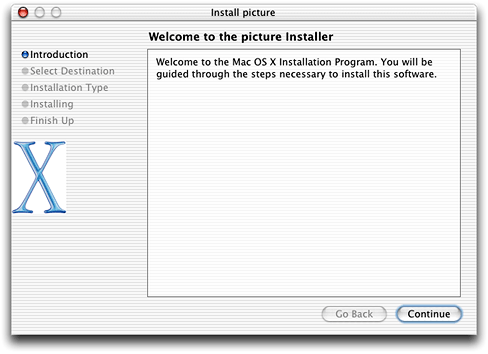
Figure 2 shows an installer window with an image of the Mac OS X logo, positioned with left alignment.
Listing 4 shows the alignment key from the XML listing of an Info.plist file for a package.
Listing 4 The IFPkgFlagBackgroundAlignment key from an Info.plist file
<key>IFPkgFlagBackgroundAlignment</key> |
<string>bottomright</string> |
You typically use alignment when you have a background image, such as an icon, that is significantly smaller than the installer window (as in the example in Figure 2). Alignment allows you to place it in a location that is appropriate for your software.
Scaling the Background Image
The scaling key controls how the background image fits within the installer window. The image can be used at its natural size, be scaled to fit the window exactly, or be scaled proportionally to fit the window as best it can without losing its natural proportions. The key for scaling a background image is IFPkgFlagBackgroundScaling, and it takes any of the following string values:
The size and proportions of the image don’t change. If the frame is too small to display the whole image, the edges of the image are trimmed off.
The image shrinks or expands, and its proportions distort, until it exactly fits the frame.
If the image is too large, it shrinks to fit inside the frame. If the image is too small, it expands. The proportions of the image are preserved.
nonetofitproportionalListing 5 shows the background scaling key from the XML listing of an Info.plist file for a package.
Listing 5 The IfPkgFlagBackgroundScaling key from an Info.plist file
<key>IfPkgFlagBackgroundScaling</key> |
<string>proportional</string> |
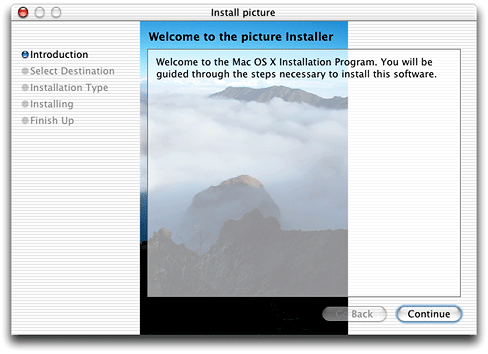
Figure 3 shows the installer window with a background image scaled with an IFPkgFlagBackgroundScaling key value of proportional. It preserves the proportions of the original photo, and scales the photo until it fits inside the installer window without distortion or stretching. The original image is larger than the installer window, and you can see that it is taller than it is wide, so the result of scaling proportionally is that the image fills only a “column” in the middle of the window.
Using a value of tofit would stretch (and distort) the photo to fill the window, while using none displays the image at full size so that only a small portion of it would be visible (remember, the photo is larger than the installer window).
Localizing the Background Image
If your package requires localized graphic content, you can place localized versions of the background image in multiple localized directories within a package’s Resources directory.
Important: Localizing a large image can dramatically increase the size of your installation package. If you’re distributing software on a CD, that may be no problem. However, if you’re distributing software through Internet downloads, you may want to use smaller images and more compact image types.
Listing 6 shows the contents of a package that provides a localized background image for English, French, and Japanese, as well as a default image at the highest level in the Resources directory.
Listing 6 Package contents with a localized background image
Contents |
Archive.bom |
Archive.pax.gz |
Info.plist |
Resources |
background.tif |
English.lproj |
Description.plist |
background.tif |
French.lproj |
Description.plist |
background.tif |
Japanese.lproj |
Description.plist |
background.tif |
Additional Tips for Background Images
The following tips may help you to achieve a more pleasing result with your background image:
Use a picture that is just large enough to contain the background element. Do not use an image as large as the installer window if the image will not occupy the entire background of the window.
Use the alignment key (described in “Aligning the Background Image”) to position the picture properly. Doing so increases the likelihood that the image will be presented reasonably if the installer window becomes resizable in a future release.
To have your window background appear with the standard Aqua background, use transparency when drawing. Do not attempt to use a background image for this purpose.
The background of the content area is lighter than the rest of the background. This effect is created by Installer, so you don’t need to make any special provisions for the area in your background image where the content is displayed. Again, if the installer window becomes resizable or the content area changes size or shape, you do not want your background image to become “inconsistent” because it assumed a specific size for foreground elements.
© 2003, 2006 Apple Computer, Inc. All Rights Reserved. (Last updated: 2006-07-24)


