Legacy Document
Important: The information in this document is obsolete and should not be used for new development.
Creating a Package
This section describes the general steps you take to package your software. It assumes you are familiar with the information in “About Packages,” which introduces packages and describes the contents of a simple package. You should also be familiar with the information in “PackageMaker and Installer Features.”
This section is not strictly a tutorial. For a step-by-step tutorial that describes how to create a package, see Packaging Your KEXT for Distribution and Installation, in Darwin Documentation. That document describes how to create a package for installing a kernel extension (or KEXT), but most of the steps are common to packaging any kind of software.
In addition, you can read about many of the steps for creating a package in PackageMaker Help. You can also learn about the PackageMaker user interface through the available help tags.
Contents:
Preparation
Roadmap
Create a Directory to Store Your Software
Create Files to Customize the Installation
Create Script Files for Special Processing
Create a Directory to Store Additional Installation Files
Specify the Installation Destination
Create a Package With PackageMaker
Modify the Package for Special Processing
Test the Package
Preparation
Before you start packaging your software, it is worthwhile to consider your installation goals and make some decisions. The following issues apply to most software installations:
Do you really need to use an installation process, or can you allow users to simply drag your software to an appropriate location, as described in “Drag-and-Drop Installation”?
How will you be distributing your software? If you’re distributing software on a CD, you can be less sensitive to size issues. However, if you’re distributing software through Internet downloads, you may want to take steps to minimize the size of your package:
Be sure you choose to compress the package archive (this is the default setting).
If possible, consider providing your software in separate packages.
Avoid steps that can make the package unnecessarily large, such as using a large background image and providing localized copies for many languages.
Are some parts of your software optional? If so, consider distributing your software with a metapackage, which allows the user to do a custom install.
For more information, see “What Is a Metapackage?.”
Does your software need to reside in a specific location, or is it relocatable (the user can choose a location for it)? If your software must be installed in more than one location (such as
/Applicationsand/System/Library/Fonts), you can’t make it relocatable (unless you put it into separate packages).For more information, see “Specify the Installation Destination.”
How much will you want to customize the installation process? You can supply a welcome statement, a Read Me file, a license agreement, and a background image for the installer window. These are described in “Customizing What Installer Shows to the User,” which also describes how you can localize the information you provide for customization.
Do you need to check for certain requirements on the installation system or the installation volume? Do you need other special processing before or after installing your software? See “Specifying Installation Requirements” and “Customizing an Installation With Executable Scripts” for information on how to perform these kinds of operations.
Will installing your software require root or administrator authorization? For more information, see “Authorization, File Ownership, and Permissions.”
Does your software require or recommend a restart, logout, or shutdown? You can specify such requirements in PackageMaker.
There are additional issues you may need to resolve for some software installations. These include:
Will you provide information that can help Installer find your previously installed software during future upgrades? This is most likely to be an issue if your software is easily relocatable. For more information, see “Finding Previously Installed Software.”
Will you provide information in your software that can help Installer decide what needs to be replaced during future upgrades? For more information, see “Specifying Version Information for Packaged Software.”
Finally, you should take a tour of the PackageMaker application, using the Help and help tags to gain familiarity with the interface and available options.
Roadmap
Once you have completed development of your software, including making any changes required by the issues described in “Preparation,” you’re ready to start packaging. That will require the following steps:
Create a directory to store your software
Create a directory to store additional installation files
Create any files you need to customize the installation
Create files you need for special processing
Specify the installation destination
Create a package with PackageMaker
Modify the package for special processing
Test the package
These steps are described in the sections that follow.
Once you have packaged your software, you can distribute it with the mechanisms described in “Software Distribution Guidelines.”
Create a Directory to Store Your Software
You’ll have to create a directory to store your software prior to packaging. This directory can have any reasonable name, but for this example, name it Package_contents, indicating it contains the software to be packaged. These files will end up in an archive file in the package. Use the Root field on the Files pane to tell PackageMaker about this directory.
If your software consists of one, atomic component, such as an application or framework bundle, you can place it directly in the Package_contents directory. Similarly, if your software consists of multiple components, but they are all installed in the same location, you can place each of the components directly in the Package_contents directory.
If your software consists of multiple components that must be placed in specific places in a directory hierarchy, you should create a directory structure within Package_contents that mirrors the installation hierarchy. For example, to install an application in /Applications and some fonts in /System/Library/Fonts, you set up a directory structure like the one shown in Listing 1.
Listing 1 Directory structure for installing software in two fixed places
Package_contents |
Applications |
System |
Library |
Fonts |
You then place your application in the Applications directory and your fonts in the Fonts directory. Later in this process, you’ll specify a location for installing your software, as described in “Specify the Installation Destination.” For this example (with an application and some fonts), you specify an installation destination of / (the root directory), and the files are installed in the appropriate subdirectories. For an installation that places all the files in one location, you can specify the exact location, such as /Applications.
If your software consists of multiple components that don’t all have to be installed, you should put each component into a separate package, then combine the packages in a metapackage. For more information, see “Anatomy of a Metapackage.”
Create Files to Customize the Installation
You’ll need to create any text and image files desired to customize the installation. Depending on your requirements, as described in “Preparation,” you may need some or all of the following:
a welcome statement
a Read Me file
a software license agreement
a background image for the installer window
For information on how to create and use these files, see “Customizing What Installer Shows to the User.”
Note: You may also want to provide information that can help Installer find your previously installed software during future upgrades. If so, you’ll have to create a TokenDefinitions.plist file. For more information, see “Finding Previously Installed Software”
Create Script Files for Special Processing
You’ll need to create any script files (or other executables) you’ll use to perform special handling during the installation.
Important: You may be able to minimize your use of scripts, which present potential security problems, by using techniques described in “Examining and Modifying Property Lists” and “Finding Previously Installed Software.”
Depending on your requirements, as described in “Preparation,” you may need some or all of the following:
an InstallationCheck file to check for required features of the installation system
For details, see “Checking the Installation With InstallationCheck.”
a VolumeCheck file to examine each mounted volume and determine whether it meets your required criteria
For details, see “Checking the Installation Volume With VolumeCheck.”
preflight,postflight,preinstall,postinstall,preupgrade, orpostupgradescripts to perform additional operationsFor details, see “Modifying an Installation With Scripts.”
Create a Directory to Store Additional Installation Files
You’ll have to create a directory to store the files you’ve created for customizing the installation process and performing special processing. This directory can have any reasonable name, but for this example, name it Install_resources, indicating it contains additional resources to be used by Installer during the installation process. Use the Resources field on the Resources pane to tell PackageMaker about this directory.
Once you have created the Install_resources directory, you should copy in the files you created in “Create Files to Customize the Installation” and “Create Script Files for Special Processing.”
In some cases, you may want to create localized directories within the Install_resources directory. For details, see “Localizing the Welcome, Read Me, and License Files,” “Additional Tips for Background Images,” and “A Complex Installation Package.”
Specify the Installation Destination
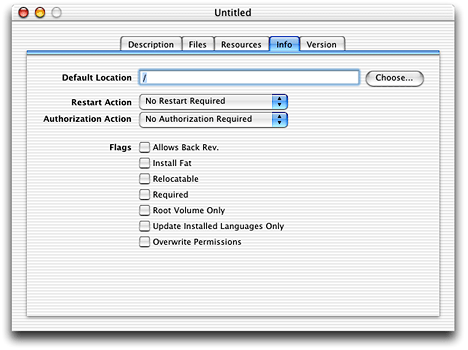
You’ll have to supply PackageMaker with a default destination for installing the software on the volume selected by the user. For example, you might specify a default location of /Applications. You supply this information in the Default Location field on the PackageMaker Info pane. Figure Figure 1 shows the Info pane with its default settings.
Note: For additional information on features listed on this pane, see “Restarting, Logging Out, or Shutting Down” and “Authorization, File Ownership, and Permissions,” as well as the PackageMaker Help and help tags in the application.
The following sections describe how to specify a fixed location, how to let the user specify the location, and how to specify the location for a package that will be part of a metapackage.
Installing in a Fixed Location
To require that your software be installed in a fixed location, observe the following:
If your package places items in more than one location (such as an application in
/Applicationsand fonts in/System/Library/Fonts, you should set the default location to the highest enclosing directory (in this case,/). If your package places items in only one location, you can choose any default location.Do not select the Relocatable checkbox shown in Figure 1.
Place your software in a directory hierarchy within the
Package_contentsdirectory that is consistent with the default directory into which the software will be installed, such as in the example shown in Listing 1.
If you follow these recommendations, Installer will place your software only in the directory hierarchy you have specified and will not allow a user to choose a destination for the software. Installer assembles paths based on the mountpoint of the selected volume, plus the value of the default location, plus the paths in the structure in your Package_contents directory.
Important: If the directory structure in your Package_contents directory is not consistent with the default directory in which the software will be installed and the package is not relocatable, the installation will not succeed.
Letting the User Choose the Location
To allow a user to choose where to install your software, there are two requirements:
Select the Relocatable checkbox shown in Figure 1.
Place all your software directly within the
Package_contentsdirectory.
Important: To allow a user to choose where to install your software, you cannot put software into multiple locations, although you can specify a directory hierarchy in the package that can be installed, in its entirety, into an existing directory.
If you follow these two requirements, Installer will allow the user to choose where to install your software. Installer assembles paths based on the mountpoint of the selected volume, plus the location selected by the user, plus the paths in the structure in your Package_contents directory.
Note, however, that the user’s choice of location may be constrained in several other ways:
You can require that the installation be on the root volume (the one with the running system) with the Root Volume Only checkbox shown in Figure 1.
You can require that the user have root or administrator privileges with the Authorization Action pop-up menu shown in Figure 1. If the user does not have the required privileges and cannot authenticate to receive authorization, the installation is canceled.
Your package can include an InstallationCheck script that checks for various system requirements before allowing an installation to proceed.
Your package may include a VolumeCheck script that checks each volume and disallows installation on any volume that doesn’t meet your criteria.
Choosing the Location for a Metapackage
When you combine individual packages in a metapackage, the user will be able to choose a destination if any of the individual packages is relocatable. If this is the case, the user will be able to choose only one destination for all relocatable packages they install, not separate destinations for each relocatable package; installed packages that are not relocatable will not be relocated. Note, however, that prior to Mac OS X version 10.3.4, relocation did not work reliably for metapackages.
Create a Package With PackageMaker
When you launch PackageMaker, it automatically opens an untitled package editor window. You can also choose File > New > Single Package to open a new package editor window.
When you have filled in all the desired information, choose File > Create Package (or Command-K) to create an installation package for your software. For convenience, you may want to save the package in the same directory where you created your Package_contents and Install_resources directories.
If a package is lacking required information (for example, you forgot to specify the location of the software files to include in the package), PackageMaker displays a warning and will not create the package. On success, PackageMaker displays a message that the package was assembled without any problems. However, there may still be problems with the package—see “Test the Package” for more information.
You should also save the package definition file for your package. You can give it the same name as your package file and store it in the same directory. For example, you might have MyGreatSoftware.pkg and MyGreatSoftware.pmsp. Double-clicking the latter opens a package editor window for the former, where you can make changes and create an updated package.
Modify the Package for Special Processing
There are currently some installation features that are not available through the PackageMaker user interface. To take advantage of these features, you will have to directly modify files within the package. For information on these features, and on how to modify files in the package, see:
Test the Package
When you have successfully created an installation package, you’ll naturally want to test it by attempting to install the software. If PackageMaker did not report any errors, the package should be valid, but there may still be problems, or modifications you’ll want to make to the package.
Double-clicking a package launches Installer. If Installer detects an invalid package, it displays an error message and stops the installation. This is an early and useful aid in debugging a package.
Warning: When an installation is canceled during testing, Installer remains open with its current (invalid) state, so you should be sure to quit Installer before further testing. Otherwise, you can modify the package, test again, and see the same error because of the saved state.
In addition to the testing information in the following sections, see “Troubleshooting Packages and Installation.”
Viewing the Installer Log and Script Output
Another important testing aid is the Installer Log window, in which Installer displays a log of various operations it performs. Even if an installation appears to complete successfully, there may be information in the Installer Log window revealing possible errors (such as permissions problems). And even when Installer displays an error alert, information in the log window may elaborate on the alert.
To open the log window, choose File > Show Log. The Installer Log window has buttons for printing and saving its information. In addition, the log window displays output from the installation script files described in “Modifying an Installation With Scripts.”
Output for the InstallationCheck and VolumeCheck scripts (described in “Checking the Installation With InstallationCheck”“Checking the Installation Volume With VolumeCheck”) is directed to the Console window. The Console application is located in /Applications/Utilities.
Many of the previously mentioned scripts can halt execution by returning a non-zero value. When this happens, Installer will display an error message. However, you should again look for additional information in the appropriate places (the Installer Log window or Console window). In addition, if your scripts write progress or error information to a log file, you should check that file too.
Common Problems Found in Testing
Some of the common problems you may find when testing your package include the following:
The software wasn’t installed where you expected.
Installation halts with the message that a script or tool is not set executable and readable.
If you assemble a package with PackageMaker, it will automatically set correctly named scripts to be executable and readable. If you modify a package file directly, it’s your responsibility to ensure that the script file is both executable and readable.
Installation halts due to a permissions problem.
You may have specified an installation location for which the user doesn’t have sufficient permissions privileges, but you haven’t required Installer to request authorization. For more information, see “Authorization, File Ownership, and Permissions”
A requested action didn’t occur, such as a request for authorization, or a restart on completion of the installation.
Open the package definition file (
.pmsp) and verify that you did in fact specify the missing action. You can also examine the Installer Log and any script logs for clues as to what did actually happen.
© 2003, 2006 Apple Computer, Inc. All Rights Reserved. (Last updated: 2006-07-24)