Designing a User Interface
Interface Builder is Apple’s graphical editor for designing user interfaces. This tutorial shows how to use Interface Builder to design the user interface for a Cocoa application called Converter. After you’re finished, you will incorporate your design into a working application.
To help you troubleshoot problems as you follow the tutorial, this document includes the completed Converter project in a companion archive named XcodeQuickTour_companion.zip.
Note: If you’re interested in learning how to build applications with Cocoa, you should also read Cocoa Application Tutorial.
In this section:
Creating the Converter Interface
Implementing the Converter Application
Summary
Creating the Converter Interface
Converter is a simple application that converts temperatures from Fahrenheit degrees to Celsius degrees.
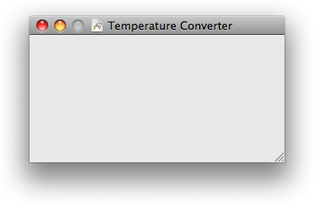
The user interface for Converter is displayed in a single window. Figure 3-1 shows what the application’s user interface looks like after you’ve completed this tutorial.

To convert a temperature, you enter a value in the “Fahrenheit degrees” text field and press Return or click the Convert button. Converter displays the result in the “Celsius degrees” text field, which is read-only. To quit the application, you can either click the Close button or press Command-Q.
Getting Started
When you use Interface Builder to design a user interface, your work is saved in a file with the .xib or .nib extension. (A file of either type is referred to as a nib file.) At runtime, an application uses the contents of this file to construct and display its user interface, typically inside a window.
Xcode provides a template project that you can use to create a project for the Converter application. This template includes a nib file that defines a default user interface.
To create the Converter project and open its nib file:
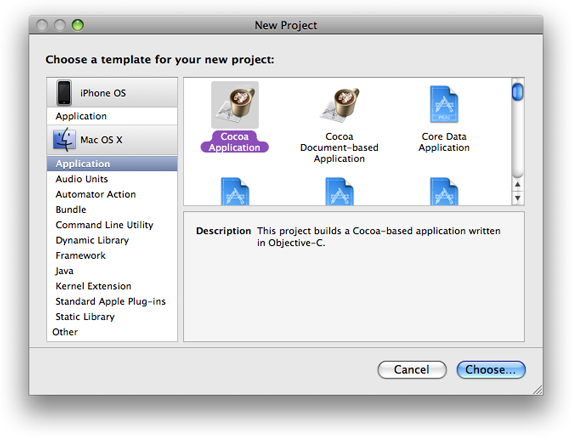
Launch Xcode and choose File > New Project (or press Command-Shift-N.) The New Project dialog appears.
Select the Cocoa Application template and click Choose.
Navigate to the location where you want Xcode to create the project folder.
Type
Converterin the Save As field and click Save. Xcode creates the project and opens the project window.In the Converter project window, select the Resources group.
In the project window’s detail view, locate and double-click the
MainMenu.xibfile.
As shown in Figure 3-2, Interface Builder launches and presents a set of windows.
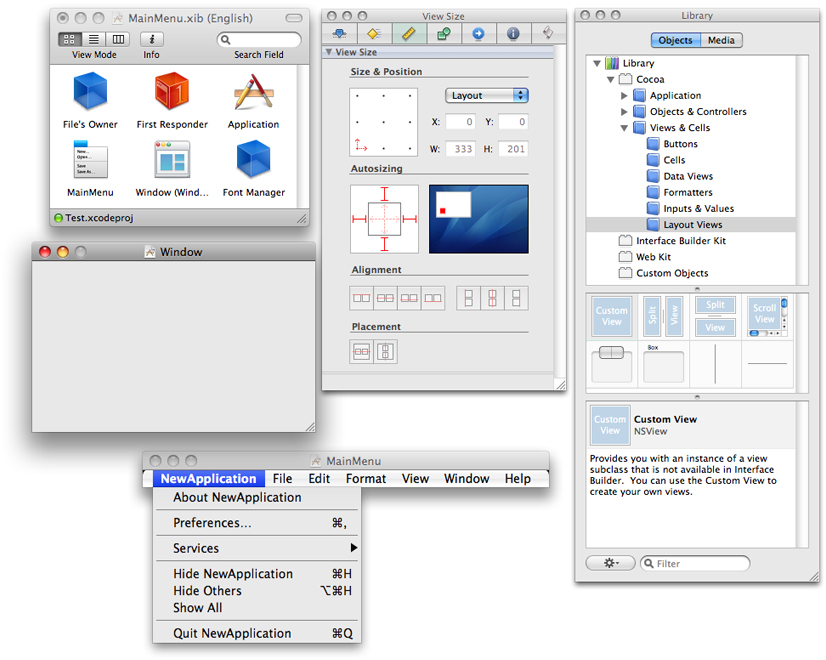
Here are brief descriptions of the windows in Figure 3-2.
MainMenu.xib represents the contents of the nib file. This window contains items titled MainMenu and Window that represent the application’s menu bar and main window.
Window is a visual representation of the main window. In it you place the controls that define the main window’s user interface.
MainMenu is a visual representation of the application’s menu bar. You use this window to customize the menu bar.
View Size is the size pane in the inspector window. You use the inspector to examine and change properties of any object in a nib file. The inspector window displays the properties of the currently selected object in multiple panes. The title of the inspector window changes based on the current context. To display this window, choose Tools > Inspector.
Library contains objects, including controls and menu items, which you drag into other windows in the nib file to create the application’s user interface. To display the library window, choose Tools > Library.
Setting the Window’s Attributes
To set the attributes for the Converter window:
Click in the title bar of the main window to select it.
Choose Tools > Attributes Inspector (or press Command-1.) Interface Builder displays the attributes pane in the inspector window.
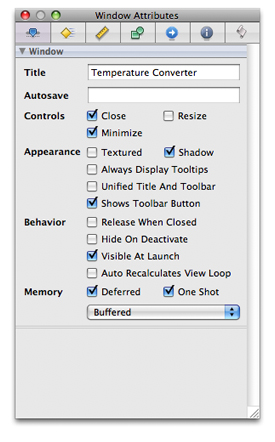
In the attributes pane, type
Temperature Converterin the Title field and press Return to make the change appear in the window.Deselect the Resize option—there’s no need to support the window resizing control here.
At this point, the window attributes should look like this:
Choose Tools > Size Inspector (or press Command-3.) Interface Builder displays the size pane in the inspector window.
In the Content Size & Position group, set the window’s width to 300 and its height to 150.
There are two ways to resize a window in Interface Builder—by direct manipulation, or by specifying the exact dimensions as you have done here. These dimensions are not exactly correct, but they’re a good first approximation. You set the exact dimensions later, after adding the window’s user interface elements.
Set the initial position of the Converter window.
The Apple Human Interface Guidelines says windows should open horizontally centered and positioned vertically so that the distance below the window is about two times the distance above the window. For now, simply drag the simulated window toward the center of the screen.
Your main window should now resemble this window:
The inspector window is used throughout this tutorial, so it makes sense to leave this window open.
Adding the Fahrenheit Control
To add the Fahrenheit control:
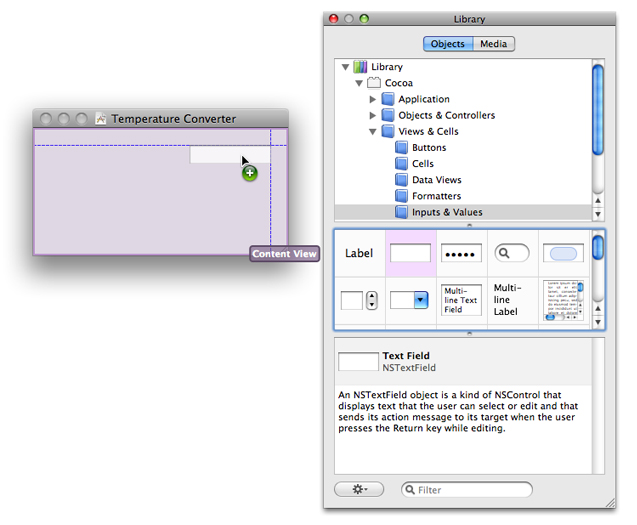
In the library window, be sure that Objects is selected in the control at the top.
In the top pane, navigate to Library > Cocoa > Views & Cells and select Inputs & Values.
You can view information about each control displayed in the middle pane by placing the pointer over it and clicking.
Drag an editable text field (NSTextField) from the palette to the main window.
Notice that Interface Builder helps you place objects according to the Aqua guidelines by displaying pop-up guides when an object is dragged close to the proper distance from neighboring objects or the edge of the window.
In the Converter window, select the editable text field and display the attributes inspector.
In the Title field, type
32and press Return to apply the value.This serves as the default Fahrenheit temperature.
With the text field still selected, click the right-justified alignment tab.
Display the size inspector and set the width to 92.
Back in the main window, adjust the position of the text field as needed.
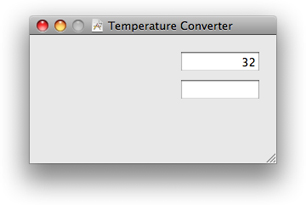
Adding the Celsius Control
Converter needs a second control to display the Celsius temperature, the same size as the first.
To duplicate the Fahrenheit control:
In the Converter window, select the editable text field.
Choose Edit > Duplicate (or press Command-D.)
Interface Builder adds a new text field, slightly offset from the original.
Position the new text field below the original.
Allow the guides to assist you by snapping the second field into place.
With the new field selected, display the attributes inspector and remove the title—a default Celsius temperature is not needed.
Deselect the Editable checkbox to make this a read-only control.
The Converter window should now resemble this window:
Adding Labels
Controls without labels would be confusing, so you’re going to add these labels now. Cocoa uses static text fields for this purpose.
Drag a label from the library window to the Converter window.
For now, you can place the label in the empty area below the temperature controls.
In the attributes inspector for the label, set the title to “Fahrenheit degrees:” and set the Alignment attribute to right-justified.
Use the size inspector to set the width of this label to 150.
Back in the Converter window, position the label to the left of the first editable text field.
Allow the guides to assist you by snapping it into place.
Make a duplicate label.
Set the title of this label to “Celsius degrees:” and position it to the left of the second editable text field.
The Converter window should now resemble this window:

Adding the Convert Button
The Converter application is designed to convert a Fahrenheit temperature to Celsius when the user presses Return or clicks the Convert button.
To add the Convert button:
Drag a push button from the library window (Cocoa > Views & Cells > Buttons) to the bottom-right portion of the Converter window.
With the button selected, use the attributes inspector to set the button’s title to Convert.
In the Key Equiv. section of the inspector, click the query box and press the return key to make this a default button.
In a user interface with a default button, pressing the return key simulates a button click.
With the button selected, use the size inspector to set the button width to 84.
Return to the main window, and align the button under the temperature fields.
In order to make an attractive user interface, you must be able to visually align interface objects in rows and columns. Estimating correct alignment manually can be very difficult, and typing in x-y coordinates by hand is tedious and time consuming. Aligning Aqua user interface elements is made even more difficult because the objects have shadows and UI guideline metrics don’t always take the shadows into account. Interface Builder uses visual guides to help you with object alignment.
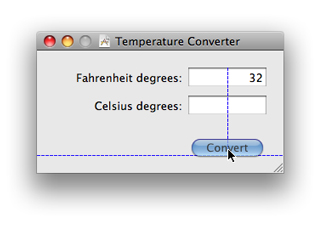
Drag the button downward until a horizontal Aqua guide appears.
This guide shows you that the button is the correct distance from the bottom of the window.
Drag the button to the left or right until a vertical Aqua guide appears.
This guide shows you that the button is centered with respect to the temperature fields.
This figure illustrates how to position the Convert button with the aid of Aqua guides.
Finishing the Window Layout
The Converter user interface is almost complete. The finishing touch is to align the controls with respect to the top-left corner of the window and then resize the window. You keep using the automated Aqua guides, along with a few layout commands.
Select all the controls in the main window, either by dragging a rectangle around them or by pressing Command-A.
Drag the group (using any control as a handle) toward the top-left corner of the window, using the Aqua guides to help you find the proper position relative to the window’s edges.
If necessary, move the button into position again under the temperature controls.
Locate the resize control at the bottom-right corner of the window. Drag the resize control inward, using the guides to give you the proper distance from the temperature fields (on the right) and the Convert button (on the bottom).
At this point, the main window should look like Figure 3-1.
Testing the Interface
The Converter interface is now complete. Interface Builder provides a simulator that lets you test your interface without having to write one line of code.
To test your interface:
Choose File > Save to save your work.
Choose File > Simulate Interface (or press Command-R) to run the simulator.
Note that the initial screen position you set in Interface Builder is used as the initial position for the Converter window in the simulator.
Enter a value in the Fahrenheit field, select the value, and cut and paste the value.
Make sure the Convert button is pulsating, indicating that it’s the window’s default button.
When you’re finished testing the interface, press Command-Q to quit the simulator.
Congratulations! With Interface Builder, you have designed the user interface for a useful Cocoa application.
Implementing the Converter Application
The purpose of this section is to show you how to implement the Converter application, using the interface you have just designed. Because this tutorial is not designed to teach you Cocoa programming, it doesn’t provide an explanation of what the code does.
Implementing the Model Class
Model objects contain special knowledge and expertise. They hold data and define the logic that manipulates that data. In the Converter application, the model class converts Fahrenheit degrees to Celsius degrees. Note that instances of a model class do not communicate directly with the user interface.
To create the two source files for the Converter model class:
In your Xcode project window, select the Classes group in the Groups & Files list.
Choose File > New File (or press Command-N.) The New File dialog appears.
In the list on the left, select the Mac OS X > Cocoa template.
In the list on the right, select Objective-C Class and click Next.
Name the file
Converter.mand make sure the checkbox “Also create Converter.h” is selected.Click Finish.
To add the source code that specifies the Converter class interface:
Open the source file
Converter.h.Add lines so that the code looks like that in Listing 3-1.
Listing 3-1 Converter.h
#import <Cocoa/Cocoa.h>
@interface Converter : NSObject {float fahrenheit;
}
@property(readwrite) float fahrenheit;
- (float) convertToCelsius;
@end
Save your changes to
Converter.h.
To add the source code that specifies the Converter class implementation:
Open the source file
Converter.m.Add lines so that the code looks like that in Listing 3-2.
Listing 3-2 Converter.m
#import "Converter.h"
@implementation Converter
@synthesize fahrenheit;
- (float) convertToCelsius {return (self.fahrenheit - 32.0) * 0.555556;
}
@end
Save your changes to
Converter.m.
Implementing the Controller Class
The primary purpose of the controller class is to communicate between the model class and the user interface you created earlier in this chapter. In Converter, the controller class is also a delegate for the application class.
To create the two source files for the controller class:
In your Xcode project window, select the Classes group in the Groups & Files list.
Choose File > New File (or press Command-N.) The New File dialog appears.
In the list on the left, select the Mac OS X > Cocoa template.
In the list on the right, select Objective-C Class and click Next.
Name the file
Controller.mand make sure the checkbox “Also create Controller.h” is selected.Click Finish.
To add the source code that specifies the Controller class interface:
Open the source file
Controller.h.Add lines so that the code looks like that in Listing 3-3.
Listing 3-3 Controller.h
#import <Cocoa/Cocoa.h>
@interface Controller : NSObject {IBOutlet NSTextField *fahrenheitField;
IBOutlet NSTextField *celsiusField;
}
- (IBAction)convert:(id)sender;
@end
Save your changes to
Controller.h.
To add the source code that specifies the Controller class implementation:
Open the source file
Controller.m.Add lines so that the code looks like that in Listing 3-4.
Listing 3-4 Controller.m
#import "Controller.h"
#import "Converter.h"
@implementation Controller
- (IBAction) convert:(id)sender
{Converter *converter = [[Converter alloc] init];
[converter setFahrenheit:[fahrenheitField floatValue]];
float celsius = [converter convertToCelsius];
[celsiusField setStringValue:[NSString stringWithFormat:@"%.2f", celsius]];
[fahrenheitField selectText:self];
[converter release];
}
- (BOOL) applicationShouldTerminateAfterLastWindowClosed:(NSApplication *)theApplication
{return YES;
}
@end
Save your changes to
Controller.m.
Adding a Controller to Your Nib File
In order to add connections between the controller and other objects in your design, you need to create an instance of the controller class in your nib file.
In Interface Builder, choose File > Open Recent to open the
MainMenu.xibfile in the Converter project.In the library window, select Cocoa > Objects & Controllers.
Drag an instance of
NSObjectinto theMainMenu.xibwindow.Select the new object and press Command-6 to open the identity inspector.
In the Class field, type
Controller.Save your changes to the nib file.
Adding the Controller Connections
Interface Builder not only helps you design your user interface, it makes it possible to connect the properties of the various objects in your design. Several objects in the Converter interface need to be connected to properties in the controller class.
To add the connections:
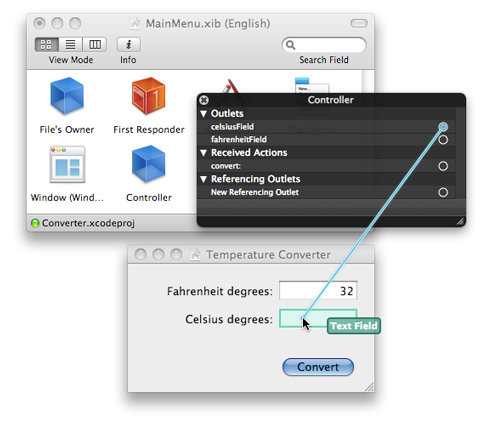
In the
MainMenu.xibwindow, Control-click the controller object. A connections panel appears.Drag from the circle to the right of the
celsiusFieldto the Celsius degrees field in the Temperature Converter window, as shown below.When you release the mouse, the connection is established and the circle is filled.
Using the same technique, add a connection from the
fahrenheitFieldoutlet to the Fahrenheit degrees field.Add a connection from the
convert:action to the Convert push button.Add a connection from New Referencing Outlet to the File’s Owner object. When you release the mouse, an outlet named
delegateappears. Select this outlet.Close the connections panel and save your changes to the nib file.
Inspecting the Controller Connections
With Interface Builder’s connections inspector, you can examine and verify the connections in a nib file.
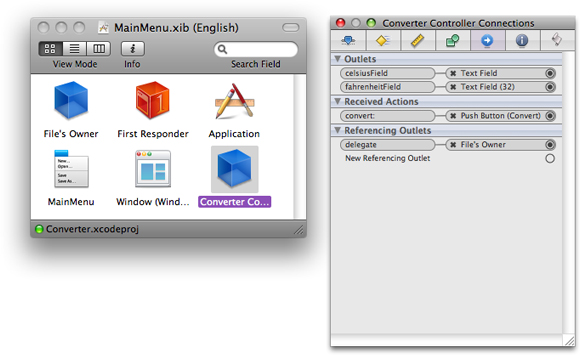
With the Controller object still selected, press Command-5 to display the connections inspector.
Verify that there are four connections: two outlets for the text fields, a received action for the Convert button, and an application delegate outlet. Figure 3-3 shows these connections in the inspector.
Now select the Convert button in the main window.
The connections inspector shows a sent action for the Controller object. This action represents the other end of the received action shown in Figure 3-3. The two text fields and the File’s Owner object have similar complementary connections.
Building and Running the Application
To build and run the Converter application:
In the Xcode project window, click the Build toolbar item (or press Command-B.)
The status bar at the bottom of the project window indicates the status of the build. When Xcode finishes—and encounters no errors along the way—it displays “Build succeeded” in the status bar. If there are errors, however, you need to correct them and start the build process again.
Click the Build and Go toolbar item (or press Command-Return.)
After the Converter application launches, enter the Fahrenheit degrees you wish to convert and click the Convert button. A value should appear in the Celsius degrees field.
Enter a different Fahrenheit value and press the Return key. This is equivalent to clicking the Convert button.
When you’re finished using the application, close the Converter window. Notice that the application quits.
What’s Next?
To make Converter a solid Mac OS X application, clearly there’s more work to be done. If you’re interested in Cocoa programming, here are a few ideas to improve and extend this application:
Edit the menu bar using Interface Builder. The default Cocoa application menu bar contains items that don’t apply here and should be removed.
Add range checking for the Fahrenheit temperature control. Absolute zero is around –459.6 degrees Fahrenheit.
Add conversion from Celsius to Fahrenheit.
Summary
The Converter tutorial showed you how to implement the user interface for a simple Cocoa application using Interface Builder. First, the tutorial described how to lay out a window’s user interface elements. Next, the tutorial demonstrated how to test an application’s user interface before implementing its logic. Then, the tutorial helped you make the necessary connections between user interface objects and class outlets and action methods. Finally, you built and ran the Converter application to verify that the user interface was constructed correctly.
© 2003, 2008 Apple Inc. All Rights Reserved. (Last updated: 2008-10-15)