Creating a Project
Every software product starts out as a project. A project is the repository for all the elements used to design and build your product—including source files, user interface specifications, sounds, images, and links to supporting frameworks and libraries.
Xcode is a great application for creating and managing projects. Xcode can be used to build a wide variety of software products, ranging from Carbon and Cocoa applications to kernel extensions, libraries, and Mac OS X frameworks.
This short tutorial shows how to create an Xcode project for a Cocoa application called Hello that prints “Hello, World!” inside a window. Along the way, you get a chance to explore some of the basic features of Xcode.
To help you troubleshoot problems as you follow the tutorial, this document includes the finalized Hello project in a companion archive named XcodeQuickTour_companion.zip.
In this section:
Creating an Xcode Project
The Project Window
Editing Project Files
Building the Application
Running the Application
Summary
Creating an Xcode Project
Xcode includes a set of built-in project templates configured for building specific types of software products. When creating a project, you can save time by starting with the appropriate template.
To create an Xcode project for the Hello application using a template:
Launch Xcode.
To launch Xcode, find it in the
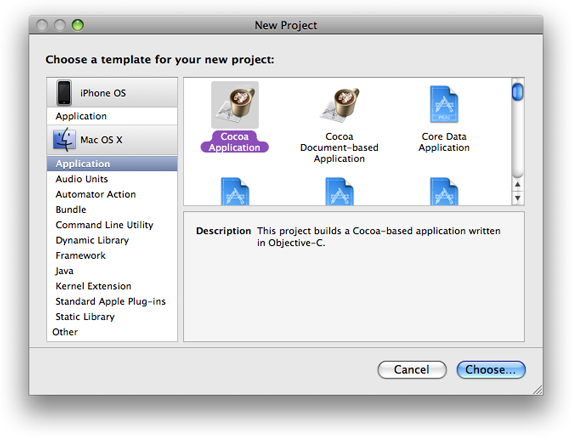
/Developer/Applicationsdirectory and double-click its icon (see Figure 1-1). If the Welcome to Xcode window opens, close it for now.Choose File > New Project. The New Project dialog appears.
If you’re curious, browse through the list of templates to see the variety of software products Xcode can build.
In the list on the left, select Mac OS X Application (as shown in Figure 1-2.)
Select the Cocoa Application template and click the Choose button.
Navigate to the location where you want the Xcode application to create the project folder.
Type
Helloin the Save As field.Click Save.
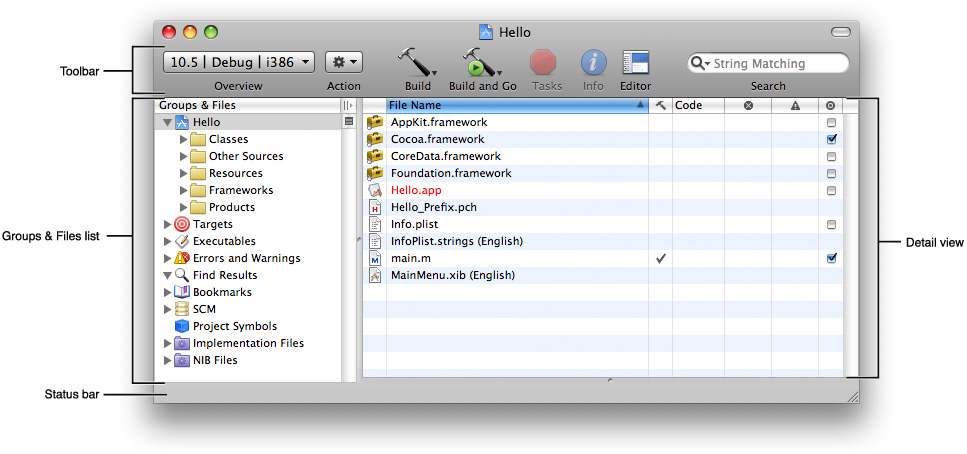
The Xcode application creates the project and displays the project window, as shown in Figure 1-3.
The Project Window
The project window is the control center for an Xcode project. This section briefly describes the components of the project window.
The Toolbar and Status Bar
The project window toolbar contains buttons and other controls you can use to perform common operations. Figure 1-4 shows the default toolbar.

The Overview drop-down menu selects target settings such as the active SDK, configuration, and architecture.
The Action drop-down menu displays actions you can perform on the currently selected item. You get the same menu when you Control-click an item.
Build buttons initiate actions such as building, cleaning, running, and debugging.
The Tasks button allows you to stop any operation in progress.
The Info button opens an Info window for inspecting and editing groups, files, and targets in your project.
The Editor button shows or hides the text editor in the project window.
The Search text field filters the items currently displayed in the detail view.
Located at the bottom of the project window is the status bar, which displays status messages for the project, such as whether a build is successful.
Groups & Files
The Xcode application uses various groups to organize the files and information in a project. These groups are visible in the Groups & Files list, shown in Figure 1-3. To see the contents of a group, select the group or click its disclosure triangle.
Groups are flexible—they don’t need to reflect the actual structure of the project directory or the way the build system views the files. Their purpose is to help you organize your project and quickly find project components and information. You can customize some of the default groups in the list and define groups of your own.
Groups with plain icons are static groups. The items in a static group stay put until you move them. Groups with gears or other fancy icons are dynamic groups, called smart groups, that show items with a particular characteristic. The items in a smart group can change as you perform various actions in your project.
Here are some of the basic groups:
The project group organizes all the components needed to build your product. This group is always listed first, and its name is the same as the project.
Inside the project group are subgroups that contain your project’s source files, resource files, frameworks, and products.
The Targets group contains all the build targets in your project. A build target is a blueprint for building a product from a set of specified files and libraries.
Errors and Warnings is a smart group that contains any error and warning messages generated during the most recent build.
To the right of the Groups & Files list is the detail view. The detail view is a flattened list of all the items that are currently selected in the Groups & Files list. You can quickly search and sort the items in the detail view, gaining rapid access to important information in your project.
Editing Project Files
This section shows how to modify the behavior of the application to print “Hello, World!” in its main window.
To implement this new behavior, you:
Create the
HelloViewclass as a subclass ofNSViewAdd a
HelloViewuser interface element to the Hello application windowUse the
drawRect:method of theHelloViewclass to draw the textual greeting
The following sections describe these tasks in detail.
Creating a Custom View Class
In Cocoa, all drawing is done in objects known as views. The basic functionality of a view is implemented by the NSView class. Subclasses of NSView, such as NSButton and NSTextView, add functionality tailored for specific user interface objects.
In the Groups & Files list of the Hello project window, select Classes.
Choose File > New File. The New File dialog appears.
If you’re curious, browse through the list of templates to see the variety of files Xcode can create for you.
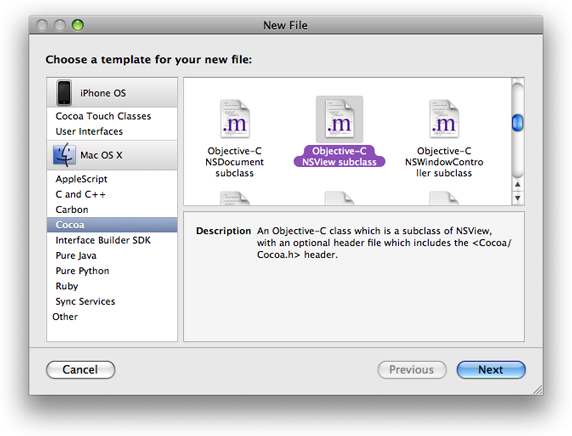
Select the Cocoa Objective-C
NSViewsubclass template, as shown in Figure 1-5, and click Next.Enter
HelloView.min the File Name field. Make sure the option “Also create HelloView.h” is checked.Click Finish. The Xcode application creates the source files and places them inside the Classes group in your project.
Using Interface Builder
Interface Builder is Apple’s graphical editor for designing user interfaces. Interface Builder makes it easy to design an interface that adheres to the Aqua layout guidelines and takes advantage of the newest Cocoa technologies.
To familiarize yourself with the task of creating user interfaces with Interface Builder, you’re going to add an instance of your HelloView class to the application window.
Open Interface Builder.
In the Groups & Files list in Xcode, select the project group and locate the file
MainMenu.xibin the detail view. For historical reasons, an Interface Builder document such asMainMenu.xibis called a nib file.Double-click this nib file to launch Interface Builder and open the Hello interface.
Find the main application window and change its title.
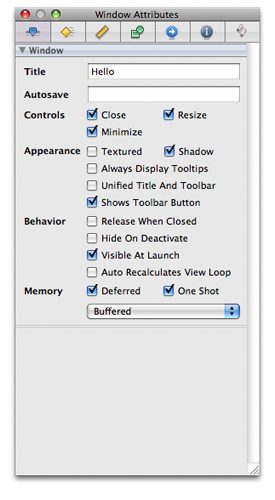
Interface Builder displays several windows. The main window is the one with “Window” in the title bar. Change the title of the main window as follows:
Click inside the Window title bar.
Choose Tools > Attributes Inspector. Figure 1-6 shows the window attributes pane in the inspector window.
Enter
Helloin the Title field and press Return.
Add a
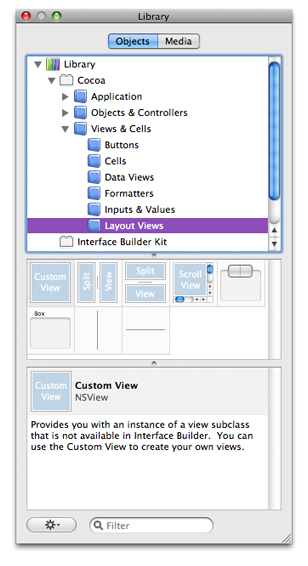
HelloViewelement to the Hello window.In Interface Builder, Choose Tools > Library to display the library palette. Select the Objects tab, and disclose Cocoa > Views & Cells. Then select Layout Views, as illustrated in Figure 1-7.
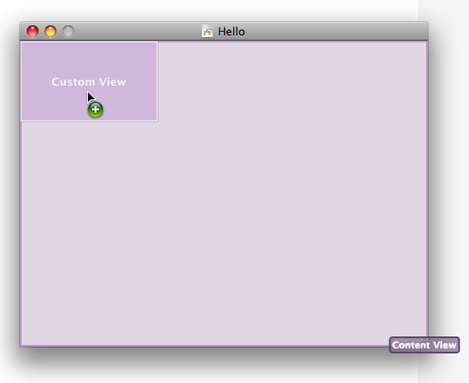
From the Layout Views pane, drag the Custom View element to the Hello window, as shown in Figure 1-8.
Resize the
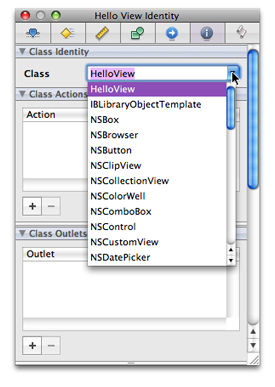
CustomViewelement so that it occupies the entire content area of the Hello window.Choose Tools > Identity Inspector.
Use the Class pop-up menu to select
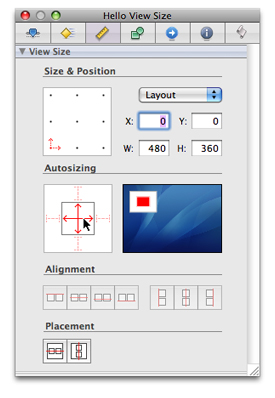
HelloViewin the Class list, as shown in Figure 1-9.Choose Tools > Size Inspector.
In the Autosizing area, click the vertical and horizontal lines in the inner square, as shown in Figure 1-10.
Save the nib file and quit Interface Builder.
Using the Text Editor
Xcode has a built-in text editor that supports multiple buffers and windows. For convenience, a source file can be edited in a separate editor window or directly inside the project window.
To edit the source code for the Hello project:
Open the Hello project window and select the Classes group.
Your two custom source files should be listed in the detail view.
Open
HelloView.min an editor by double-clicking it in the detail view.The file should look something like Listing 1-1.
Listing 1-1 Initial Implementation of the
HelloViewclass#import "HelloView.h"
@implementation HelloView
- (id)initWithFrame:(NSRect)frame {self = [super initWithFrame:frame];
if (self) {// Initialization code here.
}
return self;
}
- (void)drawRect:(NSRect)rect {// Drawing code here.
}
@end
Insert these code lines as the body of the
drawRect:method:NSString* hello = @"Hello, World!";
NSPoint point = NSMake
Position the cursor right after
NSMakeand press Escape. A pop-up menu appears.The menu contains the symbols Xcode knows about whose name start with
NSMake, as shown in Figure 1-11.This is an example of code completion. When Xcode underlines the text you’ve typed, it has compiled a list of symbols whose name starts with the letters you’ve typed so far. You can continue typing or press Escape to view this list.
Complete the
pointassignment expression:Choose
NSPoint NSMakePoint(CGFloat x, CGFloat y)from the code-completion pop-up menu.Replace
CGFloat xwith15.Replace
CGFloat ywith75.Add a semicolon (
;) to the end of the code line.
Finish entering the implementation of
drawRect:, shown in Listing 1-2.Listing 1-2 Implementation of the
drawRect:method- (void) drawRect:(NSRect) rect
{NSString* hello = @"Hello, World!";
NSPoint point = NSMakePoint(15, 75);
NSMutableDictionary* font_attributes = [NSMutableDictionary new];
NSFont* font = [NSFont fontWithName:@"Futura-MediumItalic" size:42];
[font_attributes setObject:font forKey:NSFontAttributeName];
[hello drawAtPoint:point withAttributes:font_attributes];
[font_attributes release];
}
Save your changes by choosing File > Save.

Building the Application
When you initiate a build, Xcode begins a process that starts with the source files in your project directory and ends with a complete product. Along the way, Xcode performs various tasks such as compiling source files, linking object files, copying resource files, and so forth.
To build the Hello application:
Choose Project > Set Active Build Configuration > Debug.
From the Build menu, choose Build, or click the Build button in the project window’s toolbar.
After Xcode finishes building the product (and if it doesn’t encounter any errors along the way), it displays “Build succeeded” in the project window’s status bar, as shown in Figure 1-12. See “Compile-Time Errors” for details on handling build errors.

One of the build tasks is to copy nib files, sounds, images, and other resources from the project to the appropriate places inside the application bundle. An application bundle is a directory that contains the application executable and the resources needed by that executable. This directory appears in the Finder as a single file that can be double-clicked to launch the application.
The build system in Xcode handles the complex process of creating a finished product based on build settings and rules specified in each of the project’s targets. A target represents a single product, and Xcode supports multiple targets in a project.
Each target can specify one or more sets of build setting specifications, called build configurations. Targets are preconfigured with two build configurations, Debug and Release. The Debug build configuration specifies build settings that generate products containing information that is useful during development, such as debug symbols. The Release build configuration specifies build settings appropriate for products that are ready for regular use.
To see your application’s current build configuration:
In the Groups & Files pane of the project window, select the Hello target and choose File > Get Info.
In the window that appears, select the Build tab, as shown in Figure 1-13. This figure shows some of the build settings defined in the Debug build configuration of the Hello target.
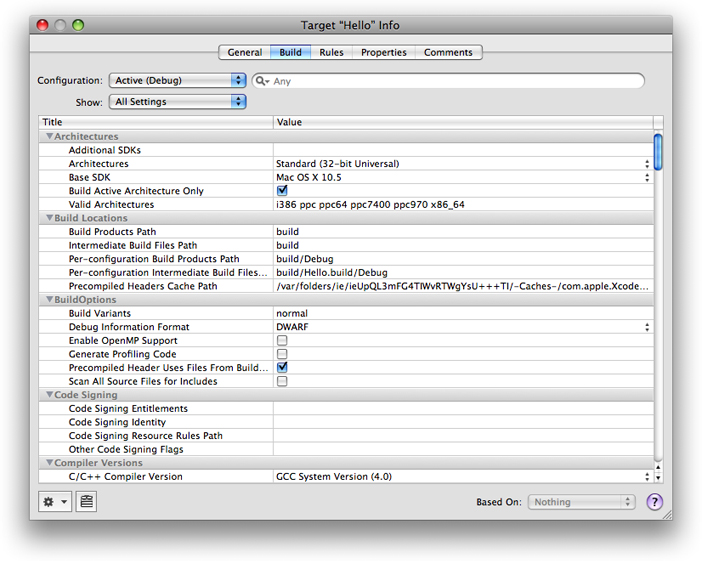
For more information on build configurations, see Xcode Build System Guide.
Running the Application
Now you have an application that’s ready to run. Xcode places the application bundle in a location specified in your project’s settings—in this case, inside your project folder. (See, within your project’s build folder, a folder named Release.)
To verify that the application runs:
Choose Run > Go (Run), or click the Build and Go button in the project window’s toolbar.
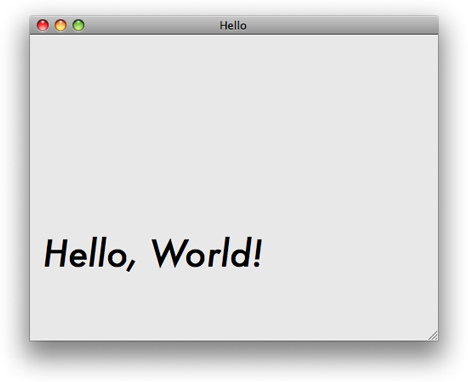
Verify that the application opens a window, displays “Hello,World!” and waits for user interaction.
Close the window by clicking the window’s close button or typing Command-W.
Type Command-Q to quit.
You may also run the application from the Finder by opening the Release folder in the project’s build directory, and double-clicking Hello.
Compile-Time Errors
Projects are rarely flawless from the start. By introducing a mistake into the source code for the Hello project, you can discover the error-checking features in Xcode.
To see how error checking works:
Open
HelloView.min either the project window or a separate editor window.Remove the semicolon from the
pointdefinition code line, creating a syntax error.Choose File > Save to save the modified file.
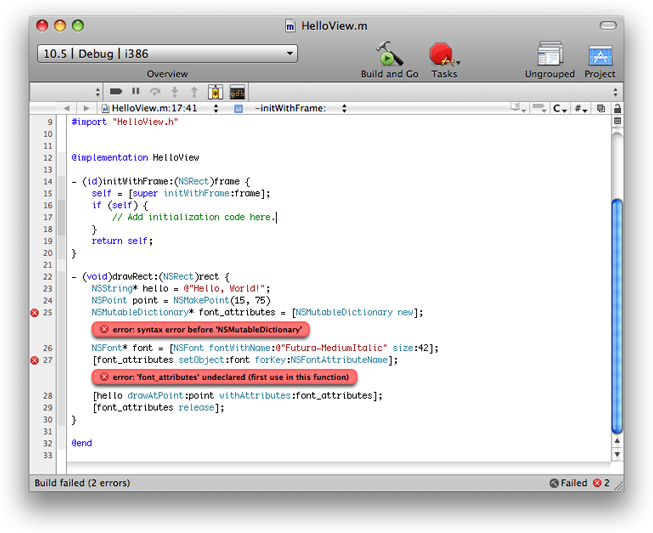
Choose Build > Build. As expected, this time the build fails.
The error and warning messages are displayed inline in the editor window, as shown in Figure 1-15.
Fix the error in the source file, save, and build again. Notice that the error messages from the previous build have been cleared.
Runtime Debugging
Xcode provides a graphical user interface for GDB, the GNU source-level debugger. Debugging is an advanced programming topic that’s beyond the scope of this tutorial, but it’s useful to try out the debug command to see how it works. Before you can debug the Hello application, you need to set Debug as the active build configuration. Choose Project > Set Active Build Configuration > Debug.
To set a breakpoint and step through a block of code:
Open the
HelloView.mfile. As before, you can open the file inside the project window or in a separate editor window.Find the line that defines the
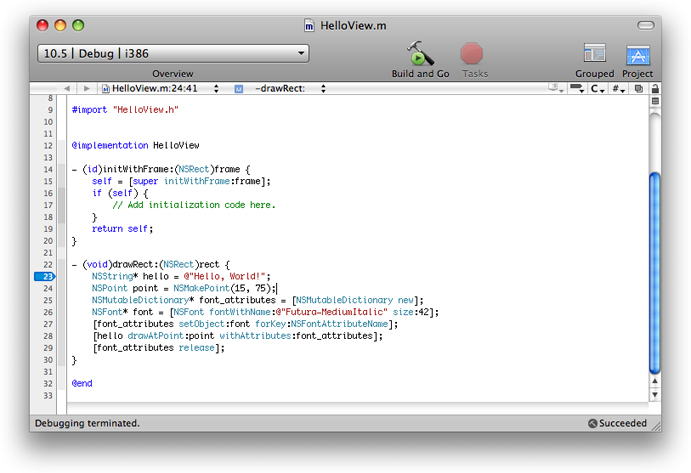
hellovariable.Set a breakpoint by clicking in the column to the left of the code line, as shown in Figure 1-16.
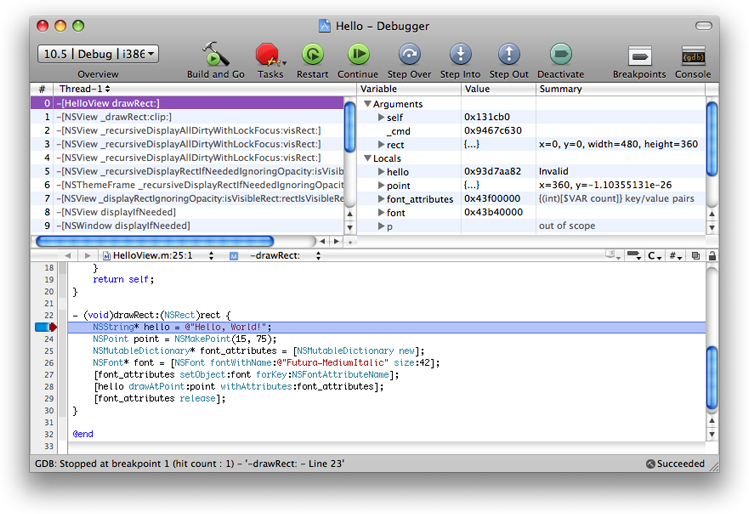
Choose Run > Debugger. Xcode opens the debugger window. Click the Build and Go button, and Xcode runs the application in debug mode, pausing at the breakpoint you set (see Figure 1-17).
Using the Step Over button in the Debugger window’s toolbar, begin stepping through the code. As each line of code executes, you can examine the program’s state. The value of a variable is sometimes drawn in red to indicate that the value was modified in the last step.
Notice that the debugger pauses before executing the indicated line. After each pause, you can add additional breakpoints or use the Debug > Restart command to terminate the application and start a new debug session.
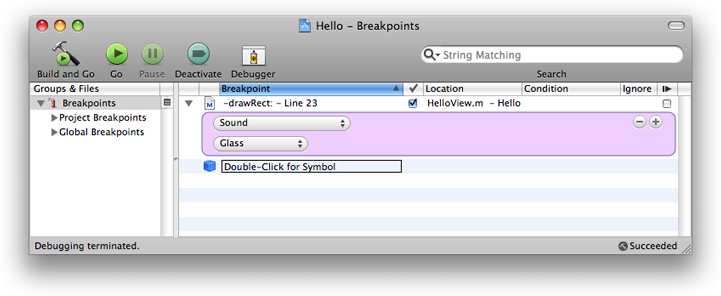
Normally, Xcode just stops the execution of the program when it encounters a breakpoint. By specifying breakpoint actions, you make Xcode perform other actions, such as logging output to the console.
To add a breakpoint action to the breakpoint you added earlier:
Choose Run > Show > Breakpoints. Xcode displays the Breakpoints window.
In the detail view in the Breakpoints window, click the triangle to the left of the breakpoint you added earlier.
Click the “add” (+) button that appears below the breakpoint.
From the first pop-up menu that appears below the breakpoint, choose Sound.
From the second pop-up menu, choose your preferred breakpoint sound.
Figure 1-18 shows a breakpoint action that plays the Glass sound when the breakpoint is reached.
Now, Xcode plays a sound—in addition to stopping the program—when execution reaches the breakpoint.
For more information on breakpoints, see Managing Program Execution in Xcode Debugging Guide.
Summary
This tutorial provided a brief introduction to the Xcode application. It showed how to use Xcode to manage projects, build products, enter source code using code completion, find and correct build errors, and debug an application using breakpoints and breakpoint actions.
© 2003, 2008 Apple Inc. All Rights Reserved. (Last updated: 2008-10-15)