Legacy Document
Important: The information in this document is obsolete and should not be used for new development.
Executable Environments
An executable environment defines how a product is run when you run it from Xcode. The executable environment tells Xcode which program to launch when you run or debug, as well as how to launch it. Xcode automatically creates an executable environment for each target that produces a product that can run on its own. However, you can create your own executable environments for testing products such as plug-ins or frameworks. You can also set up multiple custom executable environments for testing your program under varying sets of circumstances, or use a custom executable environment to debug a program you do not have the source to. This chapter describes how to view the executables in your project and how to configure an executable environment.
In this section:
Executable Environments in Xcode
Setting the Active Executable
Creating a Custom Executable Environment
Editing Executable Settings
Running a Development Product
The Run Log
Executable Environments in Xcode
The executable environment defines:
What executable file is launched.
Command-line arguments to pass to the program upon launch
Environment variables to set before launching the program.
Debugging options that tell Xcode which debugger to use and how to run the program under the debugger.
Generally, you do not have to worry about executable environments. If you are creating a target that produces a product that can be run by itself—such as an application—Xcode automatically knows to use the application when you run or debug the target.
However, if you have a product that can’t be run by itself—such as a plug-in for a third party application—you need to create your own custom executable environment. This custom executable environment specifies the program to launch when you run or debug, such as the third-party application that uses your plug-in.
Even if your target creates a product that can run on its own, you may also wish to customize the executable environment associated with it, in order to pass different arguments to the executable or test it with different environment variables.
Executable environments defined for a project are organized
in the Executables group in the Groups & Files list of the project
window. To see these executables, select that group in the Groups
& Files list or click the disclosure triangle next to the group.
Executable environments that you define are stored in your project’s
user file—that is, in the .pbxuser file in
the project bundle. As a result, each developer working on a project
needs to define their own executable environments. When you run
or debug in Xcode, Xcode launches the program specified by the active
executable, as described in the next section.
Setting the Active Executable
The active executable is the executable environment that Xcode uses when you click Run or Debug (or choose one of the corresponding menu items). Xcode tries to keep the active target and the active executable in sync; if you set the active target to a target that builds an executable, Xcode makes that executable active. Otherwise, the active executable is unchanged. If you use a custom executable environment to test your product, you have to make sure that the active executable is correct for the target you want to build and run or debug.
The active executable is indicated by the blue (selected) button in the detail view. To change the active executable yourself, you can:
Select the executable in the detail view. Click the radio button next to the executable to select it.
Choose the executable from the Active Executable pop-up menu. By default, this menu appears in the toolbar of the Build Results window, but not in the project window toolbar. To add this menu, choose View > Customize Toolbar and drag the menu to the toolbar.
Creating a Custom Executable Environment
Many targets create a product that can be run by itself, such as an application or command-line tool. When you create such a target, Xcode adds an entry to your project’s executable list that points to the target’s product, and it knows to use that executable environment when you run or debug the target.
Sometimes, though, you have a product that can’t run by itself, such as a plug-in or a framework. Even if your product can run by itself, you may want to run the product under different conditions to test it. For example, you may want to test a command-line tool by passing it different flags. Or you may have an application that performs differently depending on the value of an environment variable.
In these cases, you need to create a custom executable environment. You may have several executable environments for exercising the product of a single target. For example, you could have several applications that test different aspects of a framework. Or you could have several lists of command-line arguments and environment variables that test different aspects of a command-line tool.
To create a custom executable, choose Project > New Custom Executable. Xcode displays an assistant in which you can specify:
Executable Name is the name used to identify the executable environment in Xcode.
Executable Path is the path to the executable to launch.
The Add To Project menu lets you choose which of the currently open projects to add the custom executable to.
When you click Finish, Xcode adds the new executable environment to the project. You can change the program that Xcode launches when using this executable environment—along with other executable settings—in the inspector, as described in “Editing Executable Settings.”
Editing Executable Settings
Executable environments contain a number of settings that give you control over how your product is run when you launch it from Xcode. To configure an executable, select it in the Groups & Files list or in the detail view and open an inspector or Info window. The executable inspector contains the following panes:
The General pane lets you view and edit basic information about the executable environment, such as the executable to use, the working directory, and so forth.
The Arguments pane lets you specify arguments to pass to the executable on launch, as well as any environment variables for Xcode to set before launching the executable.
The Debugging pane lets you specify which debugger to use when debugging the executable, as well as a number of other debugging options. The options in this pane are described in “Configuring Your Executable for Debugging.”
The Comments pane lets you add notes or other arbitrary text to associate with the executable.
General Settings
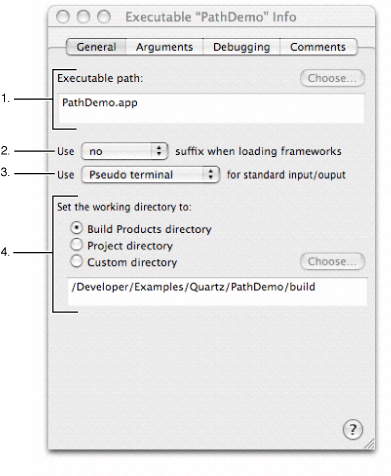
The General pane, shown here, lets you edit basic information about an executable environment.
The General pane contains the following:
The “Executable path” field shows the name and location of the executable that Xcode launches when you run or debug. When you create a custom executable environment, you specify the executable to run when that executable environment is active. However, you can change the executable associated with an executable environment at any time. To specify a different executable, either type the path to the new executable directly in the text field or click the Choose button and navigate to the executable in the dialog.
The first pop-up menu from the top lets you control which framework variant is used when loading frameworks used by the executable. Xcode tells the dynamic linker to look for frameworks with the suffix specified in this pop-up menu. This lets you test with debug versions of many system frameworks.
The second pop-up menu from the top specifies the device used for standard input and output when running the executable.
The options under “Set the working directory to” let you specify the working directory used when running the executable. By default, Xcode uses the Build Products directory, which is set for the current project, as described in “Build Locations.”
Setting Command-Line Arguments and Environment Variables
If you have a command-line tool that takes certain arguments, you can assign those arguments to the executable environment you run the tool with and Xcode will pass those arguments to your tool when you run or debug. To test your command-line tool under different conditions, you can create multiple executable environments, each with different arguments. Changing your test environment becomes as simple as changing the active executable.
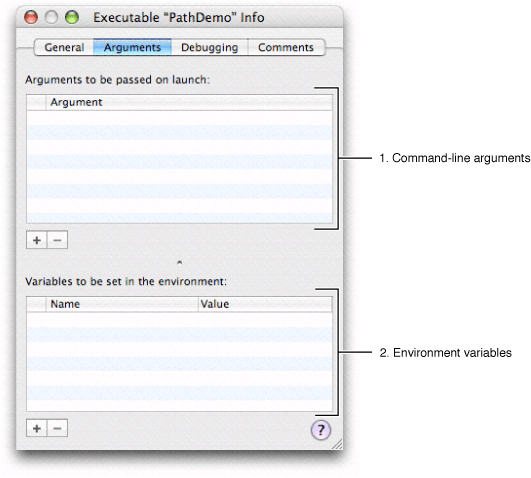
The Arguments pane of the inspector and Info window for an executable lets you specify arguments to pass to the executable, as well as environment variables that Xcode sets before launching the executable. Figure 31-2 shows the Arguments pane of the executable environment Info window.
The Arguments pane of the inspector window includes:
A table titled “Arguments to be passed on launch.” This table contains a list of command-line arguments that Xcode passes to the executable on launch. The arguments table contains two columns: the Argument column contains the argument and the Active column contains a checkbox that enables or disables the use of that argument.
To add a new argument, click the plus-sign button. Xcode adds an empty entry to the table.
To edit an argument line, double-click in the Argument column and type the argument. To disable or enable the argument, use the Active checkbox; when this checkbox is selected, Xcode passes the given argument to the executable when it is launched. To reorder the arguments list, drag the argument line to its new location in the list.
To remove an argument, single-click to select that argument in the table and click the minus-sign button.
The table titled “Variables to be set in environment” specifies environment variables that Xcode sets before it launches the executable. These environment variables are available to your program when it’s running. They can be accessed with such BSD system calls as
getenv.The environment variables table contains three columns: the Name column contains the variable name, the Value column contains the value of the environment variable, and the active column contains a checkbox indicating whether or not the given environment variable is used.
To add a new variable, click the plus-sign button. Xcode adds an empty entry to the table.
To edit a variable’s name, double-click in the Name column and type the name of the variable. To edit a variable’s value, double-click in the Value column and type the value of the variable. To disable or enable the variable, use the Active checkbox; when this checkbox is selected, Xcode sets the environment variable before launching the executable.
To remove a variable, select it and click the minus-sign button.
Running a Development Product
Once you have built a target’s product, you can test that product by running it from within Xcode. To build a development version of the selected target’s product and run it if the build succeeds, click the Build and Run button or choose Build > Build and Run. To run the active executable, click Run or choose Debug > Run Executable.
If the Build and Run button is not available, try the following:
Build the selected target.
Make sure the active executable is set correctly. See “Setting the Active Executable.”
The Run Log
Many programs print messages to stdout,
as well as logging debugging messages to the console or stderr.
When you run your program in Xcode—with the Run or Build and Run commands—you
can see this output in the Run Log window. In addition, if you are creating
a command-line program that takes input from stdin,
you can use the Run Log window to interact with your program. To
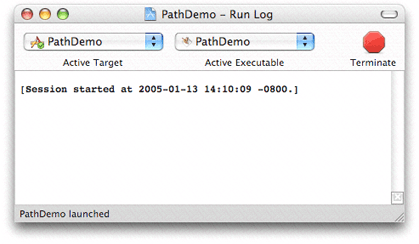
open the Run Log window, choose Debug > Run Log. Figure 31-3 shows
the Run Log window.
Note: When
you run your program in Xcode’s debugger, you must use the Standard I/O
window to communicate with your program on stdin.
You can view debugging output to the console or to stderr in
the Console Log window.
© 2004, 2006 Apple Computer, Inc. All Rights Reserved. (Last updated: 2006-11-07)


