QuickTime Interactivity
“Interaction can be defined as a cyclic process in which two actors alternately listen, think, and speak. ” ––Chris Crawford, computer scientist
This chapter introduces you to some of the key concepts that define QuickTime interactivity. If you are already familiar with QuickTime and its core architecture, you may want to skip this chapter and move on to “Chapter 2, QuickTime Sprites, Sprite Animation and Wired Movies,” which discusses the fundamentals of QuickTime sprites, with conceptual diagrams and illustrations, as well as an introduction to the basics of QuickTime wired movies. However, if you are new to QuickTime or need to refresh your knowledge of QuickTime interactivity, you should read this chapter.
Interactivity is at the core of the user experience with QuickTime. Users see, hear, and control the content and play of QuickTime movies. The process is indeed cyclic––using Crawford’s metaphor––in that the user can become an “actor” responding to the visual and aural content of a QuickTime movie. In so so doing, QuickTime enables content authors and developers to extend the storytelling possibilities of a movie for delivery on the Web, CD-ROM or DVD by making the user an active participant.
From its inception, one of the goals of QuickTime has been to enhance the quality and depth of this user experience by extending the software architecture to support new media types, such as sprites and sprite animation, wired (interactive) movies and virtual reality (QuickTime VR), which makes it possible for viewers to interact with virtual worlds. Interactive movies allow the user to do more than just play and pause a linear presentation, providing a variety of ways to directly manipulate the media.
If your development efforts are focused on programming with QuickTime VR, you should refer to the companion volume to this book, Interactive Movies: QuickTime VR, which is available at
http://developer.apple.com/documentation/Quicktime/QuickTime.html |
There are a number of ways in which developers can take advantage of these interactive capabilities in their applications, as explained in this and subsequent chapters.
The chapter is divided into the following major sections:
“QuickTime Basics” discusses key concepts that developers who are new to QuickTime need to understand. These concepts include movies, media data structures, components, image compression, and time.
“The QuickTime Architecture” discusses specific managers that are part of the QuickTime architecture: the Movie Toolbox and the Image Compression Manager. QuickTime also relies on the Component Manager, as well as a set of predefined components.
“QuickTime Player” describes the three different interfaces of the QuickTime Player application that are currently available as of QuickTime 5: one for Mac OX that features the Aqua interface, another for Mac OS 9, and another version for Windows computers.
“Sprites and Sprite Animation” describes sprites, a compact data structure that can contain a number of properties, including location on the desktop, rotation, scaling, and an image source. Sprites are ideal for animation.
“Wired Movies” discusses wired sprites, which are sprites that perform various actions in response to events, such as mouse down or mouse up. By wiring together sprites, you can create a wired movie with a high degree of user interactivity. Flash, a vector-based graphics and animation technology designed for the Internet, is also discussed in this section.
“QuickTime Media Skins” discusses how, in QuickTime 5, you can customize the appearance of the QuickTime Player application by adding a media skin to your movie.
“SMIL” discusses how you can import SMIL documents into QuickTime and play them using the QuickTime browser plug-in or QuickTime Player.
“QuickTime VR” describes QuickTime VR (QTVR), which simulates three-dimensional objects and places. The user can control QTVR panoramas and QTVR object movies by dragging various hot spots with the mouse.
QuickTime Basics
To develop applications that take advantage of QuickTime’s interactive capabilities, you should understand some concepts underlying the QuickTime architecture. These concepts include movies, media data structures, components, image compression, and time.
Movies and Media Data Structures
You can think of QuickTime as a set of functions and data structures that you can use in your application to control change-based data. In QuickTime, a set of dynamic media is referred to simply as a movie.
Originally, QuickTime was conceived as a way to bring movement to computer graphics and to let movies run on the desktop. But as QuickTime developed, it became clear that more than movies were involved. Elements that had been designed for static presentation could be organized along a time line, as dynamically changing information.
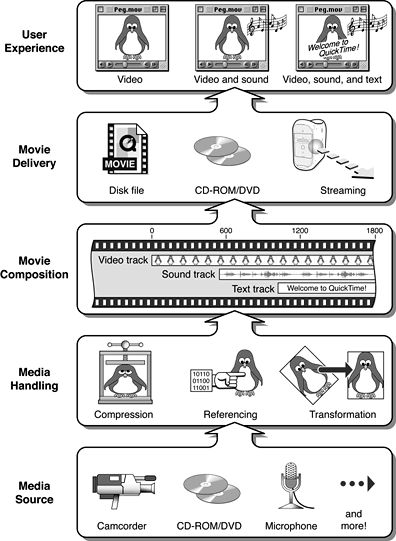
The concept of dynamic media includes not just movies but also animated drawings, music, sound sequences, virtual environments, and active data of all kinds. QuickTime became a generalized way to define time lines and organize information along them. Thus, the concept of the movie became a framework in which any sequence of media could be specified, displayed, and controlled. The movie-building process evolved into the five-layer model illustrated in Figure 1-1.
Movies––A Few Good Concepts
A QuickTime movie may contain several tracks. Each track refers to a single media data structure that contains references to the movie data, which may be stored as images or sound on hard disks, compact discs, or other devices.
Note: Your application never needs to work directly with the movie data, because Movie Toolbox functions allow you to manage movie content and characteristics. All the function calls in the Movie Toolbox are contained in the QuickTime API Reference, which is the definitive and most comprehensive reference source available of the API at http://developer.apple.com/documentation/Quicktime/QuickTime.html
Using QuickTime, any collection of dynamic media (audible, visual, or both) can be organized as a movie. By calling QuickTime, your code can create, display, edit, copy, and compress movies and movie data in most of the same ways that it currently manipulates text, sounds, and still-image graphics. While the details may get complicated, the top-level ideas are few and fairly simple:
Movies are bookkeeping structures. They contain all the information necessary to organize data in time, but they don’t contain the data itself.
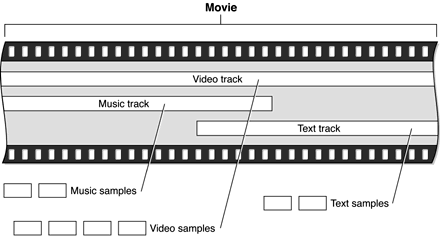
Movies are made up of tracks. Each track references and organizes a sequence of data of the same type—images, sounds, or whatever—in a time-ordered way.
Media structures (or just media) reference the actual data that are organized by tracks. Chunks of media data are called media samples.
A movie file typically contains a movie and its media, bundled together so you can download or transport everything together. But a movie may also access media outside its file—for example, sounds or images from a Web site.
The basic relations between movies, tracks, and media are diagrammed in Figure 1-2.
Figure 1-2 Movies, tracks, and media. Note that the material displayed by the tracks is contained in media structures that are located externally and organized by the movie.
Time Management
Time management in QuickTime is essential. You must understand time management in order to understand the QuickTime functions and data structures.
QuickTime movies organize media along the time dimension. To manage this dimension, QuickTime defines time coordinate systems that anchor movies and their media data structures to a common temporal reality, the second. Each time coordinate system establishes a time scale that provides the translation between real time and the apparent time in a movie. Time scales are marked in time units—so many per second. The time coordinate system also defines duration, which specifies the length of a movie or a media structure in terms of time units. A particular point in a movie can then be identified by the number of time units elapsed to that point. Each track in a movie contains a time offset and a duration, which determine when the track begins playing and for how long. Each media structure also has its own time scale, which determines the default time units for data samples of that media type.
The QuickTime Architecture
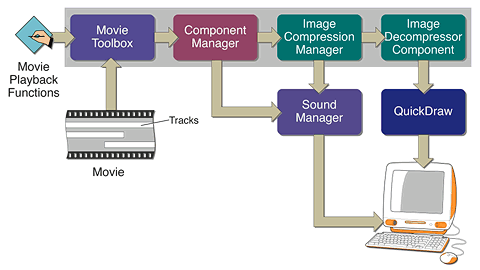
The QuickTime architecture is made up of specific managers: the Movie Toolbox, the Image Compression Manager and Image Decompressor Manager, as well as the Component Manager, in addition to a set of predefined components. Figure 1-3 shows the relationships of these managers and an application that is playing a movie.
The Movie Toolbox
An application gains access to the capabilities of QuickTime by calling functions in the Movie Toolbox. The Movie Toolbox allows you to store, retrieve, and manipulate time-based data that is stored in QuickTime movies. A single movie may contain several types of data. For example, a movie that contains video information might include both video data and the sound data that accompanies the video.
The Movie Toolbox also provides functions for editing movies. For example, there are editing functions for shortening a movie by removing portions of the video and sound tracks, and there are functions for extending it with the addition of new data from other QuickTime movies.
The Image Compression Manager
Image data requires a large amount of storage space. Storing a single 640-by-480 pixel image in 32-bit color can require as much as 1.2 MB. Similarly, sequences of images, like those that might be contained in a QuickTime movie, demand substantially more storage than single images. This is true even for sequences that consist of fairly small images, because the movie consists of a large number of those images. Consequently, minimizing the storage requirements for image data is an important consideration for any application that works with images or sequences of images.
The Image Compression Manager provides a device-independent and driver-independent means of compressing and decompressing images and sequences of images. It also contains a simple interface for implementing software and hardware image-compression algorithms. It provides system integration functions for storing compressed images as part of PICT files, and it offers the ability to automatically decompress compressed PICT files on any QuickTime-capable Macintosh computer.
In most cases, applications use the Image Compression Manager indirectly, by calling Movie Toolbox functions or by displaying a compressed picture. However, if your application compresses images or makes movies with compressed images, you will call Image Compression Manager functions.
QuickTime Components
QuickTime provides components so that every application doesn’t need to know about all possible types of audio, visual, and storage devices. A component is a code resource that is registered by the Component Manager. The component’s code can be available as a systemwide resource or in a resource that is local to a particular application.
Each QuickTime component supports a defined set of features and presents a specified functional interface to its client applications. Applications are thereby isolated from the details of implementing and managing a given technology. For example, you could create a component that supports a certain data encryption algorithm. Applications could then use your algorithm by connecting to your component through the Component Manager, rather than by implementing the algorithm again.
QuickTime provides a number of useful components for application developers. These components provide essential services to your application and to the managers that make up the QuickTime architecture. The following Apple-defined components are among those used by QuickTime:
movie controller components, which allow applications to play movies using a standard user interface
standard image-compression dialog components, which allow the user to specify the parameters for a compression operation by supplying a dialog box or a similar mechanism
image compressor components, which compress and decompress image data
sequence grabber components, which allow applications to preview and record video and sound data as QuickTime movies
video digitizer components, which allow applications to control video digitization by an external device
media data-exchange components, which allow applications to move various types of data in and out of a QuickTime movie
derived media handler components, which allow QuickTime to support new types of data in QuickTime movies
clock components, which provide timing services defined for QuickTime applications
preview components, which are used by the Movie Toolbox’s standard file preview functions to display and create visual previews for files
sequence grabber components, which allow applications to obtain digitized data from sources that are external to a Macintosh computer
sequence grabber channel components, which manipulate captured data for a sequence grabber component
sequence grabber panel components, which allow sequence grabber components to obtain configuration information from the user for a particular sequence grabber channel component
The Component Manager
Applications gain access to components by calling the Component Manager. The Component Manager allows you to define and register types of components and communicate with components using a standard interface. A component is a code resource that is registered by the Component Manager. The component’s code can be stored in a systemwide resource or in a resource that is local to a particular application.
Once an application has connected to a component, it calls that component directly. If you create your own component class, you define the function-level interface for the component type that you have defined, and all components of that type must support the interface and adhere to those definitions. In this manner, an application can freely choose among components of a given type with absolute confidence that each will work.
Atoms
QuickTime stores most of its data using specialized memory structures called atoms. Movies and their tracks are organized as atoms. Media and data samples are also converted to atoms before being stored in a movie file.
There are two kinds of atoms: classic atoms, which your code accesses by offsets, and QT atoms, for which QuickTime provides a full set of access tools. Atoms that contain only data, and not other atoms, are called leaf atoms. QT atoms can nest indefinitely, forming hierarchies that are easy to pass from one process to another. Also, QuickTime provides a powerful set of tools by which you can search and manipulate QT atoms. You can use these tools to search through QT atom hierarchies until you get to leaf atoms, then read the leaf atom’s data from its various fields.
Each atom has a type code that determines the kind of data stored in it. By storing data in typed atoms, QuickTime minimizes the number and complexity of the data structures that you need to deal with. It also helps your code ignore data that’s not of current interested when it interprets a data structure.
QuickTime Player
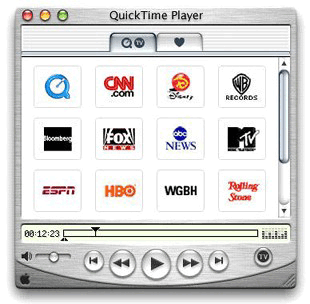
All user interaction begins with the QuickTime Player application. QuickTime Player can play movies, audio, MP3 music files, as well as a number of other file types from a hard disk or CD, over a LAN, or off the Internet, and it can play live Internet streams and Web multicasts––all without using a browser.
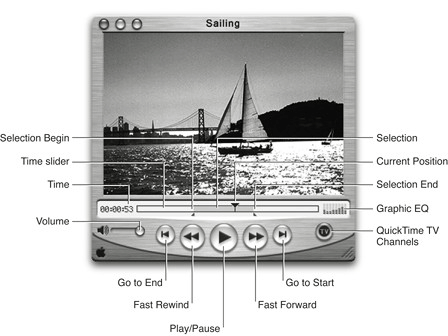
Figure 1-4 shows an illustration of the QuickTime Player application with various controls for editing and displaying movies.
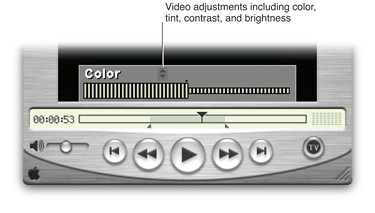
QuickTime Player also provides a set of video controls that enable users to adjust the color, tint, contrast, and brightness of video displayed, as shown in Figure 1-5.
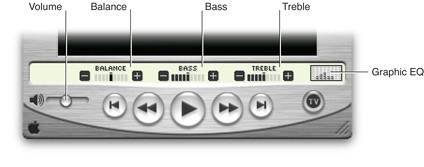
Audio controls are also available in QuickTime Player, as shown in Figure 1-6.
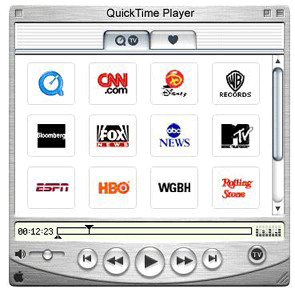
The QuickTime Player interface varies slightly based on the platform: one for QuickTime Player for Mac OS X features the Aqua interface, the Mac OS 9 version has a Platinum interface, and QuickTime Player for Windows shows the Windows menu bar attached to the Player window. Apart from these minor user interface differences, QuickTime Player behaves in a consistent manner with similar functionality across all platforms, however.
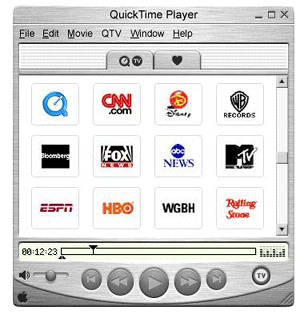
The Mac OS 9 version features the Platinum interface.
The Windows version is similar in appearance to the Mac OS 9 version, with the notable exception that the Windows menu bar is attached to the Player window. The standard Windows control and placement are included.
Sprites and Sprite Animation
To allow for greater interactivity in QuickTime movies, and to provide the basis for video animation, sprites were introduced in QuickTime 2.5. Each software release of QuickTime has included enhancements and feature additions to the fundamental building blocks of the original sprite architecture.
A sprite animation differs from traditional video animation. Using the metaphor of a sprite animation as a theatrical play, sprite tracks are the boundaries of the stage, a sprite world is the stage itself, and sprites are actors performing on that stage.
Each sprite has properties that describe its location and appearance at a given time. During the course of an animation, you modify a sprite’s properties to cause it to change its appearance and move around the set or stage. Each sprite has a corresponding image. During the animation, you can change a sprite’s image. For example, you can assign a series of images to a sprite in succession to perform cel-based animation. Sprites can also be mixed with still-image graphics to produce a wide variety of effects while using relatively little memory.
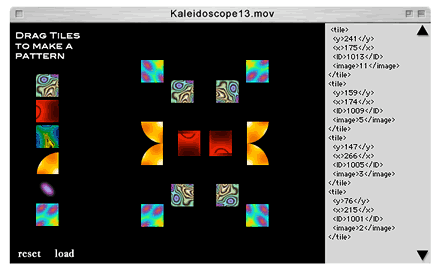
Figure 1-10 shows an example of a QuickTime movie, Kaleidoscope13.mov, that takes advantage of sprites, enabling the user to drag and arrange a set of tiles (sprites) into a pattern in the movie. The user can also add a script to display the image data and description of the sprites, recording the position and coordinates of the sprites; buttons (also sprites) allow the user to scroll up and down through the script.
Developers can use the sprite toolbox to add sprite-based animation to their application. The sprite toolbox, which is a set of data types and functions, handles all the tasks necessary to compose and modify sprites, their backgrounds and properties, in addition to transferring the results to the screen or to an alternate destination.
Creating Desktop Sprites
The process of creating sprites programmatically is straightforward enough, using the functions available in the sprite toolbox. After you have built a sprite world, you can create sprites within it. Listing 1-1 is a code snippet that shows you how to accomplish this, and is included here as an example. The complete sample code is available at
http://developer.apple.com/samplecode/Sample_Code/QuickTime.htm |
In this code snippet, you obtain image descriptions and image data for your sprite, based on any image data that has been compressed using the Image Compression Manager. You then create sprites and add them to your sprite world using the NewSprite function.
All the function calls related to sprites and sprite animation are discribed in the QuickTime API Reference available at
http://developer.apple.com/documentation/Quicktime/QuickTime.html |
// constants |
#define kNumSprites 4 |
#define kNumSpaceShipImages 24 |
#define kBackgroundPictID 158 |
#define kFirstSpaceShipPictID (kBackgroundPictID + 1) |
#define kSpaceShipWidth 106 |
#define kSpaceShipHeight 80 |
// global variables |
SpriteWorld gSpriteWorld = NULL; |
Sprite gSprites[kNumSprites]; |
Rect gDestRects[kNumSprites]; |
Point gDeltas[kNumSprites]; |
short gCurrentImages[kNumSprites]; |
Handle gCompressedPictures[kNumSpaceShipImages]; |
ImageDescriptionHandle gImageDescriptions[kNumSpaceShipImages]; |
void MyCreateSprites (void) |
{ |
long lIndex; |
Handle hCompressedData = NULL; |
PicHandle hpicImage; |
CGrafPtr pOldPort; |
GDHandle hghOldDevice; |
OSErr nErr; |
RGBColor rgbcKeyColor; |
SetRect(&gDestRects[0], 132, 132, 132 + kSpaceShipWidth, |
132 + kSpaceShipHeight); |
SetRect(&gDestRects[1], 50, 50, 50 + kSpaceShipWidth, |
50 + kSpaceShipHeight); |
SetRect(&gDestRects[2], 100, 100, 100 + kSpaceShipWidth, |
100 + kSpaceShipHeight); |
SetRect(&gDestRects[3], 130, 130, 130 + kSpaceShipWidth, |
130 + kSpaceShipHeight); |
gDeltas[0].h = -3; |
gDeltas[0].v = 0; |
gDeltas[1].h = -5; |
gDeltas[1].v = 3; |
gDeltas[2].h = 4; |
gDeltas[2].v = -6; |
gDeltas[3].h = 6; |
gDeltas[3].v = 4; |
gCurrentImages[0] = 0; |
gCurrentImages[1] = kNumSpaceShipImages / 4; |
gCurrentImages[2] = kNumSpaceShipImages / 2; |
gCurrentImages[3] = kNumSpaceShipImages * 4 / 3; |
rgbcKeyColor.red = rgbcKeyColor.green = rgbcKeyColor.blue = 0xFFFF; |
// recompress PICT images to make them transparent |
for (lIndex = 0; lIndex < kNumSpaceShipImages; lIndex++) |
{ |
hpicImage = (PicHandle)GetPicture(lIndex + |
kFirstSpaceShipPictID); |
DetachResource((Handle)hpicImage); |
MakePictTransparent(hpicImage, &rgbcKeyColor); |
ExtractCompressData(hpicImage, &gCompressedPictures[lIndex], |
&gImageDescriptions[lIndex]); |
HLock(gCompressedPictures[lIndex]); |
KillPicture(hpicImage); |
} |
// create the sprites for the sprite world |
for (lIndex = 0; lIndex < kNumSprites; lIndex++) { |
MatrixRecord matrix; |
SetIdentityMatrix(&matrix); |
matrix.matrix[2][0] = ((long)gDestRects[lIndex].left << 16); |
matrix.matrix[2][1] = ((long)gDestRects[lIndex].top << 16); |
nErr = NewSprite(&(gSprites[lIndex]), gSpriteWorld, |
gImageDescriptions[lIndex],* gCompressedPictures[lIndex], |
&matrix, TRUE, lIndex); |
} |
} |
The code in Listing 1-1, which enables you to create a set of sprites that populate a sprite world, explicitly follows these steps:
Some global arrays are initialized with position and image information for the sprites.
MyCreateSpritesiterates through all the sprite images, preparing each image for display. For each image,MyCreateSpritescalls the sample code functionMakePictTransparentfunction, which strips any surrounding background color from the image.MakePictTransparentdoes this by using the animation compressor to recompress the PICT images using a key color.Then
MyCreateSpritescallsExtractCompressData, which extracts the compressed data from the PICT image.Once the images have been prepared,
MyCreateSpritescallsNewSpriteto create each sprite in the sprite world.MyCreateSpritescreates each sprite in a different layer.
Sprites are a particularly useful media type because you can “wire” them to perform interactive or automated actions, discussed in the next section.
Wired Movies
A sprite is a compact data structure that contains properties such as location on the screen, rotation, scale, and an image source. A wired sprite is a sprite that takes action in response to events. By wiring together sprites, you can create a wired movie with a high degree of user interactivity––a movie that is responsive to user input.
When user input is translated into QuickTime events, actions may be performed in response to these events. Each action typically has a specific target, which is the element in a movie the action is performed on. Target types may include sprites, tracks, and even the movie itself. Actions also have a set of parameters that help describe how the target element is changed.
Typical wired actions—such as jumping to a particular time in a movie or setting a sprite’s image index—enable you to create a sprite that acts, for example, as a button. In response to a mouse down event, the wired sprite could change its own image index property, so that its button-pressed image is displayed. In response to a mouse up event, the sprite can change its image index property back to the button up image and, additionally, specify that the movie jump to a particular time.
Adding Actions
When you wire a sprite track, you add actions to it. Wired sprite tracks may be the only tracks in a movie, but they are commonly used in concert with other types of tracks. Actions associated with sprites in a sprite track, for example, can control the audio volume and balance of an audio track, or the graphics mode of a video track.
Wired sprite tracks may also be used to implement a graphical user interface for an application. Applications can find out when actions are executed, and respond however they wish. For example, a CD audio controller application could use an action sprite track to handle its graphics and user interface.
These wired sprite actions are not only provided by sprite tracks. In principle, you can “wire” any QuickTime media handler. In QuickTime, all of these may contain actions: QuickTime VR, text, and sprites.
You can add a high degree of interactivity by putting a sprite track in a movie and attaching actions to the sprites. The actions can be triggered by different kinds of events—mouse movements, button clicks, keystrokes, a frame loading in the movie, the passage of clock time, even events generated by other sprites.
Wired Actions
There are currently over 100 wired actions and operands available in QuickTime. They include
starting and stopping movies
jumping forward or backward to a point in the movie timeline
enabling and disabling tracks
controlling movie characteristics such as playback speed and audio volume
controlling track characteristics such as graphics mode and audio balance
changing VR settings such as field of view and pan angle
changing the appearance or behavior of other sprites
triggering sounds
triggering animations
performing calculations
sending messages to a Web server
printing a message in the browser’s status window
loading a URL in the browser, the QuickTime plug-in, or QuickTime Player
You can combine multiple actions to create complex behaviors that include IF-ELSE-THEN tests, loops, and branches.
For a complete description of all available wired actions, you should refer to the QuickTime API Reference available at
http://developer.apple.com/documentation/Quicktime/QuickTime.html |
User Events
When the user performs certain actions, QuickTime sends event messages to sprites and sprite tracks, using QuickTime’s atom architecture. You can attach handlers to sprites and sprite tracks to respond to these messages:
Mouse clickis sent to a sprite if the mouse button is pressed while the cursor is over the sprite.Mouse click endandmouse click end trigger buttonare both sent to the sprite that received the last mouse click event when the mouse button is released.Mouse enteris sent to a sprite when the cursor first moves into its image.Mouse exitis sent to the sprite that received the last mouse enter event when the curor is either no longer over the sprite’s image or enters another image that is in front of it.Idleis sent repeatedly to each sprite in a sprite track at an interval that you can set in increments of 1/60 second. You can also tell QuickTime to send no idle events or to send them as often as possible.Frame loadedis sent to the sprite track when the current sprite track frame is loaded and contains a handler for this event type. A typical response to the frame loaded event is to initialize the sprite track’s variables.
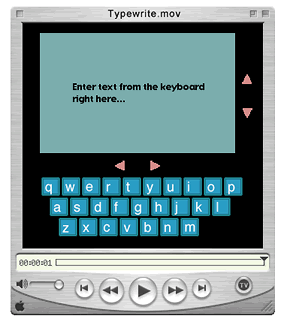
Typewrite.mov, shown in the illustration in Figure 1-11, is one example of a wired movie.
The Typewrite movie is a QuickTime movie that includes an entire keyboard that is comprised of wired sprites. By clicking one of the keys, you can trigger an event that is sent to the text track and is displayed as an alpha numeric character in the movie. You can also enter text directly from the computer keyboard, which is then instantly displayed as if you were typing in the movie itself. The text track, handling both script and live entry, can also be scrolled by clicking the arrows in the right or lower portions of the movie. Each key, when pressed, has a particular sound associated with it, adding another level of user interactivity.
Using Flash and QuickTime
Flash is a vector-based graphics and animation technology designed for the Internet that lets content authors and developers create a wide range of interactive vector animations. The files exported by this tool are called SWF (pronounced “swiff”), or .swffiles. SWF files are commonly played back using Macromedia’s ShockWave plug-in.
The Flash media handler, introduced in QuickTime 4, allows a Macromedia Flash SWF 3.0 or SWF 4.0 file to be treated as a track within a QuickTime movie. In doing so, QuickTime extends the SWF file format, enabling the execution of any of its wired actions.
A Flash track consists of a SWF file imported into a QuickTime movie. The Flash track runs in parallel to whatever QuickTime elements are availableg. Using a Flash track, you can hook up buttons and QuickTime wired actions to a movie. The Flash time line corresponds to the parallel time line of the movie in which it is playing.
Because a QuickTime movie may contain any number of tracks, multiple SWF tracks may be added to the same movie. The Flash media handler also provides support for an optimized case using the alpha channel graphics mode, which allows a Flash track to be composited cleanly over other tracks.
QuickTime 5 includes support for the interactive playback of SWF 4.0 files by extending the existing SWF importer and the Flash media handler. This support is compatible with SWF 3.0 files supported in QuickTime 4.x.
In QuickTime, you can also trigger actions in the Flash time line. A QuickTime wired action can make a button run its script in Flash. You can also get and set variables in the Flash movie (in Flash 4 these are text fields), as well as pass parameters. When you place Flash elements in front of QuickTime elements and set the Flash track to alpha, for example, all of Flash’s built-in alpha transparency is used to make overlaid, composited effects.
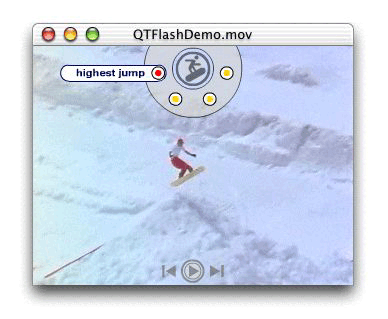
QTFlashDemo.mov, a screenshot of which is shown in Figure 1-12, uses a number of distinctive Flash interface elements. The movie itself includes an introductory animation, navigation linking to bookmarks in the movie, a semi-transparent control interface, and titles layered over the movie.
QuickTime Media Skins
Typically, QuickTime Player displays movies in a rectangular display area within a draggable window frame. The frame has a brushed-metal appearance and rounded control buttons. The exact controls vary depending on the movie’s controller type, with most movies having the standard Movie Controller.
If the movie’s controller is set to the None Controller, QuickTime Player displays the movie in a very narrow frame with no control buttons. This allows you to display a movie without controls, or to create your own controls using a Flash track or wired sprites.
In QuickTime 5, however, you can customize the appearance of QuickTime Player by adding a media skin to your movie. A media skin is specific to the content and is part of the movie (just another track, essentially). It defines the size and shape of the window in which the movie is displayed A media skin also specifies which part of the window is draggable. Your movie is not surrounded by a frame. No controls are displayed, except those that you may have embedded in the movie using Flash or wired sprites.
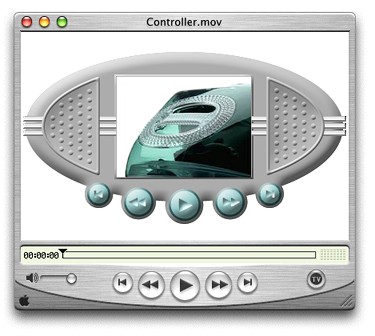
For example, suppose you’ve created a movie with a curved frame and wired sprite controls, as shown in Figure 1-13.
Now suppose you want to add a media skin that specifies a window the size and shape of your curved frame, and a draggable area that corresponds to the frame itself.
If the movie is then played in QuickTime, your movie appears in a curved window, as shown in Figure 1-14, with the areas that you have specified acting as a draggable frame, as if you had created a custom movie player application.
Figure 1-14 A skinned movie in QuickTime, which appears as if you had created a custom movie player application
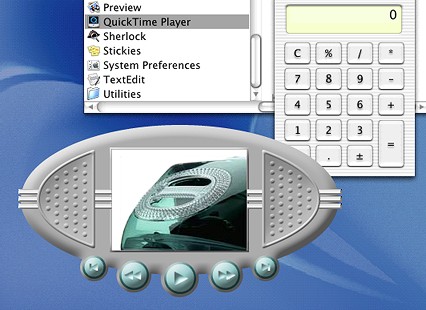
You don’t need to assign the None Controller to a movie with a media skin (although you can). If the Movie Controller is assigned to your movie, the controller’s keyboard equivalents operate when your window is active, even though the controller is not displayed. The space bar starts and stops a linear movie, for example, while the shift key zooms in on a VR panorama. You can disable this feature by assigning the None Controller.
Media skins have no effect when a movie is played by the QuickTime browser plug-in or other QuickTime-aware applications, such as Adobe Acrobat. However, developers can modify their applications to recognize movies that contain Media Skins, and to retrieve the shape information.
The process of customizing the appearance of QuickTime Player by adding a media skin to a movie is diagrammed in Figure 1-15. It involves these basic steps:
You add a media skin to your video movie by using the add-scaled command.
Create black-and-white images to define the window and drag areas (masks).
Create an XML text file containing references to your files.
Save the text file with a name ending in .mov.
Open the movie in QuickTime Player, then Save the movie as a Self-contained.mov.
The key element in a media skin movie is the XML file. This file contains references pointing at three specific sources: the content (that is, any media that QuickTime “understands,” such as JPEG images, .mov, or .swf files), the Window mask and the Drag mask. The XML file is read by the XML importer in QuickTime, and the movie is then created on the fly from the assembly instructions in the XML file. When that occurs, you have a “skinned” movie that behaves in the same way that any other QuickTime movie behaves. The subsequent step shown in Figure 1-15––Save the movie as a Self-contained.mov––takes all of the referred elements and puts them into a specific file. That step, however, is optional.
Note that the Framed.mov in the diagram can be a Flash movie, or any other QuickTime movie.
SMIL
SMIL stands for Synchronized Multimedia Integration Language and is a Web Consortium standard for describing multimedia presentations. A SMIL presentation is similar to a QuickTime movie in that it can display images, text, audio, and video and can position visual elements on the screen at specified locations. Media elements can also be sequenced and synchronized in time. SMIL presentations are defined by SMIL documents, which are text files that specify what media elements to present, and where and when to present them. Media elements in a SMIL document are specified by URLs. Media elements can be files—such as text files, JPEG images, and QuickTime movies—or live streams. The URLs that specify the media elements can use any of the common protocols: HTTP, FTP, RTSP, file access, and so on. You can import SMIL documents into QuickTime and play them using the QuickTime browser plug-in or QuickTime Player, provided that their individual media elements are all things that QuickTime can play. When you import a SMIL presentation into QuickTime, the SMIL media elements become QuickTime movie tracks, and the SMIL document describes how the tracks are arranged and overlaid in time and space.
QuickTime VR
QuickTime VR (QTVR) extends QuickTime’s interactive capabilities by creating an immersive user experience that simulates three-dimensional objects and places. In QuickTime VR, user interactivity is enhanced because you can control QTVR panoramas and QTVR object movies by clicking and dragging various hot spots with the mouse.
A QTVR panorama lets you stand in a virtual place and look around. It provides a full 360 panorama and in QuickTime, the ability to tilt up and down a full 180. The actual horizontal and vertical range, however, is determined by the panorama itself. To look left, right, up and down, you simply drag with the mouse across the panorama.
QTVR object movies, by contrast, allow you to “handle” an object, so you can see it from every angle. You can rotate it, tilt it, and turn it over.
A QTVR scene can include multiple, linked panoramas and objects.
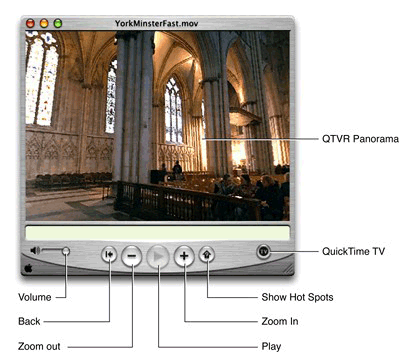
Figure 1-16 shows an illustration of a QuickTime VR panoramic movie in Mac OS X, with various controls to manipulate the panorama.
The QuickTime VR Media Type
QuickTime VR is a media type that lets users examine and explore photorealistic, three-dimensional virtual worlds. The result is sometimes called immersive imaging. Virtual reality information is typically stored as a panorama, made by stitching many images together so they surround the user’s viewpoint or surround an object that the user wants to examine. The panorama then becomes the media structure for a QuickTime movie track.
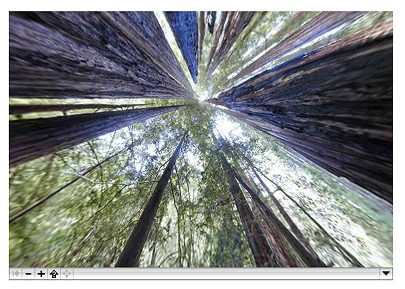
There are hundreds of ways that VR movies can transform the QuickTime experience, creating effects that are truly spectacular, such as a view to the sky from a forest, as illustrated in the cubic panorama in Figure 1-17.
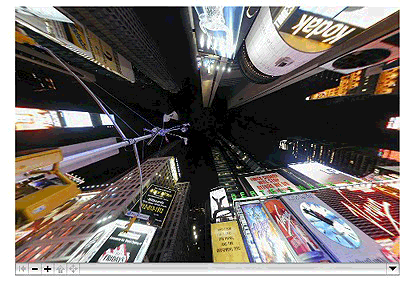
Figure 1-18 shows an illustration from a QuickTime VR panoramic movie, where you can look directly upward to the night sky from the ground level in Times Square in New York.
Using VR controls, you can move up and down 180 degrees and navigate freely around the surface edges of the nearby skyscrapers.
Creating QTVR Movies Programmatically
Users with very little experience can take advantage of applications such as QuickTime VR Authoring Studio to capture virtual reality panoramas from still or moving images and turn them into QuickTime VR movie tracks.
Alternatively, the software you write can make calls to the QuickTime VR Manager to create VR movies programmatically or to give your user virtual reality authoring capabilities. Once information is captured in the VR file format, your code can call QuickTime to
display movies of panoramas and VR objects
perform basic orientation, positioning, and animation control
intercept and override QuickTime VR’s mouse-tracking and default hot spot behaviors
combine flat or perspective overlays (such as image movies or 3D models) with VR movies
specify transition effects
control QuickTime VR’s memory usage
intercept calls to some QuickTime VR Manager functions and modify their behavior
The next chapters in this book discuss many of the ways that your code can take advantage of QuickTime, as well as the tools and techniques available to your application for enhanced user interactivity.
© 2003, 2002 Apple Computer, Inc. All Rights Reserved. (Last updated: 2002-10-01)
