QuickTime Sprites, Sprite Animation and Wired Movies
This chapter provides a general introduction to QuickTime sprites, sprite animation, and wired movies.
If you are a content author or tool developer, you’ll want to read this chapter to grasp the fundamentals of how sprites, the sprite toolbox, and wired movies work together in the QuickTime software architecture. The chapter provides a conceptual overview of this architecture, with each section laying down the fundamental building blocks.
Originally introduced in QuickTime 3, wired movies have enabled content authors and developers to push the envelope as far as creating interactive QuickTime movies. These interactive movies can be played in any Web browser using the QuickTime plug-in, and in all applications that use the QuickTime movie controller API. Each new software version of QuickTime, including the latest release of QuickTime 5.01, has been enhanced to take advantage of the capabilities provided by wired movies.
This chapter is divided into the following major sections:
“Sprite Animation and the Sprite Toolbox” introduces you to the fundamentals of sprite animation and the sprite toolbox.
“Wired Movies” introduces you to QuickTime events, actions, targets, parameters, expressions, operands, and operators.
Beyond this chapter, you’ll find a discussion of the sprite media handler in “Chapter 3, Sprite Media Handler,” which explains how you can use the media handler to add a sprite animation track to a QuickTime movie. In “Chapter 4, Authoring Wired Movies and Sprite Animations,” you’ll learn how you can author wired movies and sprite animations using the sprite media handler.
With this knowledge, you should be ready to tackle more difficult programming tasks, as discussed in “Chapter 7, Creating Advanced Interactive Movies,” That chapter describes a set of features that allow authors and tool developers to create more complex, advanced interactive movies. These features include the use of embedded movies, new wired actions and events, and new ways to communicate between a wired movie and JavaScript in a Web browser. The chapter also includes a section “Custom Wired Actions” that describes how custom action handler components may be written to perform new types of actions.
In this section:
Sprite Animation and the Sprite Toolbox
Wired Movies
Sprite Animation and the Sprite Toolbox
This section introduces you to the fundamentals of sprite animation and the sprite toolbox. Sprites were introducted in QuickTime 2.5 and have since been enhanced in later versions of QuickTime.
The section also discusses the ways in which sprite animation differs from traditional video animation. The metaphor of a sprite animation as a theatrical play is used, in which sprite tracks are characterized as the boundaries of the stage and a sprite world as the stage itself. To extend the metaphor, you may want to think of sprites as actors performing on that stage.
Each sprite has properties that describe its location and appearance at a given time. During an animation sequence, the application modifies the sprite’s properties to cause it to change its appearance and move around the screen. Sprites may be mixed with still-image graphics to produce a wide variety of effects while using relatively little memory.
You use the sprite toolbox to add sprite-based animation to your application. The sprite toolbox, which is a set of data types and functions, handles all the tasks necessary to compose and modify sprites, their backgrounds and properties, in addition to transferring the results to the screen or to an alternate destination.
Sprites and the Sprite Toolbox
This section introduces you to the terminology used to define sprites and describes the characteristics that govern the creation of sprite animation in an application.
If you’re writing an application that uses sprite animation outside of a QuickTime movie, you use the routines available to you in the sprite toolbox. If your application is designed to work with QuickTime movies, you can take advantage of the routines available to you in the sprite media handler. In “Chapter 3, Sprite Media Handler,” these routines and the sprite media handler are discussed in more detail.
The sprite toolbox is a set of data types and functions you can use to add sprite-based animation to an application. The sprite toolbox handles invalidating appropriate areas as sprite properties change, the composition of sprites and their background on an offscreen buffer, and the transfer of the result to the screen or to an alternate destination.
Sprite World Characteristics
A sprite world is a graphics world for a sprite animation. To create a sprite animation in an application, you must first create a sprite world. You do not need to create a sprite world to create a sprite track in a QuickTime movie.
Once you have created a sprite world, you create sprites associated with that sprite world. You can think of a sprite world as a stage on which your sprites perform. When you dispose of a sprite world, its associated sprites are disposed of as well.
For sprites in a sprite world, you modify a sprite’s properties by calling the SetSpriteProperty function, passing a constant to indicate which property you want to modify. SetSpriteProperty invalidates the appropriate portions of the sprite world, which are redrawn when SpriteWorldIdle is called.
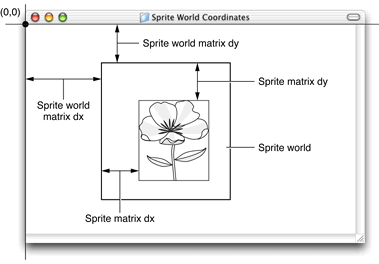
When you call SetSpriteProperty to modify a property of a sprite, SetSpriteProperty invalidates the appropriate regions of the sprite world. When your application calls SpriteWorldIdle, the sprite world redraws its invalid regions. A sprite world coordinate system is defined by translating the sprite’s display coordinate system by the sprite world’s matrix, as shown in Figure 2-1.
For sprites in a sprite world, you control a sprite’s image by setting the sprite’s kSpritePropertyImageDescription and kSpritePropertyImageDataPtr properties.
Sprite Tracks
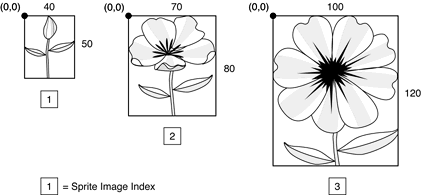
For sprites in a sprite track, all sprite images are stored in one of the sprite track’s key frame samples. This allows the sprites in the sprite track to share images. A sprite’s image index (kSpritePropertyImageIndex) specifies the sprite’s current image in the pool of available images. All images assigned to a sprite must share the same image description, unless you assign group IDs (kSpriteImagePropertyGroupID).
For sprites in a sprite track, you modify a sprite property by creating an override sample of the appropriate type.
Three sprite track properties, kSpriteTrackPropertyBackgroundColor, kSpriteTrackPropertyOffscreenBitDepth, and kSpriteTrackPropertySampleFormat, describe properties of a sprite track in a QuickTime movie.
In “Chapter 3, Sprite Media Handler,” these properties are discussed in more detail.
Sprite Animation
Sprite animation differs substantially from traditional video animation. With traditional video animation, you describe a frame by specifying the color of each pixel. By contrast, with sprite animation, you describe a frame by specifying which sprites appear at various locations. At a given moment a sprite displays a single image selected from a pool of images shared by all of the sprites.
You can think of a sprite animation as a theatrical play. In a QuickTime movie, the sprite track bounds are the stage; in an application, a sprite world is the stage. The background is the play’s set; the background may be a single solid color, an image, or a combination of images. The sprites are the actors in the play.
A sprite has properties that describe its location and appearance at a given point in time. During the course of an animation, you modify a sprite’s properties to cause it to change its appearance and move around the set or stage.
Each sprite has a corresponding image. During the animation, you can change a sprite’s image. For example, you can assign a series of images to a sprite in succession to perform cell-based animation.
Sprite Spatial Concepts
This section explains sprite spatial concepts, which you may need to understand in order to work with sprites both on the desktop (outside a QuickTime movie) and within QuickTime movies. These concepts include
matrix
local coordinate system
source box
bounding box
four corners
registration point
display space
Local Coordinate System
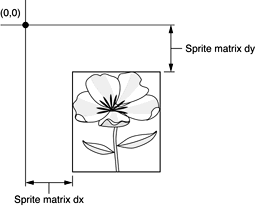
A local coordinate system is used to position a sprite within a sprite track or sprite world. The origin is the sprite track’s upper-left corner.
For example, if a sprite’s matrix contains a horizontal translation of 50 and a vertical translation of 25, the sprite is positioned such that its left side is located 50 pixels to the right of the sprite track’s left side, and its top is 25 pixels down from the top of the sprite track or sprite world.
Figure 2-2 shows the local coordinate system of a sprite track.
Source Box
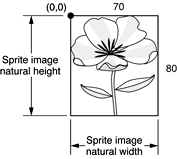
A sprite’s source box, as shown in Figure 2-3, is defined as a rectangle with a top-left point of (0, 0), and its width and height set to the width and height of the sprite’s current image.
Bounding Box
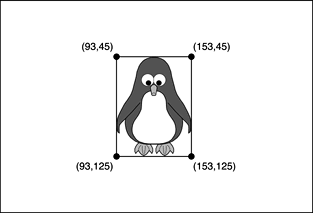
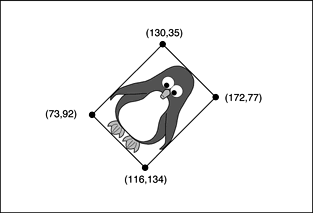
The bounding box of a sprite, shown in Figure 2-4, is the smallest rectangle that encloses the sprite’s area after its matrix is applied. If a sprite is only translated, its bounding box will have the same dimensions as its source box. However, if the sprite is rotated 45 degrees, the bounding box may be larger than its source box.
Four Corners
Some sprite actions and operands refer to a sprite’s four corners. These four corners are expressed in its track’s local coordinate system. They are the points derived by taking the four corners of the sprite’s source box and applying the current image’s registration point and the sprite’s source matrix.
The first corner is the top-left, the second corner is the top-right, the third corner is the bottom right, and the fourth corner is the bottom-left.
Figure 2-5 shows a rotated bounding box in a sprite track’s local coordinate system.
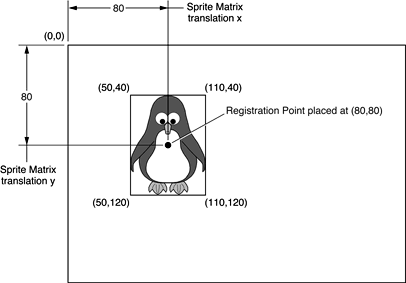
Registration Point
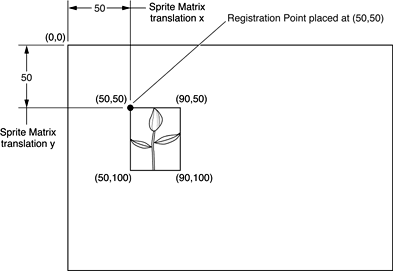
A sprite image registration point, shown in Figure 2-6, defines an offset that is applied to a sprite’s source matrix. A sprite’s default registration point is (0,0), or the top left of its source box.
When a sprite with a default registration point of (0,0) is translated to a location by setting the x and y translation elements of its source matrix, the sprite’s upper-left corner is placed at the given location. If a sprite’s source box is 100 pixels wide and 100 pixels tall, then setting the sprite image’s registration point to (50,50) causes the center of the sprite to be translated to the x and y translation of its source matrix. This also causes the wired sprite action kActionSpriteRotate to rotate the sprite about its center.
Figure 2-7 shows a default registration point in a sprite track’s local coordinate system.
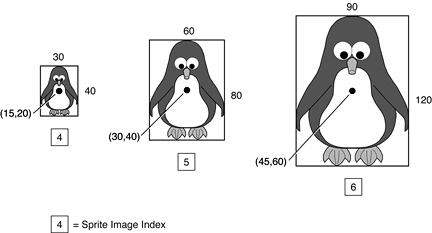
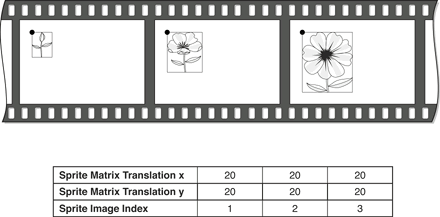
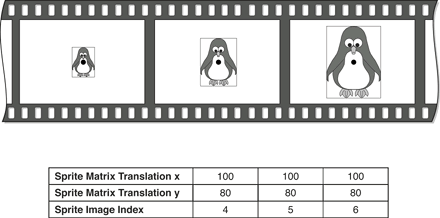
If your animation is cel-based, your images may vary in size, so you may want the registration for the center in order for the images used by the sprites to line up correctly, as shown in Figure 2-8.
For example, if you have a sprite-displayed explosion, the first cels may be smaller than the last. By setting the registration point to the center of each image, the explosion animation will be centered at the sprite’s location defined by its matrix.
Figure 2-9 shows a centered registration point in a sprite track’s local coordinate system.
Note: When a sprite uses images of different sizes, you assign group IDs to the images. (For more information on group IDs, see“Assigning Group IDs” ). Group IDs are illustrated in the code sample in “QTWiredSprite.c Sample Code” .
Figure 2-10 shows an example of registration points in a QuickTime movie.
Figure 2-11 shows an example of centered registration points in a QuickTime movie.
Display Space
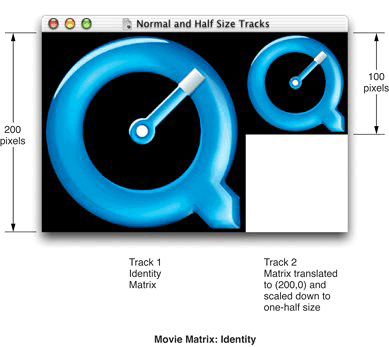
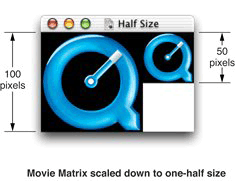
Display space, shown in Figure 2-12, refers to the pixels drawn in a window. In order to determine the area that a sprite is drawn to in display space, its registration point is first applied to its source matrix. This result is concatenated with its track’s matrix and then concatenated with its movie’s matrix.
Figure 2-13 shows a movie matrix scaled down to one-half size.
Sprite Properties
A sprite’s matrix property (kSpritePropertyMatrix) describes the sprite’s location and scaling within its sprite world or sprite track. By modifying a sprite’s matrix, you can modify the sprite’s location so that it appears to move in a smooth path on the screen or so that it jumps from one place to another. You can modify a sprite’s size, so that it shrinks, grows, or stretches. Depending on which image compressor is used to create the sprite images, other transformations, such as rotation, may be supported as well. Translation-only matrices provide the best performance.
A sprite’s layer property (kSpritePropertyLayer) is a numeric value that specifies a sprite’s layer in the animation. Sprites with lower layer numbers appear in front of sprites with higher layer numbers. To designate a sprite as a background sprite, you should assign it the special layer number kBackgroundSpriteLayerNum.
A sprite’s visible property (kSpritePropertyVisible) specifies whether or not the sprite is visible. To make a sprite visible, you set the sprite’s visible property to TRUE.
A sprite’s graphics mode property (kSpritePropertyGraphicsMode) specifies a graphics mode and blend color that indicates how to blend a sprite with any sprites behind it and with the background. To set a sprite’s graphics mode, you call SetSpriteProperty, passing a pointer to a ModifierTrackGraphicsModeRecord structure.
Wired Movies
Wired movies enable you to create QuickTime movies that are highly interactive and responsive to user input. What this means is that user input is simply translated into QuickTime events. In response to these events, actions may be performed. Each action has a specific target, which is the element in a movie the action is performed on. Target types may include sprites, tracks, and the movie itself. A few actions don’t require a target. Actions have a set of parameters that help describe how the target element is changed.
Typical wired actions—such as jumping to a particular time in a movie or setting a sprite’s image index—enable you to create a sprite that acts as a button. In response to a mouse down event, for example, a wired sprite could change its own image index property, so that its button-pressed image is displayed. In response to a mouse up event, the sprite can change its image index property back to the button up image and, additionally, specify that the movie jump to a particular time.
Adding Actions
When you wire a sprite track, you add actions to it. Wired sprite tracks may be the only tracks in a movie, but they are commonly used in concert with other types of tracks. Actions associated with sprites in a sprite track, for example, can control the audio volume and balance of an audio track, or the graphics mode of a video track.
Wired sprite tracks may also be used to implement a graphical user interface for an application. Applications can find out when actions are executed, and respond however they wish. For example, a CD audio controller application could use an action sprite track to handle its graphics and user interface.
These wired sprite actions are not only provided by sprite tracks. In principle, you can “wire” any QuickTime media handler. In QuickTime, all of these may contain actions: QuickTime VR, text, and sprites.
For a complete description of all available wired actions, refer to the QuickTime API Reference, which is available at
http://developer.apple.com/documentation/Quicktime/QuickTime.html |
QuickTime Events
When it is associated with a QuickTime movie, the movie controller checks to see if a track in the movie provides actions in response to QuickTime events. If one or more tracks provide actions, the movie controller will then monitor the activity of the mouse and send the appropriate mouse-related events.
These mouse events include: kQTEventMouseClick, kQTEventMouseClickEnd, kQTEventMouseClickEndTriggerButton, kQTEventMouseEnter, and kQTEventMouseExit.
Other types of events do not require user interaction in order to be generated.
The kQTEventIdle event is sent to each sprite in a sprite track if that sprite track’s kSpriteTrackPropertyQTIdleEventsFrequency property is set to a value other than the default value kNoQTIdleEvents.
The kQTEventFrameLoaded is generated when a sprite track sample which contains actions for it is loaded.
Actions and Their Targets
Any number of actions may be executed in response to a single QuickTime event. By using sprite track variables to maintain state, as well as conditional and looping actions, more sophisticated event handlers may be created—similar to If..Then and While statements in the C programming language.
The target of an action specifies on which element of the movie the action should be performed. Each action has an associated target type. For example, the action kActionSpriteSetVisible should only target a sprite—not a track or movie. Most of the track actions need to target either a specific track type, or a subset of track types, such as spatial or audio tracks. The target types include sprite, track, movie, 3D nodes, and no target.
Sprite and track targets may be specified in several different ways using names, IDs, or indices.
Targets are resolved at the time their action is executed. This is important to keep in mind because movies may change over time. Actions which are intended to target a movie element for the current movie time should precede actions which change the movie time. Sprites, for example, may be considered to have a lifetime lasting from one key frame to the next, so a sprite with a certain ID at one time may be different from a sprite with the same ID at another time in the movie.
Note that you may only target “live” movie elements, that is, ones that exist for the current movie time.
All events except the frameLoaded event are sent to a specific sprite or QuickDraw 3D node. This sprite is considered the current default sprite target, and its track is considered the current default track target. Since the frameLoaded event is sent to a sprite track, only the default track target is set.
Action Parameters
Actions have some number of required parameters. The parameters each have a data type. For example, the SpriteSetVisible action has a single Boolean parameter which makes the sprite visible if set to true, and invisible if set to false.
Parameters with numeric data types may optionally be specified by an expression. The SpriteSetVisible action, for example, could have an expression which evaluates to true if the movie is playing and false if it is stopped.
Options which modify a parameter’s value may be specified for some parameters. Each action defines which options are allowed for its parameters. Parameters which allow options to be specified are typically associated with a property of the action’s target. The current value of this property is used in conjunction with the parameter’s value and options to determine the new value.
The kActionFlagActionIsDelta constant takes the current property value and adds the parameter’s value to it. This value is pinned to the minimum and maximum values. The kActionFlagParameterWrapsAround constant causes the value to wrap within the range defined by the minimum and maximum value. If the new value is greater than the maximum value, it wraps around to the minimum, plus the difference between the new and the maximum value.
Parameters all have default minimum and maximum values. When using the delta, or delta with wraparound options, the minimum and maximum value options further limit this range.
The kActionFlagActionIsToggle constant is used with properties that only have two possible values, such as a visible property which may be either true or false. Using it repeatedly on a sprite’s visible property, for example, will toggle it between visible and invisible. The actual value of the parameter is ignored when using the toggle.
Note: Named time parameters use the indexed chapter text tracks to obtain time values from the names.
Expressions
Expressions may generally be used in place of numeric and Boolean values. Numeric action parameters, action target IDs, and action target indexes may all use expressions. They are also used in conjunction with the Case and While statement actions as conditional Boolean expressions.
Expressions may contain just a single operand, or may be complex, containing any number of operators and operands.
Important: Expressions are evaluated internally as single-precision, floating-point numbers. This means that all operands with numeric data types that are used in an expression are cast to a single precision floating point. For a few of the operand types, such as the sprite ID operands, it is possible to have a round-off error problem. This can be avoided by using sprite IDs that can be expressed using single- precision, floating-point numbers.
Operators
Operators are used in expressions, and are applied to their operands to calculate numeric values. The data format for Binary operations is prefix-based.
Binary operators may be applied to a list of two or more operands. They are first applied to the first two operands, then applied to this result and the next operand in the list. For example, (2 * (4 * 6)) can be represented as the kOperatorMultiply operator with a list of three kOperandConstant operands, containing the values 4, 6, and 2 in that order.
Unary operators are applied to a single operand.
Operands
Each operand is evaluated as part of an expression. Most operands have specific target types, similar to actions, since they evaluate to the current value of a specific property of the target. For example, the kOperandQTVRPanAngle returns the current pan angle of the operand’s target QuickTime VR track.
Other operands, such as kOperandKeyIsDown and kOperandMouseLocalHLoc, allow for a polling form of input by determining the current state of the keyboard or the location of the mouse.
Constants may be specified using the kOperandConstant operand.
The kOperandExpression allows for expressions to be nested within other expressions.
External Movie Targets for Wired Actions
QuickTime allows your application to target external movies in addition to tracks and objects within tracks, such as sprites and QuickDraw 3D nodes.
In QuickTime, wired actions may be performed on an element of another movie. For example, you can create a movie which acts as a custom Movie Controller, setting the rate and volume of one or more separate movies on the same Web page. Or you could create two co-operative, talking head movies that have a conversation, each waiting for the other to finish before speaking their next piece. Because each movie has its own independent time base, you can achieve results that are impossible if you used a single wired movie that uses this mechanism.
External movies may be referred to either by name or by ID. There is a standard way to tag a movie with name and ID properties.
Since a QuickTime movie has no knowledge of what other QuickTime movies are currently open, the software that is playing the movies works with a movie controller in order to resolve the external movie names or IDs to actual movie references. The QuickTime plug-in and Movie Player both support external movie targets. Using the QuickTime plug-in, the movies should all be on the same Web page. Using the Movie Player, they should all be open movie documents.
© 2003, 2002 Apple Computer, Inc. All Rights Reserved. (Last updated: 2002-10-01)
