Using Mac OS X Technologies
Mac OS X provides a wealth of highly developed technologies you can use that allow you to avoid spending development time implementing custom solutions for generic tasks. Taking advantage of these fully integrated technologies will enhance the way your application interacts with the system and with other applications on the platform.
In this section:
Address Book
Animation
Automator
Bonjour
Colors
Dashboard
Fonts
Preferences
Printing
Security
Speech
Spotlight
User Assistance
Address Book
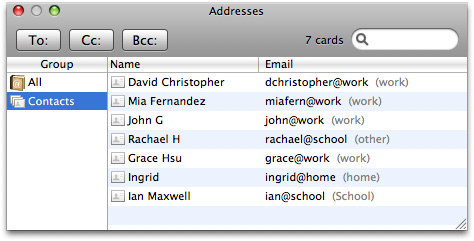
If your application stores or uses contact information, use the Address Book framework to manage that information. Contact information consists of information such as names, phone numbers, fax numbers, and email addresses of the people known to the current user. Using the Address Book framework, you can access contact information from the user’s database or display it in a customizable window.
Although the Address Book interfaces that allow you to customize the display window use the terms "people picker" and "picker," these are not acceptable names to use in your application's user interface. Instead, you should give the display window a name that describes its contents as they relate to your application, such as "Addresses" or "Contacts."
The appearance of a people-picker window is customizable to allow you to display only the data relevant to your application. For example, Mail customizes this window to show the email addresses of the contacts, as shown in Figure 6-1.
You customize the appearance of a people-picker window using the interfaces of the Address Book framework. See Address Book Programming Guide for Mac OS X for more information on using this framework.
Animation
A hallmark of Mac OS X is the use of animation to enhance the user experience, such as in the minimizing of windows to the Dock, the unfurling of sheets, and the sliding of drawers. In Mac OS X v10.5 and later, animation powers the movement of icons in the Finder Cover Flow view, the springing of items from a stack in the Dock, and the arrival of buddies in an iChat window, among other things. Figure 6-2 shows a "time-lapsed” view of items springing from a stack.

Animation allows users track the movements of objects, helps them understand the effects of their actions, and lends a sense of physicality and realism to the virtual world they see on the display screen. In general, animation is ideal for:
Communicating progress
Providing meaningful feedback
Clarifying a process or concept
If you are developing an application to run in Mac OS X v10.5 and later, you, too, can take advantage of animation by using Core Animation programming interfaces. As with most powerful tools, however, it’s important to use animation wisely, that is, as a subtle enhancement to the user experience, not as the focus of the user experience. For example, you might consider using animation in the following cases:
When users navigate a collection.
When navigation is similar to familiar, real-world activities, such as flipping through pages in a book or DVDs on a shelf, users are better able to grasp the organization and extent of a collection. In addition, when items in a collection appear to have realistic dimensionality and weight, they’re easier to recognize at a glance.
When it’s helpful for users to understand the consequences of an action before they commit to it.
Showing users the results of an action before they complete it allows them to be sure of themselves and avoid mistakes. For example, items in the Dock move aside when users drag an object into the Dock area, showing them where the new object will reside when they release the mouse button.
When users enter or initiate a different interaction mode.
When users enter a different mode of interaction, such as full-screen mode, animation can guide them and provide clues that help them keep track of the current mode. For example, the animated star field in Time Machine provides a completely different user experience that helps the user distinguish between the Time Machine view of the system and the user’s standard view of the system.
When an object changes its properties.
Showing an object’s transition from one state to another, instead of showing only the beginning and ending states, helps users understand what’s happening and gives them a greater sense of control over the process. For example, in an application that allows users to change several properties of a document at one time, an icon that smoothly shows the effects of the combination of changes would provide valuable feedback.
When an action occurs so quickly, users can’t track it.
Although speed and efficiency are essential in software, sometimes an action can take place so quickly that its context or result is unclear. When it’s important that users understand a connection or a process, animation can help them watch actions occur in a more human time frame. For example, when the user minimizes a window it doesn’t just disappear from the desktop and reappear in the Dock; instead, it moves fluidly from the desktop to the Dock so the user knows where it went.
If you decide to use animation, therefore, be sure the animation subtly enhances the tasks and concepts your application focuses on and doesn’t distract from them. Although animation can clarify obscure or hidden processes and provide valuable feedback, gratuitous or illogical animation can degrade the user experience, in addition to decreasing the performance of your application. In particular, you should:
Avoid replicating a Front Row or Time Machine style of user interface for an application that requires a lot of user input (especially textual input) or that users use for content creation. A fully animated, full-screen user interface that displays large, simplified controls does not make detailed content-creation tasks easier or more efficient.
Avoid animating everything.
Although it’s tempting to think that more animation results in greater clarification and better feedback, it’s not generally true. Most tasks and actions in an application are best performed quickly and with a minimum of fanfare.
Avoid animating routine user-interface actions supported by system-provided controls, such as:
Switching tabs
Opening or closing views
Clicking toolbar items
Users understand how common user interface elements work, and they don’t appreciate being forced to spend extra time watching unnecessary animation every time they click a button.
To learn more about using animation in your application, see Core Animation Programming Guide.
Automator
With Automator, a user can automate common procedures and build workflows by arranging processes from different applications into a desired order. Familiar Apple applications, such as Mail, iPhoto, and Safari make their tasks available to users to organize into a workflow. These tasks (called actions) are simple and narrowly defined, such as opening a file or applying a filter, so a user can include them in different workflows.
As an application developer, you can define actions that represent discrete tasks your application can perform. You make these actions available to users by creating action plug-ins that implement the appropriate behavior. An action plug-in contains a nib file and some code to manage the action’s user interface and implement its behavior. You can develop action plug-ins using either AppleScript or Objective-C. You might consider creating a set of basic actions to ship with your application so users have a starting point for using your application with Automator.
For more information on developing Automator actions, see Automator Programming Guide.
As you design the user interface of an action, keep the following guidelines in mind:
Users stack actions on top of each other in Automator. Because display screens are wider than they are tall, you should minimize the use of vertical space. One way to do this is to use a pop-up menu instead of radio buttons, even if there are only two choices.
Don’t use group boxes. An action does not need to separate or group controls with a group box.
Avoid tab views. Instead, use hidden tab views to alternate between different sets of controls.
Avoid using labels to repeat the action’s title or description; these take up space without providing value.
Use a disclosure triangle to hide and display optional settings. (See “Disclosure Triangles” for more information on disclosure triangles.)
Use small Aqua controls to minimize the use of space. (In “Controls” you can find information on the dimensions of those controls that are available in the small size.)
Use 10-pixel margins to make the best use of the space.
Provide feedback. Use the appropriate progress indicator when an action needs time to complete (see “Progress Indicators” for more information on these controls).
If possible, display an example showing the effect of the action so users can see the impact of various settings.
Bonjour
If you develop applications that need to communicate with other computers and processes on the Internet or a local area network, you should avoid making assumptions about the user’s network settings. Ensuring fast, efficient connections to other programs and computers is an important part of providing a good user experience.
Mac OS X supports a dynamically updating networking model. Because a user may change IP addresses many times during a single session, don’t save settings based on the IP address. Use Bonjour whenever a user might otherwise be required to set an IP address. Bonjour enables automatic discovery of computers, devices, and services on IP networks. The use of Bonjour can dramatically simplify network configuration for your users. For more information on Bonjour, see Bonjour Overview.
Colors
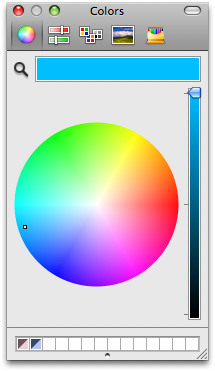
If your application deals with color, you may need a way for the user to enter color information. Mac OS X provides a standard Colors window for picking colors. Shown in Figure 6-3 this window lets the user enter color data using any of five different color models. You should use this window rather than create a custom interface for color selection.
For information on how to use this window in Cocoa applications, see Color Programming Topics for Cocoa; for Carbon programs, see Color Picker Manager Reference.
Dashboard
Dashboard provides a way for users to get information and perform simple tasks quickly and easily. Appearing and disappearing with a single keystroke or mouse gesture, Dashboard presents a default or user-defined set of widgets in a format reminiscent of a heads-up display. Each widget is small, visually appealing, and clearly indicative of its purpose. For example, each of the Mac OS X Dashboard widgets shown in Figure 6-4 is an attractive, scaled-down interface to a common task.

You can develop a standalone widget that performs a lightweight, well-defined task or a widget whose task is actually performed by your larger, more functional application. This section summarizes both the high-level and user-interface guidelines you should follow as you design your widget. Step-by-step instructions for how to implement a Dashboard widget, including plentiful code and user interface examples, are available in Dashboard Tutorial.
Many of the user-interface design principles covered in “Human Interface Design” are also applicable to Dashboard widgets. Following these guidelines gives users an automatic familiarity with this technology.
High-Level Design Guidelines for Widgets
Dashboard widgets are small and compact in part because they occupy prime screen space but also because they perform a single, well-defined task. It's especially important to avoid providing functionality that is extraneous to a widget's central task, because this dilutes a widget's usefulness. As with the design of a full-size application, taking the time to carefully define your widget's target audience (see “Involving Users in the Design Process”) will help you focus on the task your widget will perform.
As you design your widget, keep these high-level guidelines in mind:
A widget’s purpose should be immediately apparent to the user.
To achieve this, be sure you understand the user's mental model of the task your widget performs (for more information on this concept, see “Reflect the User’s Mental Model”).
A widget is not the place to display aggressive company advertising or branding.
Your widget is not merely an entrance to another application, even if that other application performs the processing for the widget’s task. If you take advantage of Dashboard’s prominence to display a banner ad, for example, users will be likely to stop including your widget in the Dashboard display.
A widget is not simply a miniaturized version of a standard application window.
Avoid making your widget look crowded by displaying only the controls that are essential to the task.
User-Interface Design Guidelines for Widgets
When you’ve decided on the widget’s task, follow these guidelines for designing the user interface:
Use color to enhance the visual impact of your widgets.
Widgets should be visually stimulating, and good color choices can help convey the type of task the widget performs. As with application icons (described in “Icon Genres and Families”), you should consider using bright, saturated colors for fun, creative tasks and more sombre, desaturated colors for utilitarian tasks
Don’t use Aqua controls on the front of your widget. Instead, design controls that support and enhance the task-oriented appearance of the widget.
Display the widget’s information at once. Dashboard appears and disappears quickly, so you don’t want to make the user wait for your content to display.
The default size of the widget should be small, but it should be able to expand if the task requires it.
Be aware that a user might want to populate the Dashboard with a very large number of widgets. If your widget is too large and seems to monopolize the screen, a user might choose not to include it.
If appropriate you can provide a resize control, but recognize that if a user misses this control and clicks outside the widget, Dashboard is hidden.
The default set of information your widget displays should be minimal and should not require scrolling.
If, however, the widget’s function is to provide a lot of information, consider making the presence of a scroll bar an option the user can select.
Use clearly readable fonts.
Avoid sacrificing readability to achieve a particular appearance. Focus on building the widget’s personality into the contours and the controls you design.
If appropriate, provide a way for the user to set a few options on the back of the widget (to do this, display an Info button in the lower right quadrant of the widget; see Dashboard Tutorial for more information).
Use a more subdued version of your color scheme on the back of the widget. This helps the user distinguish the widget’s back from its front.
Provide a Done button on the back of your widget that allows users to return to the front of the widget (for more information on how to provide this control, see Dashboard Tutorial).
Fonts
If your program supports typography and text layout using user-selectable fonts, you should use the Fonts window to obtain the user’s font selection. Users can select fonts and sizes in both the standard (Figure 6-5) and the minimized (Figure 6-6) view of the Fonts window. In the standard view, there are also controls for fine-tuning the display characteristics of fonts. Most important, the Fonts window is implemented for you. You do not have to create a Fonts menu or other special user interface to display and gather font information from the user.
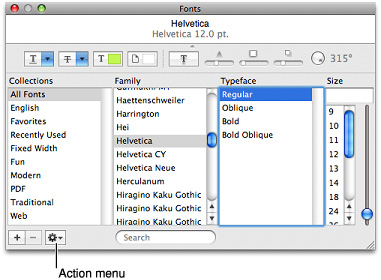

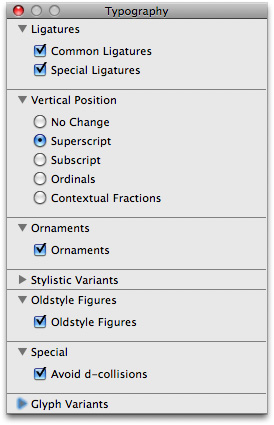
The Fonts window also provides advanced typography controls for fonts that support those options. The user can open a Typography inspector by choosing Typography from the action menu. Figure 6-7 shows the typography controls for the Zapfino font.
For more information about font selection and management in Cocoa applications, see Font Panel; for Carbon applications, see Apple Type Services for Fonts Programming Guide.
Preferences
Preference settings are user-defined parameters that your software remembers from session to session. Preferences can be a way for your application to offer choices to users about how the application runs. Preferences often affect the behavior of the application or the default appearance of content created with the application.
To reduce the complexity of your application, be picky about which features should have preferences and which should not. Avoid implementing all the preferences you can think of. Instead, be decisive and focus your preferences on the features users might really want to modify.
A preference should be a setting that the user changes infrequently. If a user might change the attributes of a feature many times in a work session, avoid using preferences to set those attributes. Instead, give the user modeless access to the controls for modifying that feature. For example, you might implement the feature using a menu item or a control in a palette or window.
Because a user does not change preference settings frequently, you should not provide a preferences toolbar item. Instead, provide access to application-level preferences in the application menu (see “The Application Menu” for more information) and to document-specific preferences in the File menu (see “The File Menu” for more information).
For information on implementing preferences with Cocoa, see User Defaults Programming Topics for Cocoa. For information on implementing preferences with Core Foundation, see Preferences Programming Topics for Core Foundation.
Printing
Mac OS X includes an advanced printing system. Because of all the options this system provides, it is important that you use the standard printing dialogs so that users understand the options that are available to them without getting lost in features. The printing architecture allows users to print “digital paper” documents that can be sent to a printer, faxed, or saved as a PDF file (Figure 6-8). These features are all available automatically when you use the Mac OS X printing system in your application.

See “The Print Dialog” for information about the standard printing dialog. See Mac OS X Printing System Overview for general information about the printing system. For information on how to extend the Print dialog to include options not provided in the standard panes, see Extending Printing Dialogs.
Security
Mac OS X provides numerous technologies to help you perform secure operations. Using these technologies, you can store secret information locally, authorize a user for specific operations, or transport information securely across a network.
Consider the following guidelines when you need to work with sensitive information or work in a secure environment:
Factor out code that requires privileged access into a separate process. Factoring isolates the secure code from the nonsecure code and makes it easier to verify that no rogue operations are occurring that could do damage, whether intentionally or unintentionally.
Avoid storing passwords and secrets in plain-text files. Even if you restrict access to the file using file permissions, the information is much safer in a keychain.
Avoid inventing your own authentication schemes. If you want a client-server operation to be secure, use the authorization APIs to guarantee the identity of the client.
Avoid loading plug-ins from privileged code. Plug-ins receive the same privileges as the parent process.
Avoid calling potentially dangerous functions, such as
systemorpopen, from privileged code.Don’t assume only one user is logged in. With fast user switching, multiple users may be active on the same system. See Multiple User Environments for more information.
Avoid relying solely on passwords for authentication. Mac OS X already supports smart card devices. Biometric devices such as fingerprint scanners may also be available some day.
If your application stores passwords or other sensitive information, such as credit card numbers, store that information using Keychain Services. The keychain mechanism in Mac OS X provides the following benefits:
It provides a secure, predictable, consistent experience for users when dealing with passwords and other secret information.
Users can modify settings for all of the passwords as a group or create separate keychains for different activities, with each keychain having its own activation settings. (By default, passwords are modified as a group.)
The Keychain Access application provides a simple user interface for managing keychains and their settings, relieving you of this task.
For information and links to security-related documentation in Mac OS X, see Getting Started With Security.
Speech
Mac OS X contains speech technologies that enable software to recognize and speak U.S. English. These technologies provide benefits for all users and present the possibility of a new paradigm for human-computer interaction.
Speech recognition is the ability for the computer to recognize and respond to a person’s speech. Using speech recognition, users can accomplish tasks comprising multiple steps—for example, “Schedule a meeting next Friday at 3 p.m. with John, Paul, and George” or “Create a 3-by-3 table”—with one spoken command. Mac OS X users can control the computer by voice rather than be limited to the mouse or keyboard; consequently, speech-recognition technology is very important for people with special needs and also for general users. Developers can take advantage of the speech engine and API included with Mac OS X, as well as the built-in user interface.
Speech synthesis also called text-to-speech (TTS), converts text into audible speech. It provides a way to deliver information to users without forcing them to shift attention from their current task. For example, the computer could, in the background, deliver such messages as “Your download is complete; one of the files has been corrupted” and “You have email from your boss; would you like to read it now?” TTS is also crucial for users with vision or attention disabilities. As with speech recognition, Mac OS X TTS provides both an API and several user interface features.
For information about implementing speech synthesis and recognition, see the documents in Guides > User Experience > Speech Technologies.
Spotlight
Spotlight is a powerful Mac OS X search technology available to both users and application developers. Built on top of Search Kit and integrated with the file system, Spotlight makes searching for files on the computer as easy as searching the web. With Spotlight, users can search for things using attributes that have meaning for them, such as the intended audience for a document, the orientation of an image, or the key signature of the music in an audio file. Information like this (called metadata) is embedded in a file by the application that created it. Spotlight’s power comes from being able to extract, store, update, and organize the metadata of files to allow fast, comprehensive searches.
Spotlight is always available to users to help them find their files on the computer. Even better, the search technologies that power Spotlight are available to developers to help them find files to display, plug-ins to load, and data to use in their applications. For example, a developer can define complex queries to find only the types of files an application needs to work with or provide Spotlight functionality from within an application. The rest of this section introduces the user’s view of Spotlight and describes some of the ways an application can take advantage of its features.
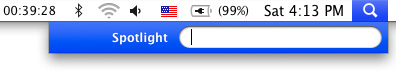
Users can easily initiate a Spotlight search using the Spotlight icon at the far right end of the menu bar. Figure 6-9 shows the Spotlight icon and search field displayed when a user clicks the icon.
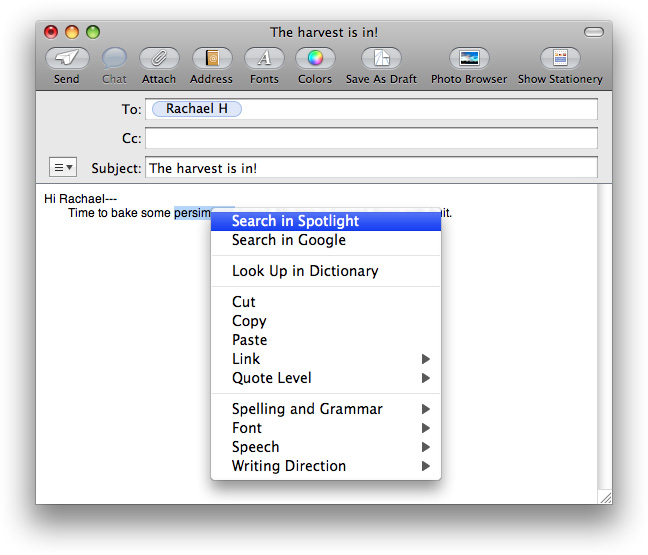
In addition, a user can select a word or phrase in a text document and Control-click to reveal a contextual menu that allows a Spotlight search for the selected text. Figure 6-10 shows this contextual menu.
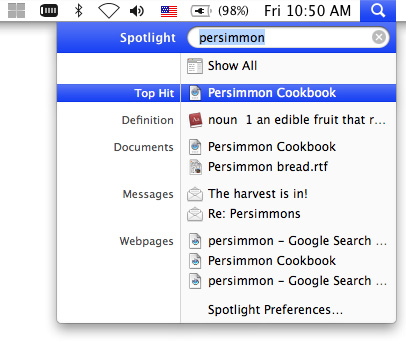
Whichever way a search is initiated, Spotlight quickly displays the results, conveniently sorted into categories the user can adjust in Spotlight Preferences. Figure 6-11 shows the standard Spotlight results window.
To applications, Spotlight provides almost limitless ability to find files and to give advanced file-search capabilities to users within the context of the application. For example, an application might choose to replicate the Spotlight contextual-menu item (shown in Figure 6-10) with a button that initiates a Spotlight search for the user’s selected text. The application could then display its own window that contains all the search results or a filtered subset of them.
An application might also choose to give users access to Spotlight searches in a rounded search field (for more information on this control, see “Search Fields”). A user often needs to work on a file that was saved in an atypical place or given an unexpected or forgotten name. If an application offers only a Finder-based Open dialog, it might force the user to waste a lot of time navigating the file system, trying to remember what the file was named and where it was saved. Instead, an application can provide a Spotlight-powered search that allows the user to search the entire file system, using meaningful attributes other than the filename.
Applications can also use Spotlight functionality behind the scenes to find needed files or plug-ins. For example, an application that provides a back-up service might allow the user to choose a broad category of file type to back up, such as images. Instead of asking users to identify all the folders that contain their images or just backing up a Pictures folder, the application could perform a Spotlight search to find every image file in the file system, regardless of its location.
It’s important to emphasize that Spotlight is tuned to search for files; it’s not intended to do extensive text-based searching within a document. If you need to do fine-grained textual searching, you should use Search Kit technologies instead. An application that stores data in database records, for example, should not base its database search on Spotlight because the data are not stored in separate files. For more information on using Search Kit in your application, see Search Kit Programming Guide.
Spotlight offers unparalleled search functionality to both users and developers. Along with these opportunities, however, comes an important developer responsibility. If your application uses a custom file format, you must supply a plug-in (called a Spotlight importer) that describes the types of metadata your file format contains. This ensures that a user will be able to search for the files your application creates using the attributes described by the metadata your files contain. For comprehensive information on how to do this, see Spotlight Importer Programming Guide.
User Assistance
Mac OS X supports two user help components: Apple Help and help tags. Help tags allow you to provide temporary context-sensitive help whereas Apple Help allows you to provide a more thorough discussion of a topic or procedure.
Use these mechanisms to provide user help in your application instead of using help mechanisms that are specific to your application. When users refer to help, it is usually because they are having difficulty accomplishing a task and therefore might be frustrated. This is not a good time to make them learn yet another task, such as figuring out a help viewing mechanism that differs from the one they use in all the other applications on their computer.
Apple Help
With Apple Help, you can display HTML files in Help Viewer, a browser-like application designed for displaying and searching help documents. Help Viewer can also display documents containing QuickTime content, open AppleScript-based automations, retrieve updated help content from the Internet, and provide context-sensitive assistance.
Users can access Apple Help by launching the Help Viewer application but they will more commonly access it from your application, in one of three ways:
The Help menu. The Help menu is the far-right item in the application region of the menu bar. When you register your help book with Help Viewer, the first item in the Help menu is the system-provided Spotlight For Help search field. The second item in the menu should be ApplicationName Help, which opens Help Viewer to the first page of your help content. For more information on the Help menu, see “The Help Menu.”
Help buttons. When necessary, you can use a Help button to provide easy access to specific sections of your help. When a user clicks a Help button, send either a search term or an anchor lookup (which leads to a specific page or pages) to Help Viewer. It’s not necessary for every dialog and window in your application to have a Help button. If there is no contextually relevant information in the help, don’t display a Help button.
From a contextual menu item. If contextually appropriate help content is available for the object being pointed to, the first item in the contextual menu is Help. As with Help buttons, the menu item can send either a search term or an anchor lookup to Help Viewer.
See Apple Help Programming Guide for more information on writing Apple Help content and providing it with your application.
Help Tags
Help tags enable your application to provide basic help information for its interface elements without forcing the user to leave the primary interface.
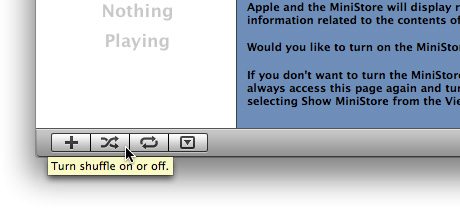
Help tags are short messages that appear when the user leaves the mouse pointer hovering over an interface element for a few seconds (see Figure 6-12 for an example of a help tag). When the pointer leaves the object, the tag vanishes. If the mouse pointer is not moved, the operating system hides the help tag after about 10 seconds.
The text of a help tag should briefly describe what an interface element does. If you find that you need more than a few words to describe the function of a control, you might want to reconsider the design of your application’s user interface.
Define help tags in Interface Builder, where they are called tooltips. Here are some guidelines to help you create effective help tag messages.
Use the fewest words possible. Try to keep your tags to a maximum of 60 to 75 characters. Because help tags are always on, it is important to keep your tag text unobtrusive—that is, short—and useful. A tag should present only one concept and that concept should be directly related to the interface element. Localization can lengthen the text by 20 to 30 percent, which is another good reason to keep the tag short.
Don’t put the interface element’s name in the tag unless the name helps the user and isn’t available onscreen. If an element is referred to by name in the documentation and in the tag, make sure the names match.
Describe only the element the mouse pointer hovers over.
You can use a sentence fragment beginning with a verb, for example, “Restores default settings”. You can also omit articles to limit the size of the tag. If the tag text is a complete sentence, end it with a period.
Use help tags to provide functional information for controls that are unique to your application. Don’t tag window controls, scroll bars, and other parts of the standard Mac OS X interface.
You can create contextually sensitive help tags, but you don’t have to; the same text can appear when an item is selected, dimmed, and so on. By describing what the interface element accomplishes, you may help the user understand the current state of the control even if the tag is applicable to all situations.
Write the help tag text in one of these ways, depending on the interface you’re documenting:
Describe what the user will accomplish by using the control. For example, “Add or remove a language from your list” or “Reduce red tint in the selected area”. Most help tags can use this format.
Give extra information to explain the results of the user’s action. This kind of tag is most effective in an interface that already includes some instructional text, because the tag and the interface text work together to describe what the control does and how the user manipulates it.
Define terms that may be unknown to the user. This kind of tag should be used only if the interface already contains instructions to the user.
© 1992, 2001-2003, 2008 Apple Inc. All Rights Reserved. (Last updated: 2008-06-09)