Example: Core Animation Menu Application
The Core Animation Menu example displays a simple selection example using Core Animation layers to generate and animate the user interface. In less than 100 lines of code, it demonstrates the following capabilities and design patterns:
Hosting the root-layer of a layer hierarchy in a view.
Creating and inserting layers into a layer hierarchy.
Using a
QCCompositionLayerto display Quartz Composer compositions as layer content.Using an explicit animation that runs continuously.
Animating Core Image Filter inputs.
Implicitly animating the position of the selection item.
Handling key events through the MenuView instance that hosts the view.
This application makes heavy use of Core Image filters and Quartz Composer compositions and, as a result, runs only on Mac OS X. The techniques illustrated for managing the layer hierarchy, implicit and explicit animation, and event handling are common to both platforms.
Contents:
The User Interface
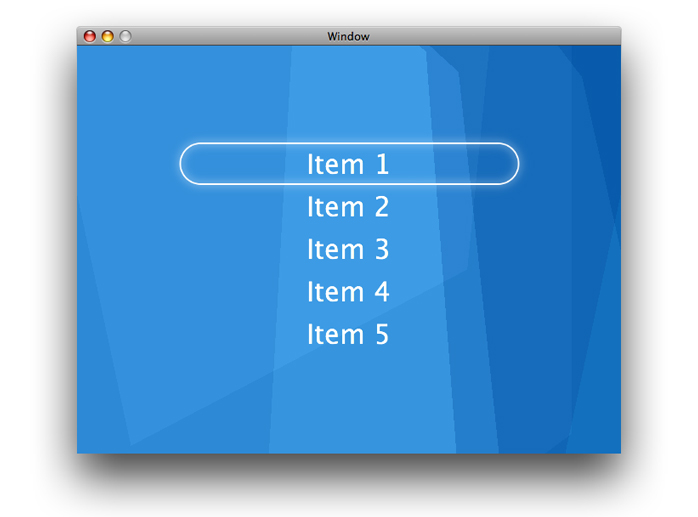
The Core Animation Menu application provides a very basic user interface; the user can select a single item in a menu. The user navigates the menu using the up and down arrows on the keyboard. As the selection changes the selection indicator (the rounded white rectangle) animates smoothly to its new location. A continuously animating bloom filter is set for the selection indicator causing it to subtly catch your attention. The background is a Quartz Composer animation that runs continuously. Figure 1 shows the application’s interface.
Examining the Nib File
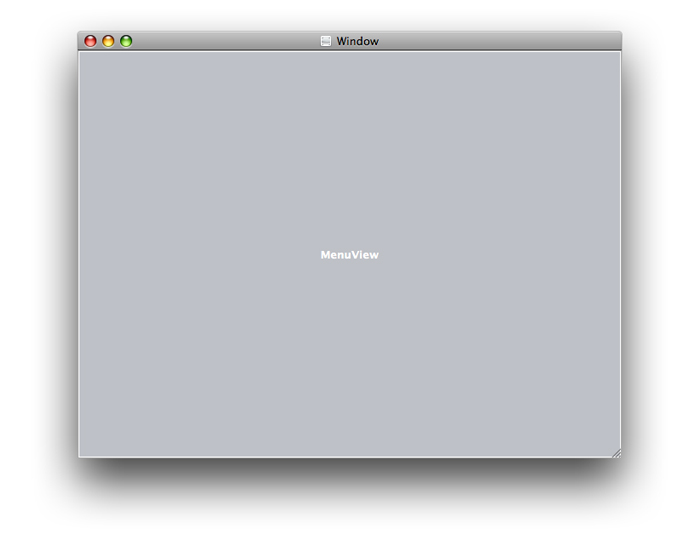
Menu.nib is very straightforward. An instance of CustomView is dragged from the Interface Builder palette and positioned in the window. It is resized such that it fills the entire window. The MenuView.h file is imported into Interface Builder by dragging it to the Menu.nib window. The CustomView is then selected, and the object type is changed to MenuView.
No other connections need to be made. When the nib file is loaded the window is unarchived and the MenuView is as well. The MenuView class gets an awakeFromNib message and the layers are configured there.
The Layer Hierarchy
The layer hierarchy, also referred to as the layer tree, of the Menu application is shown below.
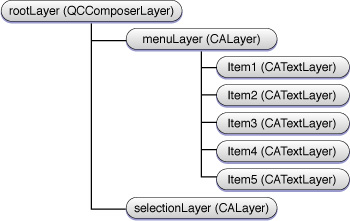
The rootLayer is an instance of QCComposerLayer. As the root-layer this layer is the same size as the MenuView instance, and remains that way as the window is resized.
The menusLayer is a sublayer of the rootLayer. It is an empty layer; it does not have anything set as its contents property and none of its style properties are set. The menusLayer is simply used as a container for the menu item layers. This approach allows the application to easily access a menu item sublayer by its position in the menusLayers.sublayers array. The menusLayer is the same size as, and overlaps, the rootLayer. This was done intentionally so that there was no need to convert between coordinate systems when positioning the selectionLayer relative to the current menu item.
The Code
Having looked at the application's nib file and the overall design, you can now begin examining the implementation of the MenuView class..
Examining MenuView.h
The MenuView class is a subclass of NSView and it declares four instance variables:
NSIndex selectedIndex— tracks the index that is currently selected.CALayer *menusLayer—the Core Animation layer that contains the menus items as its sublayers.CALayer *selectionLayer— the Core Animation layer that displays the selection indicatorNSArray *name— an array of names displayed as menu items
Note: Notice that Quartz/CoreAnimation.h is imported. The QuartzCore.framework must be added to any project that uses Core Animation. Because this example uses Quartz Composer the MenuView implementation also imports Quartz/Quartz.h, and the Quartz.framework is added to the project.
Listing 1 MenuView.h listing
#import <Cocoa/Cocoa.h> |
#import <QuartzCore/CoreAnimation.h> |
// the MenuView class is the view subclass that is inserted into |
// the window. It hosts the rootLayer, and responds to events |
@interface MenuView : NSView { |
// contains the selected menu item index |
NSInteger selectedIndex; |
// the layer that contains the menu item layers |
CALayer *menusLayer; |
// the layer that is used for the selection display |
CALayer *selectionLayer; |
// the array of menu item names |
NSArray *names; |
} |
-(void)awakeFromNib; |
-(void)setupLayers; |
-(void)changeSelectedIndex:(NSInteger)theSelectedIndex; |
-(void)moveUp:(id)sender; |
-(void)moveDown:(id)sender; |
-(void)dealloc; |
Examining MenuView.m
The MenuView class is the workhorse of this application. It responds when the view is loaded by the nib, sets up the layers to be displayed, creates the animations, and handles the keys that move the selection.
The examination of the MenuView.m is split as follows:
Setting Up the
MenuViewSetting Up the Layers
Animating the Selection Layer Movement
Responding to Key Events
Cleaning Up
Setting Up the MenuView
The awakeFromNib method is called when Menu.nib is loaded and unarchived. The view is expected to complete its setup in awakeFromNib.
The MenuView implementation of awakeFromNib creates an array of strings, names, that are used to display the menu items. It then calls the setupLayers method to setup the layers for the view.
- (void)awakeFromNib |
{ |
names=[[NSArray arrayWithObjects:@"Item 1",@"Item 2", |
@"Item 3",@"Item 4",@"Item 5", |
nil] retain]; |
[self setupLayers]; |
} |
Setting Up the Layers
The majority of the code in the Menu example resides in the setupLayers method. This method is responsible for the following:
Creating and initializing
rootLayerSetting
rootLayeras the hosted layer of the viewCreating and initializing the
menusLayerCreating and initializing the menu item layers
Adding the menu item positioning constraints
Layout the
menusLayerCreating the
selectionLayerConfiguring the continuous animation of
selectionLayerAdding it to the layer tree of
rootLayerSetting the initial value of
selectedIndex
First, the constants used to position and space the layers are defined.
-(void)setupLayers; |
{ |
CGFloat width=400.0; |
CGFloat height=50.0; |
CGFloat spacing=20.0; |
CGFloat fontSize=32.0; |
CGFloat initialOffset=100.0; |
The view must be set as the first responder to allow it to initially handle the up and down arrow events.
[[self window] makeFirstResponder:self]; |
Create the rootLayer, The rootlayer is an instance of QCCompositionLayer that displays the Background.qtz file which is located within the application bundle.
QCCompositionLayer* rootLayer; |
rootLayer=[QCCompositionLayer compositionLayerWithFile: |
[[NSBundle mainBundle] pathForResource:@"Background" |
ofType:@"qtz"]]; |
The instance of MenuView is set as the layer-hosting view of rootLayer. The order of these two calls is important. By first setting the layer to rootLayer and then setting setWantsLayer: to YES our layer is used rather than the one that the view would create. This is the key difference between layer-hosting views and layer-backed views.
[self setLayer:rootLayer]; |
[self setWantsLayer:YES]; |
Create the menusLayer, and set its bounds to those of rootLayer. Again, this is done to allow us to use the same coordinate system for both the menusLayer sublayers and the selectedLayer. The menusLayer is also retained, MenuView requires it when positioning the selectedLayer.
menusLayer=[[CALayer layer] retain]; |
menusLayer.frame=rootLayer.frame; |
Specify that the sublayers of menusLayer will be laid out using the CAConstraintLayoutManager. Constraints layout allows you to specify the location and size of layers relative to their sibling layers and superlayer. The superlayer is configured to use the constraints manager, and individual CAContraint instances are created and attached to each of the sublayers.
menusLayer.layoutManager=[CAConstraintLayoutManager layoutManager]; |
Add the menusLayer as a sublayer of the rootLayer.
[rootLayer addSublayer:menusLayer]; |
The next code fragment iterates over the items in the names array, creating a new CATextLayer for each name and defines its position using constraints.
NSInteger i; |
for (i=0;i<[names count];i++) { |
Get the name at the index of the current iteration.
NSString *name=[names objectAtIndex:i]; |
Create a new CATextLayer instance called menuItemLayer. Set its string to the name of the menu item, and specify that it should be displayed in white 32 point Lucida-Grande.
CATextLayer *menuItemLayer=[CATextLayer layer]; |
menuItemLayer.string=name; |
menuItemLayer.font=@"Lucida-Grande"; |
menuItemLayer.fontSize=fontSize; |
menuItemLayer.foregroundColor=CGColorCreateGenericRGB(1.0,1.0,1.0,1.0); |
Note that the bounds of the menuItemLayer is never specified. When using CATextLayer instances the constraints manager takes responsibility for setting the bounds and height of the layer.
The next step is to specify the constraints for the layout. First the vertical constraint is set relative to the top edge of the superlayer. The top edge of menuItemLayer is offset by the initialOffset (defined earlier) and by the spacing between items (also specified earlier) and the height (again specified earlier) is multiplied by the index of the name. The final value is inverted because the layer coordinate system uses the bottom left as its origin.
[menuItemLayer addConstraint:[CAConstraint |
constraintWithAttribute:kCAConstraintMaxY |
relativeTo:@"superlayer" |
attribute:kCAConstraintMaxY |
offset:-(i*height+spacing+initialOffset)]]; |
The second constraint simply causes the menuItemLayer object to be centered horizontally, relative to the center of its superlayer.
[menuItemLayer addConstraint:[CAConstraint |
constraintWithAttribute:kCAConstraintMidX |
relativeTo:@"superlayer" |
attribute:kCAConstraintMidX]]; |
Each menuItemLayer is added to the menusLayer layer as a sublayer.
[menusLayer addSublayer:menuItemLayer]; |
} // end of for loop |
Having configured all the menu item layers you must now force them to be laid out immediately. This is necessary to ensure that the first placement of the selectionLayer is correct.
[menusLayer layoutIfNeeded]; |
Now the CALayer that is used as the selectionlayer is created and configured. The bounds is set to be the width and height defined earlier. The layer is retained because we rely on it being available to MenuView after the layer is added to the layer tree.
selectionLayer=[[CALayer layer] retain]; |
selectionLayer.bounds=CGRectMake(0.0,0.0,width,height); |
The selectionLayer depends on the borderWidth, borderColor, and cornerRadius style properties to provide its visual components. They are set to 2 points wide, a color of white, and a corner radius that ensures that the ends of the selectionLayer are rounded completely.
selectionLayer.borderWidth=2.0; |
selectionLayer.borderColor=CGColorCreateGenericRGB(1.0f,1.0f,1.0f,1.0f); |
selectionLayer.cornerRadius=height/2; |
As the selectionLayer is displayed it softly pulses every second. This is done using a CIBloom filter and animating its inputIntensity between 0 (no intensity) and 1.5 (somewhat intense).
Create the filter, set its default values, and then specify the inputRadius is 5.0.
CIFilter *filter = [CIFilter filterWithName:@"CIBloom"]; |
[filter setDefaults]; |
[filter setValue:[NSNumber numberWithFloat:5.0] forKey:@"inputRadius"]; |
Core Animation extends the CIFilter class by adding the name property. The name property allows the inputs of filters in the layer's filters array to be animated using a key path.
[filter setName:@"pulseFilter"]; |
Set the selectionLayer filters array so that it contains filter.
[selectionLayer setFilters:[NSArray arrayWithObject:filter]]; |
The pulse animation is an explicit animation that runs continuously. It is a subclass of CABasicAnimation and, as such, must specify values for a keyPath, toValue, and fromValue.
CABasicAnimation* pulseAnimation = [CABasicAnimation animation]; |
Set the key path to be animated to filters.pulseFilter.inputIntensity. This is where the filter's name property is used.
pulseAnimation.keyPath = @"filters.pulseFilter.inputIntensity"; |
Set the fromValue and toValue to 0 and 1.0 respectively. This gives a nice pulse effect.
pulseAnimation.fromValue = [NSNumber numberWithFloat: 0.0]; |
pulseAnimation.toValue = [NSNumber numberWithFloat: 1.0]; |
The animation is 1 second long, and it repeats indefinitely. When the animation reaches 1.5, it cycles back to 0, and so on. The following code sets that up.
pulseAnimation.duration = 1.0; |
pulseAnimation.repeatCount = 1e100f; |
pulseAnimation.autoreverses = YES; |
The timingFunction of an animation controls how the animation values are distributed over the course of the animation duration. In this case we'll use an easeIn-easeOut animation. This causes the animation to begin slowly, ramp up to speed, and then slow again before completing.
pulseAnimation.timingFunction = [CAMediaTimingFunction functionWithName: |
kCAMediaTimingFunctionEaseInEaseOut]; |
For an explicit animation to begin you must add it to the layer's animation collection. This is done using addAnimation:forKey:. The key itself is used as an identifier for removing the animation later, if necessary.
[selectionLayer addAnimation:pulseAnimation forKey:@"pulseAnimation"]; |
Finally, now that setup is complete add the selectionLayer to the rootLayer.
[rootLayer addSublayer:selectionLayer]; |
Set the initial position of the selectionLayer and the initial selectedIndex to 0.
[self changeSelectedIndex:0]; |
// end of setupLayers |
The setupLayers method is by far the longest and most complex in this application. However, by breaking it down into the setup for each layer, it becomes much easier to understand.
Animating the Selection Layer Movement
The method changeSelectedIndex: is responsible for: setting selectedIndex to the new value, ensuring that the new value of selectedIndex is within the range of the number of items in the menu items, and positioning the selection layer relative to the menusLayer sublayer at the selectedIndex. This causes the selection layer to animate to show that the new item is selected.
-(void)changeSelectedIndex:(NSInteger)theSelectedIndex |
{ |
selectedIndex=theSelectedIndex; |
if (selectedIndex == [names count]) selectedIndex=[names count]-1; |
if (selectedIndex < 0) selectedIndex=0; |
CALayer *theSelectedLayer=[[menusLayer sublayers] objectAtIndex:selectedIndex]; |
selectionLayer.position=theSelectedLayer.position; |
}; |
Notice that all that is required to animate the selectionLayer is to simply assign a new value to its position property. This is an example of implicit animation
Responding to Key Events
Because layers do not take part in the responder chain, or accept events, the MenuView that acts as the layer-host for the layer tree must assume that role. The moveUp: and moveDown: messages are provided by NSResponder, of which MenuView is a descendent. The moveUp: and moveDown: messages are invoked when the up arrow and down arrows are pressed respectively. Using these methods allows the application to respect any remapped arrow key functionally specified by the user. (And it's easier than implementing keyDown:).
When the up arrow is pressed the selectedIndex value is de-incremented and updated by calling changeSelectedIndex:.
-(void)moveUp:(id)sender |
{ |
[self changeSelectedIndex:selectedIndex-1]; |
} |
When the down arrow is pressed the selectedIndex value is incremented and updated by calling changeSelectedIndex:.
-(void)moveDown:(id)sender |
{ |
[self changeSelectedIndex:selectedIndex+1]; |
} |
Cleaning Up
When the MenuView is released, we are responsible for cleaning up our instance variables. The menusLayer, selectionLayer, and names are autoreleased in the dealloc implementation.
-(void)dealloc |
{ |
[menusLayer autorelease]; |
[selectionLayer autorelease]; |
[names autorelease]; |
[super dealloc]; |
} |
© 2008 Apple Inc. All Rights Reserved. (Last updated: 2008-11-13)