Working with a User Interface Track
A user interface track records a series of events or operations in a running program. After the events are recorded, you can replay that track multiple times to reproduce the same sequence of events over and over. Each time you replay a user interface track, you can collect data using other instruments in your trace document. The benefit of doing so is that you can then compare the data you gather on each successful run and use it to measure the changes in your application’s performance or behavior.
In this section:
Recording a User Interface Track
Rerecording a User Interface Track
Replaying a User Interface Track
Recording a User Interface Track
You record a user interface track with the User Interface instrument. You add this instrument to your trace document just as you would any other instrument. When you click the Record button in your document, the User Interface instrument gathers events related to user input, such as mouse and keyboard events. It collects these events and displays them in the track pane for you to see and examine.
Note: If you create a new trace document using the UI Recorder template, Instruments automatically adds the User Interface instrument to the document for you.
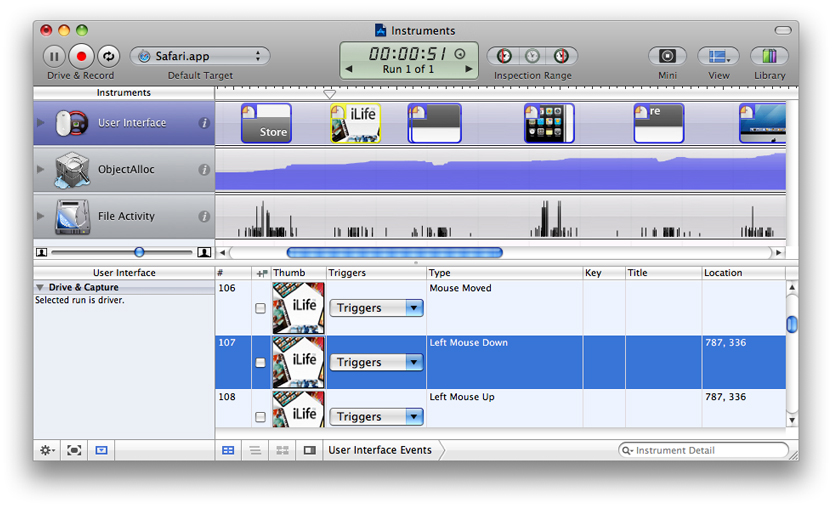
After you have gathered a set of events for the user interface track, the title of the Record button changes to Drive & Record. Pushing this button again causes Instruments to drive the user interface, replaying the sequence of events you recorded previously. While it does this, the other instruments in your trace document gather data as usual. Upon completion of the event stream, you should have a new run of data to examine. Figure 4-1 shows a trace document with a User Interface track and several other instruments. Here, the user interface track already contains a sequence of events that are ready to be replayed.
Important: User interface recording takes advantage of accessibility features normally used by screen readers and other assistive devices for disabled persons. To ensure that your computer supports this feature, open the Universal Access pane of System Preferences and make sure the “Enable access for assistive devices” setting is enabled.
The Detail pane for the User Interface instrument lists the events that were recorded, the location of the event, and the key that was pressed, if any. The instrument can also capture a screen shot of the area affected by the user action. A thumbnail version of the screen shot is shown in both the track pane and the detail pane. Each event is color-coded according to its type:
Mouse events are blue.
Key events are green.
System events are yellow.
Rerecording a User Interface Track
If, after capturing a sequence of events, you decide that you did not get the sequence right, you can go back and recapture the sequence as needed until you get it right. Before you recapture the sequence, though, you must tell Instruments not to drive the user interface using the old event sequence. The Action section of the User Interface inspector contains a pop-up menu that lets you specify how you want that instrument to run. Normally, after you capture a sequence of events, the Action setting is automatically set to Drive. To recapture, you must change the setting to Capture. After you have done that, you can begin recording the new sequence. Because the Action setting switches back to Drive after each recording, recapturing a sequence several times requires that you change the Action setting back to Capture every time you record.
Replaying a User Interface Track
After you have recorded a user interface track, you can replay that track to reproduce the sequence of user events that you recorded. After recording a sequence of events, Instruments automatically changes the title of the Record button to Drive & Record. Clicking this button launches the selected application and performs each of the actions recorded in the user interface track. At the same time, Instruments begins collecting data for any active instruments in the Instruments pane.
After each successful run of the user interface track, Instruments displays the results of that run in the track pane. To change the active set of results in the track pane, you can use the arrows in the Time control. Clicking these arrows cycles through each of the available data sets, updating the display for each of the available instruments.
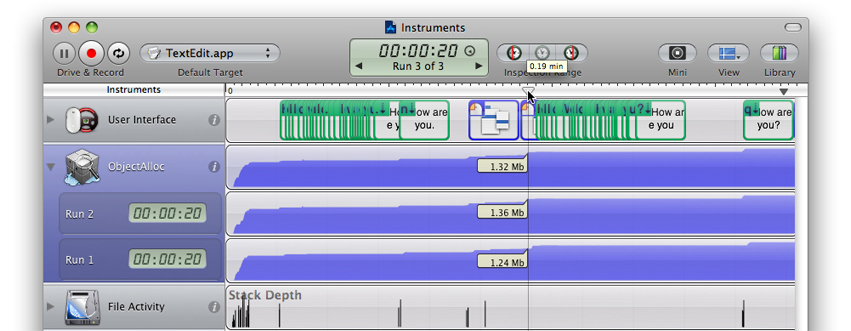
You can also view all of the runs for an instrument at the same time so that you can compare them. Each instrument includes a disclosure triangle on its left side. Clicking this control expands the instrument and displays the data from all of the previous runs side by side, as shown in Figure 4-2.
While collecting trace data, you can have Instruments repeat the events in the user interface track multiple times in succession by clicking the Loop button in the document toolbar. The state of the button is sticky, so clicking it enables looping and clicking it again disables it. When looping is enabled, Instruments runs the event sequence in a continuous loop, gathering a new set of trace data each time through the loop. You might use this feature to repeat a sequence of events that exhibits undesirable behavior after a number of tries. You can also use looping to stress-test your application by keeping it constantly busy.
© 2008 Apple Inc. All Rights Reserved. (Last updated: 2008-10-15)