Legacy Document
Important: The information in this document is obsolete and should not be used for new development.
A Quick Look at PackageMaker and Installer
This section provides a brief introduction to PackageMaker and Installer, as well as an introductory look at creating a package.
Contents:
About PackageMaker and Installer
A Quick Look at Creating a Package
About PackageMaker and Installer
You use the PackageMaker application to create package files that contain all the information and resources required to install your software. In some cases, you supply information through the PackageMaker user interface. For example, you use the interface to supply the title and description for the package and the location of the software to be placed in the package. In other cases, you prepare information before running PackageMaker. For example, you might create files such as a Read Me file or license agreement for your software.
A package has the file extension .pkg and contains both the software to install and various resources used in the installation process. Double-clicking a package file launches Installer, which installs your software according to the information you have supplied and the user’s responses. Installer then processes the package (including displaying a license agreement and other information, and executing scripts if the package contains any).
You can also create metapackages, which have the file extension .mpkg and contain other packages or metapackages. Metapackages allow a user to do a custom installation, where they can choose which parts of the software to install. Both packages and metapackages are folders that are presented to the user as a single file.
PackageMaker also creates package definition files, with extension .pmsp, which store the information needed to create a package. You can open a definition file, make changes in PackageMaker, then recreate the associated package file. Metapackage definition files, with extension .pmsm, serve a similar function for creating and modifying metapackages.
The default process provided by PackageMaker and Installer can handle most packaging and installation requirements, but when special handling is required, you can supply scripts that are executed at well-defined times during the installation.
A Quick Look at Creating a Package
To package your software with PackageMaker, you typically use steps like the following (a more detailed version is provided in “Creating a Package”):
Create your software.
Create additional resources that may be needed as part of the installation, such as a Read Me file or a license agreement.
Store the software and resources in a suitable directory structure.
In PackageMaker, create a package file and a package definition file:
Supply information such as the location of your software and resources, and how the software should be installed (whether it requires authorization, whether it must be installed at a specific destination, whether it requires a restart after installation, and so on).
Use File > Create Package to create a package file containing the information needed to install the software. The package file has the extension
.pkg.Use File > Save to save a PackageMaker package definition file as a template to recreate the package later, if necessary. The package definition file has the extension
.pmsp.These file types are described in “File Types Created by PackageMaker.”
In the Finder, double-click the package to launch Installer and test the installation.
To make changes, either double-click the package definition file and go to step 4 or, in some cases, modify the contents of the package directly (for information, see “Examining and Modifying Property Lists”) and go to step 5.
When the package is fully tested, distribute it to users for installation.
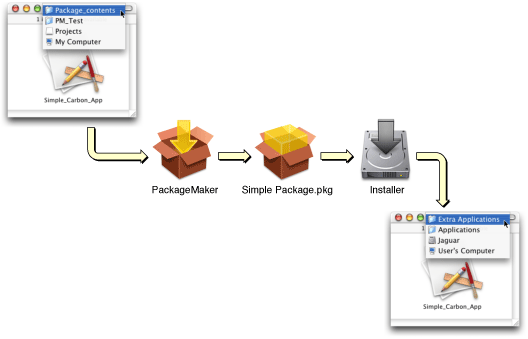
Figure 1 shows a simplified version of this process, taking an application from its location on your disk, to its final installation in the /Applications directory on a user’s volume. Though this process may appear simple, it provides a multitude of features and gives you a great deal of control over the installation process.
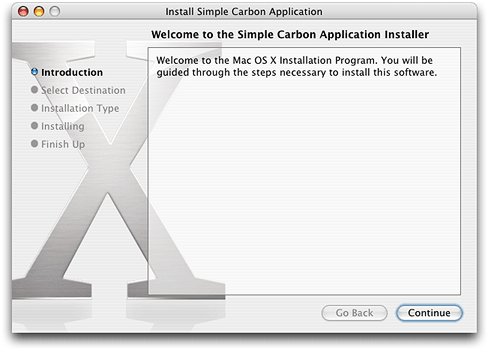
You can provide useful installation packages using just the default features provided by PackageMaker and Installer. For example, Figure 2 shows the Installer default Introduction pane for a package that installs a simple Carbon application. However, with a little more effort, you can add resources to customize the installation with a Read Me, a welcome message, a license agreement, and a background image, as described in “Customizing What Installer Shows to the User.”
While these features should be sufficient for the majority of installations, your software may require more complex handling. If so, it can provide it through script files that are executed at specific times during the installation. These scripts, or other executables, can check for required hardware, determine which volumes are suitable for installation, and more. For more information, see “Customizing an Installation With Executable Scripts.”
In some cases, you may want to edit the contents of a package file directly. For information, see “Examining and Modifying Property Lists.”
© 2003, 2006 Apple Computer, Inc. All Rights Reserved. (Last updated: 2006-07-24)