Adding and Configuring Instruments
The Instruments application uses instruments to collect data and display that data to the user. Although there is no theoretical limit to the number of instruments you can include in a document, most documents contain fewer than ten for performance reasons. You can even include the same instrument multiple times, with each instrument configured to gather data from a different process on the system.
Instruments comes with a wide range of built-in instruments whose job is to gather specific data from one or more processes. Most of these instruments require little or no configuration to use. You simply add them to your trace document and begin gathering trace data. You can also create custom instruments, however, which provide you with a wide range of options for gathering data.
This chapter focuses on how to add existing instruments to your trace document and configure them for use. For information on how to create custom instruments, see “Creating Custom Instruments with DTrace.”
In this section:
Using the Instrument Library
Adding and Removing Instruments
Configuring an Instrument
Using the Instrument Library
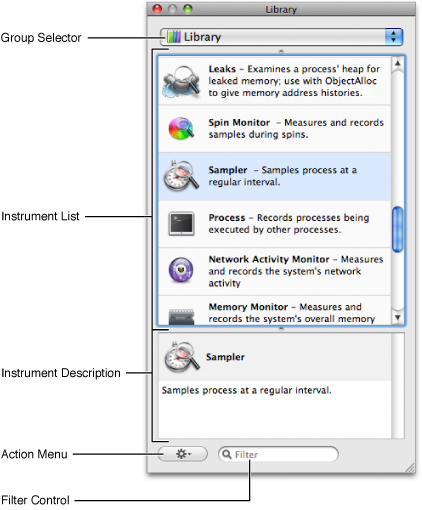
The instrument library (shown in Figure 2-1) displays all of the instruments that you can add to your trace document. The library includes all of the built-in instruments plus any custom instruments you have already defined. To open this window, click the Library button in your trace document or choose Window > Library.
Because the list of instruments in the Library window can get fairly long, especially if you add your own custom-built instruments, the instrument library provides several options for organizing and finding instruments. The following sections discuss these options and show how you use them to organize the available instruments.
Changing the Library View Mode
The library provides different view modes to help you organize the available instruments. View modes let you choose the amount of information you want displayed for each instrument and the amount of space you want that instrument to occupy. Instruments supports the following view modes:
View Icons. Displays only the icon representing each instrument.
View Icons And Labels. Displays the icon and name of each instrument.
View Icons and Descriptions. Displays the icon, name, and full description of each instrument.
View Small Icons And Labels. Displays the name of the instrument and a small version of its icon.
Note: Regardless of which view mode you choose, the Library window always displays detailed information about the selected instrument in the detail pane.
To change the library’s view mode, select the desired mode from the action menu at the bottom of the Library window.
In addition to changing the library’s view mode, you can display the parent group of a set of instruments by selecting Show Group Banners from the Action menu. The Library window organizes instruments into groups for convenience and to help you narrow down the list of instruments you want. By default, this group information is not displayed in the main pane of the Library window. Enabling the show Group Banners option adds it, making it easier to identify the general behavior of instruments in some view modes.
Finding an Instrument in the Library
By default, the Library window shows all of the available instruments. Each instrument, however, belongs to a larger group, which identifies the purpose of instrument and the type of data it collects. You can use the group selection controls at the top of the Library window to select one or more groups and thereby limit the number of instruments displayed by the Library window. When there are many instruments in the library, this feature makes it easier to find the instruments you want.
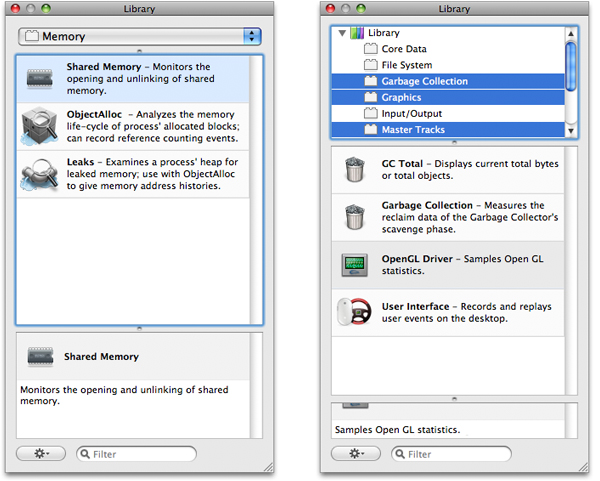
The group selection controls have two different configurations. In one configuration, the Library window displays a pop-up menu, from which you can select a single group. If you drag the split bar between the pop-up menu and the instrument pane downward, however, the pop-up menu changes to an outline view. In this configuration, you can select multiple groups by holding down the Command or Shift key and selecting the desired groups.
Figure 2-2 shows both standard mode and outline mode in the Library window. The window on the left shows standard mode, in which you select a single group using the pop-up menu. The window on the right shows the outline view, in which you can select multiple groups and manage your own custom groups.
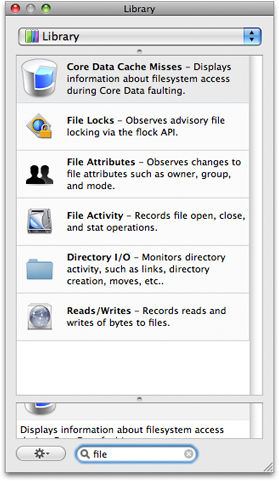
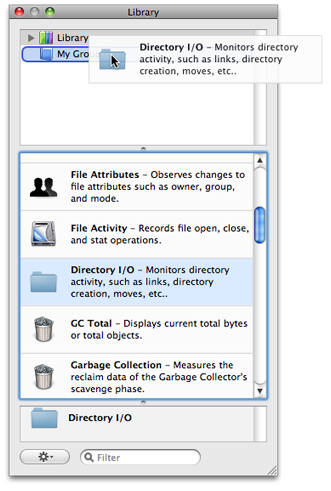
Another way to filter the contents of the Library window is to use the search field at the bottom of the Library window. Using the search field, you can quickly narrow down the contents of the Library to find the instrument or instruments whose name, description, category, or list of keywords matches the search text. For example, Figure 2-3 shows instruments that match the search string file.
When the pop-up menu is displayed at the top of the Library window, the search field filters the contents based on the currently selected instrument group. If the outline view is displayed, the search field filters the contents based on the entire library of instruments, regardless of which groups are selected.
Creating Custom Instrument Groups
In addition to using the built-in instrument groups, you can create custom groups to organize instruments in a way that better suits your own use patterns. Instruments supports two different types of custom groups: static groups and smart groups. Static groups are just that—static. Instruments does not change their contents at all, leaving you free to configure the group however you want. Smart groups, on the other hand, are dynamic groups whose contents change automatically based on the criteria you specify for the group. You can use smart groups to show the list of recently used instruments or instruments whose name or description contains a specific keyword.
Creating a Static Group
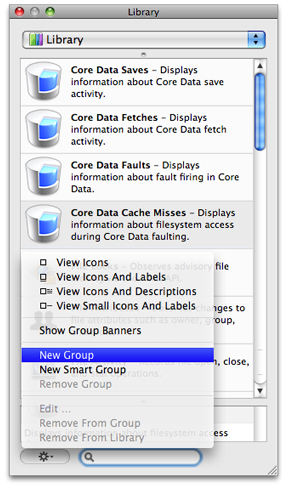
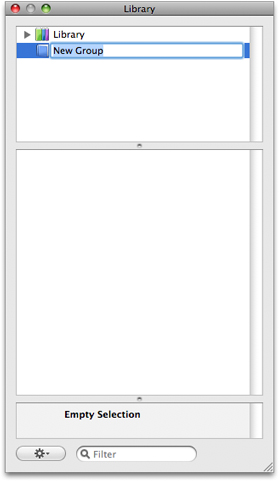
To create a static group, select New Group from the Library window’s action menu, as shown in Figure 2-4.
Instruments creates a new group and adds it to the Library window. To see the new group and edit its name and contents, drag the separator bar beneath the pop-up menu to open an upper pane showing the group structure of the Library, as shown in Figure 2-5. Click on the group and give it a new name.
To add an instrument to a static group, click Library to display the list of instruments, select the instrument, and drag it to the group in the upper pane as illustrated in Figure 2-6.
You can create hierarchical organizations of instruments using static groups. Static groups can include other static groups and they can also include smart groups. Smart groups cannot contain other groups, however. To create a hierarchical set of groups, you can do one of the following:
Drag an existing group to the parent static group.
Select a static group and choose New Group or New Smart Group to create a new item as a child of the selected group.
A group that contains other groups displays its own instruments plus the instruments contained in all of its child groups. If the same instrument is present in multiple groups and the Show Group Banners option is enabled, then the same instrument is listed under each group that contains it. If the Show Group Banners option is disabled, however, the Library window coalesces identical copies of an instrument into a single entry.
To remove an instrument from a static group, do the following:
Select the group.
In the group, select the instrument you want to remove.
Choose Remove From Group from the action menu or simply press the Delete key.
To remove a static group from the Library window, select the group and choose Remove Group from the action menu. If you are currently viewing groups using the outline view, you can also select the group and press the Delete key. Removing a static group removes the group and any nested groups it contains. This operation does not, however, delete the instruments contained in the group from the library. You can always find the instruments again by looking in the Library group.
Creating a Smart Group
To create a new smart group, choose New Smart Group from the Library window’s action menu. Instruments displays the rule editor shown in Figure 2-7. The Label field identifies the name of the group as it appears in the Library window. The rest of the sheet is dedicated to configuring the rules that determine which instruments reside in the group.
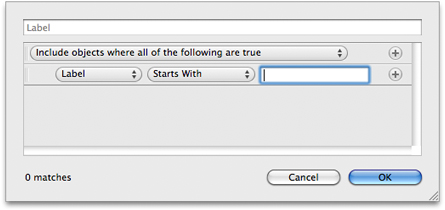
Every smart group must have at least one rule. You can add additional rules, as needed, using the controls in the rule editor and configure the group to apply all or some of the rules. Table 2-1 lists the criteria you can use to match instruments.
Criteria | Description |
|---|---|
Label | Matches instruments based on their title. This criterion supports the Starts With, Ends With, and Contains comparison operators. |
Used Within | Matches instruments based on when they were used. You can use this criterion to match only instruments that were used within the last few minutes, hours, days, or weeks. |
Search Criteria Matches | Matches instruments whose title, description, category, or keywords include the specified string. |
Category | Matches instruments whose library group name matches the specified string. This criterion does not match against custom groups. |
To edit an existing smart group, select the group in the Library window and choose Edit <Group Name> from the action menu, where <Group Name> is the name of your smart group. Instruments displays the rule editor again so that you can modify the existing rules.
To remove a smart group from the Library window, select the group and choose Remove Group from the action menu. If you are currently viewing groups using the outline view, you can also select the group and press the Delete key.
Adding and Removing Instruments
There are two ways to add an instrument to a trace document:
You can drag an instrument from the library and drop it onto your trace document.
You can add an instrument using the action menu of a trace document.
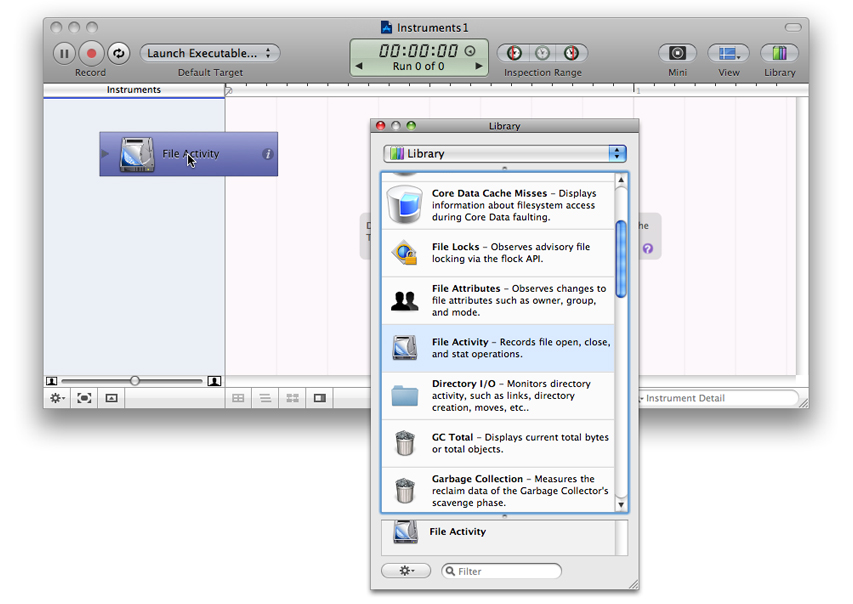
To add an instrument from the library, find the instrument you want and drag it from the Library window to the Instruments pane of your trace document, as shown in Figure 2-8.
The action menu in the bottom-left corner of a trace document includes an Add Instrument submenu that lists all of the available instruments. Selecting an instrument from this submenu adds it to your trace document.
You can add as many instruments as you like to the Instruments pane. Although some instruments can track all system processes, many track only a single process. For those instruments, you can use multiple instances of the instrument and assign each one to a different process if you like. In this way, you gather similar information for multiple programs simultaneously. For example, you might do this to sample a server process and one of its corresponding client processes and examine the overall interaction pattern.
To remove an instrument from the Instruments pane, select the instrument and press Delete.
Configuring an Instrument
Most instruments are ready to use as soon as you add them to the Instruments pane. Some instruments can be also be configured using the instrument inspector. The content of the inspector varies from instrument to instrument. Most instruments contain options for configuring the contents of the track pane and a few contain additional controls for determining what type of information is gathered by the instrument itself.
To open the inspector for a given instrument, select the instrument and do one of the following:
Click the inspector icon to the right of the instrument name.
Choose File > Get Info.
Press Command-I.
The inspector panel appears next to the instrument name, as shown in Figure 2-9. To dismiss the inspector, click the Done button. (The commands you used to open the inspector can also be used to close it.)
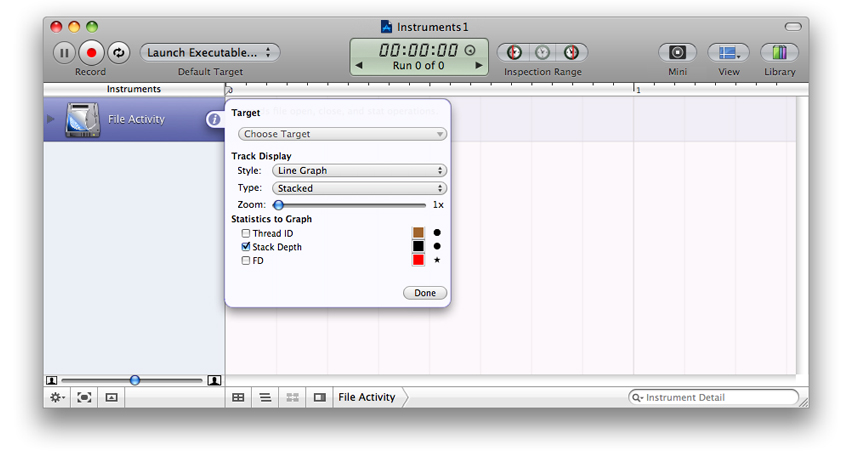
Controls related to displaying information in the track pane can be configured before, during, or after your record data for the track. Instruments automatically gathers the data it needs for each display option regardless of whether that option is currently displayed in the track pane.
The Zoom control found in most inspectors controls the vertical magnification of the trace data in the track pane. Changing the zoom value changes the height of the instrument in the track pane. The View > Decrease Deck Size and View > Increase Deck Size commands do a similar job of decreasing and increasing the track pane magnification for the selected instrument.
For a list of instruments, including their configurable options, see “Built-in Instruments.”
© 2008 Apple Inc. All Rights Reserved. (Last updated: 2008-10-15)