Packaging Filters as Image Units
An image unit represents the plug-in architecture for Core Image filters. Image units use the NSBundle class as the packaging mechanism to allow you to make the filters that you create available to other applications. An image unit can contain filters that are executable or nonexecutable. (See “Executable and Nonexecutable Filters” for details.)
To create an image unit from a custom filter, you must perform the following tasks:
Write the filter by following the instructions in “Creating a Custom Filter.”
After reading this chapter, you may also want to read Image Unit Tutorial for in-depth information on writing kernels and creating image units.
Before You Get Started
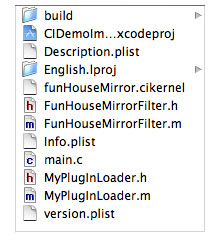
Go to the image unit sample provided with the developer tools. See Developer > Examples > Quartz > Core Image > CIDemoImageUnit. The directory should have the files shown in Figure 4-1. When you create an image unit, you should have similar files. This image unit contains one filter, FunHouseMirror. Each filter in an image unit typically has three files: an interface file for the filter class, the associated implementation file, and a kernel file. As you can see in the figure, this is true for the FunHouseMirror filter: FunHouseMirrorFilter.h, FunHouseMirrorFilter.m, and funHouseMirror.cikernel.
Each image unit should also have interface and implementation files for the CIPlugInRegistration protocol. In the figure, see MyPlugInLoader.h and MyPlugInLoader.m. The other important file that you’ll need to modify is the Description.plist file.
Now that you know a bit about the files in an image unit project, you’re ready to create one.
Create an Image Unit Project in Xcode
Xcode provides a template for creating image units. After you create an image unit project, you’ll have most of the files you need to get started and the project will be linked to the appropriate frameworks.
Follow these steps to create an image unit project in Xcode:
Launch Xcode and choose File > New Project.
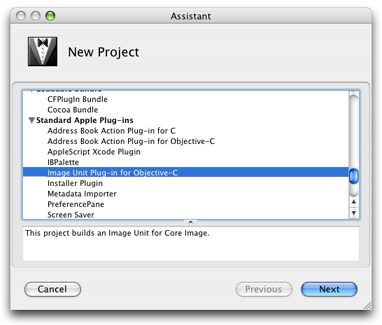
In the New Project window, choose Image Unit Plug-in for Objective C, located under Standard Apple Plug-ins, as shown in Figure 4-2. Then click Next.
Name the image unit project and click Finish.
The project window opens and looks similar to what’s shown in Figure 4-3.
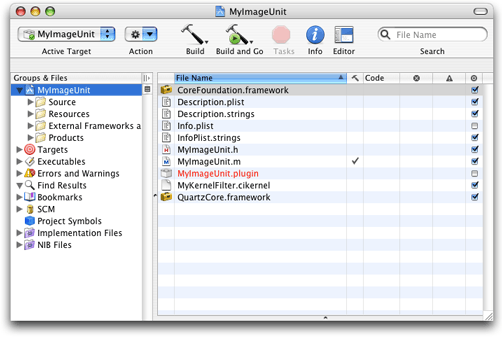
Notice that Xcode automatically creates a kernel file called MyKernelFilter.cikernel and interface and implementation files for the CIPlugInRegistration protocol. You might want to rename the CIPlugInRegistration protocol files so they are MyPlugInLoader just so that’s it’s easy to remember what’s in the file. The MyKernelFilter.cikernel file is a sample kernel file. But if you’ve already created a filter you won’t need this file, so you can delete it. You’ll add your own to the project in just a moment.
Customize the Load Method
Open the file that implements the CIPlugInRegistration protocol. In it you’ll find a load method, as shown in Listing 4-1. You have the option to add code to this method to perform any initialization that’s needed, such as a registration check. The method returns true if the filter is loaded successfully. If you don’t need any custom initialization, you can leave the load method as it is.
Listing 4-1 The load method provided by the image unit template
-(BOOL)load:(void*)host |
{ |
// custom image unit initialization code goes here |
return YES; |
} |
If you want, you can write an unload method to perform any cleanup tasks that might be required by your filter.
Add Your Filter Files to the Project
Add the filter files you created previously to the image unit project. Recall that you’ll need the interface and implementation files for each filter and the associated kernel file. If you haven’t written the filter yet, see “Creating Custom Filters.”
Keep in mind that you can package more than one filter in an image unit, and you can have as many kernel files as are appropriate for your filters. Just make sure that you include all the filter and kernel files that you want to package.
Modify the Description Property List
For executable filters, only the version number, filter class, and filter name are read from the Description.plist file. You provide a list of attributes for the filter in your code (see “Write a Custom Attributes Method”). You need to check the Description.plist file provided in the image unit template to make sure the filter name is correct and to enter the version number.
For CPU–nonexecutable filters, the image unit host reads the Description.plist file to obtain information about the filter attributes listed inTable 4-1. You need to modify the Description.plist file so that it contains the appropriate information. (For information about filter keys, see also Core Image Reference Collection.)
Key | Associated values |
|---|---|
| A dictionary of filter dictionaries. If this key is present, it indicates that there is at least one Core Image filter defined in the image unit. |
| The localized filter name available in the |
| The class name in the binary that contains the filter implementation, if available. |
| The filename of the filter kernel in the bundle, if available. Use this key to define a nonexecutable filter. |
| A dictionary of attributes that describe the filter. This is the same as the attributes dictionary that you provided when you wrote the filter. |
| An array of input keys and associated attributes. The input keys must be in the same order as the parameters of the kernel function. Each attribute must contain its parameter class (see Table 4-2) and name. |
| Reserved for future use. |
| None. Use this key to specify that the filter has a custom user interface. The host provides a view for the user interface. |
| The version of the CIPlugIn architecture, which is 1.0. |
Table 4-2 lists the input parameter classes and the value associated with each class. For a nonexecutable filter, you provide the parameter class for each input and output parameter.
Input parameter class | Associated value |
|---|---|
CIColor | A string that specifies a color. |
CIVector | A string that specifies a vector. See |
CIImage | An |
All scalar types | An |
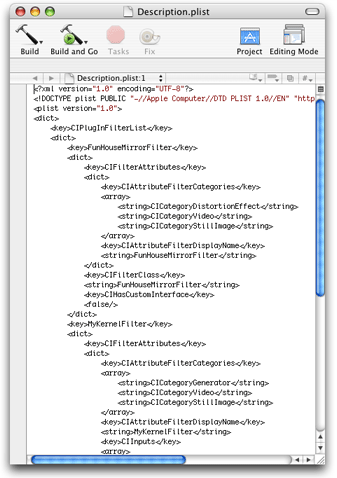
Figure 4-4 shows the contents of a description.plist file for a color generator filter. You may want to use the Property List Editor to modify a description.plist file. The Property List Editor application is located in Developer/Applications/Utilities/.
Build and Test the Image Unit
Even before you started creating the image unit, you should have tested the kernel code to make sure that it works properly. (See “Use Quartz Composer to Test the Kernel Routine.”) After you successfully build the image unit, you’ll want to copy it to the following directory:
/Library/Graphics/Image Unitsand~/Library/Graphics/Image Units
Then, you should try loading the image unit from an application and using the filter (or filters) that are packaged in the unit. See “Loading Image Units,” “Getting a List of Filters and Attributes,” and “Processing an Image.”
See Also
Image Unit Tutorial which provides step-by-step instructions for writing a variety of kernels and packaging them as image units.
CIDemoImageUnit is a sample image unit Xcode project which is available after you install the developer tools on your hard disk, in Developer > Examples > Quartz > Core Image.
CIAnnotation is a compositing and painting sample application that contains two custom image units. It is available from theADC Reference Library (Sample Code > Graphics & Imaging > Quartz.
© 2004, 2008 Apple Inc. All Rights Reserved. (Last updated: 2008-06-09)