Using Core Image Filters
Apple provides more than 100 image processing filters with Core Image. It’s easy for any developer who wants to support image processing in an application to use these built-in filters. It’s just as easy to use third-party image processing filters, as long as these filters are packaged as an image unit and installed in an appropriate location.
This chapter shows how to perform a variety of tasks related to applying filters to images:
“Adding the Quartz Core Framework” describes how to include Core Image in your Xcode project.
“Loading Image Units” tells how to load third-party image units. (If you want to create an image unit, see “Packaging Filters as Image Units” and Image Unit Tutorial.)
“Getting a List of Filters and Attributes” describes how to programmatically find out which filters are available and what the attributes of each filter are.
“Processing an Image” shows the basics of applying a filter to a single image.
“Using Transition Effects” discusses how to use filters that are applied over time to create such effects as fades and dissolves.
“Imaging Dynamical Systems” describes how to accumulate the effect of a filter.
“Applying a Filter to Video” discusses what’s needed to apply a Core Image filter to a video stream.
Adding the Quartz Core Framework
To use Core Image in Xcode, you need to import the Quartz Core framework. To import this frameworks in Xcode:
Open Xcode and create a Cocoa application.
Choose Project > Add to Project.
Navigate to
System/Library/Frameworks, choose the QuartzCore.framework and click Add.In the sheet that appears, click Add.
Loading Image Units
The built-in filters supplied by Apple are loaded automatically. The only filters you need to load are third-party filters packaged as image units. An image unit, which is simply a bundle, can contain one or more image processing filters. If the image unit is installed in one of the locations shown in Table 2-1, then it can be used by any application that calls one of the load methods provided by the CIPlugin class and shown in Table 2-1. You need to load image units only once. For example, to load all globally installed image units, you could add the following line of code to an initialization routine in your application.
[CIPlugIn loadAllPlugIns]; |
After calling the load method, you proceed the same as you would for using any of the image processing filters provided by Apple. Follow the instructions in the rest of this chapter.
Method | Comment |
|---|---|
| Scans image unit directories ( |
| Scans image unit directories ( |
| Loads the image unit at the location specified by the |
Getting a List of Filters and Attributes
Core Image has two methods you can use to discover exactly which filters are available—filterNamesInCategory: and filterNamesInCategories:. Filters are categorized to make the list more manageable. If you know a filter category, you can find out the filters available for that category by calling the method filterNamesInCategory: and supplying one of the category constants listed in Table 2-2, Table 2-3, or Table 2-4.
If you want to find all available filters for a list of categories, you can call the method filterNamesInCategories:, supplying an array of category constants from those listed in the tables. The method returns an NSArray object populated with the filter names for each category. You can obtain a list of all filters for all categories by supplying nil instead of an array of category constants.
A filter can be a member of more than one category. A category can specify:
The type of effect produced by the filter (color adjustment, distortion, and so forth). See Table 2-2.
The usage of the filter (still image, video, high dynamic range, and so forth). See Table 2-3.
Whether the filter is provided by Core Image (built-in). See Table 2-4.
Effect type | Indicates |
|---|---|
Distortion effects, such as bump, twirl, hole | |
Geometry adjustment, such as affine transform, crop, perspective transform | |
Compositing, such as source over, minimum, source atop, color dodge blend mode | |
Halftone effects, such as screen, line screen, hatched | |
Color adjustment, such as gamma adjust, white point adjust, exposure | |
Color effect, such as hue adjust, posterize | |
Transitions between images, such as dissolve, disintegrate with mask, swipe | |
Tile effect, such as parallelogram, triangle, op | |
Image generator, such as stripes, constant color, checkerboard | |
Gradient, such as axial, radial, Gaussian | |
Stylize, such as pixellate, crystallize | |
Sharpen, luminance | |
Blur, such as Gaussian, zoom, motion |
Use | Indicates |
|---|---|
Can be used for still images | |
Can be used for interlaced images | |
Can be used for nonsquare pixels | |
Can be used for high-dynamic range pixels |
Filter origin | Indicates |
|---|---|
A filter provided by Core Image |
After you obtain a list of filter names, you can retrieve the attributes for a filter by creating a CIFilter object and calling the method attributes as follows:
CIFilter *myFilter; |
NSDictionary *myFilterAttributes; |
myFilter = [CIFilter filterWithName:@"CIExposureFilter"]; |
myFilterAttributes = [myFilter attributes]; |
You replace the string “CIExposureFilter” with the name of the filter you are interested in. Attributes include such things as name, categories, class, minimum, and maximum. See CIFilter Class Reference for the complete list of attributes that can be returned.
Filter names and attributes provide all the information you need to build a user interface that allows users to choose a filter and control its input parameters. The attributes for a filter tell you how many input parameters the filter has, the parameter names, the data type, and the minimum, maximum, and default values.
Listing 2-1 shows code that gets filter names and builds a dictionary of filters by functional categories. The code retrieves filters in these categories—kCICategoryGeometryAdjustment, kCICategoryDistortionEffect, kCICategorySharpen, and kCICategoryBlur—but builds the dictionary based on application-defined functional categories—Distortion and Focus. Functional categories are useful for organizing filter names in a menu that makes sense for the user. The code does not iterate through all possible Core Image filter categories, but you can easily extend this code by following the same process.
Listing 2-1 Code that builds a dictionary of filters by functional categories
categories = [[NSMutableDictionary alloc] init]; |
NSMutableArray *array; |
array = [NSMutableArray arrayWithArray: |
[CIFilter filterNamesInCategory: |
kCICategoryGeometryAdjustment]]; |
[array addObjectsFromArray: |
[CIFilter filterNamesInCategory: |
kCICategoryDistortionEffect]]; |
[categories setObject: [self buildFilterDictionary: array] |
forKey: @"Distortion"]; |
array = [NSMutableArray arrayWithArray: |
[CIFilter filterNamesInCategory: kCICategorySharpen]]; |
[array addObjectsFromArray: |
[CIFilter filterNamesInCategory: kCICategoryBlur]]; |
[categories setObject: [self buildFilterDictionary: array] |
forKey:@"Focus"]; |
Listing 2-2 shows the buildFilterDictionary routine called in Listing 2-1. This routine builds a dictionary of attributes for each of the filters in a functional category. A detailed explanation for each numbered line of code follows the listing.
Listing 2-2 Building a dictionary of filters by functional name
- (NSMutableDictionary *)buildFilterDictionary: (NSArray *)names// 1 |
{ |
NSMutableDictionary *td, *catfilters; |
NSDictionary *attr; |
NSString *classname; |
CIFilter *filter; |
int i; |
catfilters = [NSMutableDictionary dictionary]; |
for(i=0 ; i<[names count] ; i++)// 2 |
{ |
classname = [names objectAtIndex: i];// 3 |
filter = [CIFilter filterWithName: classname];// 4 |
if(filter) |
{ |
attr = [filter attributes];// 5 |
td = [NSMutableDictionary dictionary]; |
[td setObject: classname forKey: @"class"];// 6 |
[catfilters setObject: td |
forKey:[attr objectForKey:@"name"]];// 7 |
} |
else |
NSLog(@" could not create '%@' filter", classname); |
} |
return catfilters; |
} |
Here’s what the code does:
Takes an array of filter names as an input parameter. Recall from Listing 2-1 that this array can be a concatenation of filter names from more than one Core Image filter category. In this example, the array is based upon functional categories set up by the application (Distortion or Focus).
Iterates through the array for each filter name in the array.
Retrieves the filter name from the names array.
Retrieves the filter object for the filter name.
Retrieves the attributes dictionary for a filter.
Sets the name of the filter attributes dictionary.
Adds the filter attribute dictionary for that filter to the category filter dictionary.
If your application provides a user interface, it can consult a filter dictionary to create and update the user interface. For example, filter attributes that are Boolean would require a checkbox or similar user interface element, and attributes that vary continuously over a range could use a slider. You can use the maximum and minimum values as the basis for text labels. The default attribute setting would dictate the initial setting in the user interface.
Note: Applications that run in Mac OS X v10.5 and later can use the CIFilter Image Kit additions to provide a filter browser and a view for setting filter input parameters. See CIFilter Image Kit Additions and Image Kit Programming Guide.
A client that hosts an image unit should not display user interface elements for a filter that has unknown data types or classes. This ensures that image unit host applications will work in the future if new data types and classes are added to the API.Processing an Image
You can apply Core Image filters to images in any format supported by Mac OS X which, in Mac OS X v10.5 and later, includes RAW image data (see “RAW Image Options” in CIFilter Class Reference).
The steps to process an image with a Core Image filter are:
Create a
CIContextobject.Get the image to process.
Create a
CIFilterobject for the filter to apply to the image.Set the default values for the filter.
Set the filter parameters.
Apply one or more filters.
Draw the processed image.
The details for performing each step are in the sections that follow. You’ll see how to apply three filters to the image shown in Figure 2-1.
Create a Core Image Context
In Core Image, images are evaluated to a Core Image context which represents a drawing destination. You can create a Core Image context:
By calling the
CIContextmethod of theNSGraphicsContextclassFrom a Quartz 2D graphics context
From an OpenGL graphics context
You create one Core Image context per window rather than one per view.
The CIContext method of the NSGraphicsContext class returns a CIContext object that you can use to render into the NSGraphicsContext object. The CIContext object is created on demand and remains in existence for the lifetime of its owning NSGraphicsContext object. You create the Core Image context using a line of code similar to the following:
[[NSGraphicsContext currentContext] CIContext]
For more information on this method, see NSGraphicsContext Class Reference.
You can create a Core Image context from a Quartz 2D graphics context using code similar to that shown in Listing 2-3, which is an excerpt from the drawRect: method in a Cocoa application. You get the current NSGraphicsContext, convert that to a Quartz 2D graphics context (CGContextRef), and then provide the Quartz 2D graphics context as an argument to the contextWithCGContext:options: method of the CIContext class. For information on Quartz 2D graphics contexts, see Quartz 2D Programming Guide.
Listing 2-3 Creating a Core Image context from a Quartz 2D graphics context
if(context == nil) |
{ |
context = [CIContext contextWithCGContext: |
[[NSGraphicsContext currentContext] graphicsPort] |
options: nil] |
[context retain];} |
The code in Listing 2-4 shows how to set up a Core Image context from the current OpenGL graphics context. It’s important that the pixel format for the context includes the NSOpenGLPFANoRecovery constant as an attribute. Otherwise Core Image may not be able to create another context that share textures with this one. You must also make sure that you pass a pixel format whose data type is CGLPixelFormatObj, as shown in the listing. For more information on pixel formats and OpenGL, see OpenGL Programming Guide for Mac OS X.
Listing 2-4 Creating a Core Image context from an OpenGL graphics context
CIContext *myCIContext; |
const NSOpenGLPixelFormatAttribute attr[] = { |
NSOpenGLPFAAccelerated, |
NSOpenGLPFANoRecovery, |
NSOpenGLPFAColorSize, 32, |
0 |
}; |
pf = [[NSOpenGLPixelFormat alloc] initWithAttributes:(void *)&attr]; |
myCIContext = [CIContext contextWithCGLContext: CGLGetCurrentContext() |
pixelFormat: [pf CGLPixelFormatObj] |
options: nil]; |
Get the Image to Process
Core Image filters process Core Image images (CIImage objects). Table 2-5 lists the methods that create a CIImage object. The method you use depends on the source of the image. Keep in mind that a CIImage object is really an image recipe; Core Image doesn’t actually produce any pixels until it’s called on to render results to a destination.
Image source | Methods |
|---|---|
URL | |
Quartz 2D image ( | |
Quartz 2D layer ( | |
OpenGL texture | |
Bitmap data |
|
NSCIImageRep |
|
Encoded data (an image in memory) | |
CVImageBuffer |
Create, Set Up, and Apply Filters
Listing 2-5 shows how to create, set up, and apply a hue filter. You use the filterWithName: method to create a filter whose type is specified by the name argument. The hue adjust filter is named CIHueAdjust. You can obtain a list of filter names by following the instructions in “Getting a List of Filters and Attributes” or you can look up a filter name in Core Image Filter Reference. The input values for a filter are undefined when you first create it, which is why you either need to call the setDefaults method to set the default values or supply values for all input parameters at the time you create the filter by calling the method filterWithName:keysAndValues:.
If you don’t know the input parameters for a filter, you can get an array of them using the method inputKeys. (Or, you can look up the input parameters for most of the built-in filters in Core Image Filter Reference.) Set a value for each input parameter whose default value you want to change by calling the method setValue:forKey:.
Listing 2-5 sets two input parameters—the input image and the input angle. Filters, except for generator filters, require an input image. Some require two or more images or textures. The input angle for the hue adjustment filter refers to the location of the hue in the HSV and HLS color spaces. This is an angular measurement that can vary from 0.0 to 2 pi. A value of 0 indicates the color red; the color green corresponds to 2/3 pi radians, and the color blue is 4/3 pi radians.
The last line in Listing 2-5 requests the value that corresponds to the outputImage key. When you request the output image, Core Image evaluates the input parameters and stores the calculations necessary to produce the resulting image. The image is not actually rendered. You can apply another filter and continue the process of applying filters until you want to render the result.
Listing 2-5 Creating, setting up, and applying a hue filter
hueAdjust = [CIFilter filterWithName:@"CIHueAdjust"]; |
[hueAdjust setDefaults]; |
[hueAdjust setValue: myCIImage forKey: @"inputImage"]; |
[hueAdjust setValue: [NSNumber numberWithFloat: 2.094] |
forKey: @"inputAngle"]; |
result = [hueAdjust valueForKey: @"outputImage"]; |
If you use one of the Core Image draw methods to render the output image from Listing 2-5, you’ll see what’s shown in Figure 2-2. Next you’ll see how to apply two more filters to the image—gloom (CIGloom) and bump distortion (CIBumpDistortion).
The gloom filter does just that—makes an image gloomy by dulling its highlights. Notice that the code in Listing 2-6 is very similar to that shown in Listing 2-5. It creates a filter and sets default values for the gloom filter. This time, the input image is the output image from the hue adjustment filter. It’s that easy to chain filters together!
The gloom filter has two input parameters. Rather than use the default values, which you could do, the code sets the input radius to 25 and the input intensity to 0.75. The input radius specifies the extent of the effect, and can vary from 0 to 100 with a default value of 10. Recall that you can find the minimum, maximum, and default values for a filter programmatically by retrieving the attribute dictionary for the filter.
The input intensity is a scalar value that specifies a linear blend between the filter output and the original image. The minimum is 0.0, the maximum is 1.0, and the default value is 1.0.
Listing 2-6 Creating, setting up, and applying a gloom filter
gloom = [CIFilter filterWithName:@"CIGloom"]; |
[gloom setDefaults]; |
[gloom setValue: result forKey: @"inputImage"]; |
[gloom setValue: [NSNumber numberWithFloat: 25] |
forKey: @"inputRadius"]; |
[gloom setValue: [NSNumber numberWithFloat: 0.75] |
forKey: @"inputIntensity"]; |
result = [gloom valueForKey: @"outputImage"]; |
The code requests the output image but does not draw the image. You’ll see how to draw the image in the next section. Figure 2-2 shows what the image would look like if you drew it at this point after processing it with both the hue adjustment and gloom filters.
The bump distortion filter (CIBumpDistortion) creates a bulge in an image that originates at a specified point. Listing 2-7 shows how to create, set up, and apply this filter to the output image from the previous filter, the gloom filter. By now you should be an expert. First, create the filter by providing its name. Then, set the defaults and set the input image to the previous result. The bump distortion takes three parameters: a location that specifies the center of the effect, the radius of the effect, and the input scale. The input scale specifies the direction and the amount of the effect. The default value is –0.5. The range is –10.0 through 10.0. A value of 0 specifies no effect. A negative value creates an outward bump; a positive value creates an inward bump.
Listing 2-7 Creating, setting up, and applying the bump distortion filter
bumpDistortion = [CIFilter filterWithName:@"CIBumpDistortion"]; |
[bumpDistortion setDefaults]; |
[bumpDistortion setValue: result forKey: @"inputImage"]; |
[bumpDistortion setValue: [CIVector vectorWithX:200 Y:150 ] |
forKey: @"inputCenter"]; |
[bumpDistortion setValue: [NSNumber numberWithFloat: 100] |
forKey: @"inputRadius"]; |
[bumpDistortion setValue: [NSNumber numberWithFloat: 3.0] |
forKey: @"inputScale"]; |
result = [bumpDistortion valueForKey: @"outputImage"]; |
Draw the Result
Drawing the result triggers the processor-intensive operations (GPU or CPU). Core Image provides two methods for drawing:
drawImage:atPoint:fromRect:, which renders a region of an image to a point in the context destination.drawImage:inRect:fromRect:, which renders a region of an image to a rectangle in the context destination.
The following code renders the hue-adjusted, gloom-filtered, bump-distorted image from the previous section:
[myCIContext drawImage: result |
atPoint: CGPointZero |
fromRect: contextRect]; |
Figure 2-4 shows the rendered image. In this case, Core Image draws the image at (0,0), which is CGPointZero, and draws into the entire context destination.
Using Transition Effects
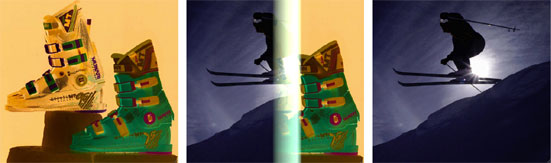
Transitions are typically used between images in a slide show or to switch from one scene to another in video. These effects are rendered over time and require that you set up a timer. This section shows how to set up and apply the copy machine transition filter—CICopyMachine—to two still images. The copy machine transition creates a light bar similar to what you see in a copy machine. The light bar sweeps across the initial image to reveal the target image. Figure 2-5 shows what this filter looks like before, partway through, and after the transition from an image of ski boots to an image of a skier.
Transition filters require the following tasks:
Create Core Image images (
CIImageobjects) to use for the transition.Set up and schedule a timer.
Create a
CIContextobject.Create a
CIFilterobject for the filter to apply to the image.Set the default values for the filter.
Set the filter parameters.
Set the source and the target images to process.
Calculate the time.
Apply the filter.
Draw the result.
Repeat steps 8–10 until the transition is complete.
You’ll notice that many of these tasks are the same as those required to process an image using a filter other than a transition filter. What’s different is the need to set up a timer and to repeatedly draw the effect at various time intervals throughout the transition.
The awakeFromNib method, shown in Listing 2-8, gets two images (boots.jpg and skier.jpg) and sets them as the source and target images. Using the NSTimer class, a timer is set to repeat every 1/30 second. Note the variables thumbnailWidth and thumbnailHeight. These are used to constrain the rendered images to the view set up in Interface Builder.
Note: The NSAnimation class, introduced in Mac OS X v10.4, implements timing for animation in Cocoa. If you use NSAnimation instead of NSTimer, you can set up more than one slide show to play transitions at the same time, using only one timing device. For more information see the documents NSAnimation Class Reference and Animation Programming Guide for Cocoa. See also the CIAnnotationCIAnnotation sample application.
Listing 2-8 Getting images and setting up a timer
- (void)awakeFromNib |
{ |
NSTimer *timer; |
NSURL *url; |
thumbnailWidth = 340.0; |
thumbnailHeight = 240.0; |
url = [NSURL fileURLWithPath: [[NSBundle mainBundle] |
pathForResource: @"boots" ofType: @"jpg"]]; |
[self setSourceImage: [CIImage imageWithContentsOfURL: url]]; |
url = [NSURL fileURLWithPath: [[NSBundle mainBundle] |
pathForResource: @"skier" ofType: @"jpg"]]; |
[self setTargetImage: [CIImage imageWithContentsOfURL: url]]; |
timer = [NSTimer scheduledTimerWithTimeInterval: 1.0/30.0 |
target: self |
selector: @selector(timerFired:) |
userInfo: nil |
repeats: YES]; |
base = [NSDate timeIntervalSinceReferenceDate]; |
[[NSRunLoop currentRunLoop] addTimer: timer |
forMode: NSDefaultRunLoopMode]; |
[[NSRunLoop currentRunLoop] addTimer: timer |
forMode: NSEventTrackingRunLoopMode]; |
} |
You set up a transition filter just as you’d set up any other filter. Listing 2-9 uses the method filterWithName: to create the filter. It then calls setDefaults to initialize all input parameters. The code sets the extent to correspond with the thumbnail width and height that is declared in the awakeFromNib: method shown in Listing 2-8.
The routine uses the thumbnail variables to specify the center of the effect. For this example, the center of the effect is the center of the image, but it doesn’t have to be.
Listing 2-9 Setting up the transition filter
- (void)setupTransition |
{ |
CIVector *extent; |
float w,h; |
w = thumbnailWidth; |
h = thumbnailHeight; |
extent = [CIVector vectorWithX: 0 Y: 0 Z: w W: h]; |
transition = [CIFilter filterWithName: @"CICopyMachineTransition"]; |
[transition setDefaults]; |
[transition setValue: extent |
forKey: @"inputExtent"]; |
[transition retain]; |
} |
The drawRect: routine for the copy machine transition effect is shown in Listing 2-10. This routine sets up a rectangle that’s the same size as the view and then sets up a floating-point value for the rendering time. If the CIContext object hasn’t already been created, the routine creates one. If the transition is not yet set up, the routine calls the setupTransition method (see Listing 2-9). Finally, the routine calls the drawImage:atPoint:fromRect: method, passing the image that should be shown for the rendering time. The imageForTransition: method, shown in Listing 2-11, applies the filter and returns the appropriate image for the rendering time.
Listing 2-10 The drawRect: method for the copy machine transition effect
- (void)drawRect: (NSRect)rectangle |
{ |
float t; |
CGRect cg = CGRectMake(NSMinX(rectangle), NSMinY(rectangle), |
NSWidth(rectangle), NSHeight(rectangle)); |
t = 0.4*([NSDate timeIntervalSinceReferenceDate] - base); |
if(context == nil) |
{ |
context = [CIContext contextWithCGContext: |
[[NSGraphicsContext currentContext] graphicsPort] |
options: nil]; |
[context retain]; |
} |
if(transition == nil) |
[self setupTransition]; |
[context drawImage: [self imageForTransition: t + 0.1] |
atPoint: cg.origin |
fromRect: cg]; |
} |
The imageForTransition: method figures out, based on the rendering time, which image is the source image and which one is the target image. It’s set up to allow a transition to repeatedly loop. If your application applies a transition that doesn’t loop, it would not need the if-else construction shown in Listing 2-11.
The routine sets the inputTime value based on the rendering time passed to the imageForTransition: method. It applies the transition, passing the output image from the transition to the crop filter (CICrop). Cropping ensures the output image fits in the view rectangle. The routine returns the cropped transition image to the drawRect: method, which then draws the image.
Listing 2-11 Applying the transition filter
- (CIImage *)imageForTransition: (float)t |
{ |
CIFilter *crop; |
if(fmodf(t, 2.0) < 1.0f) |
{ |
[transition setValue: sourceImage forKey: @"inputImage"]; |
[transition setValue: targetImage forKey: @"inputTargetImage"]; |
} |
else |
{ |
[transition setValue: targetImage forKey: @"inputImage"]; |
[transition setValue: sourceImage forKey: @"inputTargetImage"]; |
} |
[transition setValue: [NSNumber numberWithFloat: |
0.5*(1-cos(fmodf(t, 1.0f) * M_PI))] |
forKey: @"inputTime"]; |
crop = [CIFilter filterWithName: @"CICrop" |
keysAndValues: @"inputImage", |
[transition valueForKey: @"outputImage"], |
@"inputRectangle", [CIVector vectorWithX: 0 Y: 0 |
Z: thumbnailWidth |
W: thumbnailHeight], |
nil]; |
return [crop valueForKey: @"outputImage"]; |
} |
Each time the timer that you set up fires, the display must be updated. Listing 2-12 shows a timerFired: routine that does just that.
Listing 2-12 Using the timer to update the display
- (void)timerFired: (id)sender |
{ |
[self setNeedsDisplay: YES]; |
} |
Finally, Listing 2-13 shows the housekeeping that needs to be performed if your application switches the source and target images, as the example does.
Listing 2-13 Setting source and target images
- (void)setSourceImage: (CIImage *)source |
{ |
[source retain]; |
[sourceImage release]; |
sourceImage = source; |
} |
- (void)setTargetImage: (CIImage *)target |
{ |
[target retain]; |
[targetImage release]; |
targetImage = target; |
} |
Imaging Dynamical Systems
A dynamical system is one whose state changes over time using a calculation that is based on the current state of the system. Complex phenomena—fluid dynamics, stellar formation, saxophone multiphonics, self-organizing systems, and so forth—are typically modeled using iterative functions whose output is presented in graphical format. Imaging dynamical systems requires a way to feed the output of the system back to the input. Imaging these types of systems is not quite as simple as chaining a lot of filters together, as shown in “Processing an Image.” Rather, there needs to be a way to accumulate image output so that it can affect the next iteration. Core Image provides the CIImageAccumulator class for just this purpose. An image accumulator object enables feedback-based image processing for such things as the iterative painting operations required by fluid dynamics simulations.
The code in this section shows how to use a CIImageAccumulator object, but not for anything as complex as modeling dynamical systems. Instead, you’ll see how to use an image accumulator to implement a simple painting application called MicroPaint. A user drags the mouse on a canvas to apply paint. A simple button press sprays a dab of paint. A color well lets the user change color. The user can create output similar to that shown in Figure 2-6.
The “image” starts as a blank canvas. MicroPaint uses an image accumulator to collect the paint applied by the user. When the user clicks Clear, MicroPaint resets the image accumulator to a white canvas. The three essential tasks for using an image accumulator for the MicroPaint application are:
The interface file for the MicroPaint application is shown in Listing 2-14. The routines for obtaining mouse location and updating the user interface aren’t discussed here. The tasks necessary to set up and use an image accumulator are discussed in the sections that follow. (The CIMicroPaint sample application is somewhat similar to the MicroPaint application discussed here. You might also want to look at that application, which is available after you install the developer tools on your hard disk, in Developer > Examples > Quartz > Core Image.)
Listing 2-14 The interface for the MicroPaintView
@interface MicroPaintView : NSView |
{ |
BOOL initialized; |
NSBundle *bundle; |
CIImageAccumulator *_canvas; |
// User interface |
NSColor *color; |
IBOutlet NSColorWell *colorWell; |
IBOutlet NSButton *clearButton; |
// For tracking the brush and making an evenly-spaced set of paint dabs |
NSPoint lastPt; |
float lastPressure; |
float distance; |
} |
- (void)awakeFromNib; |
- (void)drawRect:(NSRect)r; |
- (void)deposit:(NSPoint)pt pressure:(float)pressure; |
- (IBAction)colorWellAction:(id)sender; |
- (IBAction)clearButtonAction:(id)sender; |
@end |
Create and Initialize an Image Accumulator Object
The canvas routine shown in Listing 2-15 creates and initializes an image accumulator object. The bounds of the image accumulator object are set to the bounds of the view, using a 32 bit-per-pixel, fixed-point pixel format (kCIFormatARGB8). The routine also sets up and initializes a constant color generator filter (CIConstantColorGenerator) with the color white. Then it uses the output of the constant color filter to initialize the image accumulator image. The canvas routine sets a blank (white) canvas the first time the application launches and anytime the user clicks the clear button. Otherwise, the routine returns the current image accumulator.
Listing 2-15 Creating and initializing an image accumulator
- (CIImageAccumulator *)canvas |
{ |
CGRect r; |
CIFilter *f; |
NSRect bounds; |
if (_canvas == nil) |
{ |
bounds = [self bounds]; |
r = CGRectMake(bounds.origin.x, bounds.origin.y, |
bounds.size.width, bounds.size.height); |
_canvas = [[CIImageAccumulator alloc] initWithExtent:r |
format:kCIFormatARGB8]; |
f = [CIFilter filterWithName:@"CIConstantColorGenerator" |
keysAndValues:@"inputColor", |
[CIColor colorWithRed:1.0 green:1.0 blue:1.0 alpha:1.0], |
nil]; |
[_canvas setImage:[f valueForKey:@"outputImage"]]; |
} |
return _canvas; |
} |
Set Up and Apply a Filter to the Image Accumulator
MicroPaint provides its own filter—a dab filter—that applies paint to the canvas. The filter calculates where and how much paint to apply based upon the location of the mouse (or pen), the brush size and brush spacing (constants defined by the application), and the pressure, which can vary if the user paints with a pressure-sensitive device.
The dab filter is part of the MicroPaint application bundle. Its implementation isn’t discussed here. If you want to create and use your own filters, see “Creating Custom Filters.”
The deposit:pressure: method shown in Listing 2-16 is called whenever there is a mouse-down or mouse-dragged event. A detailed explanation for each numbered line of code appears following the listing.
Listing 2-16 Setting up and applying the dab filter to the accumulated image
- (void)deposit:(NSPoint)pt pressure:(float)pressure |
{ |
CIFilter *myFilter; |
CGRect r; |
myFilter = [CIFilter filterWithName:@"DabFilter"];// 1 |
[myFilter setValue:[CIVector vectorWithX:pt.x Y:pt.y] // 2 |
forKey:@"inputCenter"]; |
[myFilter setValue:[CIColor colorWithRed:[color redComponent] |
green:[color greenComponent] |
blue:[color blueComponent] alpha:1.0] |
forKey:@"inputColor"]; |
[myFilter setValue:[NSNumber numberWithFloat:brushsize * 0.5] |
forKey:@"inputRadius"]; |
[myFilter setValue:[NSNumber numberWithFloat:pressure] |
forKey:@"inputOpacity"]; |
[myFilter setValue:[[self canvas] image] // 3 |
forKey:@"inputImage"]; |
r.origin = CGPointMake(pt.x - brushsize * 0.5, |
pt.y - brushsize * 0.5);// 4 |
r.size = CGSizeMake(brushsize, brushsize); |
[[self canvas] setImage:[myFilter valueForKey:@"outputImage"] dirtyRect:r];// 5 |
[self setNeedsDisplay:YES];// 6 |
} |
Here’s what the code does:
Creates a filter for the dab filter.
Note: The dab filter is a custom filter created by the application. The process for using custom filters is the same as for using Core Image filters. You create a
CIFilterobject using the name assigned to the filter, set the input values, and obtain the output image. If you package your filter as an image unit, you must first load it. See “Loading Image Units” for details.Sets the input values for the dab filter.
Sets the image accumulator image as the input image to the dab filter.
Calculates the dirty rectangle, which is based on the location of the mouse and the brush size set by the application.
Sets the image accumulator image to the output of the dab filter, but only in the area specified by the dirty rectangle.
Sets the display to be updated, which calls the
drawRect:routine for the view.
Create a CIContext Object and Draw the Image
The drawRect: method shown in Listing 2-17 is called when the deposit:pressure: method sets the display for updating. A detailed explanation for each numbered line of code appears following the listing.
Listing 2-17 The drawRect routine for the Mouse Paint application
- (void)drawRect:(NSRect)rect |
{ |
CGRect cg; |
CIContext *context = [[NSGraphicsContext currentContext] CIContext];// 1 |
cg = CGRectMake(NSMinX(rect), NSMinY(rect), |
NSWidth(rect), NSHeight(rect)); |
[context drawImage:[[self canvas] image] // 2 |
atPoint:cg.origin |
fromRect:cg]; |
} |
Here’s what the code does:
Creates a Core Image context by calling the
NSGraphicsContextmethodCIContext. You need to create the context only once; always reuse theCIContextobject when you can.Draws the image returned by the
CIImageAccumulatorobject at the origin(0,0), using the full size of the view.
Tip: If you repeatedly call Core Image without returning to your application run loop, it’s best to surround each batch of Core Image invocations with their own autorelease pool. This practice prevents your application from using more memory than necessary—which is important when you manipulate images.
Applying a Filter to Video
Core Image and Core Video can work together to achieve a variety of effects. For example, you can use a color correction filter on a video shot under water to correct for the fact that water absorbs red light faster than green and blue light. There are many more ways you can use these technologies together.
Follow these steps to apply a Core Image filter to a video displayed using Core Video:
When you subclass
NSViewto create a view for the video, declare aCIFilterobject in the interface, similar to what’s shown in this code:@interface MyVideoView : NSView
{NSRecursiveLock *lock;
QTMovie *qtMovie;
QTVisualContextRef qtVisualContext;
CVDisplayLinkRef displayLink;
CVImageBufferRef currentFrame;
CIFilter *effectFilter;
id delegate;
}
When you initialize the view with a frame, you create a
CIFilterobject for the filter and set the default values using code similar to the following:effectFilter = [[CIFilter filterWithName:@"CILineScreen"] retain];
[effectFilter setDefaults];
This example uses the Core Image filter CILineScreen, but you’d use whatever is appropriate for your application.
Set the filter input parameters, except for the input image.
Each time you render a frame, you need to set the input image and draw the output image. Your
renderCurrentFrameroutine would look similar to the following. Note that this example, to avoid interpolation, uses integer coordinates when it draws the output.- (void)renderCurrentFrame
{NSRect frame = [self frame];
if(currentFrame)
{CGRect imageRect;
CIImage *inputImage, *outputImage;
inputImage = [CIImage imageWithCVImageBuffer:currentFrame];
imageRect = [inputImage extent];
[effectFilter setValue:inputImage forKey:@"inputImage"];
[[[NSGraphicsContext currentContext] CIContext]
drawImage:[effectFilter valueForKey:@"outputImage"]
atPoint:CGPointMake(
(int)((frame.size.width - imageRect.size.width) * 0.5),
(int)((frame.size.height - imageRect.size.height) * 0.5))
fromRect:imageRect];
}
}
In your
deallocmethod, make sure you release the filter.
The following sample applications apply Core Image filters to video:
CIVideoDemoGL demonstrates using Core Image with QuickTime through Core Video.
QTCoreImage101 is a Cocoa application that demonstrates how to render a QuickTime Movie using Core Image filters, Core Video, and Visual Contexts.
You can download these and other sample applications from the ADC Reference Library (Sample Code > Graphics & Imaging > Quartz).
© 2004, 2008 Apple Inc. All Rights Reserved. (Last updated: 2008-06-09)