The Core Application Architecture on Mac OS X
When a user launches a Cocoa application, a network of objects is put into place. This runtime network consists of Application Kit objects of different types, each performing a specific role. These objects are related to each other in various ways defined by ownership, dependency, and cooperation. This chapter looks at this application architecture and examines the roles played by the core objects, their primary attributes, and the relationships they have with each other.
In this section:
The Event-Drawing Cycle, Revisited
The Global Application Object
Windows
Views
Responders and the Responder Chain
Controls and Menus
Nib Files and Other Application Resources
The Event-Drawing Cycle, Revisited
The overall purpose of the network of objects is to expedite the work of the event and drawing cycle. Figure A-1 (which you may recall from “Adding Behavior to a Cocoa Program”) illustrates this cycle.
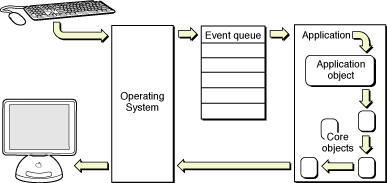
The application presents a graphical user interface; users interact with that interface by using the mouse and keyboard to enter data or indicate a choice; and this input is transformed into an event that is routed to the application and placed in its event queue. For each event in its queue, the application locates the object or objects best suited to handle the event, and after the event is handled the application may appropriately modify what it displays to users. Then the application gets the next event in its queue and the cycle begins again.
The core objects that participate in this architecture are direct or indirect descendants of the NSApplication, NSWindow, and NSView classes.
The Global Application Object
Every Cocoa application is managed by a single NSApplication object known by the name of the global variable, NSApp. This singleton instance of NSApplication (or of a custom subclass thereof) has a major responsibility: obtaining user and system events targeted at the application and dispatching them to the appropriate objects. It is also responsible for managing the application's windows, including tracking their current status as key or main window (see “Window Status”).
The Main Event Loop
Most of the work that NSApp does takes place in the application's main event loop, which is the basis of the event and drawing cycle. To understand how the main event loop operates, it helps to consider what takes place in a Cocoa application's main entry point. In a standard Xcode Cocoa project, main has a single function call, NSApplicationMain This function does three important things, in the following order:
It obtains the shared application object (
NSApp) by invoking the class methodsharedApplication.It runs the application (
[NSApprun]).
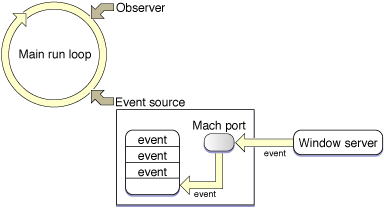
Let's examine these steps in a little more detail, starting with some background information. A running application is essentially a process, and each process has a main thread and possibly one or more secondary threads. Each thread always has a run loop created for it; a run loop is a mechanism that monitors sources of input to the process and dispatches control to it when sources become ready for processing.
The main thing that the sharedApplication method does—outside of ensuring a singleton instance—is to set up the programmatic infrastructure for receiving and processing events from the window server. In initializing the global application object, NSApplication establishes a connection to the window server by creating an event source for receiving events (implemented as a Mach port). It also sets up the application's event queue, a FIFO mechanism that enqueues events fetched from the event source as they arrive. Finally, NSApplication initializes the main run loop—the run loop on the main thread—with the event source as an input source (see Figure A-2).

The window server receives events from I/O Kit device drivers and dispatches them to the appropriate processes. The process receives the event from the event source in the run loop and places it on a queue.
When the application loads the main nib file, the objects in the file are unarchived along with the connections between these objects. The main nib file always contains the application menu and may contain one or more window objects (with their constituent views). Other nib files may be unarchived at launch time as well; document-based applications, for instance, may unarchive the nib files of documents when a user double-clicks a file in the Finder. This initial graphical user interface is needed so users can begin making requests—by, for instance, choosing a menu item— and consequently generating events for the application to handle.
The NSApplication run method is the workhorse of the main event loop. It first registers Apple event handlers for the application (see “Handling Apple Events”). Then in a closed while loop, run does the following until the application terminates:
It services pending window-display observers on the run loop (see Figure A-3, which results in the redrawing of regions in windows that are marked as "dirty."
It gets the next event in the event queue (
nextEventMatchingMask:untilDate:inMode:dequeue:).It dispatches the event to the object that should next handle it, which in most cases is an
NSWindowobject (sendEvent:). See “More About Event Dispatch” for clarification.Ultimately, numerous objects may become involved in handling the event, and the call stack may grow significantly. After the event is handled, control returns to
run.
The funnel point of the main event loop is the nextEventMatchingMask:untilDate:inMode:dequeue: method. If there are events in the event queue, this method fetches the topmost event in the queue and converts the structure to an NSEvent object. If there are no events in the queue, the method blocks. During the period the method blocks, new events from the window server are processed and placed in the queue. The presence of new events "wakes" nextEventMatchingMask:untilDate:inMode:dequeue: and it returns the first matching event in the queue.
If a window has its auto-display feature enabled and it has views marked for display, it also installs an observer (an input source) on the run loop. Just before NSApp processes the next event in the queue, this observer fires, leading to the redrawing of those views. For more on this automatic displaying of window content, see “Windows and Drawing.”
More About Event Dispatch
In its sendEvent: implementation, NSApp looks at the type of event passed in and dispatches it accordingly. Usually the target of the dispatch is one of the application's windows, and the application forwards the event by invoking the sendEvent: method of that NSWindow object. For the two major types of input events, key events and mouse events, NSApp uses a different approach to find the appropriate window.
When users press keys on the keyboard, key events are generated. NSApp forwards these events on to the key window—the window of the application that is currently accepting key presses. (In some cases, such as key equivalents, the application handles NSKeyDown events specially instead of dispatching them.)
When users click an object on a window with a mouse, such as a graphical shape in a drawing program, mouse events are generated. NSApp dispatches mouse events to the window in which the mouse event occurred.
If the object that is clicked or otherwise manipulated is a control object, such as a button or a slider, that object sends an additional sort of message to the application—an action message. That message invokes the sendAction:to:from: method of NSApplication. If a target of the message is not specified, this method searches the responder chains of the application's key and (if necessary) main windows, to find a suitable target. Then it sends the message to the target of the action message.
NSApp deals with other types of events in sendEvent:. Some events are specific to the application itself (such as activation and deactivation), and NSApp handles these itself. Other events are related to one or more windows—for example, a window is exposed or a change is made in screen resolution. For these, NSApp invokes the appropriate method in the affected windows.
Further Reading: The responder chain is described in “Responders and the Responder Chain.” To learn more about key windows, see “Window Status.” For a discussion of NSControl objects and how they work together with NSCell objects, read “Controls and Menus.”
Window Management
Part of the job of the global application object is to manage the windows of the application. NSApp performs the following window-management tasks:
It hides and unhides windows.
It deallocates windows at application termination.
It manages window activation and deactivation during application switching.
And, as noted in “More About Event Dispatch,” NSApp dispatches window-specific event and action messages to the affected windows. It also maintains the application's Window menu and manages modal windows and panels. (See “Modal Windows” for a description.)
To help it locate windows, the application object keeps a reference to them called its window list (see Figure A-4). For some window-management tasks (such as deallocation) it iterates through this list. (You can obtain the window list at any time by sending windows to NSApp.) The application object also finds windows by using the window number obtained from the current NSEvent object in a call to windowWithWindowNumber:.
Note: NSApp doesn't have anything to do with the layering of windows on the screen (Z -order). That is managed by the window server. For a discussion of window Z-order, see “Window Z-Order and Levels.”
Handling Apple Events
Not all events that an application must deal with come from the event queue. Other processes on a Mac OS X system, such as the Finder and Launch Services, use Apple events to communicate with other processes. They occasionally send an application Apple events to notify it (for example) when users double-click a document in a Finder window or choose Shut Down from the Apple menu, requiring the application to terminate.
When a Cocoa application starts up, one of the first things it does is to register a number of Apple event handlers. When an Apple event is sent to the application, the appropriate handler is invoked. A Cocoa application registers handlers for the following Apple events:
Apple event ID | Description |
|---|---|
Launches an application. | |
Reopens an application. It is sent, for example, when an application is running and a user clicks the application icon in the Dock. | |
Provides an application with a list of documents to open. This event is commonly sent when the user selects one or more documents in the Finder and double-clicks them. | |
Provides an application with a list of documents to print. This event is commonly sent when a user selects one or more documents in the Finder and chooses Print from the File menu. | |
Provides an application with dragged content, such as text or an image. This event is often sent when a user drags a file onto an application’s icon in the Dock. | |
Requests the application to terminate. |
Note: For more information on this subject, see "How Cocoa Applications Handle Apple Events".
Windows
An application uses windows to claim an area of the screen in which to display content and respond to user actions. Windows are essential to both drawing and event handling.
Further Reading: Window Programming Guide for Cocoa discusses many of the topics covered in this section in greater detail.
The Windows of an Application
Although it's possible to have an application with no visible windows (for example, a background application) such applications are rare. Generally, there are two types of applications based on the number of windows they can potentially display:
Document-based—An application capable of creating multiple documents, each in its own window. Examples are word-processing and drawing applications. In a document-based application, users choose a menu option (typically File > New) to create a new document. Most document-based applications in Cocoa are based on its document architecture. (You can find an overview of this architecture in “Other Cocoa Architectures on Mac OS X.”)
Single-window—An application that displays no more than one window at any time. Examples in Mac OS X are iSync and Font Book. When a single-window application launches, it displays its window. Often closing the window causes the application to terminate.
Any application can also have secondary windows, also known as dialogs and panels. These windows are subordinate to the current document window or, in the case of single-window applications, to the main window. They support the document or main window in various ways—for example, allowing selection of fonts and color, allowing the selection of tools from a palette, or displaying a warning‚ A secondary window is often modal. See “Panels” for more information
NSWindow and the Window Server
In Cocoa an NSWindow object represents a physical window. The window server creates physical windows and ultimately manages them on the screen. It assigns each window a unique number as an identifier. The connection between an NSWindow object and its physical window is established through this window number.
When the window server creates a window, it obtains a window graphics context and initializes the graphics-state stack. It also creates the window's backing store, a memory region holding the pixel values of the window to be placed into the display device's frame buffer.
Note: It's possible to create a window without a backing store. This is called a deferred window. The backing store of a deferred window is created when the window is ordered on-screen.
Window Buffering
Windows often overlap when there's more than one on the screen. When a group of windows are stacked one over another, a mouse click on a partially obscured window usually brings it to the front. In the process, its obscured contents become visible. If the window has a display buffer, the window server can automatically make those contents visible. Otherwise, the application has to redraw them.
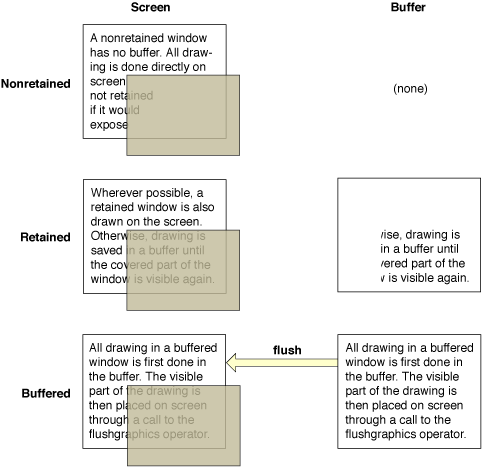
There are two types of window buffering. A window's display buffer stores pixel values either for the entire window or for those portions of the window that are currently obscured. When an obscured window with a display buffer is made frontmost, the window server copies the exposed area from the display buffer to the screen. When you create an NSWindow object you can specify one of three buffering schemes, which are depicted in Figure A-5.
Buffered. The buffer contains an exact duplicate of what's in backing store. In fact, drawing is done to the display buffer, and then its contents are flushed to the screen, composited with overlapping windows if there are shadows or transparency involved. If a window is obscured and then later brought frontmost, the entire display buffer is copied to the screen.
Retained. Although a retained window has a display buffer, drawing is done directly on-screen when the window is unobscured and no alpha component is to be drawn. When any part of the window is obscured, the displayed contents are copied to the buffer, and drawing is done to the buffer. Modified parts of the buffer are copied to the display. When the obscured areas of the window on the display are later revealed, the contents of the display buffer are copied to the screen.
Nonretained. No display buffer is provided. All drawing occurs directly onscreen—that is, the pixel values are written directly to the frame buffer. If part of the window is covered by another window, the bits for that part of the window's content area are lost. When the obscured window is exposed, the application must redraw the obscured portion; if it doesn't draw, that portion is displayed in the window's background color.
Only buffered windows support transparency effects, including the use of an alpha channel in drawing. Because the Quartz drawing system relies extensively on the use of alpha in drawing, windows to be used with Quartz should be buffered windows, and components that rely on Quartz, such as the Application Kit, should always use buffered windows. Nonretained windows might be used for transitory images or simple connection lines, such as are used in Interface Builder for target-action connections. However, the use of nonretained and retained windows is in general discouraged, because the presence of such windows interacts poorly with the modern user interface and may cause performance degradation.
Window Z-Order and Levels
The window server maintains the windows it displays on a screen in a front-to-back order known as the screen list or the Z-order. Each window has a unique position in the list. A window can be at the top of the list—that is, the frontmost window. Or it can be at the bottom of the list—that is, the window potentially overlapped by every other window. Or it can be in any other position where it is above and below other windows. The Z-order is changed every time a user clicks a window, which makes that window frontmost and puts the previously frontmost window behind it.
The concept of window layering is complicated by window levels. A level is a layering subset of windows of a particular functional type. Window levels are in a hierarchical order, with those windows in higher levels displayed above windows in lower levels. This scheme guarantees that a window of one particular type always appears above or below a window in another level. For example, a modal system dialog always appears above all application windows. Thus Z-order is really maintained within windows levels (see Figure A-6).
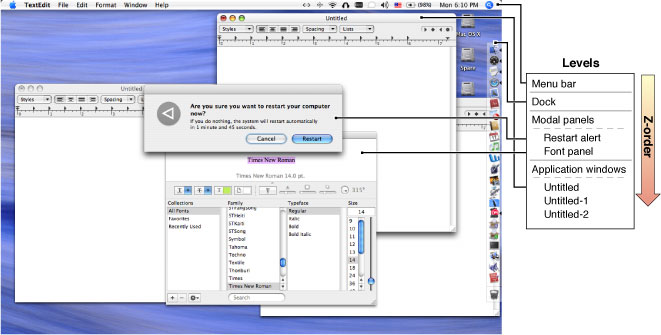
The window server supports several levels of windows, in the following order:
Screen savers. (Screen savers use a window the size of the screen but without a title bar to display their content.) Screen-saver windows are displayed above all other windows.
The menu bar (which includes application menus).
The Dock.
Modal windows and panels (see “Modal Windows.”
Contextual menus.
Floating windows (for example, palette windows for a drawing application).
Any other types of windows, including application windows.
A window can be explicitly taken off the screen list, in which case it's known as an offscreen window. A window disappears when it's removed from the list, and it's restored to the screen when it's put back on the list. Events are not dispatched to offscreen windows. Moving windows off the screen list is the basis for an application's window-hiding capability. An offscreen window must be buffered or retained in order for it to be drawn into.
Note: You can also remove a borderless window from the screen by setting its frame coordinates outside of the visible coordinates of the screen. You cannot do this with other windows, however; the Application Kit constrains these windows to remain at least partially visible within the screen bounds.
NSWindow defines methods for manipulating the Z-order of application windows, for taking windows off and on the screen list, and for setting the level of windows. See the NSWindow class reference for details.
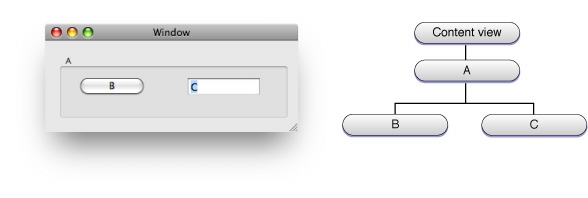
Parts of a Window
A window has two major parts: a frame area and a content area, as shown in Figure A-7. These areas are views—specifically, instances of a subclass of NSView (see “Views.” The frame view surrounds the entire window area, and draws the window's border and title bar. The frame view is a private object created by NSWindow; it is not open to alteration through subclassing. However, when you create a window, you can specify which controls and other features—close button, miniaturize button, resizing triangle, title—you want the frame view to have.
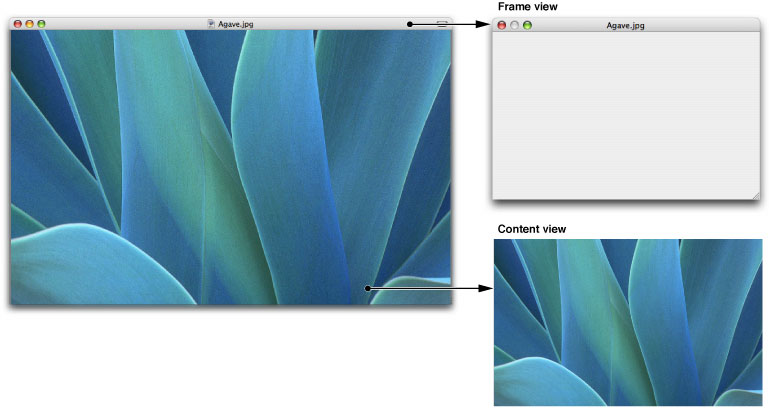
The content view is inset into the frame view, usually occupying the entire area except for the title bar and the window border. Figure A-7 shows the content view relative to the frame view. (One can create windows that don't have a title bar or visible border, but they still have a frame view.) The content view is the sole public subview of the frame view. It is not a private view so you can replace it with your own custom view, if you wish. Although the content view has a superview (that is, a view that owns and encloses it in the hierarchy of views), that superview is a private object. The content view is thus the root of the hierarchy of views for the window. For more on the view hierarchy, see “Views.”
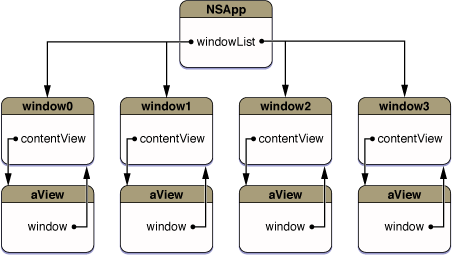
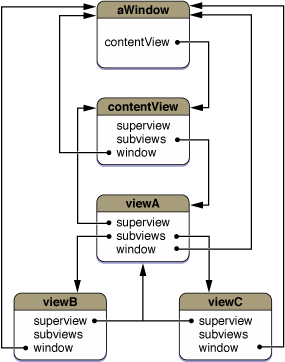
As do all view objects, the content view keeps a reference to its window, accessible through the window method. Figure A-8 depicts NSApp and its window list, the content view of each of the windows in the list, and the relationships between those objects.
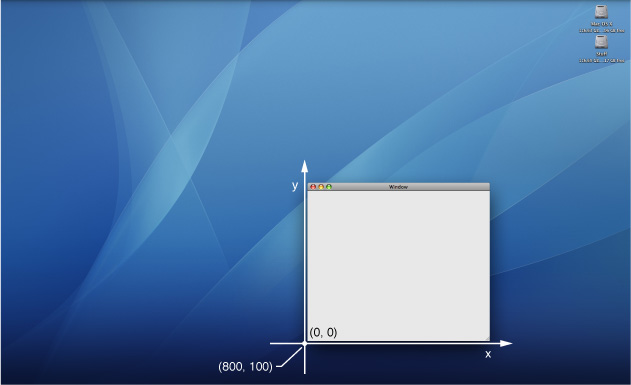
Window Coordinates
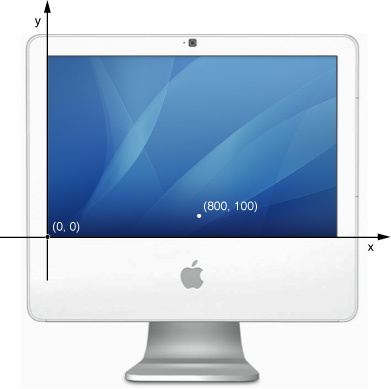
The coordinates of a window are related to the coordinates of the screen. The entire screen can be thought of as the upper-right quadrant of a two-dimensional coordinate grid, with the origin in the lower-left corner and the positive x-axis extending horizontally to the right and the positive y-axis extending vertically upward (see Figure A-9). You can locate a point in the screen by reference to this grid.
The primary function of the screen coordinate system is to position windows on the screen. When your application creates a new window and puts it on the screen, it must specify the window's initial size and location in screen coordinates. However, for drawing in a window, it uses a different coordinate system, one that's specific to the window: its base coordinate system (see Figure A-10). This coordinate system differs from the screen coordinate system in two respects:
It applies only to a particular window; each window has its own base coordinate system.
The origin is at the lower-left corner of the window rather than at the lower-left corner of the screen. If the window moves, the origin and the entire coordinate system move with it. An image retains its position within a base coordinate system no matter where the window is located.
The base coordinate system is the reference point for defining the individual coordinate systems of the window's views. The frame view draws the window's border and title bar directly in the base coordinate system. The content view and its subviews draw in coordinate systems that are transformations of the base coordinate system.
Windows and Drawing
Windows do not draw themselves. That job is left to the views they contain. However, an NSWindow object plays an important role in coordinating the drawing of its views.
Normally, during a pass of the event loop objects in an application may mark views (or regions of views) as needing to be redrawn. An NSWindow object collects references to these "dirty" views in a list, the order of which is determined by position in the view hierarchy. Shortly afterward—which is usually at the end of an event cycle—the Application Kit iterates through this list starting with the topmost view (that is, the view closest to the content view) and requests each view to draw itself. In this manner, views that are a background to other views are drawn first.
This automatic drawing of a window's views takes place only if the window's auto-display feature is turned on, which it is by default (see the setAutodisplay: method). If you turn off this feature, the application is responsible for updating window content when necessary. In addition, you can bypass the auto-display mechanism by sending an display, displayRect:, or displayRectIgnoringOpacity: message to any NSView object; as a result that view and its subviews are immediately redrawn. See “Displaying a View” for further information.
You can redraw an entire window with the NSWindow display and displayIfNeeded methods. These methods force an immediate display of the window's views, although the latter method iterates only through the list of invalidated views. The display method causes each view in the window's view hierarchy to redraw itself, starting with the content view. This method is invoked on a one-shot window (that is, a window whose backing store is released when the window is offscreen) before the window is shown onscreen. In addition, you can call setFrame:display: with a second argument of YES to cause the window to resize and to redraw all of its views.
A mechanism related to window display is window updating. At every pass through the event loop, NSApp sends an update message to each window in its window list. The default implementation of update does nothing, but subclasses of NSWindow can override this method to examine the state of the application and modify the behavior or appearance of the window as needed.
Window Status
Each window of an application has a status related to the user's interaction with it. The appearance of a window is an indication of this status. Inactive windows are open and may be visible, but they are not in the foreground. The controls and title in the title bars of inactive windows are grayed out. Users cannot interact with these windows unless they click on them to bring them forward.
Active windows are windows that are currently the focus of user input or attention. They are in the foreground, their controls have color, and their titles are in a black font. Active windows can have two statuses: main and key. The active window that is currently the focus of user attention is the main window. It is also the key window much of the time; a window is key if it currently accepts keyboard events.
However, sometimes the main window and the key window are separate windows. While the main window is still the focus of user attention, another window is the input focus for key events. The key window must have an object such as a text field in which the user can enter characters by typing at the keyboard. In this case, the key window is typically a dialog or panel (for example, the Find dialog) in which the user specifies data relevant to the main window.
The application object (NSApp) maintains the main and key status of the application's windows. A window's status often determines the events it receives and dispatches (see “More About Event Dispatch.”
Further Reading: For more on main and key windows, see the section on window behavior in Apple Human Interface Guidelines.
Windows and Event Handling
NSWindow is involved with events and event handling in two principal ways. In one activity— event dispatch—it is actively involved. In the other, it is the passive recipient of a constrained stream of events.
Event Dispatch
As described in “More About Event Dispatch,” the application dispatches most events it receives by sending sendEvent: to the NSWindow objects to which the event "belongs." The window object, in turn, locates the NSView object that should receive the event and sends the appropriate NSResponder message to that view, passing in the NSEvent object. For example, if the event is a key-down event, it sends keyDown: to the view; if it's a mouse-dragged event (left button), it sends mouseDragged:. How the window object locates the target view generally differs between key and mouse events:
The window sends key events to the first responder of the view hierarchy.
The window sends mouse events to the view in which the mouse event occurred.
The key-down (NSKeyDown) and left-mouse-down (NSLeftMouseDown) events require the most handling. Before NSWindow attempts to send the keyDown: message to the first-responder view, it feeds the key character (or characters) to the system input manager, which interprets the input as text to insert or commands to perform. Before it sends a mouseDown: message, NSWindow attempts to make the target view the first responder. If the appropriate modifier keys are pressed, it doesn't send the message at all, instead handling it by displaying contextual help or a contextual menu.
Modal Windows
Normally an application distributes events to all of its windows, guided primarily by where user actions occur. But sometimes an application may run a window modally, thus requiring users to complete a task—for example, selecting a file, entering a name, or even clicking an OK button—before they can dismiss the window. Modal windows are common in Mac OS X; they include error-message dialogs and panels for opening and printing documents.
NSWindow objects are passive participants in the modal-window mechanism; it's the application that programmatically initiates and manages modal behavior. To run a window modally, NSApp uses its normal event loop machinery but restricts input to a specific window or panel. In the loop, it fetches events but if the events do not meet certain criteria—most importantly their association with the modal window—it tosses them.
NSApplication offers a couple of ways to run a window modally:
Blocking—The application blocks until the user dismisses the modal window.
Nonblocking (modal session)—An application initiates the modal session and runs the window modally for one pass through the event loop. The modal-session code can continue to run the window modally in a loop until some condition is satisfied.
Other Application Kit classes also provide methods to run windows and panels modally.
Panels
Panels are secondary windows that act in a supporting role to an application or document window. They are frequently referred to as dialogs. In Cocoa, panels are instances of NSPanel or of a subclass of NSPanel. Panels have some special behaviors suitable to their auxiliary function. They can become the key window, but never the main window. By default, they are removed from the screen when the application becomes inactive, and are redisplayed when the application becomes active again. (Alert dialogs are an exception to this behavior.) And, because a panel is intended for repeated use, it isn't released when it's closed. You can also configure panels to become floating windows—such as utility windows—which are in a level above the other windows of an application.
Views
An NSView object (or simply, a view) occupies a rectangular area in a window. In Cocoa, views are instances of a subclass of NSView. They are the most pervasive type of object in the Application Kit; nearly every object you see in a Cocoa application is a view. Views are in the front line of both drawing and event handling, and hence are one of the more important types of objects to understand.
You can think of the drawing a view performs on the screen as a visual representation of the object itself. In a very real sense, a view draws itself. It also provides a surface that can be responsive to input from a mouse, keyboard, or other input device.
Further Reading: See Cocoa Drawing Guide for a comprehensive description of concepts and tasks related to drawing with NSView objects. Also, View Programming Guide for Cocoa describes various tasks related to the manipulation of views.
Varieties of Views
NSView is a class that defines the basic drawing, event-handling, and printing architecture of an application. NSView itself does not draw content or respond to user events, so you typically don’t interact with a direct instance of NSView. Instead you use an instance of a custom NSView subclass. A custom view class inherits from NSView and overrides many of its methods, which are invoked automatically by the Application Kit.
If you look at the class hierarchy of the Application Kit (Figure 1-10), you'll notice a proliferation of classes inheriting, directly or indirectly, from NSView. These classes fall into several categories:
Controls. Controls are views that users manipulate (for example, by clicking or dragging) to indicate a choice to an application. Buttons, sliders, text fields, and steppers are examples of controls. Controls usually (but not always) work in concert with cell objects, which do not inherit from
NSView. “Controls and Menus” discusses controls at more length.Container views. Some views are used to enclose and present other views or more primitive data. They may allow the editing of data or a more efficient presentation of a user interface. Among these kinds of views are
NSTextView,NSImageView,NSBox,NSSplitView, andNSTabViewobjects.Compound views. Some views are composed of other views. When you see a text view in a Cocoa application, it includes not just an
NSTextViewobject but also anNSClipViewobject and anNSScrollViewobject (which itself includesNSScrollerobjects). Another example are table views (instances ofNSTableView), which have constituent objects for table headers and table columns (the latter of which is not a view).Wrapper views. A few views act as a Cocoa "host" for a Mac OS X technology. Examples of these objects are instances of
NSOpenGLViewandNSMovieView.
There is some overlap between some objects in these categories. For example, an NSTableView object is a compound object, but it is also a control.
The View Hierarchy
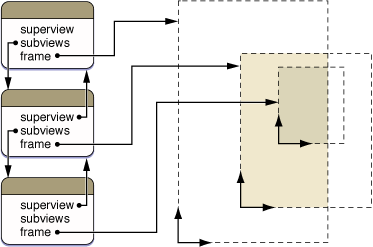
As you may recall from the earlier discussion of windows (“Windows”), each view object is associated with the window in which it is displayed. All of the views in a window are linked together in a view hierarchy. Each view has another view as its superview and may be the superview for any number of subviews. At the top of the hierarchy of views is the window's content view, which has no public superview (it does have a private one). The key visual characteristic of the view hierarchy is enclosure: a superview encloses its subviews, which are positioned relative to it. Figure A-11 illustrates this enclosure.
Arranging views in a hierarchy is beneficial for both drawing and event handling. It benefits drawing in three ways:
It permits a complex view to be constructed out of other views. For example, a graphical keypad might be a container view with a separate subview for each key.
It also permits each view to have its own coordinate system for convenient drawing. Views are positioned within the coordinates of their superviews, so when a view object is moved or its coordinate system is transformed, all of its subviews are moved or transformed with it. Because a view draws within its own coordinate system, its drawing instructions can remain constant no matter where it is or where its superview moves to on the screen.
It is used to set the layering order of views rendered in a drawing pass (see “Displaying a View”).
Note: Don't confuse the view instance hierarchy with the view class inheritance hierarchy. The view inheritance hierarchy is the arrangement of classes based on shared attributes, interface, and behavior. A view instance hierarchy is an arrangement of particular view instances based on enclosure.
The view hierarchy (referring now to the view instance hierarchy) plays an important role in event handling because it is a major part of the responder chain. See “Responders and the Responder Chain” for more about the responder chain.
The view hierarchy is dynamic: As an application runs, you can rearrange views, add them, and remove them. You can move a view from one window to another, and you can move a view around a particular hierarchy.
NSView has three relationship properties that help to locate a view in the view hierarchy:
window—the window (NSWindowobject) in which the view appearssuperview—the view that's immediately above the view in the hierarchysubviews—the list of views that contained by the view (the list could have zero or more views)
Reflecting these properties, Figure Figure A-12 diagrams the relationships of a window object and its view hierarchy.
View Geometry and Coordinates
View geometry is largely defined by two rectangles associated with each view: its frame and its bounds. Although these rectangles circumscribe the same area, they have different purposes. Together they help to define a view's position and size, and the coordinate system in which it draws and responds to events.
Note: Dimensions and locations described with these rectangles are expressed in floating-point values.
The Frame
The frame rectangle defines the area of a view, the tablet on which it can draw. If you think of a view as a rectangular area on a window, the frame specifies the dimensions of this rectangle and its location in the window. A view can draw only within its frame; by default, the Application Kit enforces clipping of the content the view draws to the view's frame.
As shown in Figure A-13, the frame rectangle of a view usually lies within the frame rectangle of its superview. But it doesn't have to. A view's frame rectangle can extend outside its superview's frame, but its drawing is clipped to its chain of containing ancestor views. The only part of the view that's visible on the screen is that part within the view's frame rectangle and within the frame rectangles of all its ancestor views.
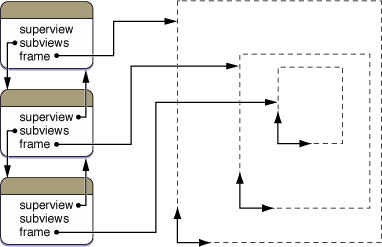
Figure A-14 also shows three hierarchically related views. In this case, however, the middle view lies partially outside it superview's frame rectangle. Although the lowest view lies entirely inside its superview, it also lies partially outside an ancestor view, so only the colored portion of it is visible.
Some views may contain more material than a window has room enough to display—a view containing the contents of a long document, for example. Such a view may be made the subview of another, smaller view that exposes only part of it. This smaller view is known as a clip view (an instance of NSClipView). With the aid of enclosing scroll view (NSScrollView) and the scrollers (NSScroller) that it manages, users can control the visible portion of the document within its clip view. As the subview moves, different portions of it are scrolled into view.
You move the location of a view within its subview by resetting its frame's origin. You change the size of a view by altering the size of the frame rectangle. Because these values are interpreted according to the superview's coordinate system, the size and location of a view on a screen can also change if the superview's coordinates change.
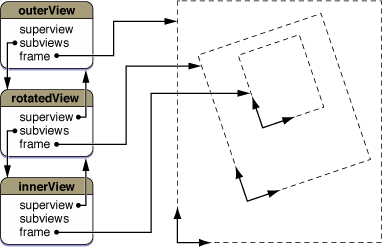
You can rotate a view around its frame origin. Rotation doesn't affect the shape or size of the view; it remains a rectangle even though it has been turned at an angle and the sides of its frame are no longer parallel to its superview's x-axis and y-axis. The frame's origin stays at the same point regardless of the angle of the frame's rotation. Subviews of a rotated view remain aligned with it and hence are also turned in relation to the superview of the rotated view. Figure A-15 illustrates the same three views shown in Figure A-13, but here the view in the center of the hierarchy has been rotated.
The Bounds
While a view's frame provides the means to size and position the view within its containing superview, it is of little use to the view for drawing. A view performs all drawing and event handling in its own local coordinate system, which is defined by its bounds rectangle.
A view's bounds rectangle defines the way that its local coordinate system is mapped onto the view's area. It describes exactly the same physical area as the frame rectangle, though this area is stated in the view's local coordinate system. By default, a view's bounds rectangle is identical in size to its frame, and has an origin of (0.0, 0.0). Under this arrangement, the view positions and draws its content using positive-valued coordinates.
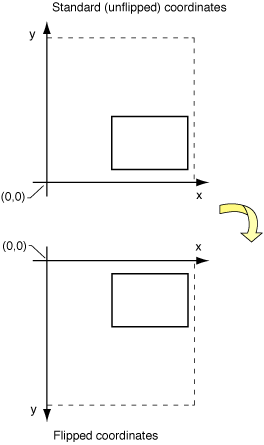
However, If the view is flipped, this situation changes. A view can flip its coordinate system so that the drawing origin is in the upper-left corner of the view and the positive y-axis extends downward. Figure A-16 shows what a flipped coordinate system looks like. Flipped views are especially useful for applications that draw text in languages such as English, where text starts in the upper-left corner of a document and flows right and then down.
Views typically use the bounds rectangle to ensure that they don't fruitlessly attempt to draw something that will never be rendered on the screen. Because drawing is clipped if it falls outside of any ancestor view, the bounds rectangle by itself is a reliable guide only for views that aren't scrolled and stay entirely within the frame rectangles of all their ancestors. The NSView class provides other programmatic ways to determine where to draw, but the bounds rectangle remains part of any drawing calculation.
Drawing Coordinates
The bounds rectangle provides a view with its drawing coordinates. Before a view draws itself, its coordinate system is made the current coordinate system for the application (see “How Views Get Drawn” for details). Recall that the default coordinate system for a view is the same as its superview's, except for these differences:
The point that locates the view's frame in its superview is made the origin (0.0, 0.0) of the bounds rectangle, and hence is the origin of the drawing coordinates.
If a view's frame is rotated, its drawing coordinate system is rotated with it; the bound's x-axis and y-axis remain parallel with the frame's axes.
If a transformation is performed on the bounds, however, these details can change.
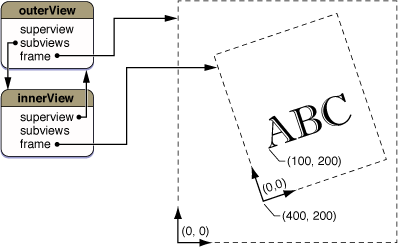
Figure A-17 illustrates the relationship between a view's default coordinate system and the coordinate system of its superview. The innerView object in this diagram is located at (400.0, 200.0) in its superview coordinate system. For any drawing that innerView does, this same point is treated as the coordinate origin (0.0, 0.0). When innerView draws text beginning at (100.0, 200.0), as it does in this example, the point is measured from its own origin, not its superview's. Even if innerView is rotated, as shown in the diagram, the bound's axes rotate with the frame; the origin of the view's drawing coordinates remain unchanged.
A view can modify its default local coordinate system in several ways:
It can translate its origin to a point other than that defined by the frame's origin.
It can scale the size of units along its bounds axes to a value different than its superview's.
It can rotate the axes of its bounds rectangle around the bounds origin so that they're no longer aligned with the frame's axes.
These modifications alter the coordinate system that the view draws in, and may affect the appearance of what's drawn, but they don't change the area where the drawing appears. In other words, they don't affect the view's frame rectangle.
How Views Get Drawn
Views are the primary objects responsible for drawing window content in a Cocoa application. Other Application Kit objects can draw (such as NSCell, NSBezierPath, and NSAttributedString objects), but they require an NSView "host" object to provide the drawing surface and coordinate the drawing. The following sections give a high-level overview of how the Application Kit coordinates the drawing of a view.
Displaying a View
A view typically doesn't draw itself whenever it wishes. It must be explicitly marked as invalid (or "dirty") and thus in need of display. Redrawing of the view can then either take place immediately or, if the NSWindow auto-display feature is turned on, it can be deferred until the conclusion of the current cycle of the main event loop. Windows have auto-display enabled by default. (Auto-display is described in “The Main Event Loop” and in “Windows and Drawing.”)
You can initiate immediate redrawing of a view or a portion of a view with one of the NSView display methods (so-called because each of these methods has "display" embedded in its name). These methods differ in various respects but they all result in the Application Kit doing the following things:
Locking focus on the invalidated view (described in “Locking Focus”)
Invoking the view's
drawRect:method (described in “What Happens in drawRect:”)At the conclusion of a drawing pass, flushing the window associated with the view (if the window's backing store is double-buffered)
Rather than displaying views immediately, the recommended course for most situations is to use the auto-display mechanism and during an event cycle mark views (or parts of views) as needing display. The NSWindow associated with the views collects the marked views in a list ordered by position in the view hierarchy, topmost view first. At the end of the event cycle, it recursively processes this list in one drawing pass, locking focus on each view in turn and asking the view to draw itself entirely or the portion of the view that was marked as needing display. When all views have been drawn, the window (if buffered) is flushed.
The Application Kit may request drawing of additional views and view areas beyond those that your application explicitly marks as needing redisplay. It may determine that additional view drawing is needed to fully update the corresponding window area. That's because an important aspect of the drawing of views is view opacity. A view does not have to draw every bit of its surface, but if it does it should declare itself to be opaque (by implementing isOpaque to return YES). When you mark a view for display, the Application Kit checks the opacity of the view, and if it is not opaque (that is, partially transparent) the Application Kit goes up the view hierarchy until it finds a superview that is opaque. It calculates the portion of the opaque ancestor covered by the original view. Then it draws forward through the hierarchy from this view to the view originally marked as dirty. If you want the Application Kit to not look for the first opaque ancestor before drawing a view, there are several "display ignoring opacity" methods you can use (which are listed in Table A-1 and Table A-3).
You can also mark portions of views and their subviews as needing display and then have them redrawn at once, instead of waiting for the auto-display mechanism to trigger. The NSView display methods that offer this feature all begin with displayIfNeeded.... Even though display is immediate, these methods are more efficient than sending display or displayRect: messages to isolated views.
Table A-1 shows the NSView display methods for displaying individual views or regions of views immediately.
Display area and opacity | Display method |
|---|---|
Entire view | |
Partial view | |
Entire view, ignoring opacity | None |
Partial view, ignoring opacity |
Table A-2 lists the methods that mark views or regions of views for redrawing using the auto-display feature.
Display area | Display method |
|---|---|
Entire view | |
Partial view |
Table A-3 lists the methods that force an immediate display of views (or portions of views) invalidated with the methods in Table A-2.
Display area and opacity | Display method |
|---|---|
Entire view | |
Partial view | |
Entire view, ignoring opacity | |
Partial view, ignoring opacity |
To reiterate, displaying views immediately is less efficient than using the auto-display feature, and immediately displaying only the marked parts of views falls somewhere in between. In addition, it is generally more efficient to mark areas of views as dirty rather than entire views. The display methods are a convenience for application development. A view can lock focus, draw itself, and unlock focus. But this is recommended only in certain circumstances, such as when animating content on a timer callback. In general, you should not try to circumvent the Application Kit's display mechanism.
Locking Focus
When the Application Kit—or your code—locks focus on a view, NSView completes the following set-up steps:
It transforms the view's coordinate system from its superview's coordinate system and makes it the application's current coordinate system.
It constructs a clipping path to define the rectangular area outside of which the view cannot draw.
It activates other parameters of the current graphics state to establish the view's drawing environment.
You lock focus on a view by sending it a lockFocus (or related lockFocus...) message. After drawing is completed in a focused view, you unlock focus by sending it unlockFocus. The Application Kit automatically locks and unlocks focus when sending a view a drawRect: message.
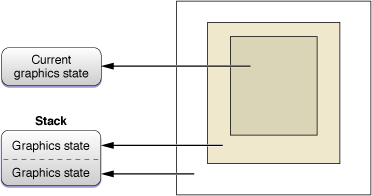
A focused view is one that is currently drawing. Every window has a window graphics context, which defines a window server destination for drawing. This graphics context contains one or more graphics states, each of which isolates drawing operations for a particular view. The current graphics state contains the effective coordinate system and other drawing parameters for the most recently focused view.
A graphics state includes the current transformation matrix, which is a mathematical construct used to map points from one coordinate space to another through rotation, scaling, and translation operations. A graphics state also defines the current clipping area and other parameters that drawing operations may consult when they render an image. These parameters include the following:
The current color for fill and stroke operations
Alpha value (transparency)
Line attributes, including width, join, cap, dash, and miter limit
Anti-aliasing value
Current color space
Text attributes: font, font size, character spacing
Blend mode
It's possible to lock focus on a view when another view already has focus. In fact, this is what the Application Kit does during a drawing pass. Because each view keeps track of its own coordinate system as a modification of its superview's, a view is generally brought into focus after its superview. In a group of invalidated views, the Application Kit locks focus on the topmost view and works its way down the view hierarchy, making a nested series of lockFocus calls. As focus is locked on each successive view, the current graphics state is saved on a stack maintained by the graphics context (see Figure A-18). As focus is unlocked on a view, the graphics state at the top of the stack is "popped" and restored as the current graphics state.
What Happens in drawRect:
After the Application Kit locks focus on a view, it sends it a drawRect: message. A view's class implements this method to draw the view. A rectangle is passed in to drawRect: that defines the area to be drawn in the view's coordinate system. This rectangle might or might not correspond to the bounds of the view. It could be the union of all rectangular regions of the view that have been marked as invalid, or it could be a superset of that.
The sending of drawing instructions and data to the window server has a cost that should be avoided when possible, especially for drawing that will not end up being visible. A major Application Kit optimization is restricting the area to draw in, especially when the drawing is complex. The view can choose to draw itself entirely—the least efficient of alternatives—or it can draw the area defined by the passed-in rectangle. A potentially even more efficient procedure for a view would be to obtain the list of invalidated regions (through the NSView method getRectsBeingDrawn:count:) and selectively draw each of these regions in turn.
In its implementation of drawRect: the view class invokes various functions and methods to specify the drawing instructions and data to be passed to the window server. The Application Kit provides the following high-level drawing functions and methods:
Drawing functions (declared in
NSGraphics.h) to draw, fill, erase, and perform other operations with rectanglesMethods to construct lines and shapes with bezier paths (
NSBezierPathclass)Methods to create and apply affine transforms, involving translation, scaling, and rotation operations (
NSAffineTransformclass)Color and color-space methods (
NSColorandNSColorSpace)Methods for creating and compositing images (
NSImageand various image-representation classes)Methods for drawing text (
NSStringandNSAttributedString)
The Application Kit implements these methods and functions using Core Graphics (Quartz) functions and types. A view can also use these Core Graphics functions natively when it draws itself. These Quartz client library functions map directly to rendering operators of the window server, resulting in a raster (bitmap) image that, for in-window drawing, becomes part of the window's backing store.
Threads and Drawing
The drawing of views does not have to occur on the main thread; each thread of an application has the ability to lock focus on a view and draw. However, there are the following qualifications:
Mutations of the properties of an
NSViewobject (for example, its frame rectangle) should happen only on the main thread.When an
NSViewdisplay method is invoked, the Application Kit grabs a lock for drawing in the receiving view's window; you cannot perform any custom drawing until the display method returns. This means that only one thread can draw into a given window at a time.
Views and Printing
Views are the foundation of the Cocoa printing architecture. They provide the content to be printed, just as they provide content to be displayed on a screen. The general procedure is the same: The Application Kit locks focus on the view, its drawRect: method is invoked, the view draws the printable content, and focus is unlocked. You can tell a view to print itself by invoking its print: method.
Views and Events
Views are the objects in an application that respond directly to most user events such as mouse clicks or key presses. They are almost always the object providing the surface on which a user event occurs. Consequently, these front-line objects are given the first shot at handling event messages.
As discussed in “Windows and Event Handling,” a window forwards a user event (as an event message) to the view in its view hierarchy that should receive the event. For mouse events, it sends the message to the view under which the event occurred. If the event is a key event, the window sends the message to its first responder, which is usually the view with key focus. In order to receive the key event, the view must declare that it accepts first-responder status (that is, it overrides the NSResponder method acceptsFirstResponder to return YES).
Views are responder objects, which means they inherit the programmatic interface of the NSResponder class. Event messages invoke methods declared by this class; examples of such messages are mouseDown:, mouseMoved:, and keyUp:. To handle an event, a view's class must implement the appropriate NSResponder method; in its implementation it can inspect the passed-in NSEvent objects (which encapsulates information about the event) and proceed from there. If a view does not handle an event, the next responder up the responder chain—which is usually a superview—is given an opportunity to handle the event. “Responders and the Responder Chain” describes responders and how events travel up the responder chain.
Views also play a major role with action messages. These messages often originate as event messages sent to NSControl objects; in handling them, a control object sends an action message to a target object. If no target is specified, the application searches up the responder chain for an object that can respond to the action message. For more on NSControl objects and the NSCell objects they use, see “Controls and Menus.”
Responders and the Responder Chain
Objects of the core application classes—NSApplication, NSWindow, and NSView—are responders. They are instances of classes that inherit, directly or indirectly, from NSResponder (see Figure A-19). This abstract class defines the interface and expected behavior of objects that can respond to events. The subclasses of NSResponder implement this behavior in whole or in part.

Note: Two other Application Kit classes directly inherit from NSResponder: NSWindowController and NSDrawer. Although NSWindowController is part of the Cocoa document architecture (described in “Other Cocoa Architectures on Mac OS X”), neither of these classes is central to the core Cocoa application architecture.
The NSResponder class defines an interface for three major patterns or mechanisms of the core application architecture:
It declares a number of methods for handling event messages (that is, messages originating in user events such as mouse clicks and key presses).
It declares dozens of methods for handling action messages that are tied to the standard key bindings (for example, those that move the insertion point within text). An action message is dispatched to a target object; if no target is specified, the application searches for a suitable responder.
It defines a set of methods for designating and managing the responders in an application. These responders form what as known as a responder chain—a series of responders along which an event or action message is passed until it finds an object capable of handling it.
The responder chain is a central mechanism in the Application Kit's architecture for event handling. It is a linked series of responder objects along which an event or action message is passed. As depicted in Figure A-20, if a responder object cannot handle an event or action—that is, it either does not respond to the message or the event is one it doesn't recognize—it resends the message to the next responder in the chain. The message travels up the chain, toward higher-level objects, until it is handled. (If it isn't handled, it is discarded.)
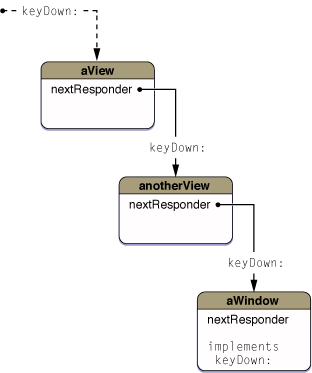
When the Application Kit constructs the objects in a application, it sets up the responder chain for each window. The essential objects in a responder chain are the NSWindow object and its view hierarchy. Lower views in the hierarchy are given the chance to handle an event or action message before higher level objects. The NSWindow keeps a reference to the first responder, which is usually the currently selected view in the window, and gives it first shot at responding to the message. For event messages, the responder chain usually ends at the NSWindow object managing the window in which the event occurred, although other next-responders can be added after the NSWindow object.
For action messages, the responder chain is more complex. Two factors determine the chain of responders for action messages:
If the application currently has both a main window and a key window, the responders chains of both windows are involved, with the key window's responder chain first given the chance at handling the action. At the end of each window's chain, the
NSWindowdelegate is given a chance to respond; at the end of the combined responder chains areNSAppand its delegate.The type of application—simple, document-based, or an application that uses a window controller—determines the type and location of responder objects in the chain.
The NSResponder class also includes declarations of methods for error presentation and recovery, message dispatch, application help, and other features.
Further Reading: To learn more about responders and the responder chain, see Cocoa Event-Handling Guide
Controls and Menus
Many of the objects you see in an application let you manipulate them to signal intent. These objects include buttons, checkboxes, sliders, table views, file-system browsers, and menus (including the application and pop-up menus). In Cocoa, similar architectures underlie the implementations of the two general kinds of choice-enabling objects: controls and menus. In these architectures, various types of objects, including NSView objects, work together to allow the indication of user choice or intent.
Control and Cell Architecture
A control is a user-interface object that responds to a user event such as a mouse click by sending a message to another object in an application. Common types of controls are buttons, sliders, and text fields (which typically send a message when users press the Return key). Other, less obvious controls are table views, data browsers, and color wells.
A control is an instance of a subclass of the abstract NSControl. It generally manages one or more cells—instances of a subclass of NSCell, another abstract class. If you look at the Application Kit class hierarchy (Figure 1-10), you notice that NSControl, a subclass of NSView, is the root of a fairly large branch of control classes: NSButton, NSStepper, NSTextField, and so on. At an entirely different location in the hierarchy (under NSObject), NSCell is the start of a branch of cell classes, most of which correspond to a control class: NSButtonCell, NSStepperCell, NSTextFieldCell, and so on.
Note: Two control classes dispense with cells entirely: NSScroller and NSColorWell. Instances of these classes, like any control, enable the user to indicate a choice, but they behave like any non-control view in that they draw themselves and respond to user events without using cells.
Controls That Manage Multiple Cells
Most controls in the Application Kit manage a single cell. In these cases, the control has its cell do almost all of the actual work; it forwards many of the messages sent to it to its cell. But some controls manage multiple cells. The Application Kit takes two general approaches to managing multiple cells within controls:
A single cell instance is used as a template for drawing. Whenever a control must draw a cell, it uses this instance to replicate each cell representation, varying only the content. The
NSTableViewandNSOutlineViewclasses take this approach when drawing the cells of table-view and outline-view columns.An individual cell instance represents each cell region drawn on a control. The
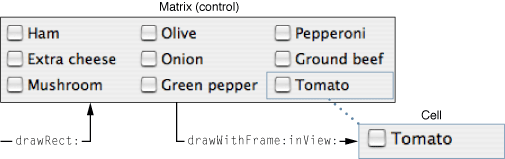
NSMatrixclass takes this approach when it requests its cell instances to draw themselves.NSBrowserandNSFormobjects function in a similar way: their cells are also individual instances.An
NSMatrixobject (or matrix) can manage most cell types. It arranges them in grids of arbitrary dimensions. When you construct a matrix of cells in Interface Builder, the cells are all copies of a given cell prototype. However, you can programmatically set the cells to be instances of differentNSCellsubclasses.NSBrowserandNSFormcontrols are more limited in the types of cells they can manage.
A single-cell control may seem to be a redundant design, but the value here is with the cell, not the control. See “Rationale for the Control-Cell Architecture” for an explanation.
How Controls Manage Cells
Controls are full-fledged NSView objects. They can be marked as needing display, they are responsible for drawing themselves, they can respond to user events, and they are in the responder chain. At runtime, a control initially behaves like any view. The Application Kit asks it to redraw itself by invoking the control's drawRect: method. If an event message is dispatched to the responder chain and the control implements the appropriate NSResponder method, the control may have an opportunity to handle the event. However, instead of drawing and handling events themselves, controls pass on these responsibilities to their cells. If the control has multiple cells, it also coordinates the behavior of its cells.
As illustrated in Figure A-21, a control within its drawRect: method typically sends drawWithFrame:inView: to a cell, asking it to draw itself within the passed-in rectangle. Because focus is already locked on the control, the cell can draw itself using the surface of its "host" view. A control in an implementation of a mouseDown: event method sends a trackMouse:inRect:ofView:untilMouseUp: to the cell in which the event occurred. Typically, the cell tracks the mouse events within its border until either the mouse exits or the cell receives a mouseUp: event; then it responds appropriately. (Other event types are handled in a similar manner.)
When a cell draws itself, it must represent two aspects. The first is the general appearance of the cell, which is consistent among cells of the same class. These characteristics include cell shape, background color, style, and visual indications of cell state (for example, a checkbox for cell selection or gray text if the cell isn't enabled). The second aspect is the cell's content, which individuates the cell. For content, a cell usually has a title (a string), an image, or in some cases both title and image. The title can be in a specified font. (Some cells, like NSSliderCell, have custom content instead of image or title.)
As content (or part of its content) a cell has an object value and possibly a represented object. The object value must be an object that can be formatted as a string and thus displayed as the cell title—for example, an NSNumber object encapsulating a float value. A represented object, although not displayed, is associated with the cell; for example, a button with a title of "Red" could have an NSColor represented object. For more on object values and represented objects, see “Represented Objects.”
What also individuates most cells is the information they encapsulate for action messages. The target-action mechanism (discussed in “The Target-Action Mechanism” allows a control to send a message to a designated object when the user activates the control (by clicking a button or pressing Return in a text field, for example). The action is a selector that identifies the method to invoke; the target is the designated object. (The target can be nil, which tells the application to search the responder chain for an object that can handle the message; see “Responders and the Responder Chain.”) The abstract NSActionCell class defines the interface for storing and retrieving action selectors and references to target objects. Most NSCell subclasses inherit from NSActionCell.
Rationale for the Control-Cell Architecture
The control-cell architecture in the Application Kit has deep historical roots, going back to the early days of NeXTSTEP. But the necessity for it might seem puzzling at first glance. Why have controls manage cells at all? Why can't controls do the required work themselves?
There's no reason why a control couldn't, and if you are designing a custom control, a cell-less control is certainly a valid approach. But the control-cell architecture brings some advantages with it:
The architecture extends the usefulness of controls. A control such as a table view or a matrix can efficiently manage many different types of cells without having to have specific knowledge of each type. A cell such as an
NSButtonCellobject might be designed to work withNSButtoncontrols, but it can also work with matrix and table-view objects.A cell is an abstraction that simplifies the management of different kinds of graphical objects on a view. It allows for a kind of plug-in design where a control can host different kinds of graphical objects, each with its own identity, including target and action information.
The control-cell architecture permits a tighter coupling between a control and its cells than between, say, a view and a collection of subviews. Subviews are largely autonomous within their superview; a control can better act as a coordinator of its cells. For example, in a matrix of radio buttons, the control ensures that only one of the buttons is on at any time.
The
NSTableViewmodel for drawing cell regions—reusing a handful of cell instances as "rubber stamps" for drawing—is efficient, especially for controls that must manage a potentially unbounded number of subregions.Even in cases where it's not feasible to use a few cell instances as templates for drawing, cells often offer a performance advantage over subviews. Views are relatively heavyweight objects both in terms of memory and computation. For example, tracking and propagating invalid view regions through the view hierarchy can exact a significant cost.
There are also tradeoffs between the use of cells versus subviews for drawing subregions. In the absence of the view invalidation mechanism, the control must take responsibility for figuring out what each cell need to draw on itself. But because views are general purpose objects, a specialized control can often do the required calculations more efficiently.
Note: See Control and Cell Programming Topics for Cocoa for more information about controls, cells, and the architecture enabling them to work together.
Menu Characteristics and Architecture
In addition to controls and cells, users can signal their intentions to an application (as well as to the operating system itself) using menus. A menu is a list of tersely worded choices—or menu items—with potentially nested menus (called submenus). Users typically choose a menu item by clicking it (although other methods are supported); as a result, a command is issued that the active application or operating system acts upon.
Cocoa supports various kinds of menus. Primary among these are the application-specific menus, which in Cocoa are collectively known as the main menu. At runtime, the application-specific menus include theapplication menu (the one bearing the application name) and all the menus to the right of it up through the Help menu. The application-specific menus share the menu bar with the Apple menu and menu extras—the service-specific menus to the right of the application-specific menus. The Application Kit automatically creates and manages certain application-specific menus, such as the Services menu, the Font menu, the Windows menu, and the Help menu. Other types of menus that Cocoa applications can manage include pop-up menus, contextual menus, and dock menus.
Menus and especially menu items have a number of interesting characteristics. Both menus and menu items have a title; the titles of menus are the strings that appear in the menu bar. Menu items can additionally have an image that appears to the left of the title, or they can have an image instead of a title. The title can be an attributed string, allowing different fonts and even text attachments (which permits an image to appear anywhere in the content area of a menu item). Menu items can also have an assigned key called the key equivalent which, when pressed together with modifier keys (except for Shift), causes the same response as a mouse click. Menu items are enabled or disabled, or they can indicate an on or off state; a check-mark appears to the left of the title if the item is in an on state.
Menus and menu items in Cocoa are instances of the classes NSMenu and NSMenuItem, respectively. In a Cocoa application, menus (in a generic sense) are based on a simple design that gives NSMenu and NSMenuItem objects complementary roles. An NSMenu object manages and draws a collection of menu items one below another. It contains an array of NSMenuItem objects representing this collection. An NSMenuItem object encapsulates all the data that characterizes a menu item but does no drawing or event handling itself. An NSMenu object uses the data in each NSMenuItem to draw the menu item within the boundaries of the menu, to track the location of the menu item within the menu, and to send an action message to a target object when users choose the menu item. When drawing, an NSMenu object uses an NSMenuItem object's title and image; for tracking, it uses the item's index; for sending action messages, it uses the action selector and target object stored in an NSMenuItem object.
Pop-up menus make use of this basic menu architecture. However, since they appear within an application's user interface, they have an additional design. Before a user clicks it, a pop-up menu appears as a button-like object. This object is an instance of NSPopUpButton, which manages an NSPopUpButtonCell instance—in other words, the control-cell architecture is used for this initial presentation. The NSPopUpButtonCell object contains an NSMenu object along with its encapsulated NSMenuItem objects. When a user clicks a pop-up button, this embedded menu is asked to display itself.
The menu items in a menu can be validated for the current context and, if an item is not relevant to that context, it can be disabled. NSMenu includes an auto-enabling feature that performs this validation automatically. Before a menu is displayed, it searches the responder chain for an object that can respond to a menu item's action message; if it cannot find any such object, it disables the item. Applications can further refine menu validation by implementing the NSMenuValidation informal protocol.
Contextual menus are implemented in way that's similar to pop-up menus. You can attach an NSMenu object (along with its menu items) to a view using the NSResponder method setMenu:. This menu lists commands specific to the view (which can be validated according to context). When users Control-click or right-click in the view, the menu is displayed.
Further Reading: Application Menu and Pop-up List Programming Topics for Cocoa discusses Cocoa menus and menu items in more detail.
Represented Objects
A cell and menu item can have a represented object, an object that is arbitrarily associated with it. The target of an action message can ask a clicked menu item or cell (sender) for its represented object; the target can then display the represented object, load it, or perform whatever operation is required with the fetched object. A cell or menu item allows clients to access a represented object, and it archives and restores it, but otherwise does not use it.
To understand how you might use represented objects, consider a couple of examples. A matrix contains cells for setting the background color of a text view. These cells have names such as "Light Blue", "Light Gray", "Pink," and so on; the represented object for each menu item is an NSColor object encapsulating the RGB components for that color. Your application might use that represented object as in Listing A-1.
Listing A-1 Using a represented object
- (void)changeColor:(id)sender { |
NSColor *repObj = [sender representedObject]; |
[textView setBackgroundColor:repObj]; // textView is an outlet |
} |
Another example would be a pop-up menu in an Info window that allows you to change the displayed pane of settings. Assigned as a represented object to each menu item is an NSView object containing the required set of text fields, controls, and so on.
A represented object is not the same thing as the object value of a control or cell. A represented object is arbitrarily associated while an object value is the value behind what the cell or control displays. For example, an object value for a text field that displays "05/23/2006" would be an NSDate or NSCalendarDate object representing that displayed value. A cell or control's formatter must be able to "understand" an object value. (A formatter is an NSFormatter object).
Represented objects are not strictly limited to cells and menu items. For example, NSRulerMarker objects can have represented objects. And you can design your own custom views to have represented objects.
Nib Files and Other Application Resources
So far the discussion in this chapter has focused on the fundamental application architecture of Cocoa, describing how at runtime the core objects of an application work together to facilitate event handling and drawing. But now the focus shifts somewhat to take in the full picture of a running Cocoa application. Rarely does an application create all of its constituent objects "from scratch" when it launches. Many, if not most, of these objects are stored in the application bundle as archives of object graphs. These object graphs can represent the model objects that encapsulate the application's data as it existed just before the user quit the application. Or they can be encoded representations of the windows, views, and other objects that make up the application's user interface. An application loads and unarchives object archives at runtime to re-create the original objects.
An application includes not just objects and code but the other resources in its bundle, such as images and localized strings. This section also summarizes the role that instances of the NSBundle class plays in locating and loading all types of application resources, both localized and non-localized.
Object Archives
Objects in a program exist in a network of relationships with other objects. An object can own particular objects or collections of objects, it can be dependent on other objects, and it can hold references to objects in the program in order to send messages to those objects. This web of interrelated objects is known as an object graph. Object graphs can become quite complex.
An archive is a means for storing an object graph. It usually takes the form of a file but can be a stream transmitted between processes. An archive preserves the identity of each object in the graph and all the relationships that object has with all other objects in the graph. It encodes the type of each object along with the object's data. When an object graph is unarchived, each decoded object is typically of the same class as the object that was originally encoded into the stream. An object's instance data is also decoded and is used to reconstitute the object. The relationships among objects in the graph are also restored. As a result, an unarchived graph should almost always duplicate the original object graph.
Note: Many Cocoa applications use archives as a persistent store for their model objects. However, the Core Data framework (a Cocoa framework) uses a more sophisticated mechanism for object persistence. See “Other Cocoa Architectures on Mac OS X” (in this document) and Core Data Programming Guide for more information.
Archiving is an operation that requests each object in an object graph to encode itself into a stream; unarchiving does the reverse, requesting that each object decode itself. Both operations are initiated with a message sent to the root object of the graph. An object that wants to be saved to an archive must encode itself when asked to; to be restorable, it must be able to decode itself. The two types of archiving in Cocoa, sequential and keyed, reflect different styles for encoding and decoding objects. Sequential archiving requires objects to encode and decode their instance data in the same order. Keyed archiving (a more modern approach) permits each piece of stored instance data to be stored and retrieved using a key (that is, an identifying string). A class that wants to archive its instances must conform to the NSCoding protocol. An object that does sequential archiving uses the encoding and decoding methods of the NSCoder class. For keyed archiving (and unarchiving), it must use the methods of the NSKeyedArchiver and NSKeyedUnarchiver classes.
Further Reading: To learn more about archiving and unarchiving objects, see Archives and Serializations Programming Guide for Cocoa.
Nib Files
Nearly all Cocoa developers use the Interface Builder application to construct the user interface of their applications. (There's no requirement to use Interface Builder, but it makes the job of a developer so much easier.) Figure A-22, which you might recall from an earlier chapter, shows a typical arrangement of Interface Builder windows. To create a user interface, you drag objects such as text views, buttons, and table views from palettes and drop them on windows; you then position and size the objects and set their other attributes. You can also make various kinds of connections—outlets, target-action, and bindings—between these objects. Interface Builder also lets you make the initial definitions of custom model and controller classes for the purpose of making connections to and from proxy instances of those classes. And, using Interface Builder, you can specify a placeholder object assigned to a custom NSView subclass. When you finish work on a user interface in Interface Builder, you can save it as a nib file in the project as a localized resource. When the project is built, the nib file is copied to the same localization (.lproj) folder in the application bundle.
Nib files are archives whose object graphs describe an entire or partial user interface. These graphs represent the complex relationships within a user interface, including a window's view hierarchy and the various connections between objects. The descriptions of these object graphs use XML as a representation language. (You should never attempt to directly edit the XML in a nib file.)
The root object of a graph appears in the Instances pane of the nib file window (the lower-left window in Figure A-22). In this example, the Panel instance is a root object (since it contains a view hierarchy). A nib file could have other root objects as well as NSController objects (used for bindings) and proxy instances of custom classes. In addition, each nib file window of a Cocoa application has two special kinds of instances:
File's Owner. An object that owns the nib file and manages the objects within it. The File's Owner must be external to the nib file. You use the File's Owner object as the conduit for connections between objects in the nib file and objects outside of it.
First Responder. An object representing the first responder in the responder chain (see “Responders and the Responder Chain”). In target-action connections you can specify the First Responder object as target; when a control or menu sends an action message, the application searches the responder chain (starting with the first responder) until it finds an object that can handle the message.
The standard objects on Interface Builder palettes are allocated and initialized when a user interface is built and later are archived when the objects are saved to a nib file. When the nib file is unarchived, these objects are restored. If you create a custom subclass based on the class for a standard palette object, Interface Builder encodes the superclass when it archives the object but has the custom class swapped in when the object is unarchived. In either case, the initializer for the unarchived object is not called. However, if you have a custom class of NSView (represented by the Custom View palette object), the initializer of the class is called when the Custom View object is unarchived. In any case, the application sends each custom class associated with a nib file an awakeFromNib message when all objects in a nib file have been unarchived; this message gives the class an opportunity to establish connections or perform any other set-up tasks.
Each Cocoa application has a main nib file that contains the application-specific menus and possibly one or more windows. NSApp is File's Owner of the main nib file. When an application launches, NSApp loads the main nib file, unarchiving it, and displays the menus and initial windows. Many applications have auxiliary nib files for such things as documents and panels; these nib files are loaded on demand (that is, when the user requests behavior provided by objects in the nib file).
Further Reading: You can find out more about nib files (including how to dynamically load them) by reading Resource Programming Guide.
Loading Application Resources
Nib files are an application resource, as are image files, sound files, help files, and other kinds of data. Application resources can be localized—that is, they can be adapted to multiple languages and locales. For nib files, localization primarily means translating the strings that appear in a user interface, but other modifications might also be required. Text fields, buttons, and other user-interface objects might have to be resized to accommodate the new strings. The formats of dates and numbers might also have to change.
Internationalization denotes the developmental infrastructure that supports localization. When internationalizing a software product, you must put resources for a language or locale in a particular location inside a bundle's Resources directory. This location is a folder whose name identifies a language and perhaps a locale, either as a well-known language string or an abbreviation conforming to the ISO 639-1, ISO 639-2, and (for locales) ISO 3166-1 specifications. The extension of localization folders is .lproj. Users compose their list of preferred localizations in the International pane of System Preferences, and an application selects resources from the .lproj folder that corresponds to the first matching localization. Xcode offers support for internationalizing application resources; it creates the bundle structure, including the .lproj folders, and automatically populates them.
Application resources can also be nonlocalized. Nonlocalized resources go just under the application bundle's Resources directory, outside of any .lproj directory.
At runtime, an application can locate an application resource within a bundle and load it into memory. It uses an instance of the NSBundle class for this purpose. Methods of this class, when given the name and extension of a resource, return the file-system path to that resource. Application Kit categories on NSBundle allow an application to locate and load nib files, help files, and sound and image files. For example, the NSBundle class method loadNibNamed:owner: finds and loads a nib file that has the specified name and is owned by the referenced object. Loading resources dynamically this way is a programming practice that contributes to the overall efficiency of the application. An application should load resources into memory only when users request those resources.
An application can dynamically load more than file-based resources. It can programmatically load localized strings in certain contexts (for example, dialogs where the displayed message might vary). The localized string is fetched from a "strings" file (that is a file with an extension of .strings) stored in one of a bundle's .lproj directories. An application's main bundle can also contain subsidiary bundles, called loadable bundles. Loadable bundles can contain their own code (and resources), and an application, using NSBundle objects, can dynamically load this code into memory. Loadable bundles make it possible to extend application behavior flexibly through a kind of plug-in architecture. (The Automator application is an example of this architecture; it dynamically loads actions, which are loadable bundles.)
Further Reading: For more information about localization and internationalization, see Internationalization Programming Topics. To learn more about NSBundle and bundles, see Resource Programming Guide and Code Loading Programming Topics for Cocoa.
© 2008 Apple Inc. All Rights Reserved. (Last updated: 2008-11-19)