Legacy Document
Important: The information in this document is obsolete and should not be used for new development.
The Xcode Editor
Xcode contains a full-featured editor for editing your project files. You have many options for using this editor to view and modify the files in your project; you can edit files in a dedicated editor window or use the editor attached to most Xcode windows. You can also choose whether to have multiple editor windows open at once, or use a single editor window for all files that you open.
This chapter describes Xcode’s editor, shows how to open files in a standalone editor window or in an attached editor, and how to control the appearance of Xcode’s editor.
In this section:
The Xcode Editor Interface
Navigating Source Code Files
Controlling the Appearance of the Code Editor
The Xcode Editor Interface
When you edit a file in Xcode, you have the choice of using a standalone editor window or editing the file directly in any of the other Xcode windows, such as the project window, debugger window, build results window, and so forth. Regardless of your choice, Xcode uses a common interface for the editor. When you open a file in Xcode’s editor, you see a view similar to that in Figure 15-1.
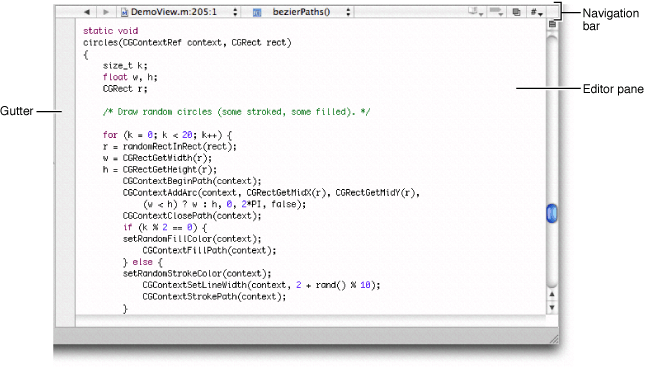
Here’s what the Xcode editor contains:
Gutter. The gutter displays file line numbers, as well as information about the location of breakpoints, errors, or warnings in the file. See “Displaying the Editor Gutter” to learn more about the contents of the gutter, as well as how to show and hide the gutter.
Editor. The text editing pane displays the contents of the file.
Navigation bar. The bar along the top of the editor contains several menus and buttons that let you quickly see, and jump to, locations within the current file and in other files open in the editor. “The Navigation Bar” describes the contents of the navigation bar and how to use it to navigate source code files.
Note: You can also modify the attributes of the file reference associated with a file open in the editor, as described in “Inspecting File, Folder, and Framework References.”
Editing Files in a Separate Editor Window
If you prefer, you can use a dedicated window for editing source files in Xcode. Regardless of your preference for whether Xcode automatically opens the attached editor in Xcode windows, you can always open a file in a separate editor by doing any of the following:
Double-click the file in the Groups & Files list or the detail view in the project window.
Select the file and choose View > Open in Separate Editor.
Control-click the file and choose Open in Separate Editor from the contextual menu.
Figure 15-2 shows the Xcode editor in a separate window.
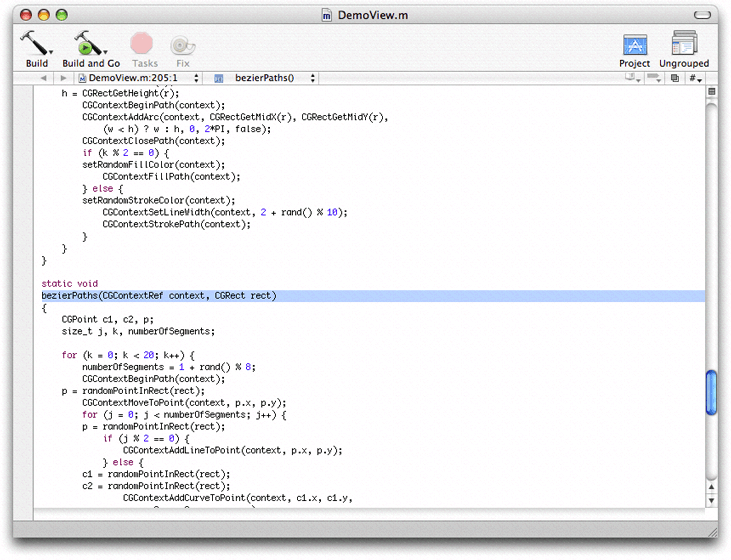
In addition to the basic editor interface, the standalone editor window also contains a toolbar and a status bar. The status bar is similar to the status bar of other Xcode windows, described in “The Project Window Status Bar.” Like the toolbar in other Xcode windows, the editor window toolbar provides easy access to common tasks. By default, it includes buttons to build, run, and debug the current target. It also contains the following two buttons:
The Project button lets you quickly jump to the file in the project window. Clicking this button brings the project window to the front.
The Grouped and Ungrouped buttons control whether opening a file, using any of the methods described above, opens a new standalone editor window for that file or opens the file in the current window. Clicking the button toggles the state. If the button is Grouped, indicated by the icon of a single window, double-clicking a file opens it in the current editor. If the button is Ungrouped, indicated by an icon of multiple layered windows, each file opens in a new editor window.
To preserve the state of any open editor windows when you close a project, choose Xcode > Preferences, click General, and select “Save window state” in the Environment options.
Using the Attached Editor
You can also edit your source files from within other Xcode windows, such as the project window and the debugger window. To open a file in the attached editor, make sure that the editor is visible in the window. If the editor is not already visible, you can open it by clicking the Editor button or choosing View > Zoom Editor In. This opens the attached editor to its maximum size. If the editor was already at its maximum size, clicking the Editor button or choosing View > Zoom Editor Out returns the attached editor pane to its previous size. To adjust the size of the attached editor to a different size, drag the separator to the size that you prefer.
Selecting a file, an error or warning, a bookmark, a find result or a project symbol opens the associated file in the editor as long as the editor is visible. You can also have Xcode automatically show the attached editor when you select one of these items in the detail view. To specify that Xcode automatically open the attached editor, select “Automatically open/close attached editor” in the Editing options in the General pane of the Xcode Preferences window.
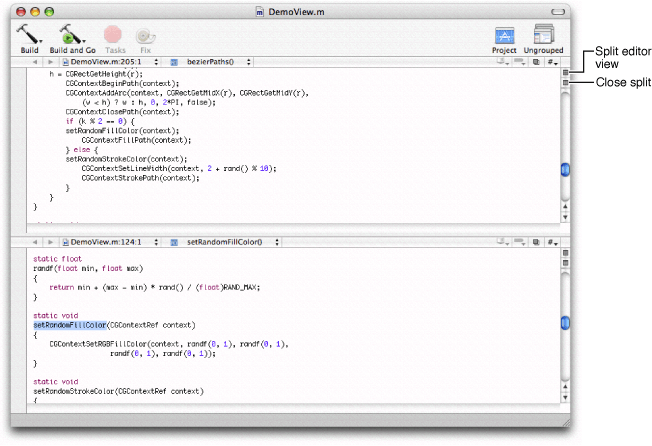
Splitting Code Editors
Xcode allows you to simultaneously view multiple files or multiple sections of the same file without increasing the number of open windows. It does this by splitting a code editor. The figure seen here shows an editor that has been split to display two parts of the same file.
Note that you can split an editor whether that editor appears in a separate window or as an attached editor.
To split a code editor, make sure that the editor has focus and do one of the following:
To split the editor vertically, choose View > Split filename Vertically, or click the split button. The split button—identical to the split button in the Groups & Files list, described in “Splitting the Groups & Files View”—appears above the scrollbar of the editor window.
To split a code editor horizontally, hold down the Option key and choose View > Split filename Horizontally, or Option-click the split button.
To close a split, choose View > Close Split View, or press the Close Split button. You can resize the panes of a split editor by dragging the resize control between them.
Navigating Source Code Files
Xcode provides many ways to find and navigate to information in a file and move between files in an editor. The navigation bar of the editor provides a number of menus that let you jump to related header or source files, move between open files, and jump to bookmarks, breakpoints, or other locations in the current file. Xcode’s single file find lets you search the contents of a file in the editor. Xcode also provides a number of shortcuts for opening files, jumping to symbol definitions or declarations, or finding documentation, all from the editor.
This section describes the contents of the navigation bar and shows you how to search within a file. It also shows some of the shortcuts you can use in Xcode’s editor to find text and symbol definitions.
Some tricks for finding information from an editor are described in other chapters. “Opening Files by Name or Path” describes shortcuts you can use to open a file whose name or path appears in an editor. “Searching for Documentation” describes shortcuts you can use to jump to the documentation for a symbol whose name appears in the editor, or search the installed documentation for a word or phrase.
The Navigation Bar
The navigation bar contains a number of controls that you can use to move between open files, jump to symbols, and open related files. Figure 15-5 shows the navigation bar.

Here is what the navigation bar contains:
The Previous and Next arrows move between open files in the editor.
The File History pop-up menu lists recently viewed files. Selecting a file from this menu displays that file in the editor, without having to repeatedly click Next or Previous.
The Function pop-up menu lists the function and method definitions in the current file. When you select a definition from this menu, the editor scrolls to the location of that definition. For information on how to configure the Function pop-up menu, see “The Function Pop-up Menu.”
The Bookmarks pop-up menu lists any bookmarked locations in the current file. When you select a bookmark from this menu, the editor scrolls to the location of the bookmark. See “Saving Commonly Accessed Locations as Bookmarks” to learn more about bookmarks in your project.
The Breakpoints pop-up menu lists any breakpoints in the current file. Choosing a breakpoint from this menu scrolls the editor to the location at which the breakpoint is set. See “Breakpoints” to learn more about breakpoints in Xcode.
The Go To Counterpart button opens the counterpart of the current file or jumps to the symbolic counterpart of the currently selected symbol. See “Jumping to a File’s or Symbol’s Counterpart” for more information on the Go To Counterpart button.
The Included Files pop-up menu lists all of the files included by the file that is currently being edited, as well as all of the files that include the current file. Selecting a file from this list opens that file in the editor window. This menu is described more in “Opening Header Files and Other Related Files.”
The File History Menu
The File History pop-up menu lists all of the files that you have viewed in the current editor, with the current file at the top of the menu. To return to any of the these files, simply select it from the menu.
You can clear the File History menu by choosing Clear File History. This removes all but the file currently open in the editor from the editor’s history list. By default, Xcode does not place a limit on the number of files that it remembers in this menu. However, you can limit the size of the file history menu by choosing the number of files you want remembered from the History Capacity menu. For example, if you choose 5 from this menu, Xcode only remembers the five most recently viewed files in the File History menu.
The Function Pop-up Menu
The function pop-up menu lets you jump to many points in your file, including any identifier it declares or defines. You can also add items that aren’t definitions or declarations. The function pop-up menu is in the navigation bar, next to the File History menu. In this menu, you can see:
Declarations and definitions for classes, functions, and methods
#definedirectivesType declarations
#pragmamarks
To scroll to the location of any of these identifiers, select it from the menu. Figure 15-6 shows the function pop-up menu.
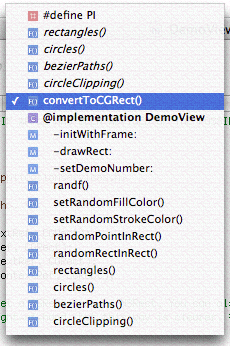
By default, the contents of the function pop-up menu are sorted in the order in which they appear in the file. You can hold down the Option key while clicking the function pop-up menu to toggle the sort order of the items in the menu between alphabetical and the order in which they appear in the source-file.
You can also change the default behavior for the function pop-up menu. To choose which items appear in the function pop-up menu and the order they appear in, choose Xcode > Preferences, click Code Sense, and use the Editor Function Pop-up options:
Select “Show declarations” to include declarations in the function pop-up menu. Otherwise, the function pop-up menu shows only definitions.
Select “Sort list alphabetically” to have Xcode display the contents of the function pop-up in alphabetical order. Otherwise, the contents are sorted in the order in which they appear in the file.
Note: Syntax coloring must be enabled for the function pop-up menu to be available in the editor window.
To add a marker to a C, C++, or Objective-C source file and
make that marker appear in the function pop-up menu, use the #pragma
mark statement in your source code. For example,
the following statement adds “PRINTING FUNCTIONS” to the function
pop-up menu:
#pragma mark PRINTING FUNCTIONS |
To add a separator to the function pop-up, use:
#pragma mark - |
Jumping to a File’s or Symbol’s Counterpart
Clicking the Go To Counterpart button opens the related header
or source file for the file currently open in the editor. For example,
if the file currently open in the editor is MyFile.c, clicking
this button opens MyFile.h,
and vice versa. When your project contains files with the same name,
Xcode gives preference to files located in the same folder as their counterparts.
You can also open the current file’s related header or implementation
file by choosing View > Show Header/Source File.
Option-clicking the Go To Counterpart button displays the counterpart of the currently selected symbol—class, method, function, and so on—opening the corresponding file and scrolling to the appropriate section within it if necessary. If the selected symbol is a class, method, or function declaration, Xcode jumps to the definition for that item. If a class, function, or method definition is currently selected, Xcode jumps to the symbol’s declaration. You can specify a key binding for the Switch to Symbolic Counterpart action in the Key Bindings pane of Xcode Preferences. For information on configuring key bindings for actions, see “Customizing Key Equivalents.”
By default, Xcode opens the file or symbol counterpart in the same editor; however, you can have Xcode open counterparts in a separate editor window. This makes it easy to view both a header and its implementation file, or a symbol declaration and its definition, at once. To have Xcode open counterparts in a separate window, open the General pane of Xcode Preferences and select “Open counterparts in same editor” in the Editing options.
Searching in a Single File
When editing files in the code editor, it is fairly common to find that you need to make the same change in several places in the file. For example, when you rename a function, you also have to find all of the places where you call that function and change those calls to use the new name. Xcode provides a single-file find that allows you to search for and replace text within a single file. You can perform a simple textual search or search using regular expressions.
Specifying Search Terms
To search for text in a file that you have open in an Xcode editor, choose Find > Single File Find or press Command-F. Xcode displays the Single File Find window, shown here.
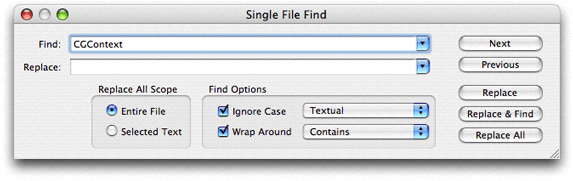
You can search using a text string or a regular expression; choose the appropriate search type from the pop-up menu next to the Ignore Case option in the Find Options group. Choosing “Textual” searches for text matching the string in the Find field. Choosing “Regular Expression” searches for text matching the regular expression in the Find field.
Type the text string or regular expression pattern to use for the search in the Find field of the Single File Find window. Xcode keeps track of search strings; to reuse a previous search string, click the arrow in the Find field and choose the string from the menu.
The other options in the Find Options group give you additional control over how the search is performed; these options are:
Ignore Case. Use this option to ignore whether letters are uppercase or lowercase.
Wrap around. Select this option to search the whole file; otherwise, Xcode searches from the current location of the insertion point to the end of the file.
The pop-up menu next to the Wrap Around option specifies how Xcode determines a match to the search term in the Find field. Choose “Contains” to search for words that contain matching text in a substring, “Starts with” to search for words that begin with text matching the search term, “Whole words” to search for words that contain only text matching the contents of the Find field, or “Ends with” to search for words that end with matching text.
Use the Next and Previous buttons to continue searching for the same text in a file. Alternatively, you can choose Find > Find Next or hold down the Shift key and choose Find > Find Previous. Pressing Return finds the next (or first) match and dismisses the Single File Find window.
Replacing Text
You can use the Single File Find window to replace some or all occurrences of text matching the string or regular expression specified in the Find field. To search for and replace text in a file:
Open the Single File Find window and specify the search criteria, as described in the previous section.
Type the replacement text in the Replace field. As with search strings, Xcode keeps track of substitution strings; to reuse a previous substitution string, choose it from the menu in the Replace field.
Use the replace buttons in the bottom-right portion of the Single File Find window to perform the text substitution. The scope of the replacement varies, depending on the button you choose. Here are the buttons available to you:
Replace substitutes the replacement text for the current selection.
Replace & Find substitutes the replacement text for the current selection and then finds and selects the next occurrence of text matching the contents of the Find field.
Replace All searches the entire file or selection and replaces all occurrences of text matching the contents of the Find field with the replacement text.
If you choose Replace All, the Replace All Scope radio buttons control the scope of the search and replace operation. To search for and replace instances of the given search text throughout the entire file, select the Entire File option. To perform the search and replace operation within only the current selection, choose Selected Text.
Each of these buttons also has a menu item equivalent in the Find menu. To replace the current selection or to replace the current selection and find the next match, choose Find > Replace or Find > Replace and Find Next, respectively. To replace all occurrences of the search text, hold the Option key and choose Find > Replace All.
You can also replace the current selection and find the previous match in the file. To do so, hold the Shift key and either choose Find > Replace and Find Previous or click the Replace & Find button.
Shortcuts for Finding Text and Symbol Definitions From an Editor Window
Xcode provides a number of shortcuts for searching using text or other content that appears in an editor window. You can use these shortcuts to perform single-file and project-wide searches without going through the Single File Find or Project Find windows. When you use these shortcuts, Xcode performs the search using the same options specified the last time you used the Single File Find or Project Find windows. These windows are described in further detail in “Searching in a Single File” and “Searching in a Project.”
To search a single file for text that appears in an editor window, select the text to search for, and choose Find > Find Selected Text.
To perform a project-wide search using the current selection in an editor window, use the shortcuts listed in Table 15-1.
Search project for |
Choose |
|---|---|
Selected text |
Find > Find Selected Text in Project |
Selected regular expression |
Hold Option key and choose Find > Find Selected RegEx in Project |
Selected symbol definition |
Find > Find Selected Definition in Project |
You can also jump directly to the definition for a symbol identifier by doing either of the following:
Command—double-click the symbol name.
Select the symbol name and choose Find > Jump to Definition. The Jump to Definition menu item does not have a keyboard shortcut by default, but you can assign a keyboard shortcut to it in the Key Bindings pane of the Xcode Preferences window.
Each of the searches described in Table 15-1 uses the last set of search options used when searching your project. If you want to perform a project-wide search using the current selection in an editor window, but do not want to use the last set of search options, you can open a Project Find window with the current selection by doing either of the following:
To use the current selection as a search term, choose Find > Use Selection For Find. Xcode opens a Project Find window and places the contents of the current selection in the Find field.
To use the current selection as a substitution string, choose Find > Use Selection for Replace. Xcode opens the Project Find window and places the contents of the current selection in the Replace field.
Controlling the Appearance of the Code Editor
Xcode gives you a great deal of flexibility to customize the appearance of the editor. You can change the fonts and colors used to display text in the editor to suit your own preferences. You can also control the amount of information that Xcode displays about file locations and contents. This section describes how to change the default font and text editing colors for Xcode editors, and how to use the gutter, page guide, and file history menu to locate information in a file.
Setting Default Fonts and Colors
You can change the font and colors used for text editing in Xcode in the Xcode Preferences window. Choose Xcode > Preferences and select Fonts & Colors. The Editor Font section displays the font used for text in the editor; to change this font, click the Set Font button.
Note: This font is also used for all text, regardless of its role, when syntax coloring is enabled, unless you specify otherwise. See “Setting Syntax Coloring” for more information.
To change the colors used in the editor, use the Editor Colors options. To change the color of an item, click its color well and choose a new color. You can change the default color for the following elements:
Text. This option controls the default color used for text in an editor. You can specify additional colors for text that represents particular code elements, such as strings. For a description of how to use syntax coloring in Xcode, see “Setting Syntax Coloring.”
Background. This option specifies the background color used for editor windows.
Selection. This option specifies the highlight color used to indicate selected text.
Insertion Point. This option controls the color of the blinking insertion point character in an editor window.
Displaying a Page Guide
To help keep code lines no longer than a specified length, you can have Xcode display a guide line in every code editor at that column position in the file. To display a guide line, open the Text Editing pane of Xcode Preferences and select “Show page guide” in Display Options. Enter the location, in number of characters, at which you want the guide line displayed in the text field titled “Display at column.” Xcode displays a gray line in the right margin of all open editors, at the specified column.
Xcode does not wrap your code lines when they reach the guide line. The line serves only as a guide.
Displaying the Editor Gutter
The gutter that appears on the left side of a code editor helps you quickly locate items in a file. This gutter can display:
Line numbers for the current file. Line numbers make it easy to find a location in a file. Xcode does not show line numbers by default; to change this, open the Text Editing pane of Xcode Preferences and select “Show line numbers” in Display Options.
Errors and warnings. To help you locate and fix problems in your code, Xcode displays error and warning icons next to the line at which an error or warning occurred. Clicking on the icon or pausing with the mouse over the icon displays the error or warning message.
Breakpoints. You can use the gutter to set, remove, and otherwise control the breakpoints in a file. Xcode indicates the location of a breakpoint by displaying an arrow next to the line at which the breakpoint is set. For more information on using breakpoints, see “Breakpoints.”
You can control the visibility of the gutter in a single editor or set the default behavior for all editors. To change the visibility of the gutter for all editors that you open, standalone and attached, open the Text Editing pane of Xcode Preferences and use the “Show gutter” option in Display Options. If this option is selected, as it is by default, the gutter is visible in all editors that you open. Otherwise, the gutter appears in all code editors only when you start debugging.
To show or hide the gutter in a particular instance of the editor, bring the window to the front and use the View > Hide Gutter and View > Show Gutter commands.
Viewing Column and Line Positions
As you’ve seen in “The Navigation Bar,” the File History pop-up menu in the navigation bar not only lets you move between currently open files, it also shows you your current location in the file. For the file currently open in the editor, the File History menu shows the name and the line number of the line containing the insertion point. You can also have the File History menu display the column position of the insertion point; that is, the offset of the insertion point, in number of characters, from the left margin of the editor. Figure 15-8 shows the location of the current insertion point in the File History menu.

By default, Xcode does not display the column position of the insertion point. To change this, open the Text Editing pane of Xcode Preferences and select “Show column position.”
© 2004, 2006 Apple Computer, Inc. All Rights Reserved. (Last updated: 2006-11-07)