Drawing Offscreen
OpenGL programs draw offscreen for many reasons. They may need to store intermediate rendering results as a scene is built or they may need to store data that is used repeatedly, such as a texture. Mac OS X provides several options for rendering offscreen:
Offscreen drawable objects. The Apple-specific OpenGL APIs provide routines that support drawing to CPU memory and are supported only by the software renderer. These objects are available in Mac OS X v10.0 and later, but are not recommended for performance-critical applications. See “Setting Up an Offscreen Drawable Object.”
Hidden Cocoa views or Carbon windows. Starting in Mac OS X v10.2, the
NSOpenGLContextclass and AGL API provide routines that use the GPU to draw to hidden windows or views and then draw that content to an onscreen rendering context. See “Using a Hidden View or Window.”Pixel buffer drawable objects. Each of the Apple-specific OpenGL APIs provides routines for drawing to offscreen memory that's located on the GPU. An application can render an image into a pixel buffer once and then use the buffer contents multiple times to texture a variety of surfaces without copying the image data. Pixel buffers are available starting in Mac OS X v10.3. See “Rendering to a Pixel Buffer.”
Framebuffer objects. A recently added OpenGL extension, these objects allow you to draw to buffers other than the usual buffers provided by OpenGL or the Mac OS X windowing system. Because these objects are window-system agnostic, they are easier to set up and more efficient to use than pixel buffers. Framebuffer objects are available in Mac OS X v10.4.3 and later, but not all hardware supports their use. See “Rendering to a Framebuffer Object.”
Setting Up an Offscreen Drawable Object
Offscreen drawable objects reside in CPU memory and are supported only by the software renderer. If you must support versions of Mac OS X prior to 10.2, you may need to use offscreen drawable objects. Otherwise, you should consider one of the other options for drawing offscreen.
The general procedure for setting up an offscreen drawable object is similar to setting up other drawable objects:
Specify renderer and buffer attributes, making sure to specify the offscreen attribute.
Obtain a pixel format object.
Create a context and make it current.
Bind the context to an offscreen drawable object.
Each of the Apple-specific OpenGL APIs provides a routine for binding the context to an offscreen drawable object:
The
setOffScreen:width:height:rowbytes:method of theNSOpenGLContextclass instructs the receiver to render into an offscreen buffer.The AGL function
aglSetOffScreenattaches an AGL rendering context to an offscreen buffer.The CGL function
CGLSetOffScreenattaches a CGL rendering context to an offscreen buffer.
After creating and drawing to an offscreen context, call the OpenGL function glFinish to ensure that all submitted OpenGL commands have finished rendering into the memory buffer before you access the data. You can read the buffer contents by calling the OpenGL function glReadPixels, or you can use the buffer contents as a texture by calling the appropriate copy and surface texture functions.
The code in Listing 4-1 shows how to use the CGL API to create an offscreen drawable object that has a resolution of 1024 x 768 pixels and a depth of 32 bits per pixel. A detailed explanation for each numbered line of code appears following the listing.
Listing 4-1 Using CGL to draw to an offscreen drawable object
CGLPixelFormatAttribute attribs[] = // 1 |
{ |
kCGLPFAOffScreen, |
kCGLPFAColorSize, 32, |
NULL |
} ; |
CGLPixelFormatObj pixelFormatObj; |
long numPixelFormats; |
CGLChoosePixelFormat (attribs, &pixelFormatObj, &numPixelFormats); // 2 |
CGLContextObj contextObj; |
CGLCreateContext (pixelFormatObj, NULL, &contextObj); // 3 |
CGLDestroyPixelFormat (pixelFormatObj); |
CGLSetCurrentContext (contextObj); // 4 |
void* memBuffer = (void *) malloc (1024 * 768 * 32 / 8); // 5 |
CGLSetOffScreen (contextObj, 1024, 768, 1024 * 4, memBuffer); // 6 |
//***** Perform offscreen drawing |
CGLSetCurrentContext (NULL); |
CGLClearDrawable (contextObj); |
CGLDestroyContext (contextObj); |
Here's what the code does:
Sets up an array of pixel format attributes—an offscreen drawable object and a color buffer with a size of 32 bytes. Note that the list must be terminated by
NULL.Creates a pixel format object that has the specified renderer and buffer attributes.
Creates a CGL context using the newly created pixel format object.
Sets the current context to the newly created offscreen CGL context.
Allocates memory for the offscreen drawable object.
Binds the CGL context to the newly allocated offscreen memory buffer. You need to specify the width and height of the offscreen buffer (in pixels), the number of bytes per row, and a pointer to the block of memory you want to render the context into. The number of bytes per row must be at least the width times the bytes per pixels.
Using a Hidden View or Window
Starting in Mac OS X v10.2, you can use a hidden Carbon window or Cocoa view as a texture source. Cocoa supports this kind of offscreen drawing through the createTexture:fromView:internalFormat: method of the NSOpenGLContext class. Carbon provides the function aglSurfaceTexture.
Note: Although these routines provide a flexible way to render to an offscreen texture and then use that texture as a source, you should consider using pixel buffers and framebuffers instead. If your application provides support for Mac OS X v10.2, however, you must use hidden views and windows if you want accelerated offscreen drawing, because the other hardware-accelerated options are not available for Mac OS X v10.2
The crucial concept behind using hidden views and windows is that there are two rendering contexts involved, as shown in Figure 4-1: one that's bound to the hidden drawable object and the other that's bound to the destination window. You must make sure that the current rendering context is set to the appropriate context prior to drawing.
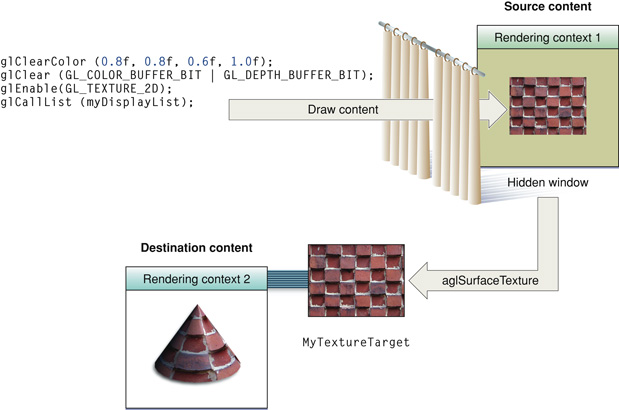
Drawing the texture content is just like drawing to an offscreen window. The content is treated as a texture only when you actually use it for the destination rendering context. You generate a texture name, bind it, and set the texture environment after you set the current context to the destination context. Once the texture is set, you call the routine that makes the texture content available to the destination window (either the createTexture:fromView:internalFormat: method of the NSOpenGLContext class or the AGL function aglSurfaceTexture). Then you can draw using the texture.
Figure 4-1 depicts the steps, explained below, that are required to use an offscreen window as a texture source:
Create a window to use as the texture source. The window should specify a hidden attribute.
Create a destination window to use the texture in.
Set up each window as a drawable object attached to an AGL context. That is, set up buffer and renderer attributes, get a pixel format object, create an AGL context, and attach the window to the context. For details, see “Drawing to a Window or View.” The pixel format object for each context must be compatible, but the contexts do not need to be shared.
Set the current rendering context to the texture source context and draw the texture. OpenGL draws the contents to the hidden window.
Set the current rendering context to the destination window.
Enable texturing by calling the function
glEnable.Generate a texture name and bind the name to a texture target, using code similar to the following:
glGenTextures (1, &mySurfaceTexName);
glBindTexture (GL_TEXTURE_2D, mySurfaceTexName);
glTexParameterf (GL_TEXTURE_2D, GL_TEXTURE_MIN_FILTER, GL_LINEAR);
This code sets up a power-of-two texture. You can just as easily use a rectangular texture by providing the
GL_TEXTURE_RECTANGLE_ARBoption.Map the contents of the texture source window to the texture target bound in the destination window, using code similar to the following:
aglSurfaceTexture (myDestinationContext,GL_TEXTURE_2D,
GL_RGBA8, mySurfaceTextureContext);
Draw to the destination window, using the texture just as you would any other texture.
When you are done using the texture, unbind it by calling
glBindTexturewith the texture set to0.glBindTexture (GL_TEXTURE_2D, 0);
Flush the content to the destination window by calling the function
aglSwapBuffers.
Rendering to a Pixel Buffer
The OpenGL extension string GL_APPLE_pixel_buffer provides hardware-accelerated offscreen rendering to a pixel buffer. A pixel buffer is typically used as a texture source. It can also be used for remote rendering.
When you are using a pixel buffer as a texture source, keep in mind that you must manage two rendering contexts. One is the rendering context attached to the pixel buffer. That's the context that you must draw to when you create the texture content. The other is the rendering context attached to the onscreen drawable object that will use the texture.
The first step in using a pixel buffer is to create it. The Apple-specific OpenGL APIs each provide a routine for this purpose:
The
NSOpenGLPixelBuffermethodinitWithTextureTarget:textureInternalFormat:textureMaxMipMapLevel:pixelsWide:pixelsHigh:The AGL function
aglCreatePBufferThe CGL function
CGLCreatePBuffer
Each of these routines requires that you provide a texture target, an internal format, a maximum mipmap level, and the width and height of the texture.
The texture target must be one of these OpenGL texture constants: GL_TEXTURE_2D for a 2D texture, GL_TEXTURE_RECTANGLE_ARB for a rectangular (not power-of-two) texture, or GL_TEXTURE_CUBE_MAP for a cube map texture.
The internal format specifies how to interpret the data for texturing operations. You can supply any of these options: GL_RGB (each pixel is a three-component group), GL_RGBA (each pixel is a four-component group), or GL_DEPTH_COMPONENT (each pixel is a single depth component).
The maximum mipmap level should be 0 for a pixel buffer that does not have a mipmap. The value that you supply should not exceed the actual maximum number of mipmap levels that can be represented with the given width and height.
Note that none of the routines that create a pixel buffer allocate the storage needed. The storage is allocated by the system at the time that you attach the pixel buffer to a rendering context.
Setting Up a Pixel Buffer for Offscreen Drawing
After you create a pixel buffer, the general procedure for using a pixel buffer for drawing is similar to the way you set up windows and views for drawing:
Specify renderer and buffer attributes.
Obtain a pixel format object.
Create a rendering context and make it current.
Attach a pixel buffer to the context using the appropriate Apple OpenGL attachment function:
The
setPixelBuffer:cubeMapFace:mipMapLevel:currentVirtualScreen:method of theNSOpenGLContextclass instructs the receiver to render into a pixel buffer.The AGL function
aglSetPBufferattaches an AGL rendering context to a pixel buffer.The CGL function
CGLSetPBufferattaches a CGL rendering context to a pixel buffer.
Draw, as you normally would, using OpenGL.
Using a Pixel Buffer as a Texture Source
Pixel buffers let you perform direct texturing without incurring the cost of extra copies. After drawing to a pixel buffer, you can create a texture by following these steps:
Generate a texture name by calling the OpenGL function
glGenTextures.Bind the named texture to a target by calling the OpenGL function
glBindTexture.Set the texture parameters by calling OpenGL function
glTexEnvParameter.Set up the pixel buffer as the source for the texture by calling one of the following Apple OpenGL functions:
The
setTextureImageToPixelBuffer:colorBuffer:method of theNSOpenGLContextclass attaches the image data in the pixel buffer to the texture object currently bound by the receiver.The AGL function
aglTexImagePBufferbinds the contents of an AGL pixel buffer as the data source for a texture object.The CGL function
CGLTexImagePBufferbinds the contents of a CGL pixel buffer as the data source for a texture object.
The context that you attach to the pixel buffer is the target rendering context: the context that uses the pixel buffer as the source of the texture data. Each of these routines requires a
sourceparameter, which is an OpenGL constant that specifies the source buffer to texture from. The source parameter must be a valid OpenGL buffer, such asGL_FRONT,GL_BACK, orGL_AUX0, and should be compatible with the buffer attributes used to create the OpenGL context associated with the pixel buffer. This means that the pixel buffer must possess the buffer in question for texturing to succeed. For example, if the buffer attribute used with the pixel buffer is only single buffered, then texturing from theGL_BACKbuffer will fail.If you modify content of any pixel buffer that contains mipmap levels, you must call the appropriate Apple OpenGL function again (
setTextureImageToPixelBuffer:colorBuffer:,aglTexImagePBuffer, orCGLTexImagePBuffer) before drawing with the pixel buffer to ensure that the content is synchronized with OpenGL. To synchronize the content of pixel buffers without mipmaps, simply rebind to the texture object usingglBind.Draw primitives using the appropriate texture coordinates. (See "The Redbook"—OpenGL Programming Guide—for details.)
Call
glFlushto cause all drawing commands to be executed.When you no longer need the texture object, call the OpenGL function
glDeleteTextures.Set the current context to
NULLusing one of the Apple OpenGL routines:The
makeCurrentContextmethod of theNSOpenGLContextclassThe AGL function
aglSetCurrentContextThe CGL function
CGLSetCurrentContext
Destroy the pixel buffer by calling
CGLDestroyPBuffer.Destroy the context by calling
CGLDestroyContext.Destroy the pixel format by calling
CGLDestroyPixelFormat.
You might find these guidelines useful when using pixel buffers for texturing:
You cannot make OpenGL texturing calls that modify pixel buffer content (such as
glTexSubImage2DorglCopyTexImage2D) with the pixel buffer as the destination. You can use texturing commands to read data from a pixel buffer, such asglCopyTexImage2D, with the pixel buffer texture as the source. You can also use OpenGL functions such asglReadPixelsto read the contents of a pixel buffer directly from the pixel buffer context.Texturing can fail to produce the intended results without reporting an error. You must make sure that you enable the proper texture target, set a compatible filter mode, and adhere to other requirements described in the OpenGL specification.
You are not required to set up context sharing when you texture from a pixel buffer. You can have different pixel format objects and rendering contexts for both the pixel buffer and the target drawable object, without sharing resources, and still texture using a pixel buffer in the target context.
Rendering to a Pixel Buffer on a Remote System
Follow these steps to render to a pixel buffer on a remote system. The remote system does not need to have a display attached to it.
When you set the renderer and buffer attributes, include the remote pixel buffer attribute
kCGLPFARemotePBuffer.Log in to the remote machine using the
sshcommand to ensure security.Run the application on the target system.
Retrieve the content.
Rendering to a Framebuffer Object
The OpenGL framebuffer extension provides a mechanism for applications to render offscreen to a destination other than the usual OpenGL buffers or destinations provided by the windowing system. This destination is called a framebuffer object.
Note: Extensions are available on a per-renderer basis. Before you use the framebuffer extension you must check each renderer to make sure that it supports the extension.
A framebuffer object (FBO) contains state information for the OpenGL framebuffer and its set of images. A framebuffer object is similar to a drawable object, except that a drawable object is a window-system-specific object, whereas a framebuffer object is a window-agnostic object that's defined in the OpenGL standard, not by Apple. After drawing to a framebuffer object it is straightforward to display the content onscreen. A single command redirects all subsequent drawing back to the drawable object provided by the window system, where the FBO content can then be used as a texture.
Framebuffer objects offer a number of benefits over using pixel buffers.
They are window-system independent, which makes porting code easier.
They are easy to set up and save memory. There is no need to set up attributes and obtain a pixel format object.
They use a single OpenGL context, whereas each pixel buffer must be bound to a context.
You can switch between them faster since there is no context switch as with pixel buffers. What this means is that an application doesn't need to ensure that all rendering commands to the offscreen context are complete before using the results in the window context. Since there is only one context, commands are guaranteed to be serialized.
They can share depth buffers; pixel buffers cannot.
You can use them for 2D pixel images and for texture images.
Completeness is a key concept to understanding framebuffer objects. Completeness is a state that indicates whether a framebuffer object meets all the requirements for drawing. You test for this state after performing all the necessary setup work. If a framebuffer object is not complete, it cannot be used effectively as the destination for rendering operations and the source for read operations.
Completeness is dependent on many factors that are not possible to condense into one or two statements, but these factors are thoroughly defined in the OpenGL specification for the framebuffer object extension. The specification describes the requirements for internal formats of images attached to the framebuffer, how to determine if a format is color-, depth-, and stencil-renderable, as well as a number of other requirements.
Prior to using framebuffer objects, you should take a look at the OpenGL specification, which not only defines the framebuffer object API, but provides detailed definitions of all the terms necessary to understand their use and shows several code examples.
The remainder of this section provides an overview of how to use a framebuffer in the simplest case. You'll get an idea of how the setup of a framebuffer object compares to the other methods described in this chapter. To learn how powerful framebuffer objects are and to see examples of how to use them for a variety of purposes (such as for mipmaps) you'll want to read the OpenGL specification.
Similar to pixel buffers, framebuffer objects are suited for two types of drawing: textures and images. The functions used to set up textures and images are slightly different. The API for images uses the renderbuffer terminology defined in the OpenGL specification. A renderbuffer image is simply a 2D pixel image. The API for textures uses texture terminology, as you might expect. For example, one of the calls for setting up a framebuffer object for a texture is glFramebufferTexture2DEXT, whereas the call for setting up a framebuffer object for an image is glFramebufferRenderbufferEXT. You'll see how to set up a simple framebuffer object for each type of drawing, starting first with textures.
Drawing a Texture Offscreen
These are the basic steps needed to set up a framebuffer object for drawing a texture offscreen:
Make sure the framebuffer extension (
GL_EXT_framebuffer_object) is supported on the system that your code runs on. See “Determining the OpenGL Capabilities Supported by the Hardware.”Check the renderer limits. For example, you might want to call the OpenGL function
glGetIntegervto check the maximum texture size (GL_MAX_TEXTURE_SIZE) or find out the maximum number of color buffers (GL_MAX_COLOR_ATTACHMENTS_EXT).Generate a framebuffer object name by calling the following function:
void glGenFramebuffersEXT (GLsizei n, GLuint *ids);
nis the number of framebuffer object names that you want to create.On return,
*idspoints to the generated names.Bind the framebuffer object name to a framebuffer target by calling the following function:
void glBindFramebufferEXT(GLenum target, GLuint framebuffer);
targetshould be the constantGL_FRAMEBUFFER_EXT.framebufferis set to an unused framebuffer object name.On return, the framebuffer object is initialized to the state values described in the OpenGL specification for the framebuffer object extension. Each attachment point of the framebuffer is initialized to the attachment point state values described in the specification. The number of attachment points is equal to
GL_MAX_COLOR_ATTACHMENTS_EXTplus 2 (for depth and stencil attachment points).Generate a texture name.
Bind the texture name to a texture target.
Set up the texture environment and parameters.
Define the texture by calling the appropriate OpenGL function to specify the target, level of detail, internal format, dimensions, border, pixel data format, and texture data storage.
Attach the texture to the framebuffer by calling the following function:
void glFramebufferTexture2DEXT (GLenum target, GLenum attachment,
GLenum textarget, GLuint texture,
GLint level);
targetmust beGL_FRAMEBUFFER_EXT.attachmentmust be one of the attachment points of the framebuffer:GL_STENCIL_ATTACHMENT_EXT,GL_DEPTH_ATTACHMENT_EXT, orGL_COLOR_ATTACHMENTn_EXT, wherenis a number from0toGL_MAX_COLOR_ATTACHMENTS_EXT-1.textargetis the texture target.textureis an existing texture object.levelis the mipmap level of the texture image to attach to the framebuffer.Check to make sure that the framebuffer is complete by calling the following function:
GLenum glCheckFramebufferStatusEXT(GLenum target);
targetmust be the constantGL_FRAMEBUFFER_EXT.This function returns a status constant. You must test to make sure that the constant is
GL_FRAMEBUFFER_COMPLETE_EXT. If it isn't, see the OpenGL specification for the framebuffer object extension for a description of the other constants in the status enumeration.Render content to the texture. You must make sure to bind a different texture to the framebuffer object or disable texturing before you render content. That is, if you render to a framebuffer object texture attachment with that same texture currently bound and enabled, the result is undefined.
To view the contents of the texture, make the window the target of all rendering commands by calling the function
glBindFramebufferEXTand passing the constantGL_FRAMEBUFFER_EXTand0. The window is always specified as0.Use the texture attachment as a normal texture by binding it, enabling texturing, and drawing.
Delete the texture.
Delete the framebuffer object by calling the following function:
void glDeleteFramebuffersEXT (GLsizei n, const GLuint *framebuffers);
nis the number of framebuffer objects to delete.*framebufferspoints to an array that contains the framebuffer object names.
Listing 4-2 shows code that performs these tasks. This example sets up and draws to a single framebuffer object. Your application can set up more than one framebuffer object if it requires them.
Listing 4-2 Setting up a framebuffer for texturing
GLuint framebuffer, texture; |
GLenum status; |
glGenFramebuffersEXT(1, &framebuffer); |
// Set up the FBO with one texture attachment |
glBindFramebufferEXT(GL_FRAMEBUFFER_EXT, framebuffer); |
glGenTextures(1, &texture); |
glBindTexture(GL_TEXTURE_2D, texture); |
glTexParameteri(GL_TEXTURE_2D, GL_TEXTURE_MAG_FILTER, GL_LINEAR); |
glTexParameteri(GL_TEXTURE_2D, GL_TEXTURE_MIN_FILTER, GL_LINEAR); |
glTexImage2D(GL_TEXTURE_2D, 0, GL_RGBA8, TEXWIDE, TEXHIGH, 0, |
GL_RGBA, GL_UNSIGNED_BYTE, NULL); |
glFramebufferTexture2DEXT(GL_FRAMEBUFFER_EXT, GL_COLOR_ATTACHMENT0_EXT, |
GL_TEXTURE_2D, texture, 0); |
status = glCheckFramebufferStatusEXT(GL_FRAMEBUFFER_EXT); |
if (status != GL_FRAMEBUFFER_COMPLETE_EXT) |
// Handle error here |
// Your code to draw content to the FBO |
// ... |
// Make the window the target |
glBindFramebufferEXT(GL_FRAMEBUFFER_EXT, 0); |
//Your code to use the contents of the FBO |
// ... |
//Tear down the FBO and texture attachment |
glDeleteTextures(1, &texture); |
glDeleteFramebuffersEXT(1, &framebuffer); |
Drawing a Renderbuffer Image Offscreen
There is a lot of similarity between setting up a framebuffer object for drawing images and setting one up to draw textures. These are the basic steps needed to set up a framebuffer object for drawing a 2D pixel image (a renderbuffer image) offscreen:
Make sure the framebuffer extension (
EXT_framebuffer_object) is supported on the renderer that your code runs on. See “Determining the OpenGL Capabilities Supported by the Hardware.”Check the renderer limits. For example, you might want to call the OpenGL function
glGetIntegervto find out the maximum number of color buffers (GL_MAX_COLOR_ATTACHMENTS_EXT).Generate a framebuffer object name by calling the function
glGenFramebuffersEXT. (See Step 3 in “Drawing a Texture Offscreen.”)Bind the framebuffer object name to a framebuffer target by calling the function
glBindFramebufferEXT. (See Step 4 in “Drawing a Texture Offscreen.”)Generate a renderbuffer object name by calling the following function:
void glGenRenderbuffersEXT (GLsizei n, GLuint *renderbuffers );
nis the number of renderbuffer object names to create.*renderbufferspoints to storage for the generated names.Bind the renderbuffer object name to a renderbuffer target by calling the following function:
void glBindRenderbufferEXT (GLenum target, GLuint renderbuffer);
targetmust be the constantGL_RENDERBUFFER_EXTrenderbufferis the renderbuffer object name generated previously.Create data storage and establish the pixel format and dimensions of the renderbuffer image by calling the following function:
void glRenderbufferStorageEXT (GLenum target, GLenum internalformat,
GLsizei width, GLsizei height);
targetmust be the constantGL_RENDERBUFFER_EXT.internalformatis the pixel format of the image. The value must beRGB,RGBA,DEPTH_COMPONENT,STENCIL_INDEX, or one of the other formats listed in the OpenGL specification.widthis the width of the image, in pixels.heightis the height of the image, in pixels.Attach the renderbuffer to a framebuffer target by calling the function
glFramebufferRenderbufferEXT.void glFramebufferRenderbufferEXT(GLenum target, GLenum attachment,
GLenum renderbuffertarget, GLuint renderbuffer);
targetmust be the constantGL_FRAMEBUFFER_EXT.attachmentshould be one of the attachment points of the framebuffer:GL_STENCIL_ATTACHMENT_EXT,GL_DEPTH_ATTACHMENT_EXT, or GL_COLOR_ATTACHMENTn_EXT, where n is a number from0toGL_MAX_COLOR_ATTACHMENTS_EXT–1.renderbuffertargetmust be the constantGL_RENDERBUFFER_EXT.renderbuffershould be set to the name of the renderbuffer object that you want to attach to the framebuffer.Check to make sure that the framebuffer is complete by calling the following function:
enum glCheckFramebufferStatusEXT(GLenum target);
targetmust be the constantGL_FRAMEBUFFER_EXT.This function returns a status constant. You must test to make sure that the constant is
GL_FRAMEBUFFER_COMPLETE_EXT. If it isn't, see the OpenGL specification for the framebuffer object extension for a description of the other constants in the status enumeration.Draw the 2D pixel image to the renderbuffer.
To view the contents of the renderbuffer, make the window the target of all rendering commands by calling the function
glBindFramebufferEXTand passing the constantGL_FRAMEBUFFER_EXTand0. The window is always specified as0.To access the contents of the renderbuffer object, use OpenGL functions such as
glReadPixelsorglCopyTexImage2D.Delete the framebuffer object with its renderbuffer attachment.
Listing 4-3 shows code that sets up and draws to a single renderbuffer object. Your application can set up more than one renderbuffer object if it requires them.
Listing 4-3 Setting up a renderbuffer for drawing images
GLuint framebuffer, renderbuffer; |
GLenum status; |
// Set the width and height appropriately for you image |
GLuint texWidth = 1024, |
texHeight = 1024; |
//Set up a FBO with one renderbuffer attachment |
glGenFramebuffersEXT(1, &framebuffer); |
glBindFramebufferEXT(GL_FRAMEBUFFER_EXT, framebuffer); |
glGenRenderbuffersEXT(1, &renderbuffer); |
glBindRenderbufferEXT(GL_RENDERBUFFER_EXT, renderbuffer); |
glRenderbufferStorageEXT(GL_RENDERBUFFER_EXT, GL_RGBA8, texWidth, texHeight); |
glFramebufferRenderbufferEXT(GL_FRAMEBUFFER_EXT, GL_COLOR_ATTACHMENT0_EXT, |
GL_RENDERBUFFER_EXT, renderbuffer); |
status = glCheckFramebufferStatusEXT(GL_FRAMEBUFFER_EXT); |
if (status != GL_FRAMEBUFFER_COMPLETE_EXT) |
// Handle errors |
//Your code to draw content to the renderbuffer |
// ... |
// Make the window the target |
glBindFramebufferEXT(GL_FRAMEBUFFER_EXT, 0); |
//Your code to use the contents |
// ... |
// Delete the renderbuffer attachment |
glDeleteRenderbuffersEXT(1, &renderbuffer); |
See Also
This chapter provided an overview of the various ways to perform offscreen OpenGL drawing. It's only a starting point, especially for those who want to use textures and who are concerned with performance. You'll also want to read the following:
OpenGL specification for the framebuffer object extension describes the framebuffer API in detail and provides sample code for setting up and using framebuffer objects and renderbuffers.
OpenGL sample code projects (ADC Reference Library):
AGLSurfaceTexture shows how to render to a texture.
GLCarbon1ContextPbuffer renders surfaces into a pixel buffer and uses it as a texture to draw on a cube; uses a single context.
GLCarbonSharedPbuffer shares a single pixel buffer with multiple other contexts.
Quartz Composer Offline Rendering shows how to render a Quartz Composer composition as a series of images using an OpenGL pixel buffer.
© 2004, 2008 Apple Inc. All Rights Reserved. (Last updated: 2008-06-09)